Windows
Note
All chosen settings (how you sort and group, which columns are visible, the window size and position, ...) are saved per Windows user per PC.
In the Recreatex framework there are two distinct types of windows:
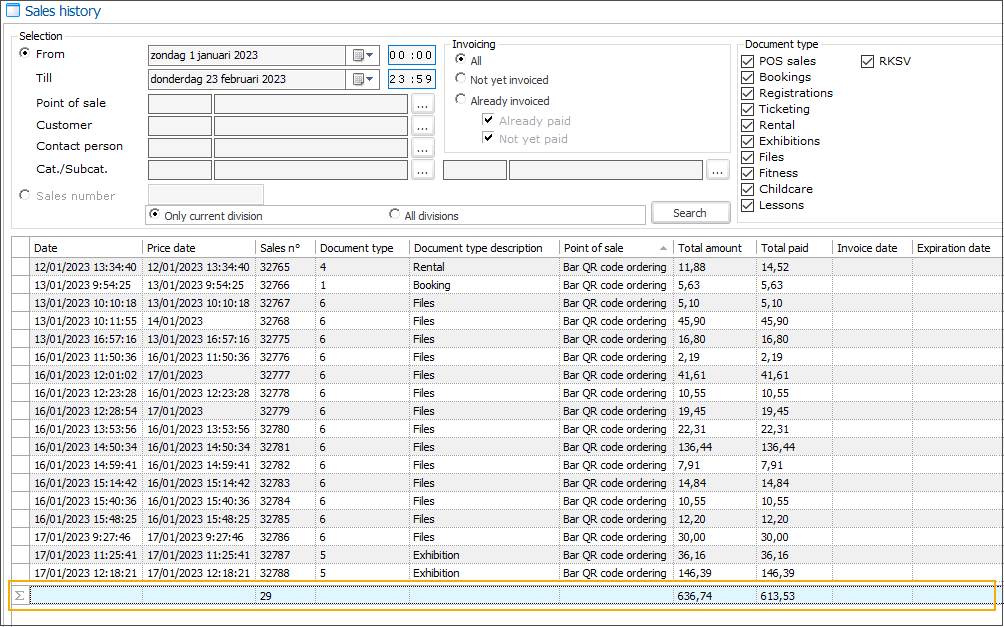
Overview windows
Overview windows contain lists of data, e.g. articles, customers, stocks, and so on.
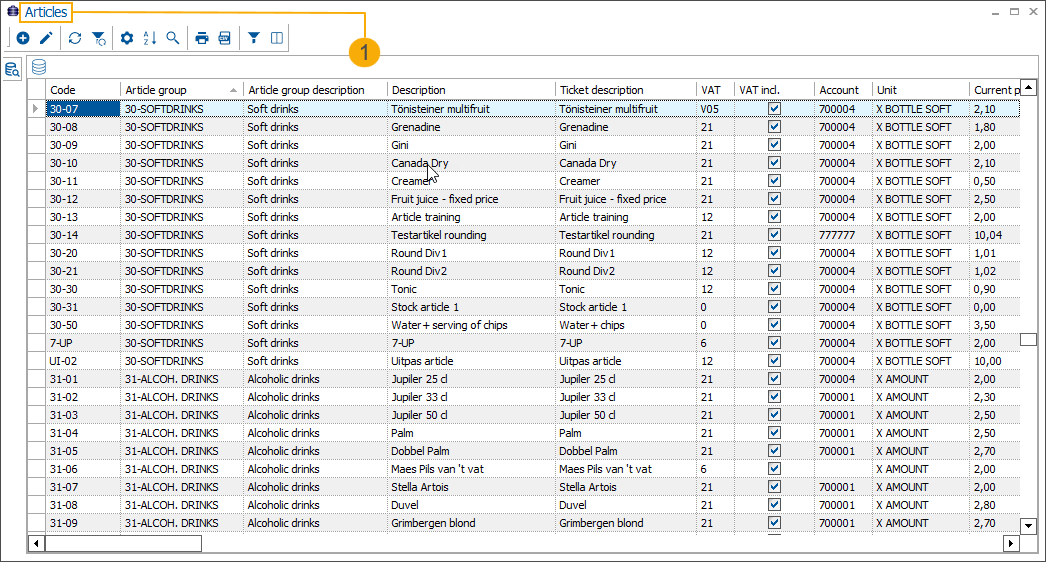
In the top-left corner of the window, you can find the toolbar (1) and underneath the list of called-up data (2). The toolbar can be moved around or even popped out using the drag function.
 |
The functionalities of the toolbar can also be called up in the form of a floating menu, by clicking on the right mouse button anywhere in the overview:
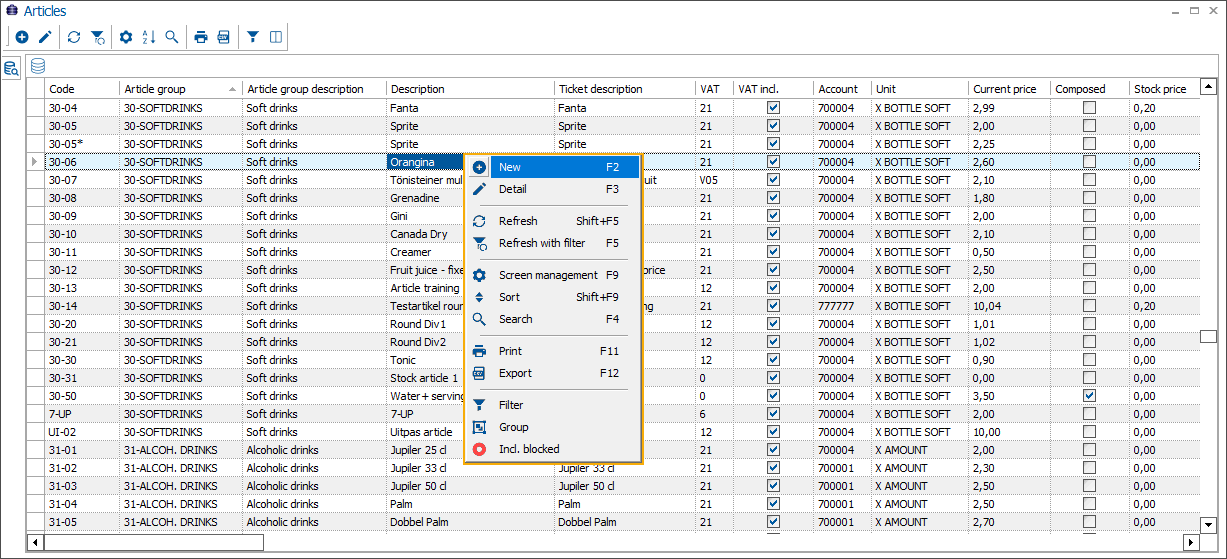 |
Generally, it is not allowed to enter or modify the data in the overview windows. This can only be done when opening the detail view of the particular item, that appears in an input window.
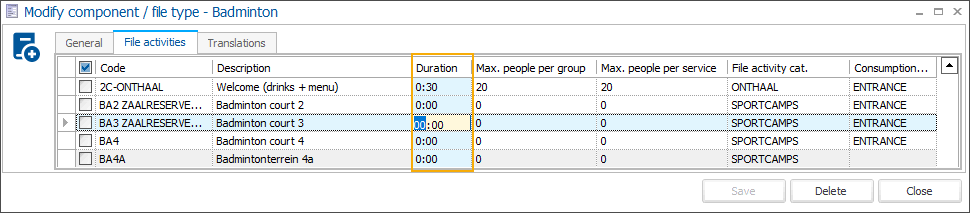
In some overviews, however, it is possible to enter or modify data directly:
The fields that can be modified have a light blue background, to clearly indicate that these fields are adjustable, e.g. modify the duration of file activities (module Files) directly in the overview:
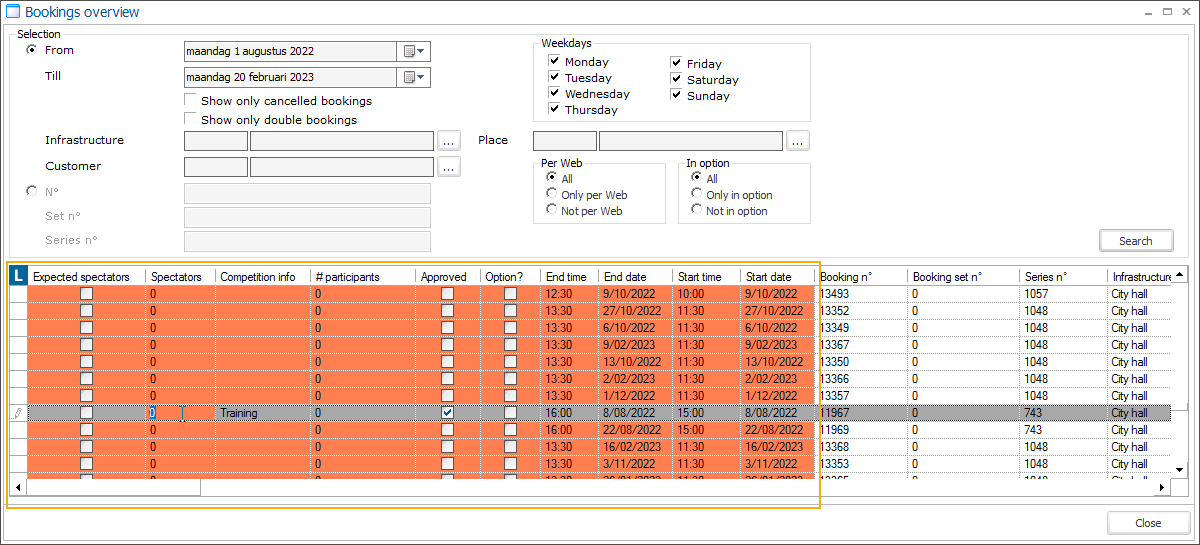
or sometimes the fields are coloured orange to indicate which values can be modified, e.g. in the bookings overview, some fields can be modified directly:
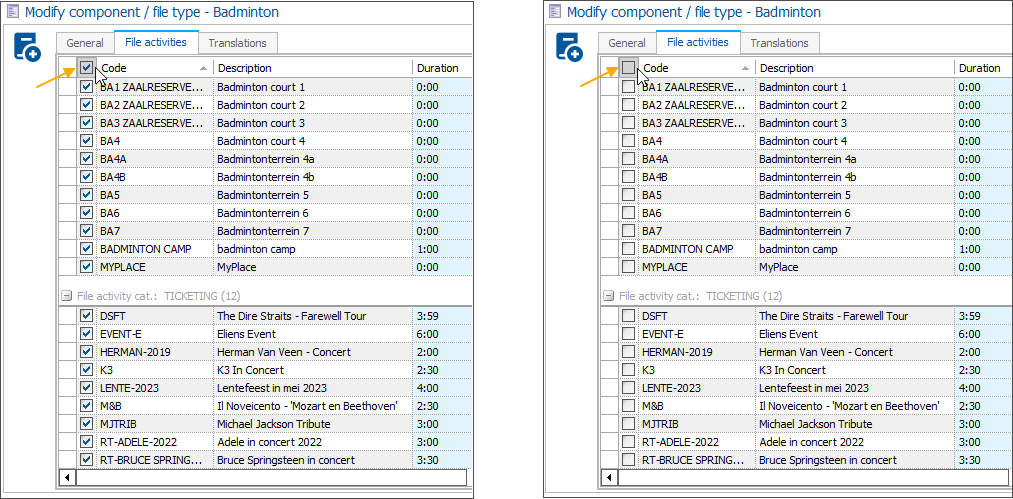
Other overviews, allow selecting one, several or all records (data lines) by means of checkboxes. You can select the records one by one, all at once or select a range between two checkboxes using the <Shift> button:
Select the first record of the desired range (1), then select the last record of the range while holding the <Shift> key on your keyboard (2). As a result, all records between the first and last selected checkboxes are selected.
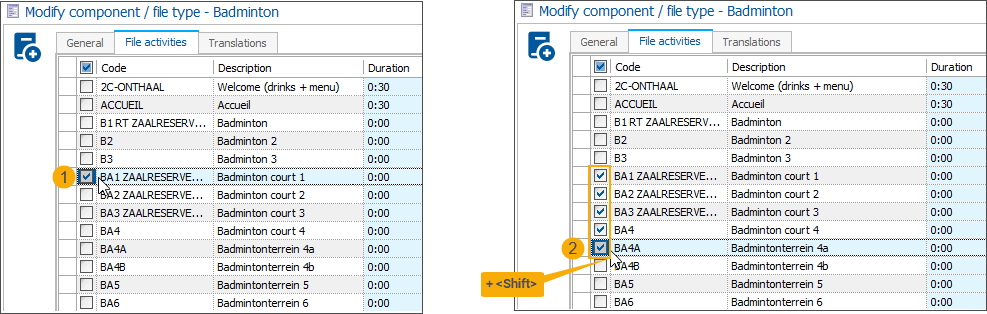
Use the checkbox in the header of the overview to select/deselect all items at once.
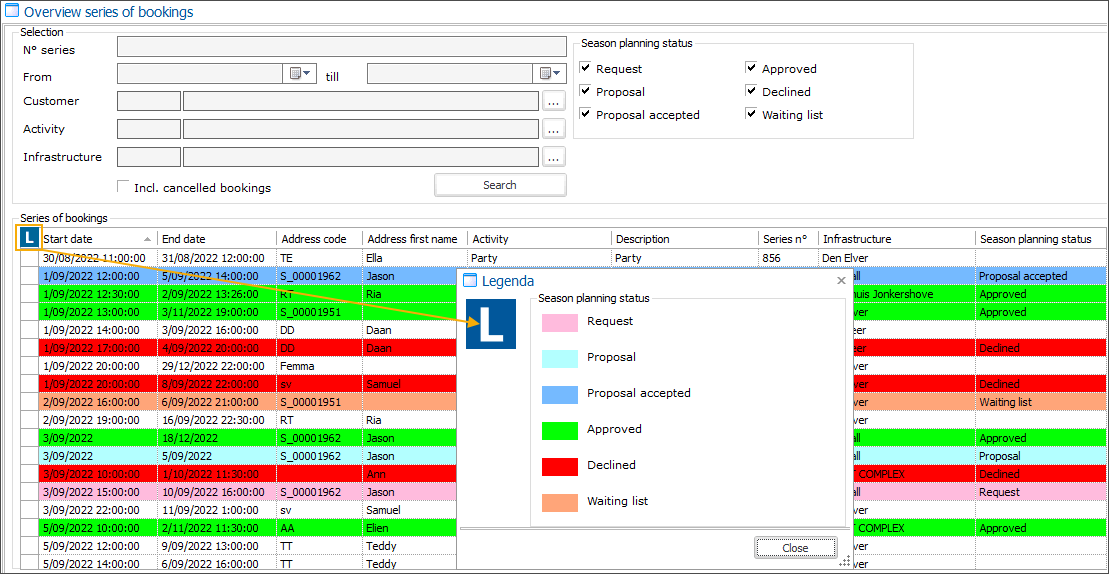
In certain overviews, multiple colours are used to indicate different statuses in the processing of particular data, e.g. season planning statuses in the overview of booking series.
Toolbar

Most of the functions can be accessed using a shortcut key or key combination.
| Create a new line | F2 |
| Modify the current line | F3 |
| Refresh the overview (entirely) | Shift+F5 |
| Refresh the overview and save the current filter | F5 |
| Change the overview settings (screen management) | F9 |
| Change the overview sorting | Shift+F9 |
| Search the overview | F4 |
| Print the overview | F11 |
| Export current overview to CSV file | F12 |
| Filter data from the overview | Shift+F4 |
| Group the overview |


The toolbar can also be called up in each window in form of a context menu by clicking on the right mouse button anywhere in the overview.
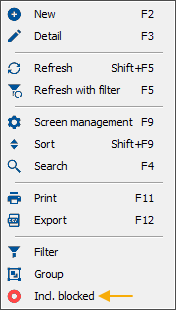
This menu also has the following extra option:
| Including blocked |

Below the toolbar, on the left-hand side of the window, you can also find a button that allows you to increase the performance of search queries.
| Search criteria |

Add new item
| Create a new line | F2 |
Use this button or the shortcut key F2 to create a new item. For example an article, customer, booking, and so on.
Show item details
| Modify the current line | F3 |
Use this button or the shortcut key F3 or double-click on the selected line to open the detail of the selected item.
Refresh overview
| Refresh the overview (entirely) | Shift+F5 |
After performing a search, use this button or the shortcut key combination Shift+F5 to refresh the overview. The system will discard the search results and show all data in the overview again. No previous searches or filters are taken into account.
Refresh overview with filter
| Refresh the overview and save the current filter | F5 |
After performing a search, use this button or the shortcut key combination F5 to refresh the overview while saving the current filter. This means that the data from the previously performed search will still be taken into account if you perform a new search query.
Screen management
 | Change the overview settings (screen management) | F9 |
Use this button or the shortcut key F9 to open the management screen with the following functions:
Window header
It is possible to change the current default name of the window header. To do this, you need administrator rights.

 |
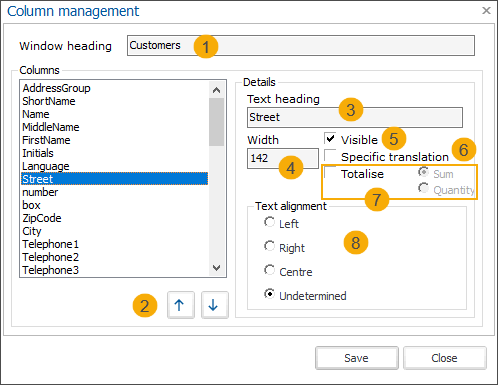
In the Column management screen, enter the new name in the Window heading field and click Save.
Columns
 |
On the left side of the Column management screen, you can see the list of all available columns in the order as they are currently displayed in the overview window.
Select a column in the list and use the buttons  and
and  to move the column up or down. The higher the column is in the list, the more to the left it will be positioned in the overview window.
In the overview window, you can move columns by grabbing a column header (holding down the left mouse button) and dragging it to the desired position.

Tip
In combination with the <end> or <home> key, you can quickly jump all the way to the end or front of the overview window.
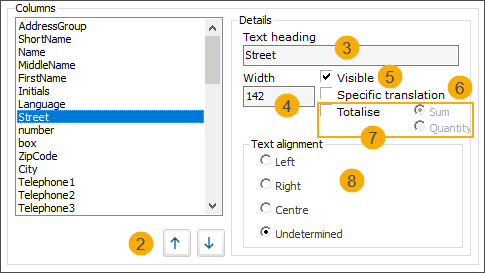
The column overview can be fully customized. When you select a column in the list on the left, you find the properties of this column in the section Details on the right. Per column you can configure the following properties:
Text heading (3): adjust the column names the same way as the window heading.
Width (4): the width of the column can be adjusted as desired.
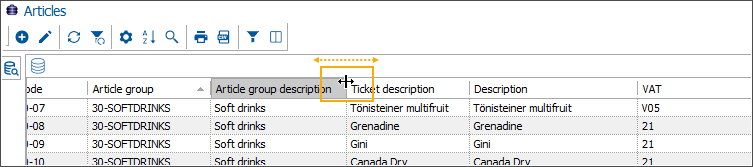
If you are in the overview window, you can also adjust the width by positioning your mouse pointer between 2 column headers, left click and move the pointer to the left or right.
Tip
Press <Ctrl> + '+' to automatically adjust the column width of all columns to the maximum content length of each column for a clear overview.
Visible (5): Choose which columns you want to visualize in the overview window. Uncheck this option to hide the column from the overview.
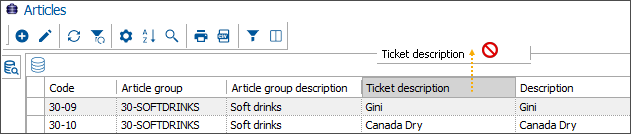
If you are in the overview window, you can easily hide unnecessary columns by grabbing the column header with the left mouse button and dragging it outside the window frame.
Specific translation (6): If you choose to use a custom column name (field Text heading), select this option as well to make sure this custom column name is saved and not overwritten in case the original default column name would change.
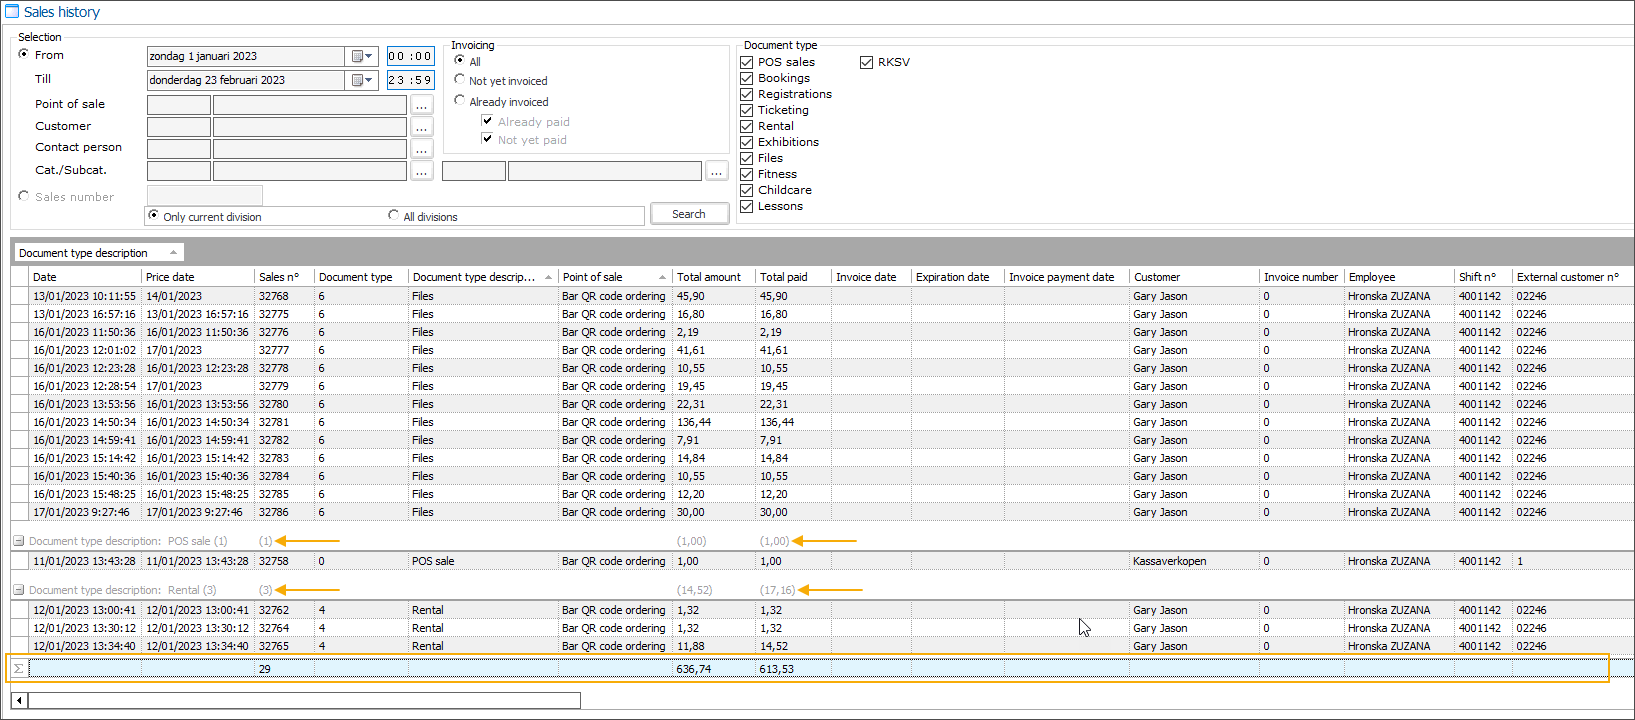
Totalise (7): Use this option to calculate the Sum of all values in the selected column (available only for columns with numeric values) or choose Quantity to show the row count. The totals are always shown at the bottom, under the specified column.
If the columns are grouped, next to the overall totals, totals are also calculated and shown per group.
Text alignment (8): Choose how the column text should be aligned.
Sort overview columns
 | Change the overview sorting | Shift+F9 |
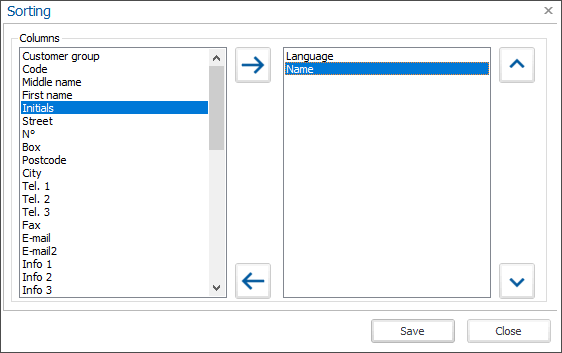 |
The sorting of the columns can be fully customized.
On the left side, you can see all available columns, on the right side you can see by which columns the overview is sorted. To move the columns from the left overview to the right overview and vice versa, use the right  and left
  arrows between the two overviews.
Within the right overview, you can also set the sort order by moving the selected column heading up  or down
  using the arrows.
A sorted column is indicated by a small triangle on the right side of the column heading.

In the overview window, it is also possible to sort columns by clicking once on the column header. Click on the same column header again to reverse the sorting direction.
To sort on several columns, press and hold the <Shift> key on your keyboard while clicking on the desired columns with the left mouse button.
Search within an overview
 | Search the overview | F4 |
To find data within an overview quickly and efficiently, you can use search criteria.
Tip
It is sufficient to start typing directly in an active overview window in order to open the Search criteria. No need to click the search icon or press the shortcut key <F4> each time you want to search in the overview.
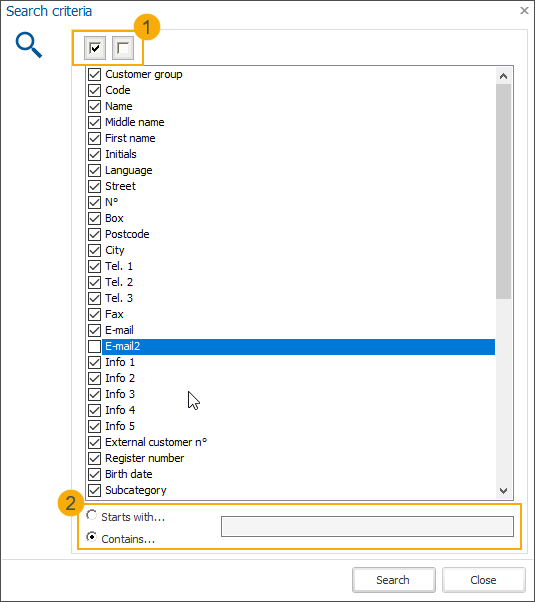 |
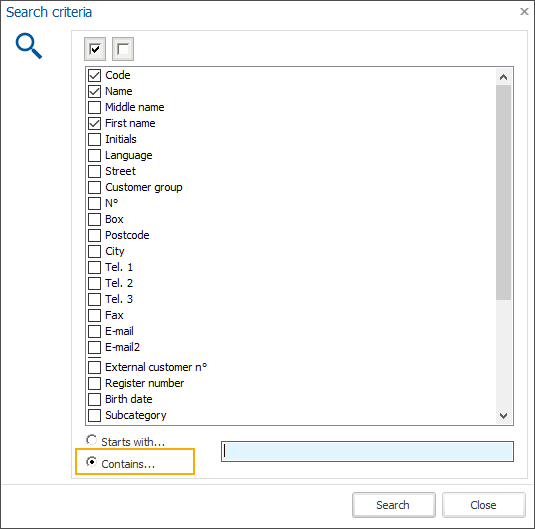
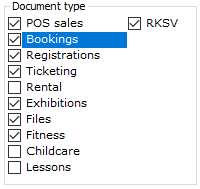
Select the columns in which you want to search:
Use the individual checkboxes to select or deselect columns.
Use the two buttons at the top of the window (1) to select or deselect all columns at once.
We recommend selecting only the columns essential for your search. Including all or too many columns may slow down the search.
Important
Hidden columns are not included in the search criteria. If you do not see a specific column in the overview, go to Screen management
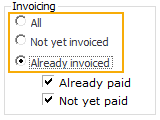
(F9) to see if the option Visible has been selected for this column.Make your search even more relevant by searching for specific text in the selected columns (2):
Starts with...: Find everything that starts with [your search term].
Contains...: Find everything that contains [your search term].
Search further in detail within the current search results: you can perform multiple searches after each other where each next search will be performed on the search results of the previous query.
Important
If you want to perform a new search on the entire (original) overview, you will have to first refresh
 (<Shift> + <F5>) the overview entirely to discard the previous search.
Print an overview
 | Print the overview | F11 |
Each overview in Recreatex can be printed. Click the print button in the toolbar to generate a print overview first.
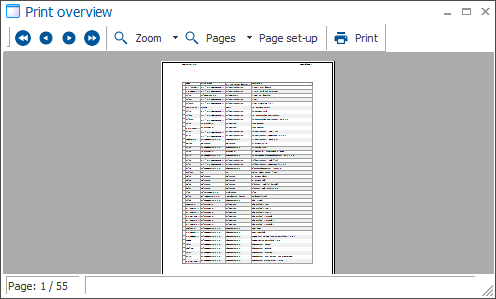 |
The print overview allows you to define the page settings and check the output before actually printing the data overview.
Important
The generation of the print overview may take some time when printing a large amount of data.
Export overview to a CSV file
 | Export current overview to CSV file | F12 |
Each Recreatex overview can be exported to a TXT or CSV file for possible further processing in Microsoft Word or Excel.
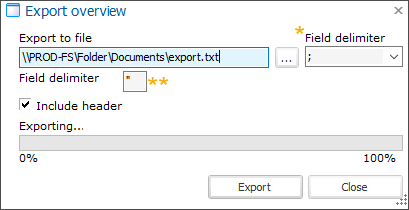 |
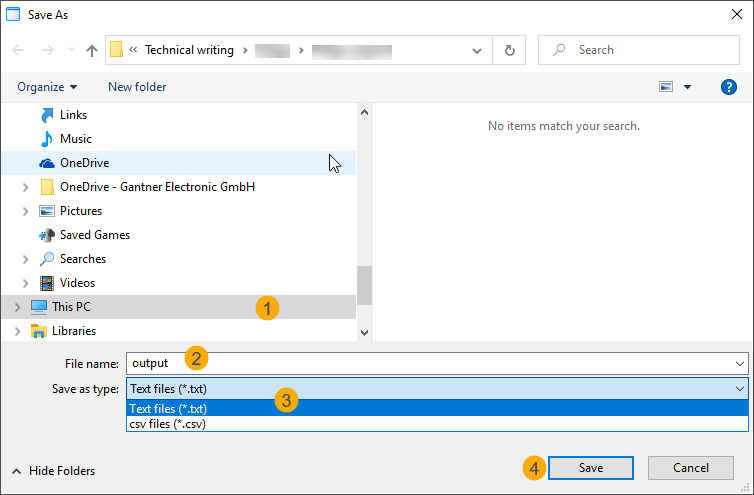
Export to file | Fill in the full path of the export file, including the name and file type. You can do this by typing or pasting the path directly in the text field or click on
Click Save (4) to return to the Export overview window. | |
Field delimiter (*) | Choose which field separator (punctuation) should be used in the export file to separate the fields: , (comma) or ; (semicolon). | |
Field delimiter (**) | Use an additional data delimiter if required, when exporting to TXT format. 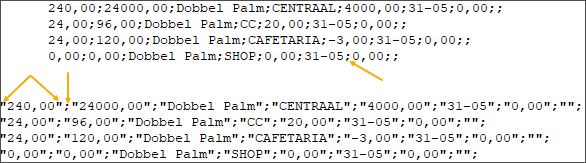 | |
Include header | Choose to include column headers in the export, when exporting to TXT format. NoteWhen exporting to CSV format, the column headers are included automatically. | |
Export | Click the button to generate the export file and save it automatically to the predefined location. |

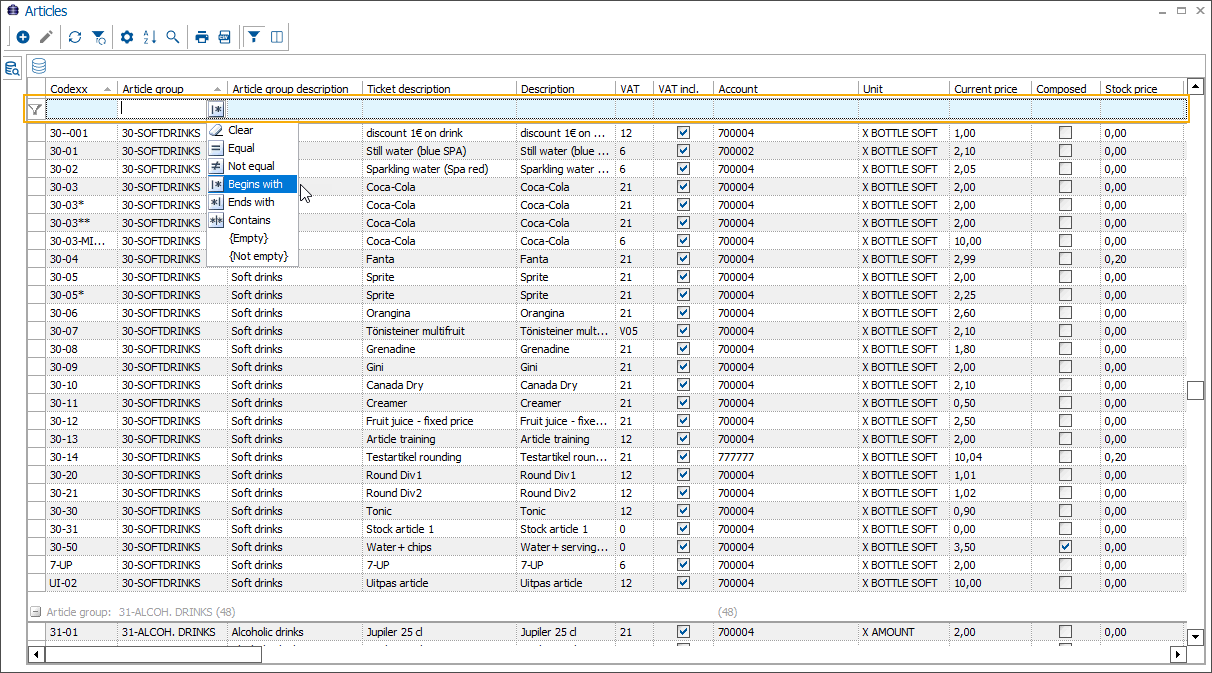
Filter overview data
 | Filter data from the overview |
To filter data in the overview, you can use the selection filter. It is possible to use multiple filters simultaneously.
Click the filter button to activate the filter line on top of the overview under the table header.
 |
Filter options may differ per field type:
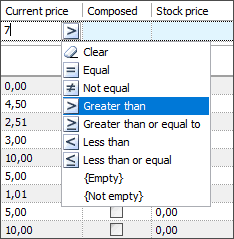
Numeric value fields
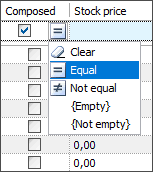
Logical value fields (containing checkbox)
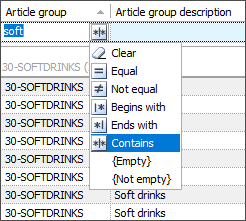
Textual value fields
Clear | Delete the current filter for this field. |
Equal | The field contains exactly the specified text. |
Not equal | The field must not contain the specified text. |
Begins with | The field begins with the specified text. |
Ends with | The field ends with the specified text. |
Contains | The field also contains the specified text. |
Greater than | The field contains a value greater that the specified value |
Greater than or equal | The field contains a value greater or equal to the specified value |
Less than | The field contains a value smaller that the specified value |
Less than or equal | The field contains a value smaller or equal to the specified value |
{Empty} | The field in this column has to be empty. |
{Not empty} | The field in this column can not be empty. |
After selecting the filter options and values, click anywhere in the overview window or press the <Tab> key on your keyboard to apply the filter.
Important
Avoid pressing the <Enter> key as this will undo your selection
Group the overview
 | Group the overview |
Click the group button in the toolbar to activate the group functionality on top of the overview above the table header.
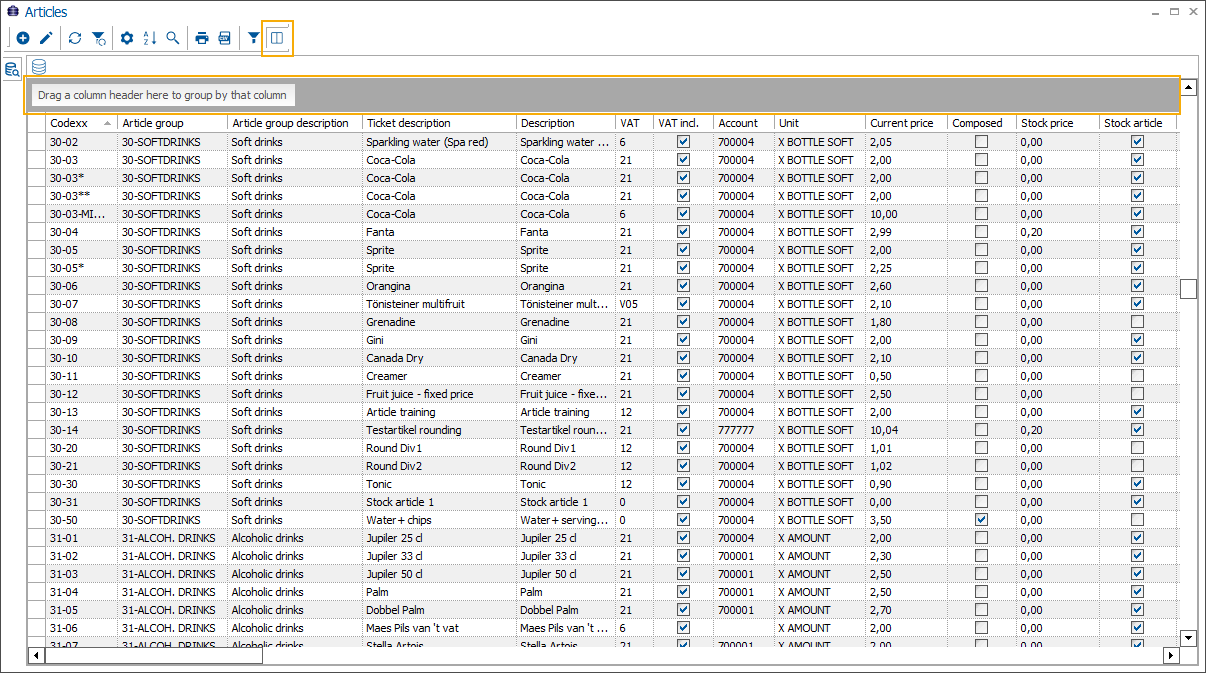 |
Note
Grouping is remembered under your personal settings, so this feature remains active until you undo it.
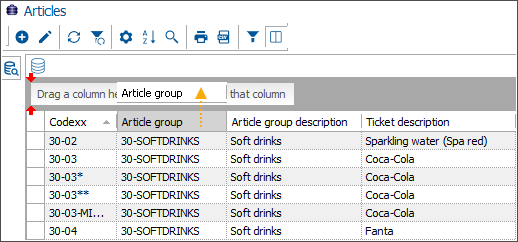
To group the overview, select the column heading with your left mouse button. Then drag and drop it onto the bar Drag a column header here to group by that column.
You can group the overview further by dragging additional column headings onto the bar.
The system will also automatically sort the created groups by this column.
Note
If you use the Sort function on the grouped overview it will be applied on the items per group.
To ungroup the overview, drag and drop the column heading back onto the overview header.
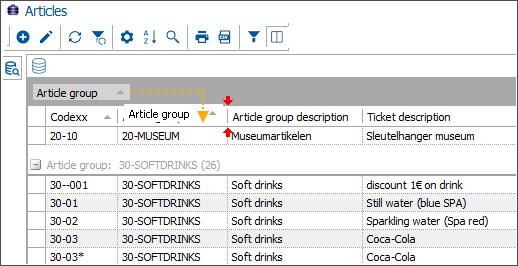
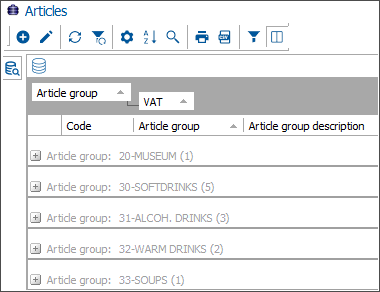
E.g. articles grouped by article group:
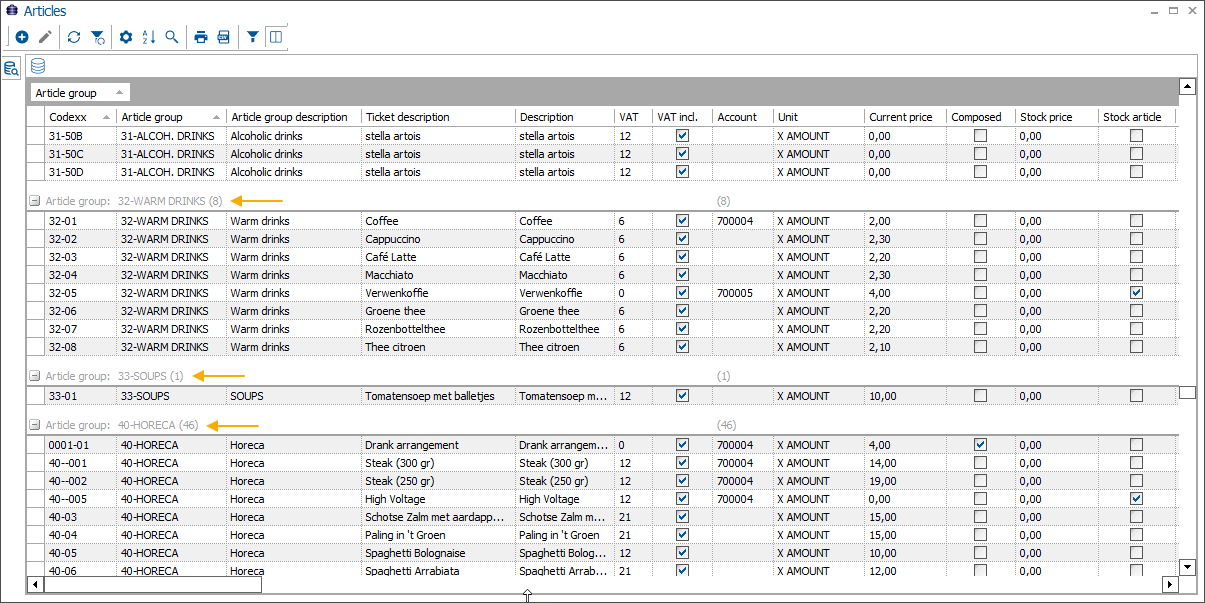 |
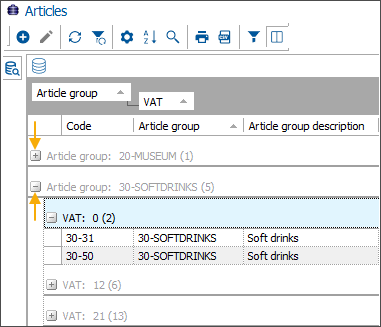
E.g. articles grouped by article group and then further by VAT type:
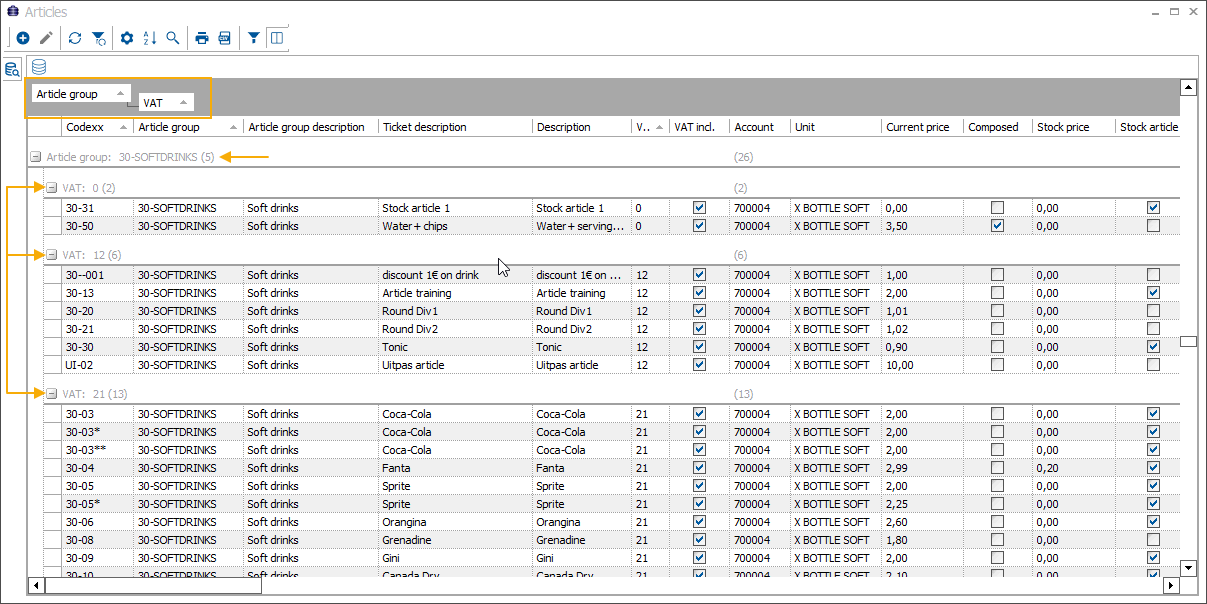 |
Tip
Press the <Shift> button + * to collapse all groups at the same time.
Press * to expand all groups at the same time.
Use the + and - buttons next to each group to expand or collapse the groups one by one.
Including blocked items
 | Including blocked items |
Although items that have already been linked within Recreatex can no longer be deleted, they can be blocked. Blocked items are automatically hidden from the overview.
If you, however, want to visualise the blocked items in an overview window, click the right mouse button in the overview and select Incl. blocked from the context menu.
Important
This function is only available in overviews where blocking of the data has been implemented.
Increase performance of search criteria
 | Search criteria |
If an overview contains a lot of data (for example a list of customers with >50000 customers), loading the data may take some time. To optimize this process, we have implemented a framework functionality with which you can pre-filter the data before they are loaded in the overview.
In the top-left corner of the overview window, click the search criteria button to open the functionality.
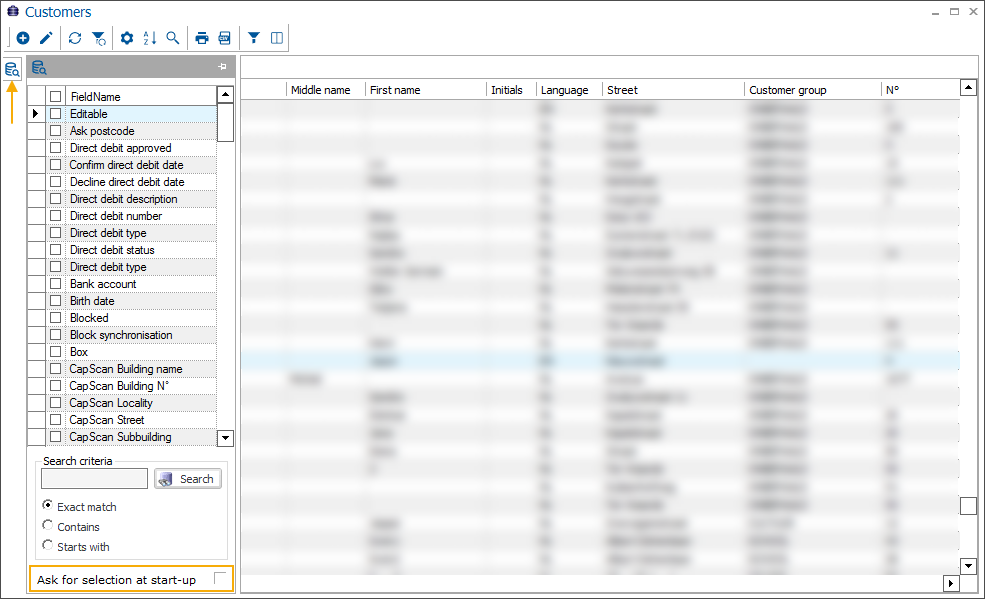 |
Select the option Ask for selection at startup at the bottom of the screen and then select the fields that should be included in the search.
The next time you go to this overview the search criteria window opens automatically first so that you can enter a search query before the data can be loaded.
You can determine per overview if a window with search criteria has to be opened before loading that particular overview.
Note
Customer lists for which no user settings have been defined yet are loaded by default with the search criteria window. In this way, the performance is optimized when loading the list for the first time.
Each user can determine per overview which fields the system has to search.
Important
It is possible that not all the fields are available as selection fields. Only the database fields can be selected, not the linked fields, e.g. the postal code cannot be selected as a search field.
Click Search after filling in the search criteria. Only the data that meet the search criteria will be loaded, which is more efficient than loading all data first and searching these data afterwards.
Use a wildcard
When searching, you can always use a wildcard (wildcard character) to flexibly define a specific search term. In such a case you define only part of the search term with known characters and the rest as a wildcard.
The wildcards that can be used in the search criteria are % (percentage sign) * (asterisk) and _ (dash).
If you use the sign % or * you define an arbitrary series of characters:
*road Abbey road, Jennens road, Eastwood road, ... (idem if you use '%')
%of% Cup of tea, Cup of coffee, ... (idem if you use *)
If you use the sign _ you define a single variable character.
_arl Carl, Karl
The wildcards can even be combined within the same search term.
Important
If you use the standard search query in an overview window (see Search within an overview) it is not possible to use a wildcard but you can use the function Contains... to search for partial item names instead.
 |
Pin/unpin the search criteria window
If you pin the search criteria window, the window will always remain visible within the overview window.
If you unpin the search criteria window, the window will automatically hide when you click outside of the search criteria window.
To pin or unpin the search criteria window click respectively on  or
or  in the upper right corner of the window.
Tip
If you notice unexpected results when refreshing an overview, it may be due to the applied filter criteria. Pinning the search criteria window will keep this information in view and may help you to remember which overview windows contain prefiltered data while working in other windows.
Input windows
Input windows allow you to fill in, modify and delete data. Within the Recreatex framework input can be provided using different types of input elements: fields, selection options and buttons.
Some input windows, e.g. the customer address card, combine a whole variety of input elements:
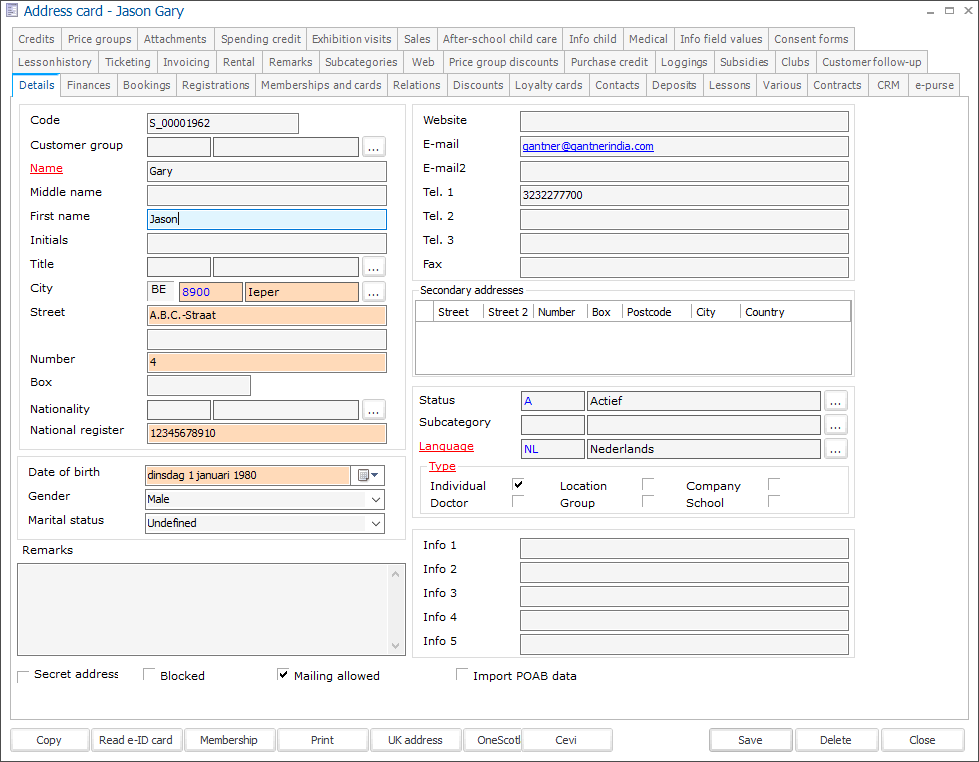 |
Input fields
| In the regular input field, you can type text or numbers. | |
| Fields with a title in red and underlined are mandatory. You will not be allowed to save the data of the input window if the mandatory fields have not been filled in. These mandatory fields are determined by Recreatex. | |
| The fields with the pale orange background are also mandatory. However, these mandatory fields can be defined in SydAdmin by your application administrator with sufficient rights. | |
 | In the input field with a linked list you can use multiple framework functions:
| |
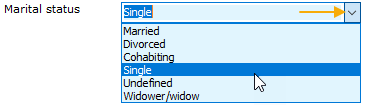 | A drop-down list allows you to choose an option from the available list. You can open the list by clicking the arrow on the right or by pressing <F4>. | |
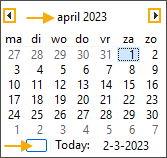
| The date field allows you to fill in the date by typing it directly or using the date picker (calendar) on the right. You can fill in the date in several different ways:
|


Multiple choice
Input can also be provided via checkboxes ( ) and/or radio buttons (
 ).
).
| A selection using checkboxes allows you to select multiple options simultaneously. Click the checkbox or press the space bar on your keyboard to select/deselect an option. | |
| A selection using radio buttons allows you to select one of the options, which automatically excludes the remaining options. |
Buttons
All input windows are provided with extra button functions. The following functions are the most common:

Save | This button allows you to save the data in the current input window. If the Save button is greyed out, no data have been changed yet or the modified data have already been saved. In this case, you will not be able to click on the button. | |
Delete | This button allows you to delete an item (database record) and the linked data. ImportantItems can only be deleted if they have not yet been used or linked to other data within the Recreatex database. The items that cannot be deleted can still be blocked and hidden from the overview using the Blocked functionality, available by default for most of the Recreatex data items. | |
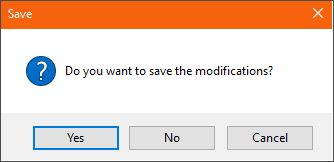
Close | This button allows you to close the current input window. If the data in the input window have not yet been saved, the following message will appear:
|
Apart from the button functions, the button bar also provides 2 useful right-click functions which can only be accessed with administrator rights:
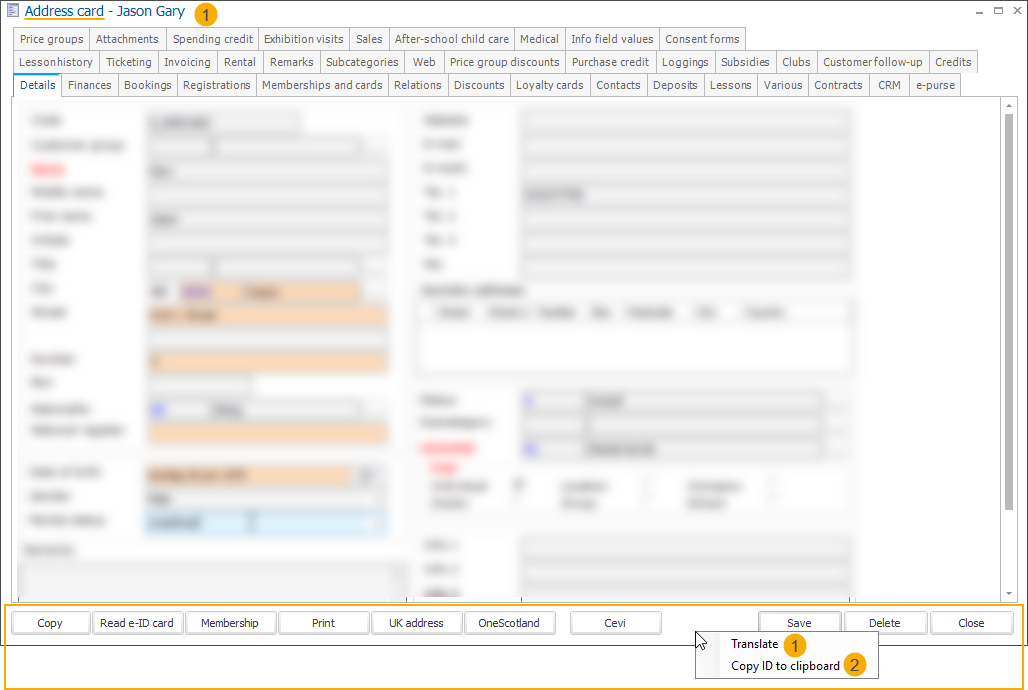
Translate | With this function, you can translate/rename the input window title. 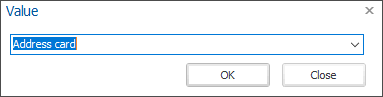 Note that the dynamic part of the window title has to be defined in general parameters, separately for each window where applicable. |
Copy ID to clipboard | This function allows you to retrieve an ID of each input window in Recreatex and SydAdmin to be used e.g. when building deeplink URLs used on the Webshop to direct customers to specific pages. 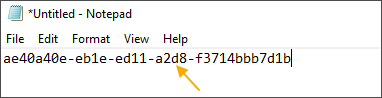 |
Non-editable fields
Some input windows in Recreatex contain fields which cannot be edited. These fields have a title displayed in green colour. These are usually the fields where the value is automatically generated or calculated by Recreatex.
 |
Tabs
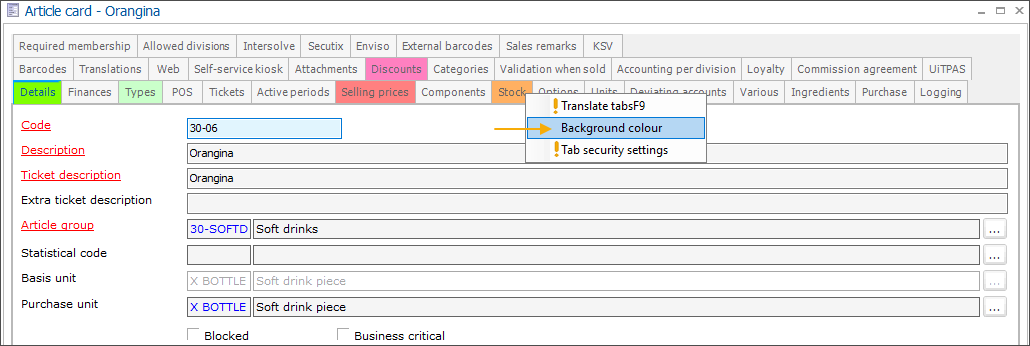
Most of the input windows in Recreatex have multiple tabs, each containing specific information. You can use colours to highlight e.g. the important tabs or frequently used tabs.
To adjust the background colour of the tab headers right-click on the tab header and select the option Background colour from the menu.
 |
Choose a background colour from the available basic colours, or define a custom colour yourself.
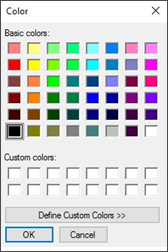 |
Click OK to apply the selected colour.
Important
The additional functions that allow you to Translate tabs and define Tab security settings can only be accessed with administrator rights.
Useful window functions
Within Recreatex it is possible to open multiple windows at the same time, but with too many windows open you can often lose the overview. Via System > Window Recreatex provides some useful functions that can help you to organize the open windows and achieve a better overview.
Cascade | If you have too many screens open you can easily regain the overview by cascading all open windows. 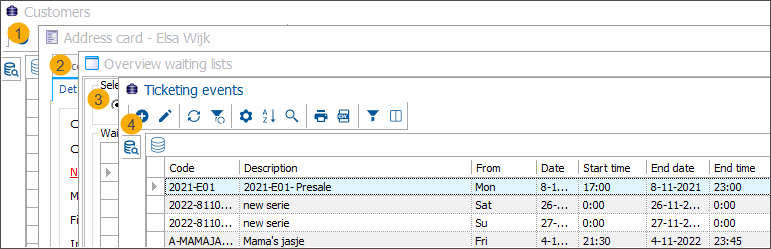 |
Show windows stacked | Vertical stacking will arrange the windows in such a way that all open windows are visible on the screen. 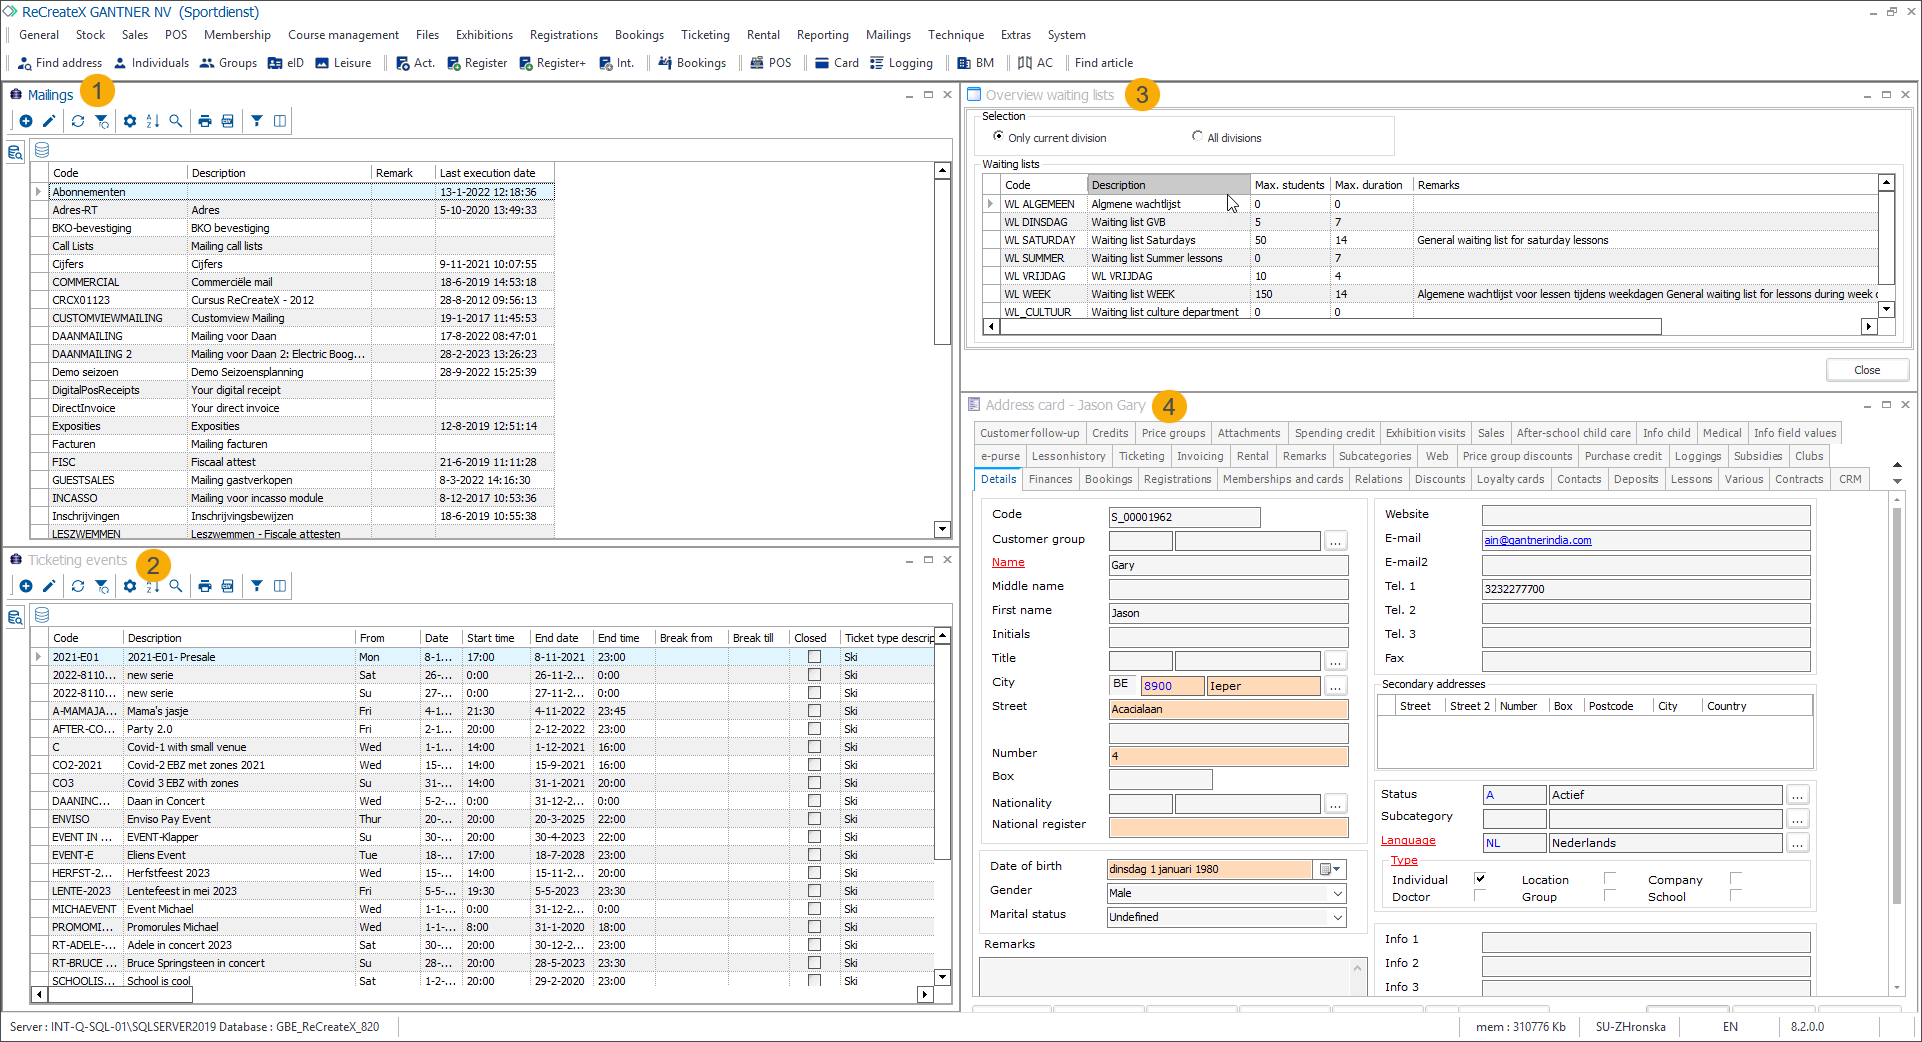 |
Show windows side by side | Arranging windows side by side (horizontal stacking) can be useful e.g. when comparing data in 2 windows. 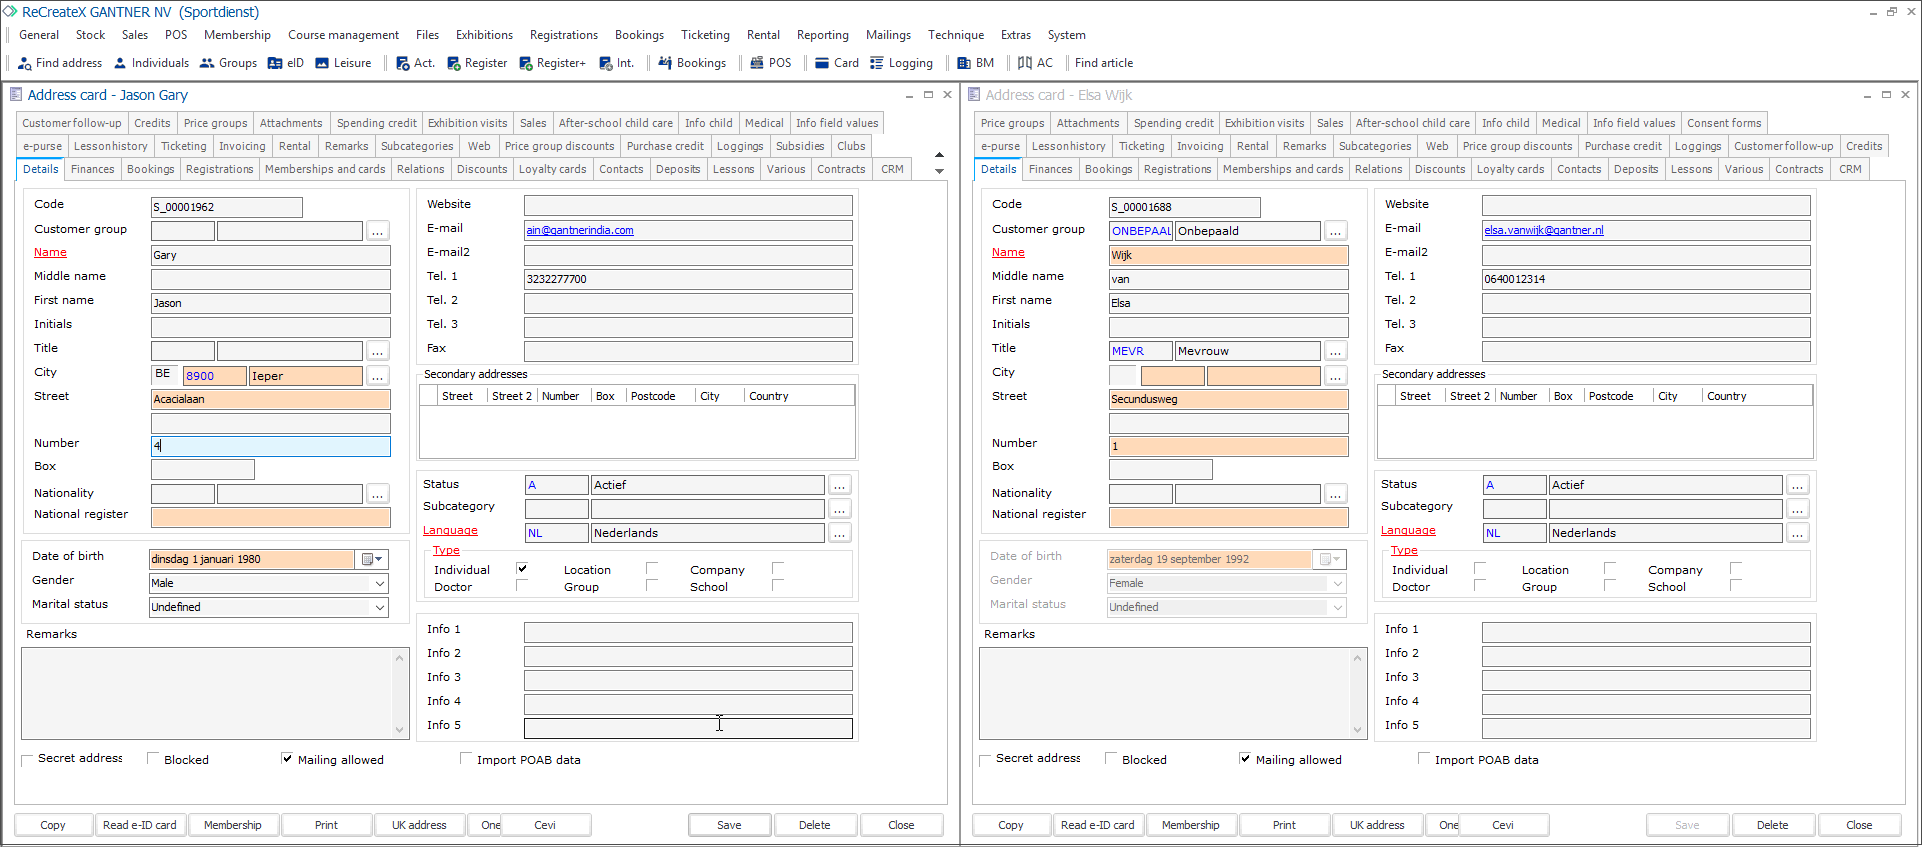 |
Open windows | Under this option, you can find a list of all open windows (including the minimized ones) and easily select the window you want to bring forward. 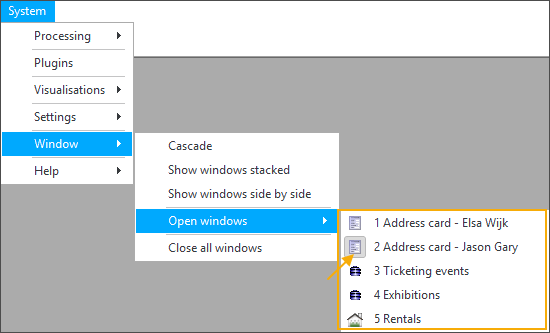 The window currently focused on has an icon with a grey background. |
Close all windows | You can close all windows at once.  When closing all windows you may be presented with additional notifications or warnings, if there are any unsaved or incomplete data in these windows. |