Designing promotion rules
Create new rules
To create a new promotion rule, go to Sales admin > Promotion rules > Overview promotion rules. This will open the Promotion rules window with the overview of all existing rules. Next press F2 or right-click > New. The window Modify promotion rule will open.
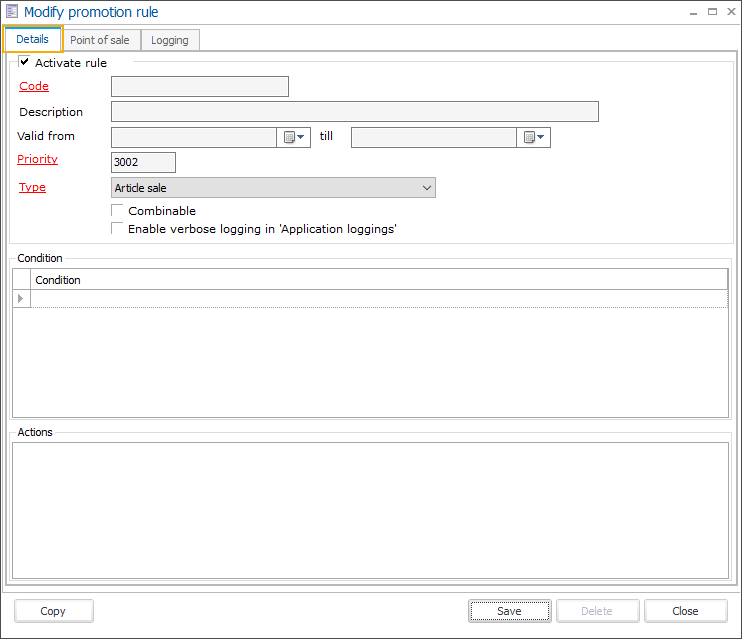 |
Tab Details:
Activate rule | When you create a new rule, it is enabled by default. You can uncheck the rule if you no longer want to apply it. | |
Code (mandatory) | Please enter a clear code as this will be displayed in later stages. | |
Description | Please enter a clear description as this will be displayed in later stages. | |
Valid from ... till ... | This is the period in time during which the rule is checked and applied. This has no influence on the time the exhibition visit or culture event takes place. | |
Priority (mandatory) | Enter a unique number to determine the priority, with 1 being the lowest number and the highest priority. The higher the number, the lower the priority. | |
Combinable | Check this setting if this promotion rule can be combined with other rules. | |
NotePriority and Combinable are used to configure the behaviour if the conditions of multiple rules are met. In that case, the rule with the highest priority will be executed. If that rule is combinable, it will search for the rule with the next priority that is also configured as combinable. | ||
Type (mandatory) | Choose a condition type depending on which module you want to make a promotion rule for. By default you can choose between Article sale, Exhibition and Ticketing. More information on condition types can be found here. | |
Enable verbose logging in Application loggings | When enabled, extra information about the promotion rule will be logged in the Application Loggings screen. This allows the user to track down why a certain rule is not applied. Additionally, it will monitor and report on related rules that cause the specific rule not to run. | |
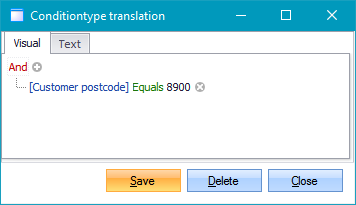
Condition | This is the field in which the condition for the promotion rule needs to be configured. A single click in the first blank line will open the window Conditiontype translation. In this window, you can use the filter controls to configure what condition(s) need(s) to be met to execute the action. More information on how to configure the filter controls can be found here.
WarningA condition only defines whether a discount (action) can be awarded or not: yes or no. A condition does not define to what the discount is applied. The filter conditions in the Condition section have no influence on the applicability of the action. | |
Actions | This is the field in which the action for the promotion rule needs to be configured. In the action you need to configure what kind of discount you want to give (amount, percentage, …) and to what the discount needs to be applied (on all articles, on the cheapest article, on a specific article, …). To add an action, press F2 or right-click > New. Multiple actions can be configured. More information on how to configure the actions can be found here. WarningThe filter condition in the Applicability section is meant to define to what the discount needs to be applied. The filter conditions in the Condition section have no influence on the applicability of the action. | |
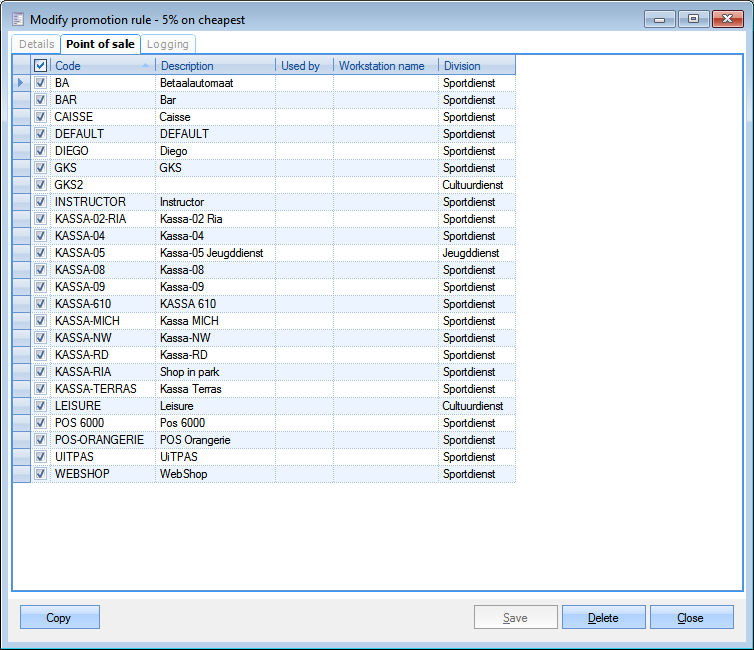
Tab Point of sale: (For this tab to become configurable, you may need to click Save first.)
| |
|
Buttons:
Copy | Copying a promotion rule can be useful when you want to create a similar promotion rule with just a few minor changes and you do not want to remove the original rule. After clicking Copy, a new window with the copied rule will open, an asterisk (*) is added to the description and the priority number will be the highest number in use +1. |
Delete | When you click Delete, the promotion rule is removed from the Promotion rules overview but not from the database. Otherwise it would not be possible to find the loggings of promotion rules that may have been applied already. |
Warning
As a rule of thumb, a new promotion rule should always be set up in a test environment to be able to detect potential mistakes or vulnerability for misuse before launching it.
Create conditions (using filters)
To create conditions, you use the filter control. The filter control consists of several visual elements and gives you the possibility to easily configure the conditions for your promotion rules.
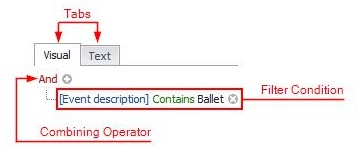 |
Tabs
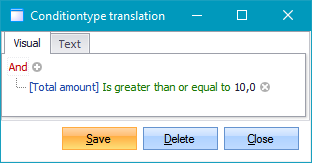
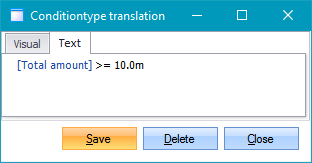
You can create filter criteria by using visual elements in the Visual tab (recommended) or by typing the criteria as text in the Text tab (for experienced users only). The content of the tabs is automatically synchronized.
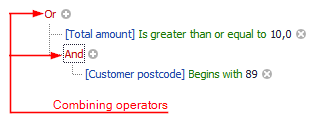
Combining operator
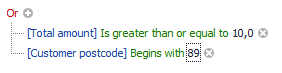
The combining operator combines filter conditions and groups of filter conditions.
 |
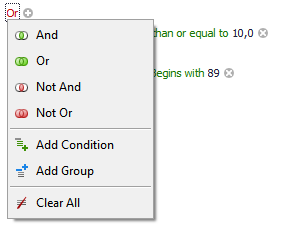
You can click the combining operator in order to invoke the drop-down menu that allows you to:
change the combining operator.
add a nested group.
add a filter condition.
or remove the group.
 |
And | A AND B | The result is true when both A and B are true, in all other cases the result is false. I.e.: Both conditions need to be fulfilled in order to proceed. | |
Or | A OR B | The result is true when either A or B are true. The result is false when both A and B are false. I.e.: Only one of the conditions needs to be fulfilled in order to proceed. | |
Not And (NAND) | A NAND B | The result is false when both A and B are true, in all other cases the result is true. This is the same as NOT(A AND B). I.e.: Only one or none of the conditions can be fulfilled in order to proceed. If both conditions are fulfilled, it is not possible to proceed. | |
Not Or (NOR) | A NOR B | The result is true when both A and B are false, in all other cases the result is false. This is the same as NOT(A OR B). I.e.: None of the conditions can be fulfilled in order to proceed. If one or both conditions are fulfilled, it is not possible to proceed. | |
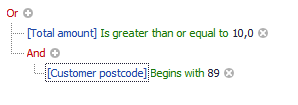
Add Condition | This adds a filter condition. (On the same level)
| ||
Add Group | This adds a nested group. (One level down)
| ||
Clear all or Remove Group | This will remove the group. | ||
Filter condition
The Filter Condition is a single filter criterion in the window Conditiontype translation.
 |
The Filter Condition can contain the following elements:
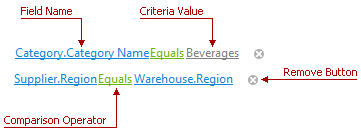 |
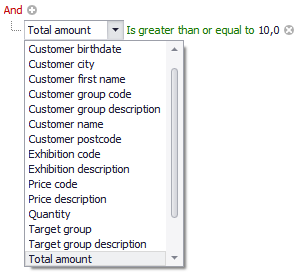
Field Name | The Field Name is a part of a filter condition that displays the name of the field to which the filter condition is applied. You can click the Field Name in order to invoke the drop-down menu that allows you to select another field.
| |
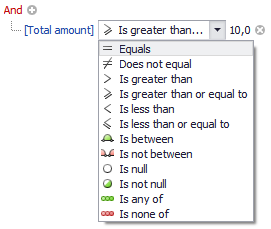
Comparison Operator | The Comparison Operator is a part of a filter condition that allows you to select the applied logical operator. You can click the Comparison Operator in order to invoke the drop-down menu that allows you to change the logical operator.
| |
Criteria Value | The Criteria Value is part of a filter condition that allows you to specify a condition's comparison value. You can click the Criteria Value in order to edit it.
| |
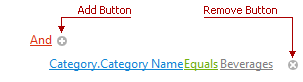
Add and Remove Buttons | The Add button allows you to add a new filter condition to the respective group. You can remove a filter condition with the Remove button.
|

Create actions
When the conditions are met, the action configured in the promotion rule is executed.
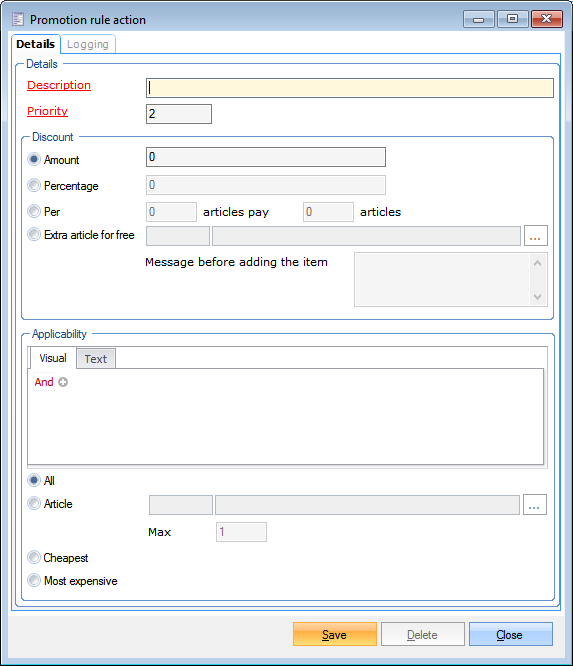 |
Description (mandatory) | Please enter a clear description. |
Priority (mandatory) | Enter a unique number to determine the priority, with 1 being the lowest number and the highest priority. The higher the number, the lower the priority. |
Discount | In this area, you configure what discount is awarded and how. |
Amount | Enter a fixed amount. |
Percentage | Enter a percentage. |
Per ... articles, pay ... articles | Enter the number of articles. (e.g. Order 3 articles, but only pay for 2) |
Extra article for free | Select an article from your article list that you want to give for free with purchase.You can fill in a Message before adding the item. This message will only be visible in ReCreateX back-office and the point(s) of sale. |
Applicability | In this area, you configure to which article(s) the action applies. |
Filter control | Here you can add extra filter controls to further narrow down the conditions for applying the discount. More information on how to configure the filter controls can be found here. WarningThe filter condition in the Applicability section is meant to define to what the discount needs to be applied. The filter conditions in the Condition section have no influence on the applicability of the action. |
All | The discount will be given on all articles. |
Article | Select a specific article from your article list. NoteIn case the promotion rule is of the condition type Ticketing, you need to select the Seats article so that the action of the promotion rule can be applied. The Seats article is purely for registration purposes and should also be specified in Ticketing > Parameters > tab Pre-invoicing. Max: This is by default "1" and makes sure that a customer cannot fulfil the conditions only once, but order as many discounted articles as is permitted in this field Max. This does however have the restriction that the discount is only given once per purchase. |
Cheapest | The discount will be given on the cheapest article. |
Most expensive | The discount will be given on the most expensive article. |
Note
When choosing to apply the discount to the cheapest or most expensive article, you can still specify that the discount is only applied to certain articles by using the filter control.
E.g. the discount is applied to the cheapest article of a certain article group.