Make a rental order
There are multiple methods to make a rental order:
Through the graphic rentals overview
Go to Rental > Rentals (Graphic).
A graphic overview of rental orders will appear.
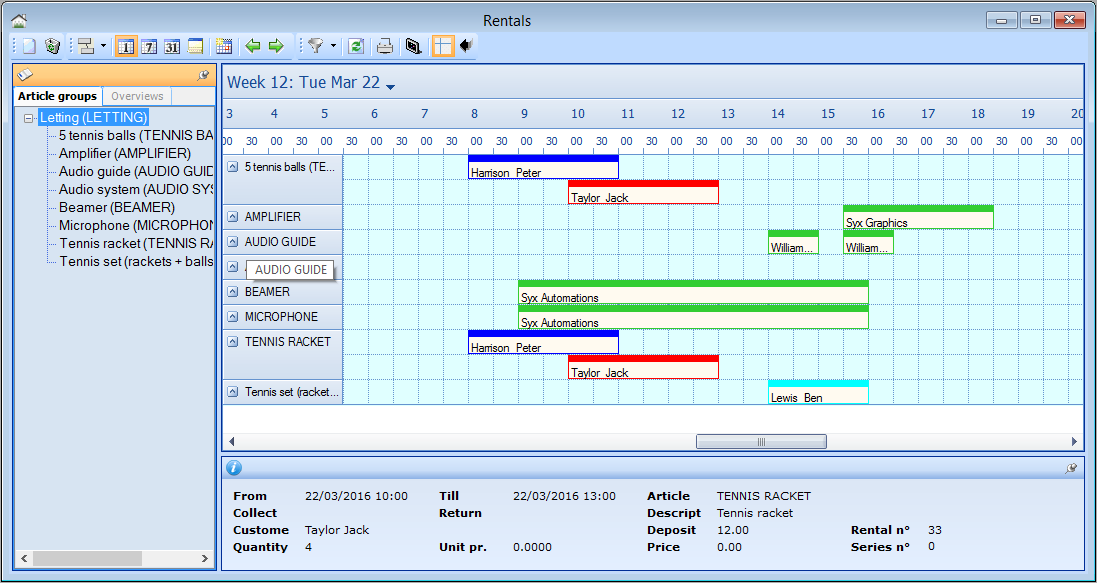 |
This window shows you a clear overview of all rental orders per article, in function of the chosen article group or rental overview (left part of the window). The rental orders are visualised as blocks showing information on the rental order. Dependent on the parameter settings (see chapter Parameters > General), this is the customer name, the article name or the availability of the rental in question. The colours of the block (status of the rental orders) can also be defined in the parameters.
The toolbar above the graphic overview allows you to change the settings of the timetable, to filter, to refresh and to print the overview and to consult the availability of the rental articles.
 |
If you click on a specific block/rental order, the detailed data will be shown in the lower part of the window. If you double-click a block, the window Modify rental will appear allowing you to make modifications if required.
You can create a new rental order by clicking on  in the toolbar, after which the window Modify rental will appear. This window contains different tabs in which all rental details can be entered. Alternatively, you can also open this window by double-clicking somewhere in the overview or by clicking on the right mouse button, followed by New order.
General
The tab General contains the basic data of the rental order, of which the customer and rental period (Rented from... till...) are mandatory fields, all other fields are optional.
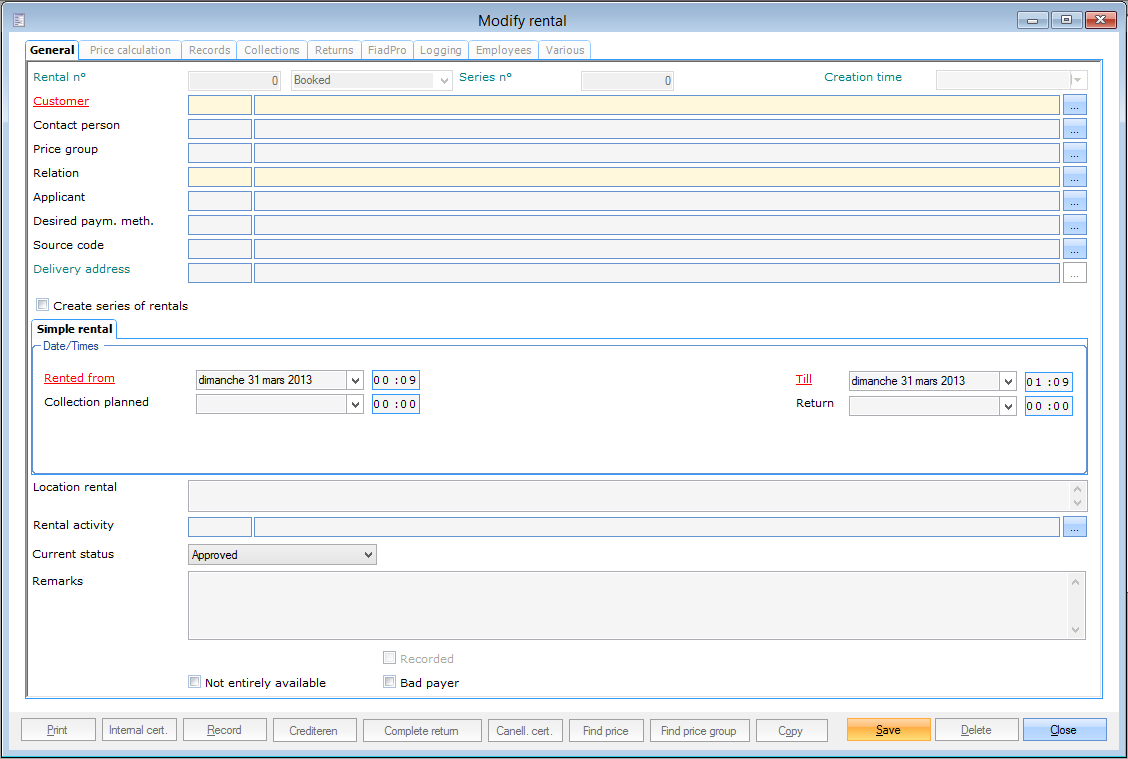 |
After filling in the general data of the rental order, it is advised to first save these data by clicking on the button Save after which all other tabs will become available.
Articles
In the tab Articles you can select (tick) and manage the articles you want to rent. You can choose to list all articles or only those already selected.
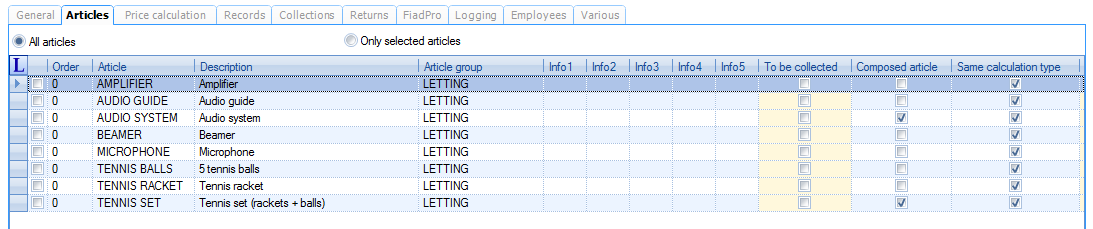 |
This tab contains some adaptable fields (columns marked in yellow) that allow you to select the desired quantity, price group, calculation type, collection and return dates, deposit amount, discount amount etc.
You can also modify the rental line by double-clicking on it, or by clicking on the right mouse button followed by Detail.
The window Modify rental order line will appear:
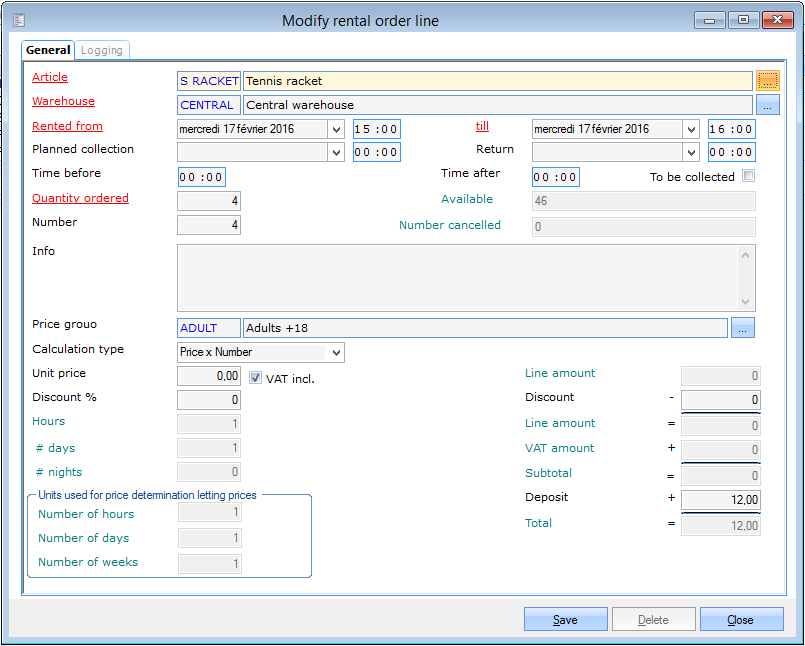 |
In this window you can fill in or modify all details of the rental order line. Most data are taken over from the article card (warehouse, calculation type, price, deposit, ...) of the article to be rented and from the tab General of the rental order (rental period). If you want to, however, you can still change these data here before saving the rental order line. All modifications to the rental order line are logged and can be consulted under the tab Logging.
Price calculation
The tab Price calculation shows the price overview of the current rental order.
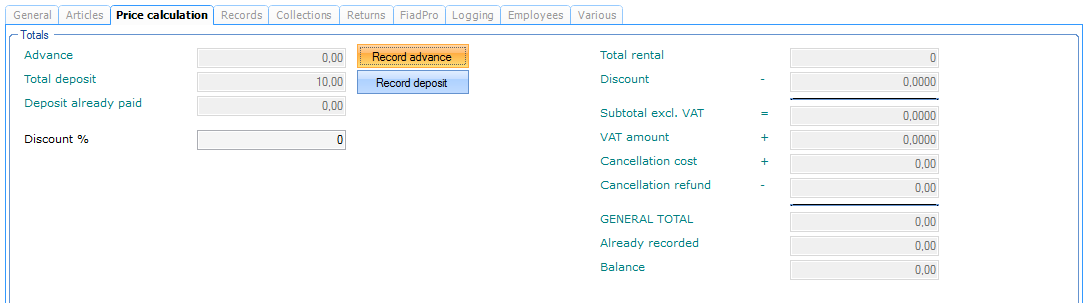 |
In this tab you can also record one or more advances (before the definitive payment) as well as the deposit. It is also possible to apply a discount % on the rental price.
Records
Under this tab you can see all recorded payments of the current rental order. Multiple records are possible, for example as a result of advances or deposits.
 |
Collections
The tab collections shows you which articles of the current rental order have already been collected, partially or completely. If you click on a line in the upper part of the window, the details of that line will appear in the section below.
 |
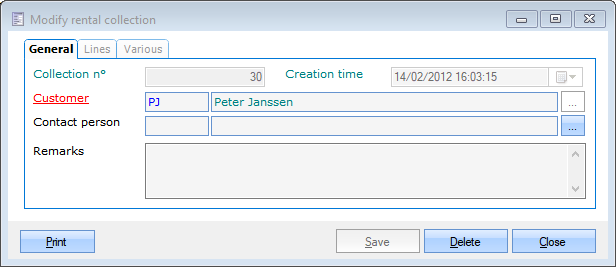
You can also consult the details of a collection by double-clicking on the line in question (or clicking on it followed by <F3>). The window Modify rental collection will appear.
Under the tab General you can see the collection n°, creation time, customer and possibly the contact person who collected the rented articles and remarks.
 |
The tab Lines shows you an overview of the articles that were collected.
 |
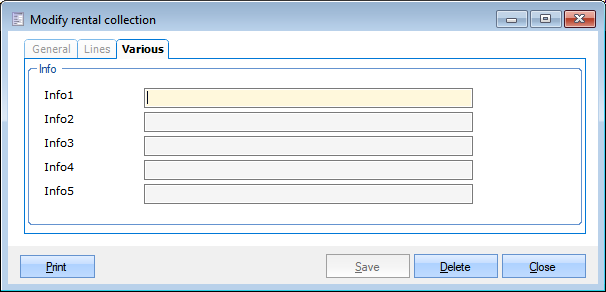
The tab Various gives you the possibility to add extra information about the collection.
 |
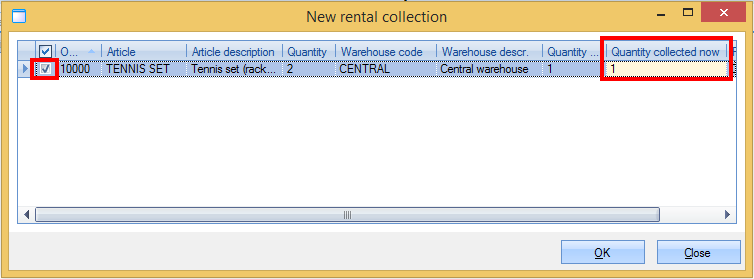
If the rental order has not been completely collected yet, it is possible to add a new collection line by clicking on the right mouse button, followed by New or by hitting the <F2> key. The window below will appear in which you have to tick the article you want to collect and fill in the quantity to be collected now. Then click OK. Finally a window will appear allowing you to specify some more details and to record the collection.
 |
For more detailed information on collecting rental orders, we refer to Collect a rental order(see paragraph Collect a rental order).
Returns
The tab Returns shows you which articles of the current rental order have already been returned (partially or completely). If you click on a rental line in the upper part of the window, the details of the selected line will appear in the section below. These details also show if items are broken and/or need to be repaired.
 |
You can also consult the details of a return by double-clicking on the line in question (or clicking on it followed by <F3>. The window Modify rental return will appear.
Under the tab General you can see the return n°, creation time, customer and possibly the contact person who returned the rented articles and remarks.
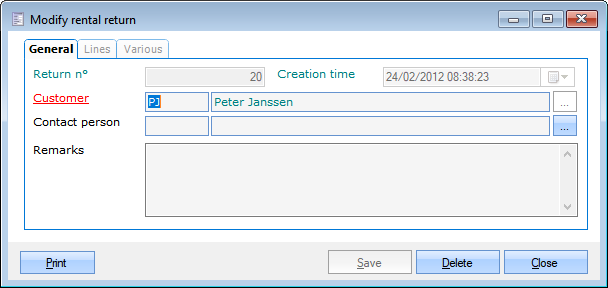 |
The tab Lines shows you an overview of the articles that were returned.
 |
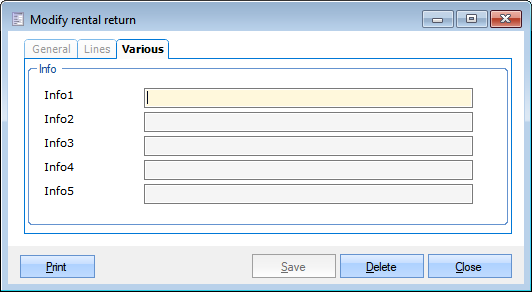
The tab Various gives you the possibility to add extra information about the collection.
 |
If the rental order has not been completely returned yet, it is possible to add a new return line by clicking on the right mouse button, followed by New or by hitting the <F2> key. The window below will appear in which you have to tick the article you want to return and fill in the quantity to be returned now (and if required also the quantity broken and to be repaired). Then click OK. Finally a window will appear allowing you to specify some more details and to record the return.
 |
For more detailed information on returning rental orders, we refer to Return a rental(see paragraph Return a rental order).
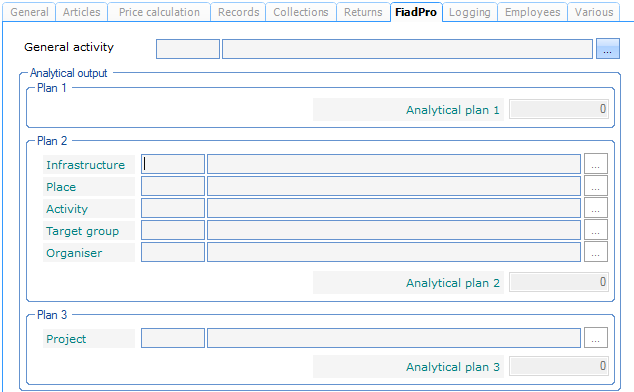
FiadPro
If you, as an organisation work with Global activities AND with the financial export link FiadPro, you can use the tab FiadPro to link a global activity and to consult the analytical output.
 |
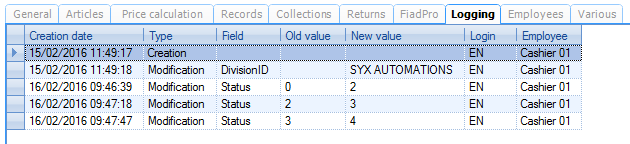
Logging
In the tab Logging all modifications to the current rental order are logged. You can see which modification has been made, when and by whom.
 |
Employees
The tab Employees shows you all employee tasks linked to the current rental order. The look of this tab depends on the parameter setting Use task planning (see chapter Parameters > Employees)
If the parameter setting Use task planning has not been activated, the tab will look as follows:
 |
If you want to add an employee task to the current rental order, you can simply select the desired employee. All employees that can do the default work type for rentals are listed here. (See Employeesmanual 'GENERAL-Employees')
If the parameter setting Use task planning has been activated, the tab will look as follows:
 |
If you want to add an employee task to the current rental order, you can either hit the <F2> key or click the right mouse button followed by New. The window Modify task per employee will appear.
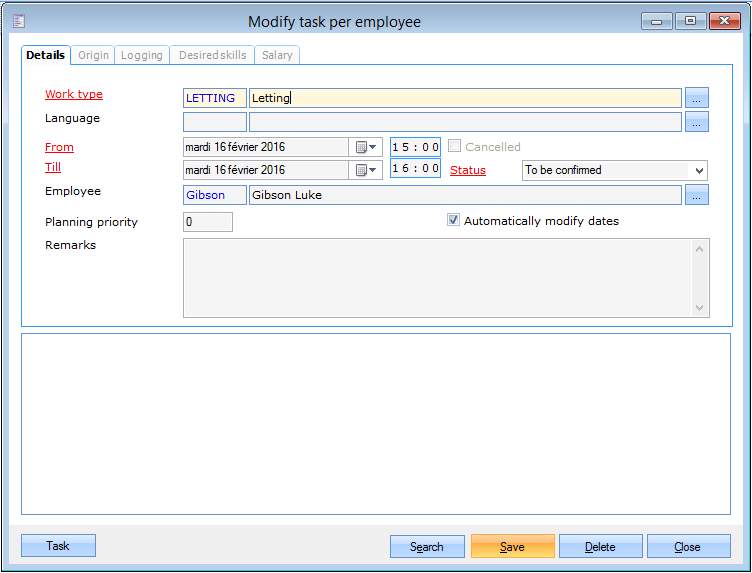 |
In this window you can fill in all details of the employee task in different tabs. For a detailed explanation on employee tasks, we refer to Employeesthe manual 'GENERAL - Employees'.
Barcodes
The tab Barcodes is only available if a barcode has been linked to the rental article in question and if this barcode has effectively been scanned at the cash register when renting the article. Barcodes can be linked on article level under the tab Rental > Barcodes (see ArticlesManual 'GENERAL-Articles').
 |
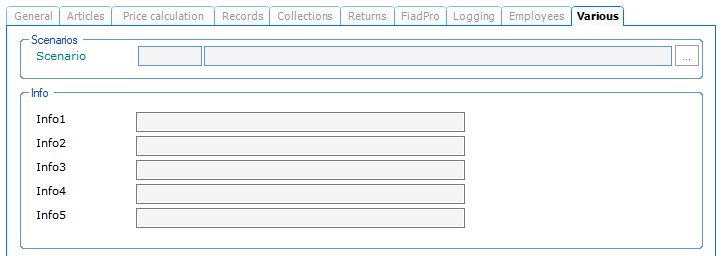
Various
Under the tab Various you can link a scenario to the current rental order and add extra information.
 |
Create a rental series
It is possible to create several rental orders with a fixed frequency in one go. Therefore, you have to tick the setting Create series of rentals in the tab General of the window Modify rental.
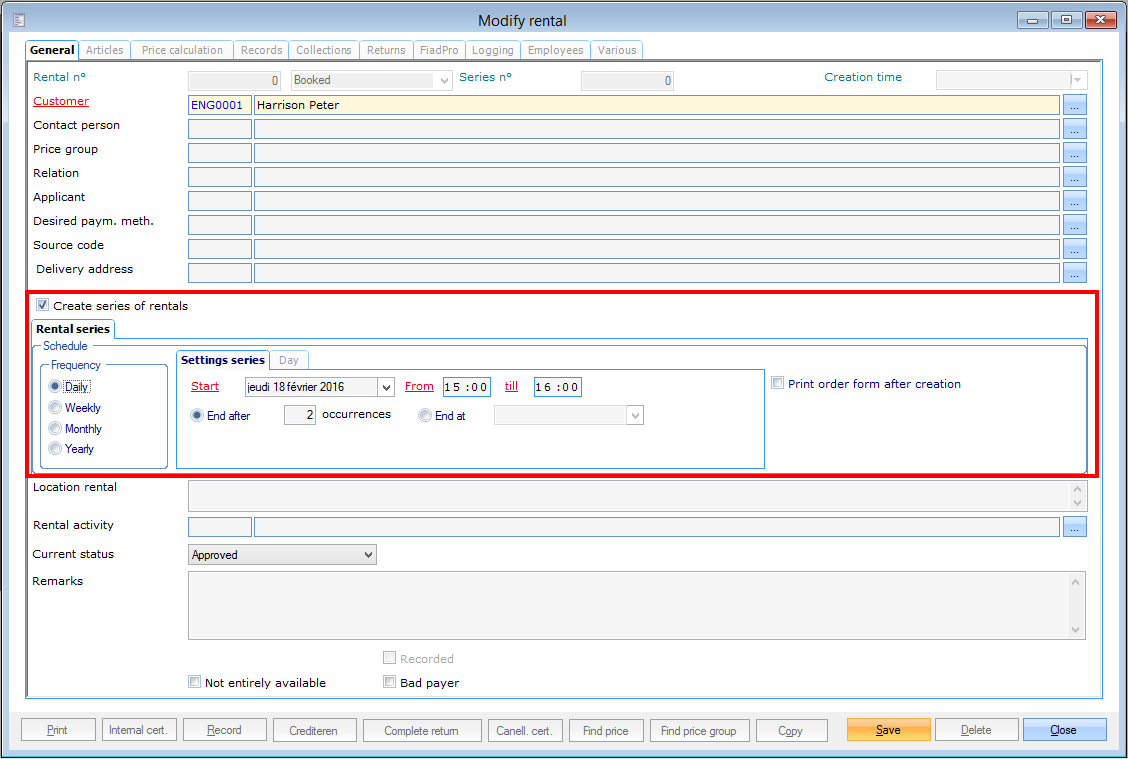 |
The tab Rental series will appear, in which you can fill in the settings of the series and determine the frequency (daily, weekly, monthly, yearly). In this way you can for example make a rental order each Wednesday, from 15.00 pm to 16.00 pm, during a period of one month.
 |
 |
After filling in all details of the rental order (such as choosing the articles to be rented) and clicking the button Save, the window below will appear, listing all rental orders that will be created.
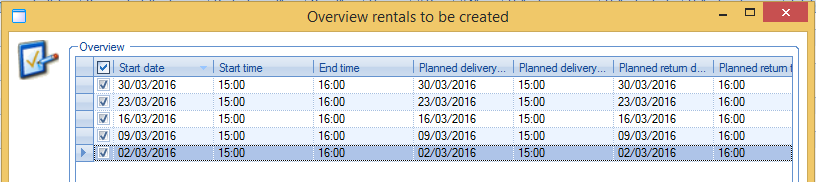 |
In this window you can still exclude rental orders by simply deselecting the box before the desired line. If you click Ok, a confirmation message will appear:
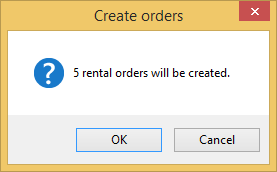 |
After confirmation, all desired rental orders will be created.
Through the overview of rental orders
Go to Rentals > Orders.
An overview of rental orders will appear (by default those with order date of today). In the section below, you can see the details of the selected order line.
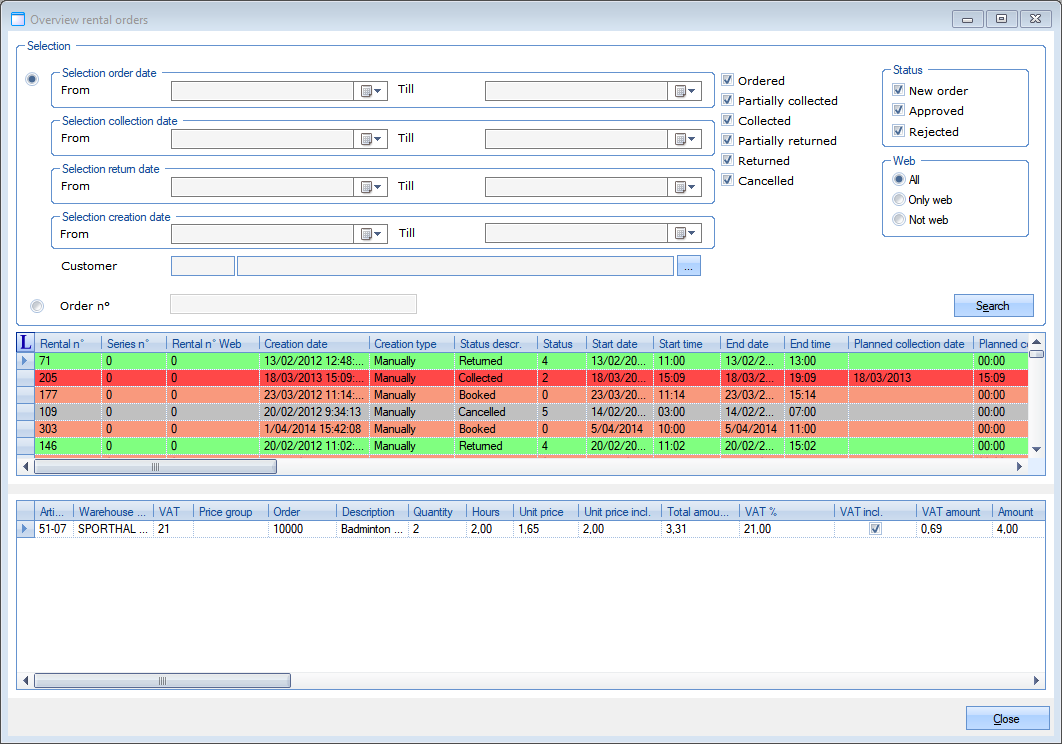 |
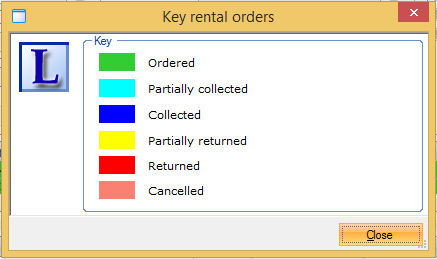
The rental orders are marked in a colour according to their status (the key can be consulted by clicking on  ).
).
 |
In addition to searching for existing rental orders (based on certain selection criteria you can specify in the upper part of the window), this window also allows you to create a new rental order, by clicking on the right mouse button in the overview, followed by New or by hitting the <F2> key.
The window Modify rental will appear in which all rental data can be entered (in the different tabs). See previous chapter (Make a rental order > Through the graphic rentals overview).
Through the Recreatex POS system
It is possible to register a rental order through the POS system by simply selecting the desired rental article to be rented on the cash register screen.
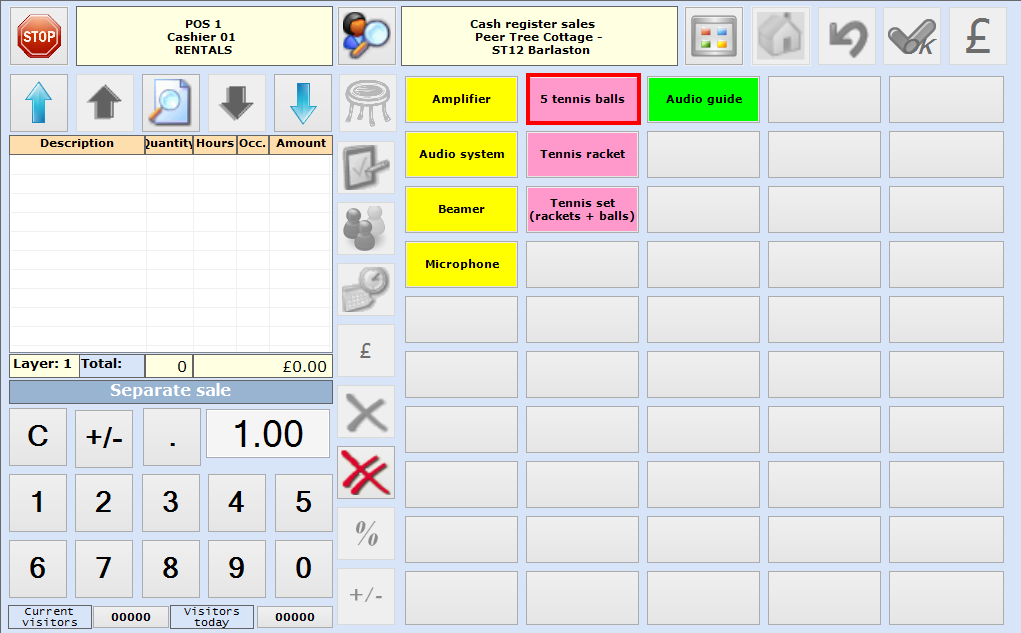 |
If the desired rental article is not on the menu or cannot immediately be found, it is still possible to look for the article using the extra POS functions.
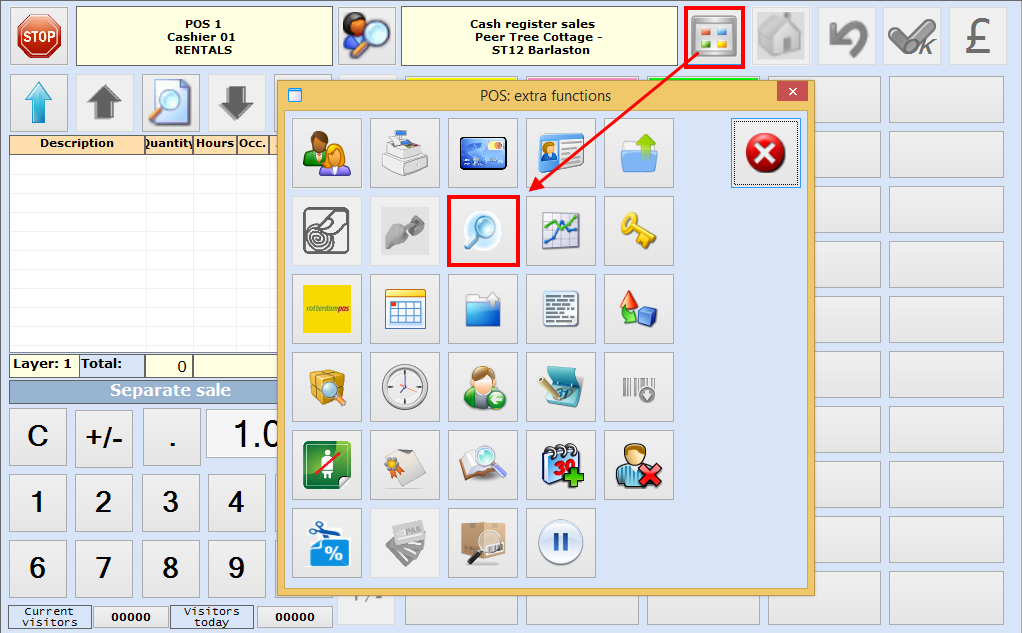 |
After selecting the desired rental article and the customer (dependent on the settings on point of sale level this may be mandatory), you can continue ordering the rental article. Dependent on the POS setting Manual price group determination (see POS- UseManual 'POS-Use'), there are two ways to register a rental order.
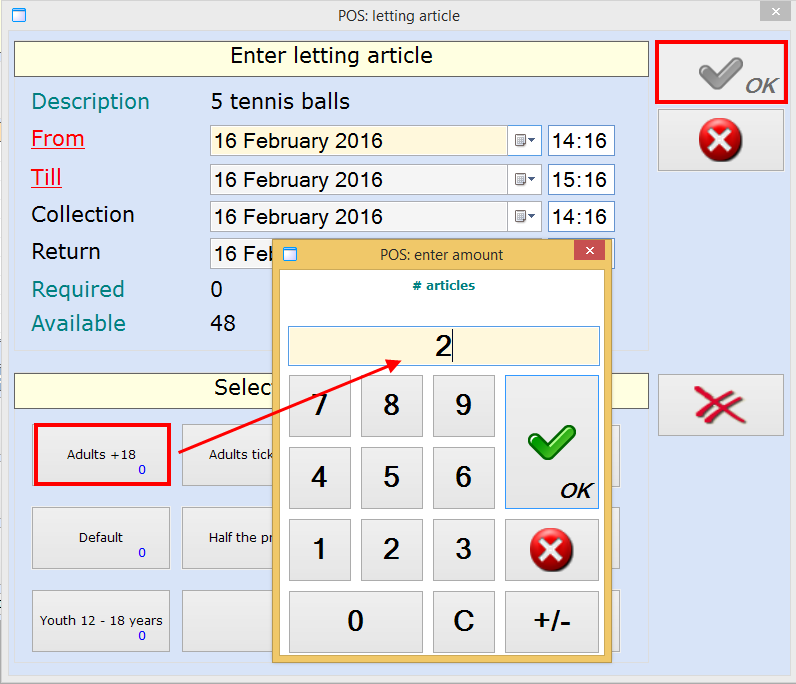
If the setting Manual price group determination is not active:
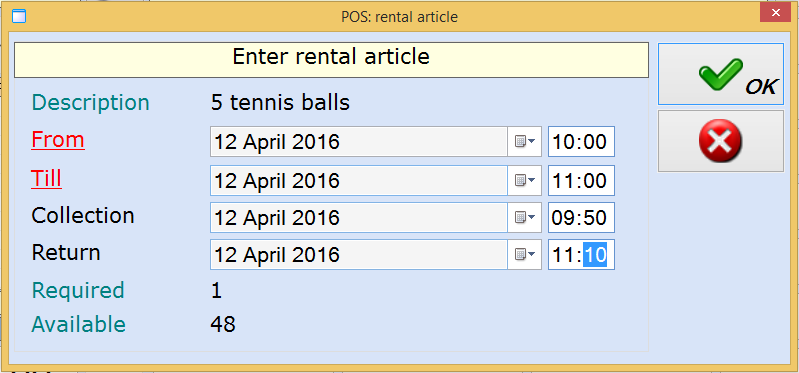 |
The window above appears in which you can fill in the rental time (the default rental duration is taken over from the article card but can still be changed if you want to). If the setting Ask for collection/return time on point of sale level is active, you will also be able to fill in the planned collection and return times. If this setting is not active, these fields will simply not be available.
The required and available quantity of the article to be rented are also shown informatively. The quantity to be rented cannot be changed here. You can do this after clicking the OK button, in the selection window of the cash register.
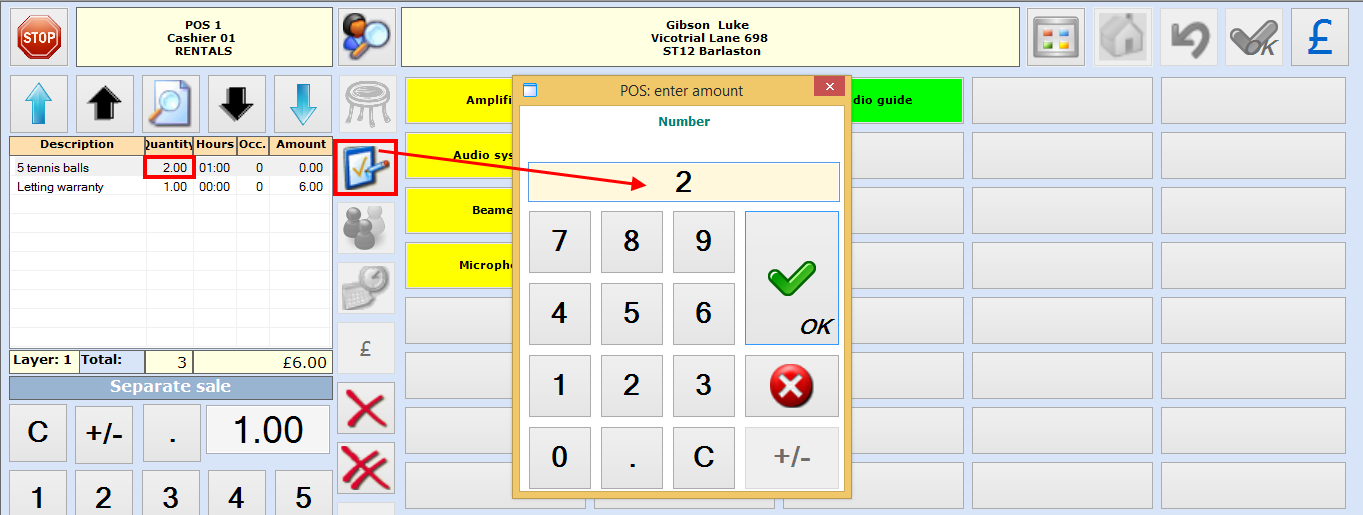 |
Afterwards the rental order can be processed further through the POS system.
If the setting Manual price group determination is active:
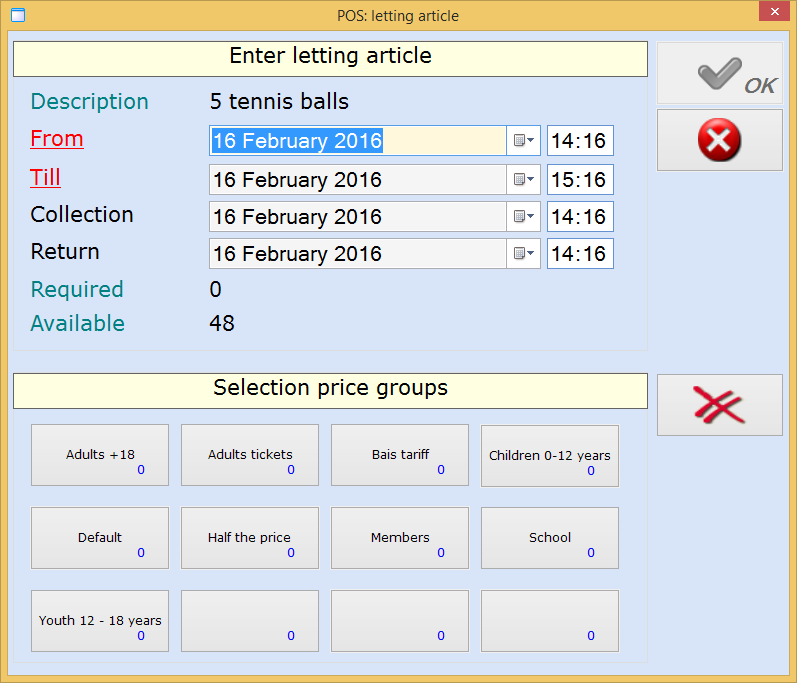 |
The window above appears in which you can specify the rental period (dependent on the setting Ask for collection/return time on point of sale level also the collection and return date) and the quantity to be rented per price group. Simply click on the correct price group and fill in the quantity. Then click OK.
 |
Afterwards the rental order can be processed further through the POS system. For more information on processing rental orders through the POS system, we refer to POS - Usethe manual 'POS - Use'.
Through the Recreatex Web Shop
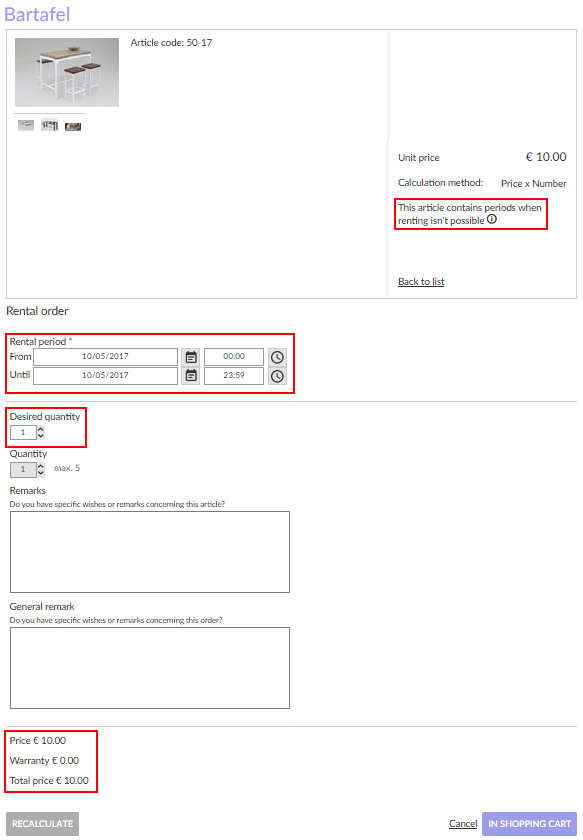
Another method to register a rental order is through the Recreatex Web shop. This kind of registration is performed by the customer himself, but in fact the same rental order is created in Recreatex, as is the case with the other methods for creating a rental order.
 |
Select the article you want to rent, fill in the rental period and possibly the planned collection and return dates. Choose the quantity you want to rent and, if required, add additional remarks.
When Invalid periods have been configured for this article, a message will appear, stating that 'This article contains periods when renting isn't possible'. Clicking on the information icon  will produce a pop-up message with details when the article is not available.
At the bottom of the web page, you can see the price overview of the rental order.
 |
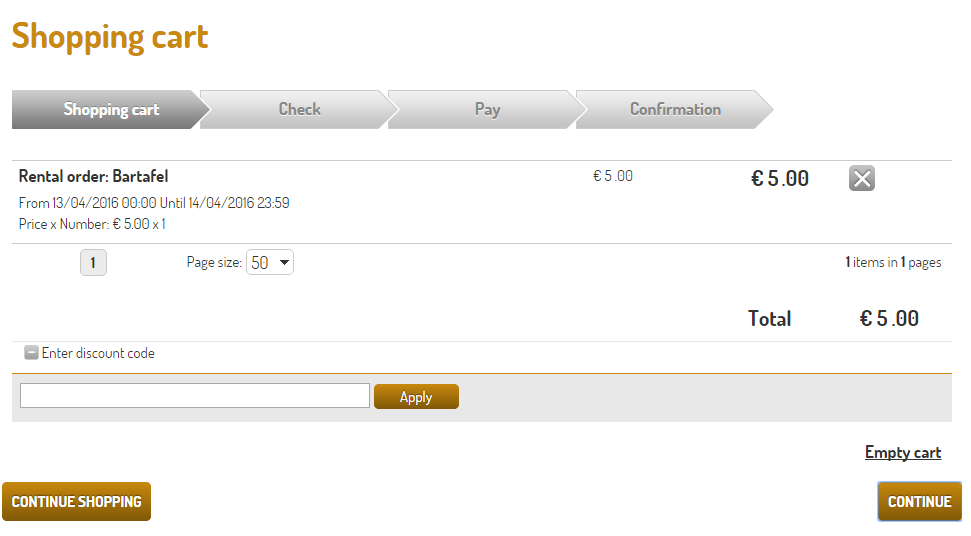
Continue by clicking on the button In shopping cart and finalise the order by running through the payment process.
 |
After completing the online rental order, the rental order will be available in Recreatex, for example in the overview of rental orders.
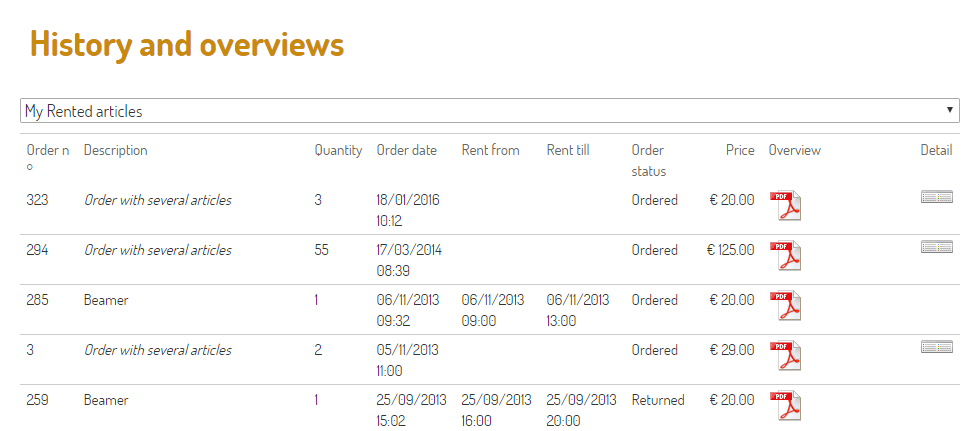
The Recreatex web shop also allows the customer to consult his/her rentals by going to My profile > History and overviews > My rented articles. A list will appear containing all of the customer's rental orders with the order status.
 |