Parameters
Under General > Parameters you can configure the basic Recreatex parameters.
The window with the general parameters consists of multiple tabs:
Addresses
In the tab Addresses, you can configure basic parameters for new customers.
Details
In the tab Details you can specify general parameters for all new customers.
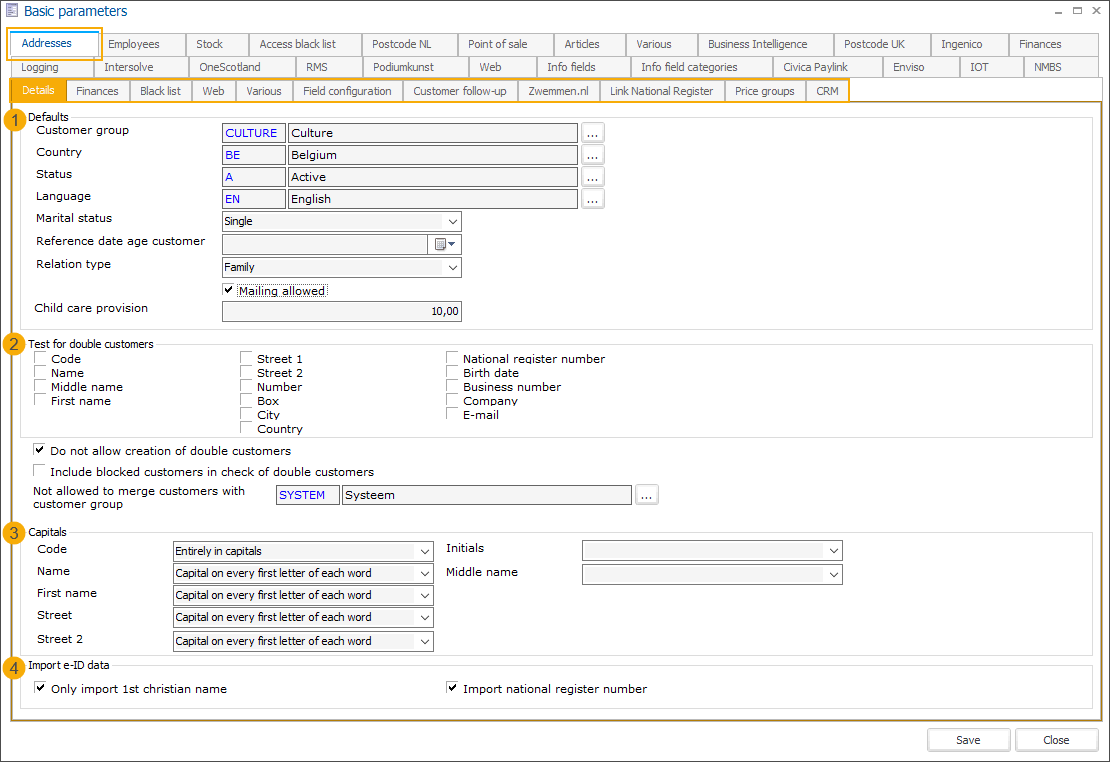 |
The section Defaults (1) allows you to determine the default parameters that will be pre-filled automatically in the address card when creating a new customer.
Customer group | Choose to put all newly created customers automatically in a specific customer group. |
Country | If you add new customers, this country code will be linked by default. For more information about countries, see Countries. |
Status | New created customers will automatically be given the predefined status. |
Language | Choose which language will be linked to new customers by default. For more information about languages, see Languages |
Marital status | This is the marital status that will be linked to new customers by default. Possible marital statuses are:
|
Reference date age customer | The calculation of the customer's age will be based on the date selected here.
|
Relation type | Choose the default relation type of new customers. Possible relation types are:
|
Child care provision | This parameter is specific for the module Childcare and determines the default value that will be attributed to all new Recreatex customers (tab After-school child care on the customer card). |
Mailing allowed | Determine whether the mailing is automatically allowed or not for all new customers. |
In the section Test for double customers (2), you can determine which criteria the system has to take into account when saving a new customer or when merging customer data.
If you specify the criteria here but do not configure the option Do not allow creation of double customers, the system will still perform the check but only display a warning, informing that the customer with this data already exists. You can choose to switch to the existing customer or discard the warning and create a new customer anyway.
Do not allow creation of double customers | With this option you prevent the creation of double customers, taking into account the specified criteria. ImportantIf you use this option without specifying any criteria the system will create double customers without warning. |
Include blocked customers in check of double customers | Check for double customers will also be executed on blocked customers
|
Not allowed to merge customers with customer group | Specify a customer group to which you assign system-critical customer accounts in order to exclude them when merging customer data. |
In the section Capitals (3), you can determine how capitalization should be applied in the fields Code, Name, First name, Street, Street 2, Initials and Middle name.
Select Entirely in capitals or Capital on every first letter of each word - the text you type in will be formatted accordingly even if you type in lowercase.
No option selected - the text you type will be saved unchanged.
In the section Import e-ID data (4), you can determine what data should be imported when reading out an electronic ID of a customer (license Integration with eID required).
Only import 1st christian name | Select to only import the 1st first name of the customer or leave unchecked to import all first names. |
Import national register number | Possibility to import the national register number. |
Finances
The tab Finances allows you to determine all financial parameters for new customers.
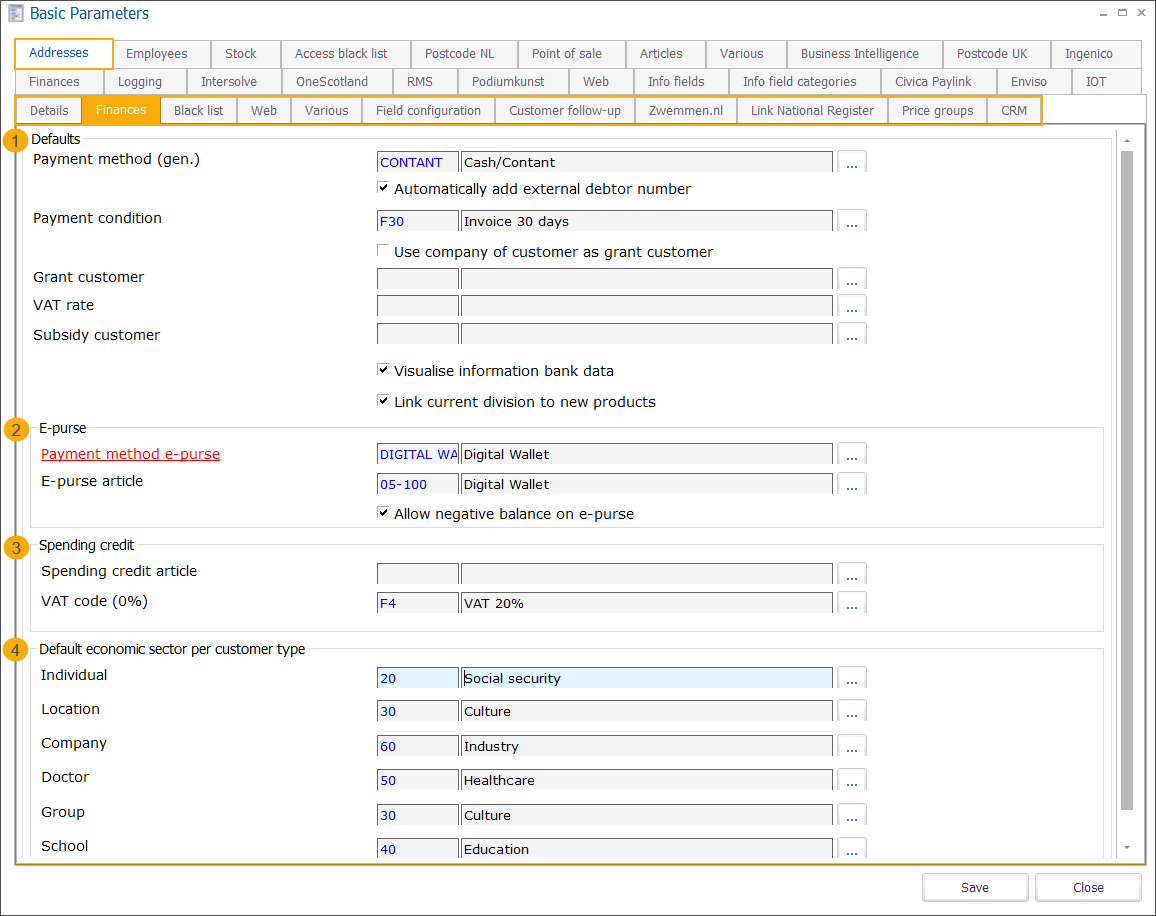 |
Section Defaults (1):
Payment method (gen.) | Select a default payment method. |
Automatically add external debtor number | Select this option to create an external debtor number automatically after saving a new customer. You can find the external debtor number on the customer card, in the tab Finances. |
Payment condition | Determine which payment condition new customers have to respect if they receive invoices. |
Use company of customer as grant customer | If you select this option and if you fill in a company on the customer level (Address card, tab Relations), this company will also be indicated as grant customer (providing financial intervention). |
Grant customer | This is the default customer that will pay the grant of new customers. |
VAT rate | Select the default VAT rate for all customers. For more information about VAT rates, see VAT rates |
Subsidy customer | This is the default customer that will pay the subsidy of new customers. |
Visualise information bank data | When this option is not selected, the account number, IBAN and BIC will be anonymized and shown as "*****". |
Link current division to new products | When this option is selected, the current division will automatically be assigned upon saving a new article (article card > tab Finances). |
In the section E-purse (2), you can set up the default settings for e-purse processing.
Payment method e-purse | Here you have to select the payment method for payments of the type e-purse. |
E-purse article | The financial (fictive) article on which payments of the type e-purse are counter-entered in case the e-purse is devalued. This is required because otherwise both, the purchase of and the payment with e-purse amounts would be registered as revenues. |
Allow negative balance on e-purse | Determine whether it is allowed to have negative e-purse balances in Recreatex or not. |
The section Spending credit (3), allows you to set up the default settings for spending credit processing.
Spending credit article | The financial (fictive) article on which payments of the type spending credit are counter-entered. This is required because otherwise both, the purchase of and the payment with purchase credit would be registered as revenues. |
VAT code (0%) | When using spending credit as a payment method VAT is never charged. As in Recreatex it is possible to create several 0% VAT codes, here you can determine which 0% VAT code should be linked to the spending credit. |
The section Default economic sector per customer type allows you to specify the default economic sector for each customer type: individual, doctor, location, group, company and school. When you select a customer type in the tab Details on the customer address card and save the record, the default economic sector will be automatically filled in in the tab Finances.
Black list
In the tab Black list you can determine the parameters for fingerprint identification and blacklist configuration.
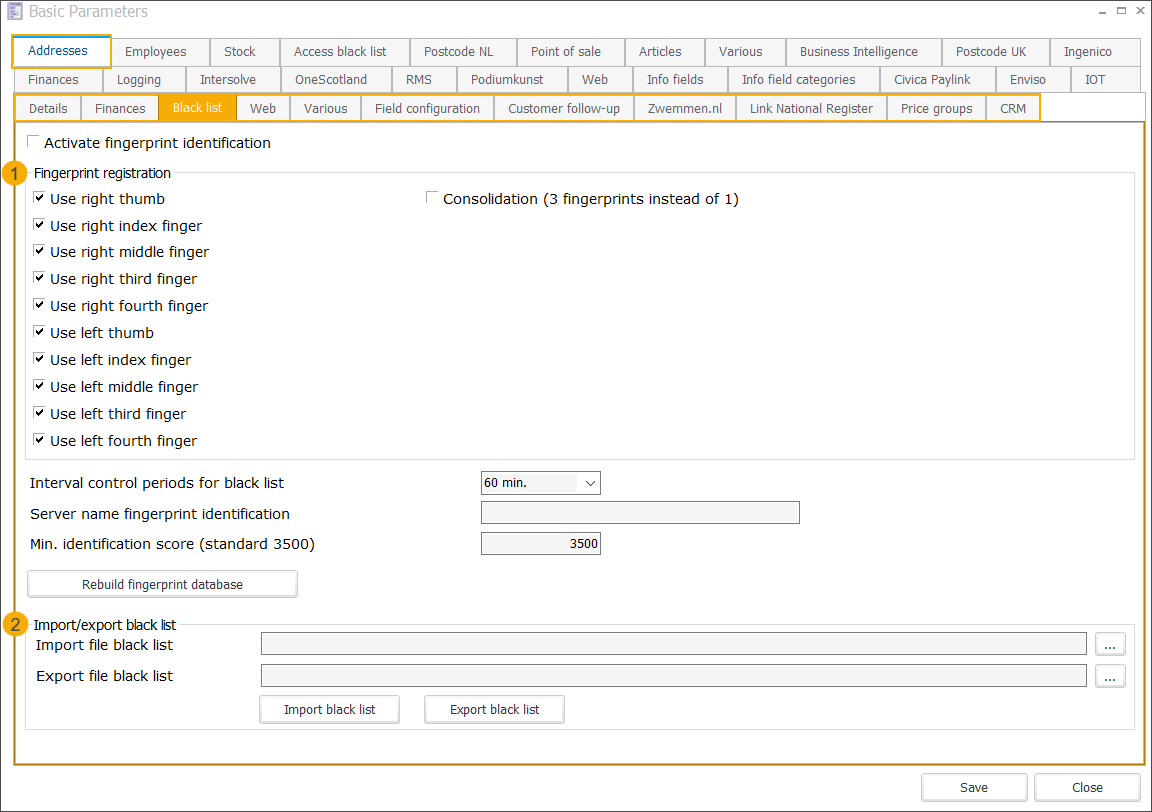 |
To be able to work with fingerprint identification, the option Activate fingerprint identification has to be selected.
In the section Fingerprint registration (1) select the fingers that will be used for identification by default. You can also indicate whether the identification should happen by means of 3 fingers instead of 1 by selecting the option Consolidation (3 fingerprints instead of 1).
Interval control periods for black list | Indicates, how detailed the graphical visualisation of the black list control period should be. Current options are per 5, 6, 10, 15, 30 or 60 minutes. A control period for the blacklist can be specified on the article card, under the tab POS. The control period interval then determines how detailed the time frames are visualized in the tab Graphic. |
Server name fingerprint identification | Fill in the name or IP address of the server. If this field is empty, the local PC is used as the identification server. In such case, the software key has to be installed on this PC, or you can use a MSO300 reader with a built-in identification license. |
Min. identification score (standard 3500) | Indicates the minimum score needed to be identified as a person on the blacklist. 3500 is the standard score. The score can be raised/lowered in order to increase/decrease the access conditions. Advantages and disadvantages always have to be well considered. |
Rebuild fingerprint database | Click this button to rebuild the database on the server specified above. This is a work database for the ActiveMKit_Matcher component (for identification), containing all fingerprint templates of the persons that are currently on the blacklist. This database will first be completely emptied and then all templates of the blacklist will be added one by one. It is important to execute this functionality at least once, before each new installation. You may do so before or after the registration of the first fingerprints. Afterwards, the database does not have to be rebuilt again since the registration or deletion of fingerprints is treated incrementally. If you encounter problems, you can always rebuild the fingerprint database. Make sure that no POS sales with fingerprint registration are done during the rebuild. You can avoid this by temporarily deactivating the fingerprint identification. |
In the section Import/export black list (2) you can determine to which location you want to export an overview of the blacklist, as well as to which location you want to import a certain blacklist.
Import file black list | Specify the location (path) of the blacklist file you want to import. |
Export file black list | Specify the location (path including the file name) to which you want to export the blacklist file. |
Import black list | Click this button to import the blacklist from the specified location. |
Export black list | Click this button to export the blacklist to the specified location. |
Web
The tab Web allows you to determine whether a Web ID and/or password have to be created automatically after saving the new customer's record.
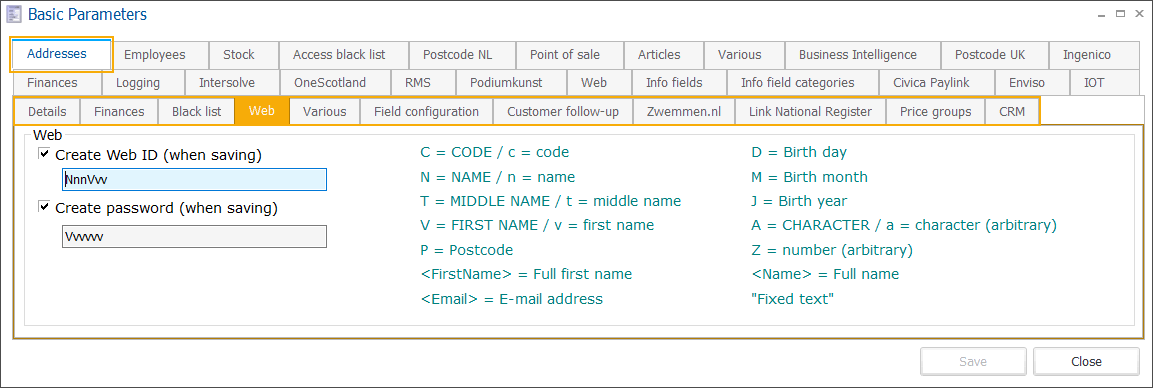 |
You can define the structure of the WebID and/or password using the on-screen legend.
If you choose for example to create the Web ID following the structure NNDDMMJJJJ"web" the Web ID will be composed of the first two letters of the name (in capitals), followed by the first two digits of the birth date, the first two digits of the birth month and the four digits of the birth year, followed by the word "web".
So if your customer's name is Bert Janssen who was born on 12/01/1964, his automatically created Web ID will be JA12011964web.
Automatically created Web ID and password are available on the customer address card, under the tab Web in the fields Web user name and Web password.
Various
In the tab Various, you can define some extra parameters that will influence the customer configuration in Recreatex.
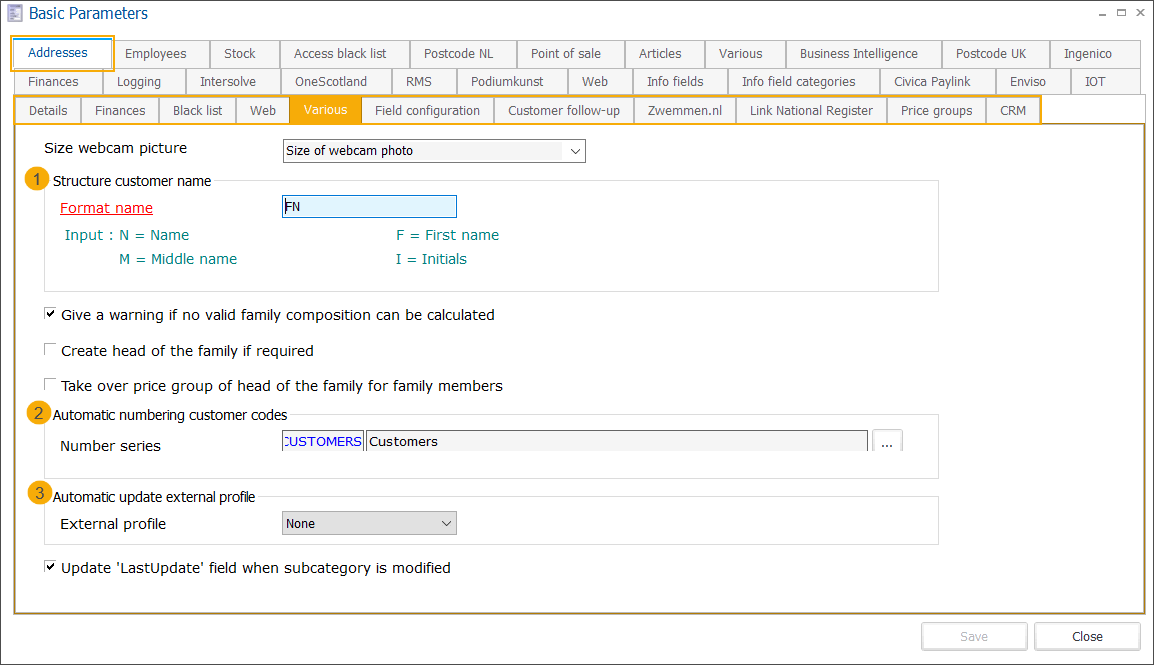 |
Size webcam picture | You can add a picture of a customer using a webcam. There are 2 formats you can choose from:
| |
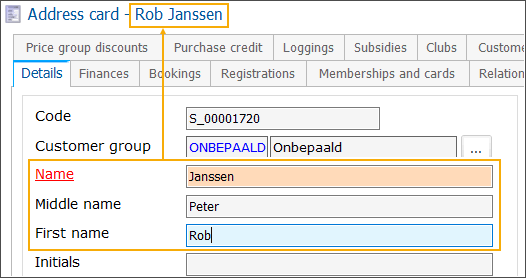
Format name | In the section Structure customer name (1) define the structure of the customer name as it should be displayed in different places in Recreatex, e.g. in the window header of a customer address card or when printing certain tickets. Use the on-screen legend to define how the customer name should be displayed. If you format the name e.g. as "FN", the customer name will be displayed as First name Last name:
| |
Give a warning if no valid family composition can be calculated | Indicate whether a warning has to be given if no matching family composition can be found when creating a new customer. For more information on family compositions, see Family compositions and Relations | |
Create head of the family if required | This setting applies when creating a new customer account online or via the POS. | |
Take over price group of head of the family for family members | With this setting activated, the price group of the head of the family will have priority over the predefined default price groups. | |
Number series | In the section Automatic numbering customer codes (2), specify a predefined number series structure that should be applied automatically to generate customer codes when creating new customers. For more information, see Number series. | |
External profile | In the section Automatic update external profile (3) you can indicate with which external party the profile should be updated if any changes are done to a Recreatex profile. This setting is a part of a configuration that allows updates of profiles at external parties Zwemmen.nl and Bloso. | |
Update 'LastUpdate' field when subcategory is modified | With this setting active, whenever you modify the subcategory on the customer address card in the tab Details or select/deselect categories in the tab Subcategories, the field Last update in the Customers overview table will be updated with the date and time of the update. This is necessary when using the API functionality to find a person based on category/subcategory. |
Field configuration
If you use the simplified customer selection window at the POS this tab allows you to specify all visible, mandatory and editable fields per customer type (individual, group and company).
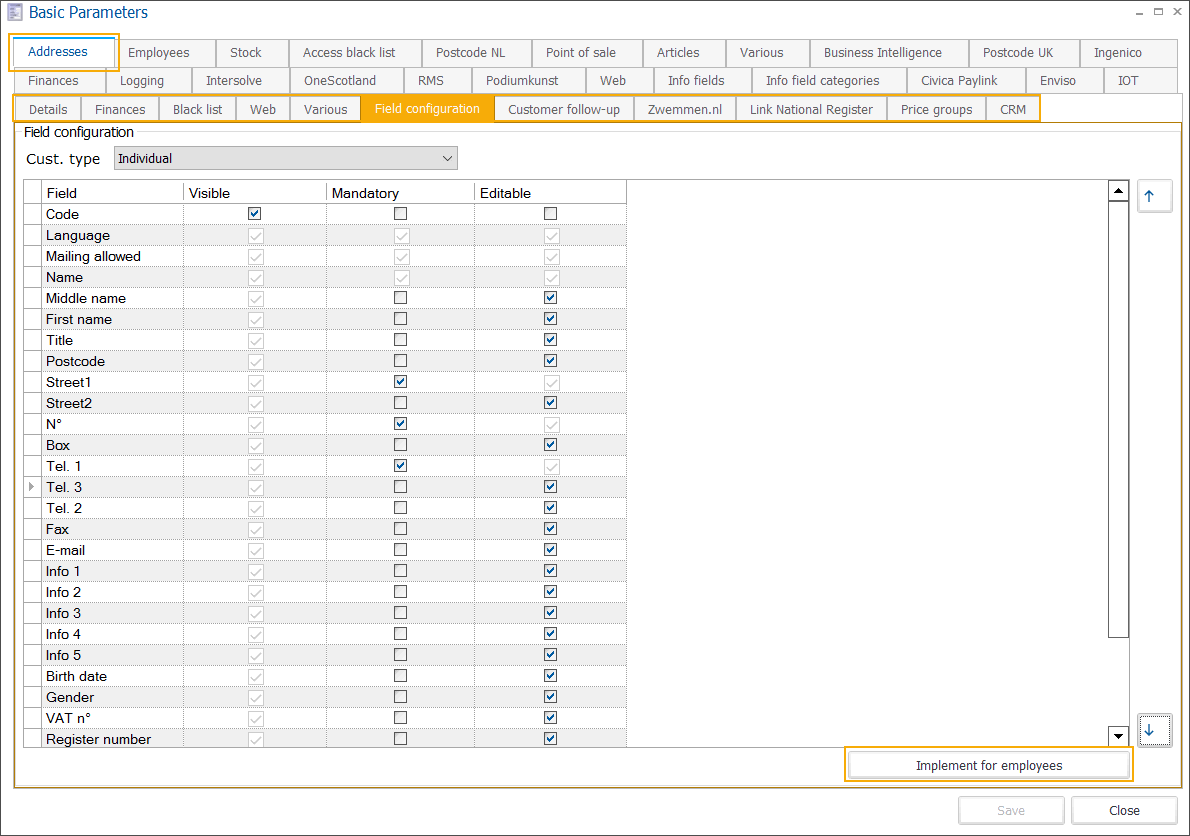 |
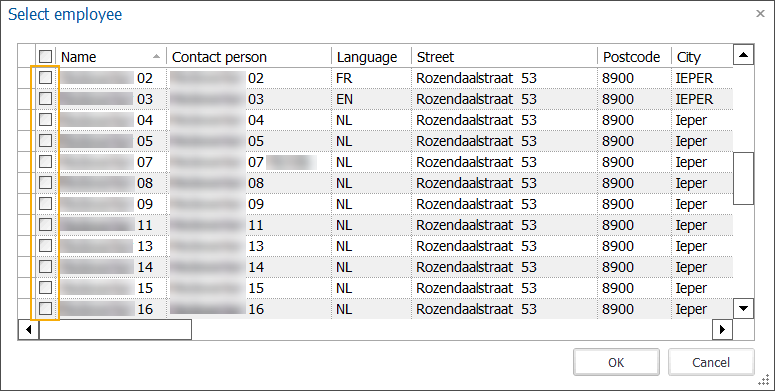
Click the button Implement for employees to apply the field configuration to the selected employees.
 |
Note
The field configuration setting can also be defined per employee on the employee card, under the tab Cashier data > Customer Selection.
Customer follow-up
In the tab Customer follow-up you can choose to link the customer follow-up to the employee task planning.
 |
The configuration of the customer follow-up parameter determines how you set up the customer follow-up on the customer address card (tab Customer follow-up).
Plan customer follow-up for employees (1) |
|
Use task planning (2) |
|
Default work type (3) | Select the default work type for customer follow-up. This work type contains a list of employees that have been selected for this type of customer follow-up assignments. |
Zwemmen.nl
The RCX WebshopID must be filled in to enable the updates of external user profiles via the zwemmen.nl webservices.
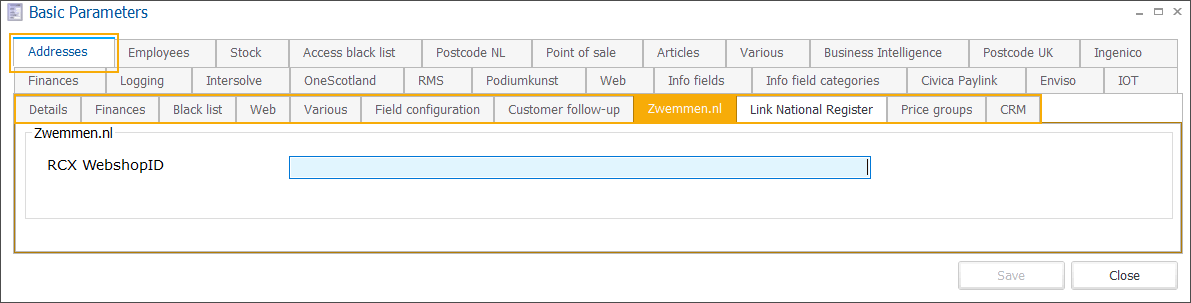
See also the section Automatic update external profile in the tab Various.
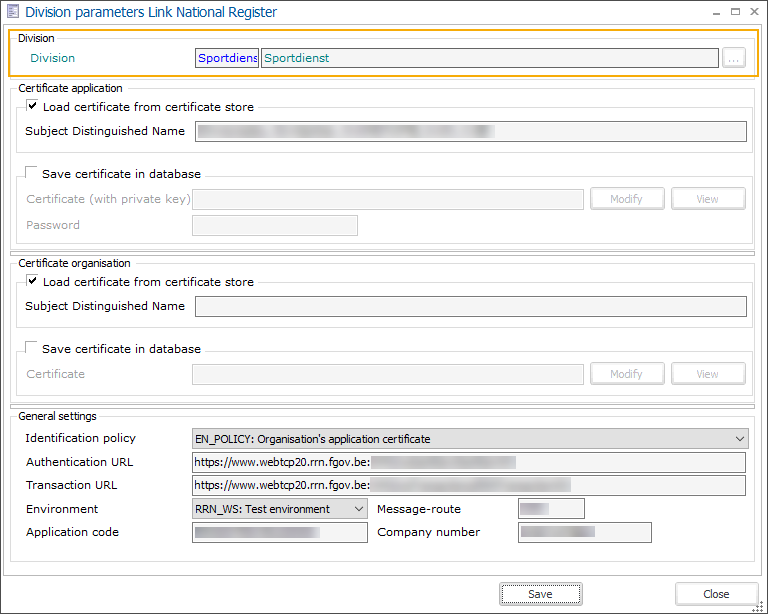
Link National Register
In this section, you enter the settings necessary when setting up the connection with the National Register (BE).
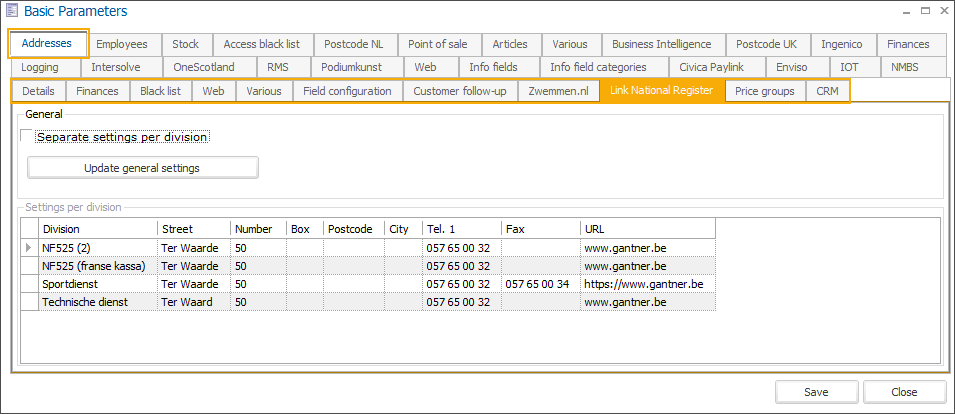
A separate setup can be provided per division.
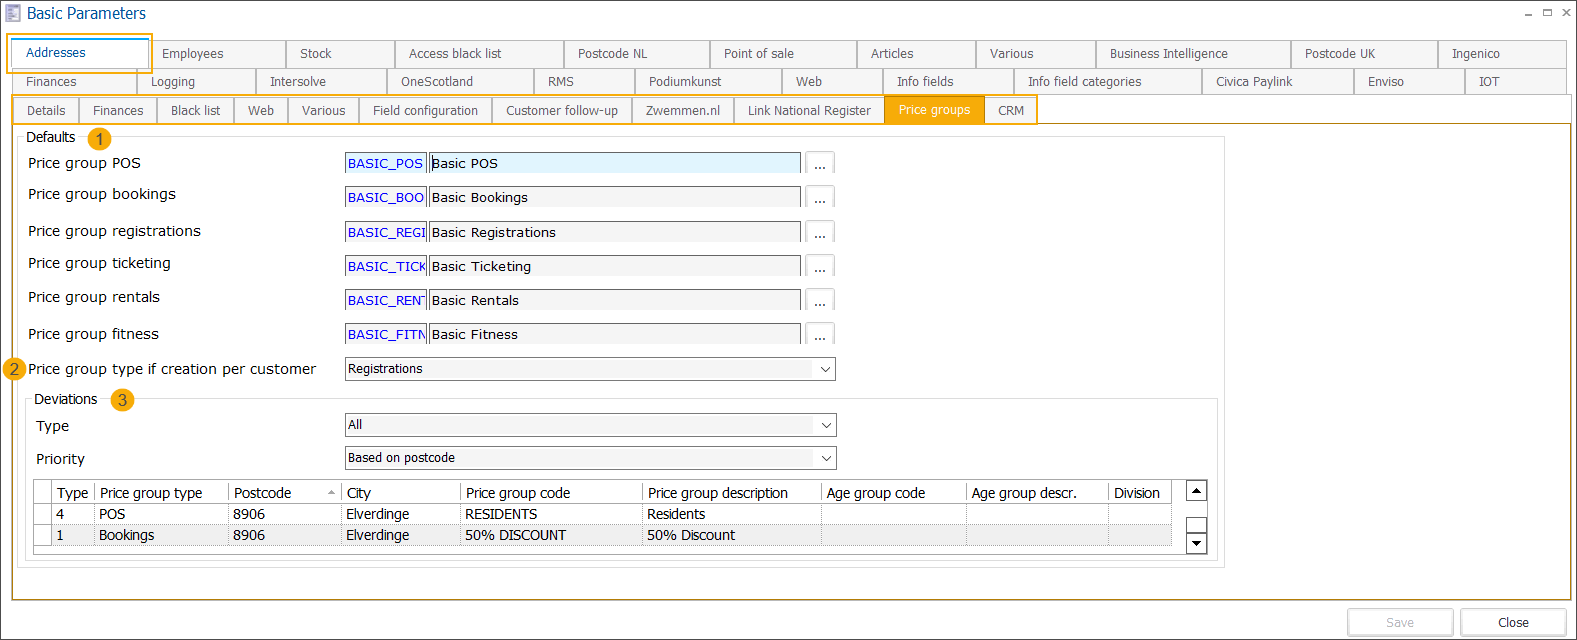
Price groups
In the tab Price groups determine default price groups and deviations that will be applied for new customers on sales transactions within the related modules, if there are no price group settings specified on other levels (e.g. customer or article).
Price group POS | This default price group will be respected in case of sales at the POS. The module POS is required. |
Price group bookings | This default price group will be respected when bookings are made. The module Bookings is required. |
Price group registrations | This default price group will be respected when customers register for an activity. The module Registrations is required. |
Price group ticketing | This default price group will be respected for ticketing sales. The module Ticketing is required. |
Price group rentals | This default price group will be respected when renting articles. The module Rental is required. |
Price group fitness | This default price group will be respected when booking fitness activities. The module Fitness is required. |
Price group type if creation per customer (2) | Here you can specify what type of price group should automatically be pre-filled when creating a new customer price group per customer on the address card (tab Price groups):
|
In the section Deviations (3) you can define exceptions to the default price groups. The price group deviation can be based on age, postcode or a combination of these 2 parameters.
To create, modify or delete price group deviations use the available framework functionality.

Postcode | Select a postcode to create a price group deviation for residents from a certain area. For more information, see Postcodes. |
Age group | Select an age group to create a price group deviation for a certain age category (e.g. 55+ or under 18) |
Price group | Select the price group which will apply to the deviating group of customers |
Division | Specify a division if applicable (e.g. if you have multiple divisions). |
Type | Select a price group type to which the price group deviation applies. Depending on the Recreatex module(s) you use, you can choose:
|
All deviations are displayed in a table overview with the possibility to filter per price group type and/or priority (based on postcode or age).
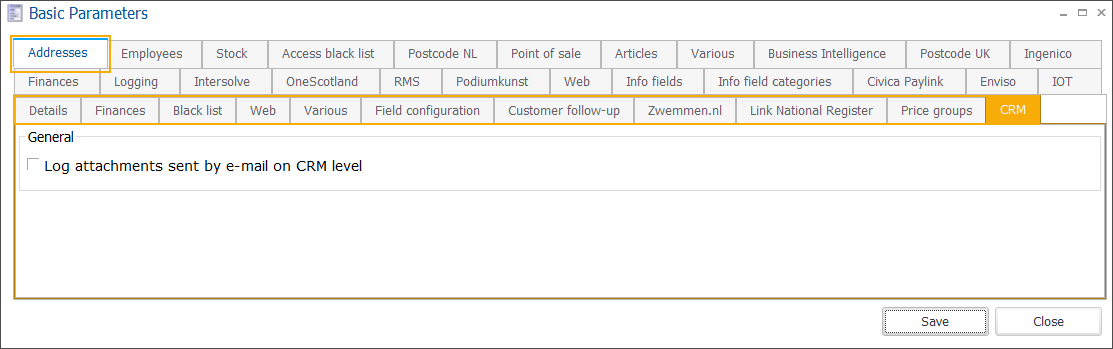
CRM
The CRM parameter allows you to choose whether you want to keep attachments sent by e-mail from Recreatex or not.
If the option Log attachments sent by e-mail on CRM level has been activated, all emails and attachments will be saved and available on the customer address card, under the tab CRM
Note
Activating this function may negatively affect the performance of your database.
Employees
In the tab Employees, you can define the basic parameters for creating, managing and deactivating employees' accounts and set the default parameters for employee task planning.
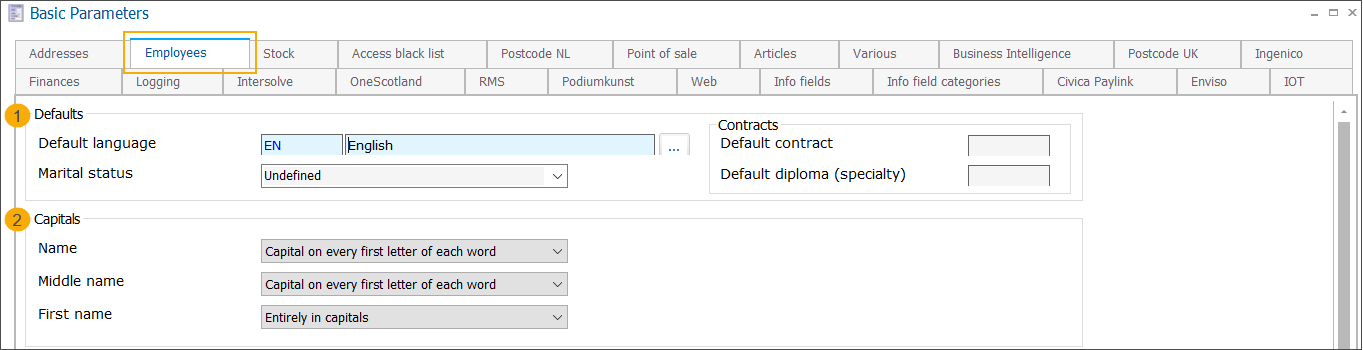 |
Section Defaults (1):
Default language | Choose which language will be linked by default to new employees. |
Marital status | Select the marital status that will be linked by default to new employees.
|
Default contract | The contract type you define here will be preselected when creating the actual contract for an employee in the module Employees, under the tab Contracts. |
Default diploma (specialty) | A specialty is always linked to a type of diploma (degree) that the employer may require for the type of job involved. If you define a default specialty here, the field Diploma will be pre-filled with the combination of the specialty and the linked diploma type when creating a contract for an employee in the module Employees (tab Contracts). For more information about diploma types, see Employees > Settings > Diplomas. |
In the section Capitals (2), you can determine how capitalization should be applied in the fields Name, Middle name and First name.
Select Entirely in capitals or Capital on every first letter of each word - the text you type in will be formatted accordingly even if you type in lowercase.
No option selected - the text you type will be saved unchanged.
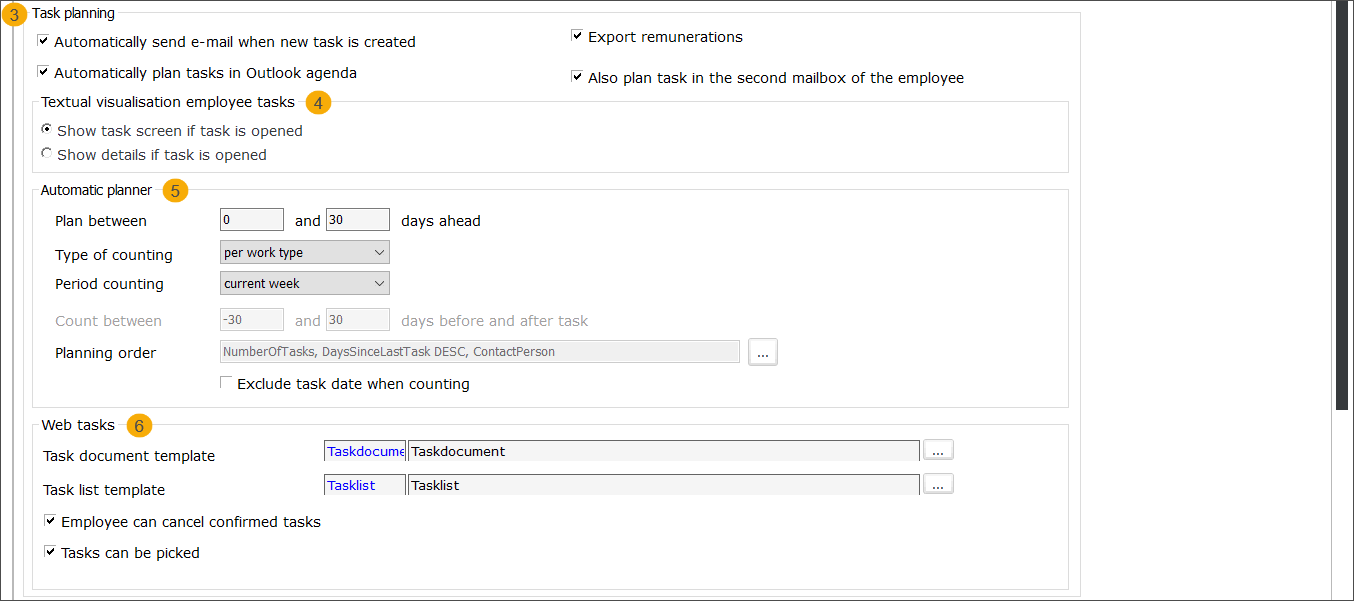
In the section Task planning (3), you can determine if an e-mail has to be sent automatically to the employee when a new employee task is created and if the created task has to be planned automatically in the employee's Microsoft Outlook agenda.
Automatically send e-mail when new task is created | Determine whether an e-mail has to be sent automatically to the employee in question when a new employee task has been created. |
Automatically plan tasks in Outlook agenda | Determine whether the created task has to be planned automatically (added, changed, deleted) in the employee's Microsoft Outlook agenda. The employee must have a Microsoft Office account and email filled in on the employee card in the field Email (tab Personal data). |
Also plan task in the second mailbox of the employee | If the employee has a second email available or your company uses a shared Outlook agenda for employees, you have the possibility to add the created task to the second agenda as well. NoteThis option is only available when the option Automatically plan tasks in Outlook agenda is active and the employee has a Microsoft Office email filled in on the employee card in the field Email2 (tab Personal data). |
Export remunerations | If remunerations are set up and applied for employee tasks you can choose to export them. For more information, see Remunerate employee tasks. |
Subsection: Textual visualisation employee tasks (4) Here you can choose what you prefer to see when opening a task in the textual visualisation of employee tasks. | |
Show task screen if task is opened | Opens the detail of the actual task. |
Show details if task is opened | Opens the detail of the assignment (e.g. exhibition or file) for which the task has been created. |
Subsection: Automatic planner (5) Define the parameters for the automatic task planner. | |
Plan between x and x days ahead | Taking the current date into account, you can define how far ahead should the planning be made. |
Type of counting | The tasks can be counted:
|
Period counting | Tasks already done by the employee, counted over the specified period:
|
*Count between x and x days before and after task | Has to be filled in when days until task* has been selected as Period counting option |
Planning order | Define which criteria and in which order should be applied to sort the employees. The first employee in the list will be the first one used by the automatic planner. 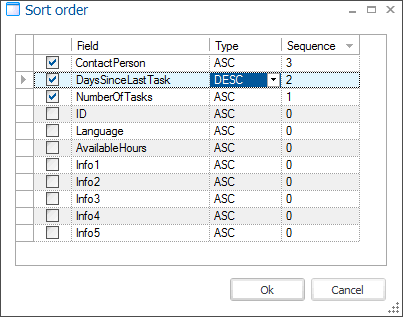 The default sorting order: Number of tasks, Number of days since the last completed task (descending), Employee name (alphabetic). NoteWhen sorting employees the following settings on work type and/or workgroup level will be taken into account as well:
|
Exclude task date when counting | Select this option to start counting from the date after the task has been completed. |
Subsection: Web tasks (6) Set up parameters for the online guide planning application. | |
Task document template | Provide a Word template to print the task detail using a customized layout. For more information on how to create a template, see Ticket templates |
Task list template | Provide a Word template to print the task list using a customized layout. For more information on how to create a template, see Ticket templates |
Employee can cancel confirmed tasks | When selected, an employee (guide) has the possibility to cancel an already confirmed task online. |
Tasks can be picked | When selected, an employee (guide) can pick tasks from a prefiltered list of available tasks (taking into account available info about the guide's skills, availability, language, work type and so on) and assign them to himself/herself. |
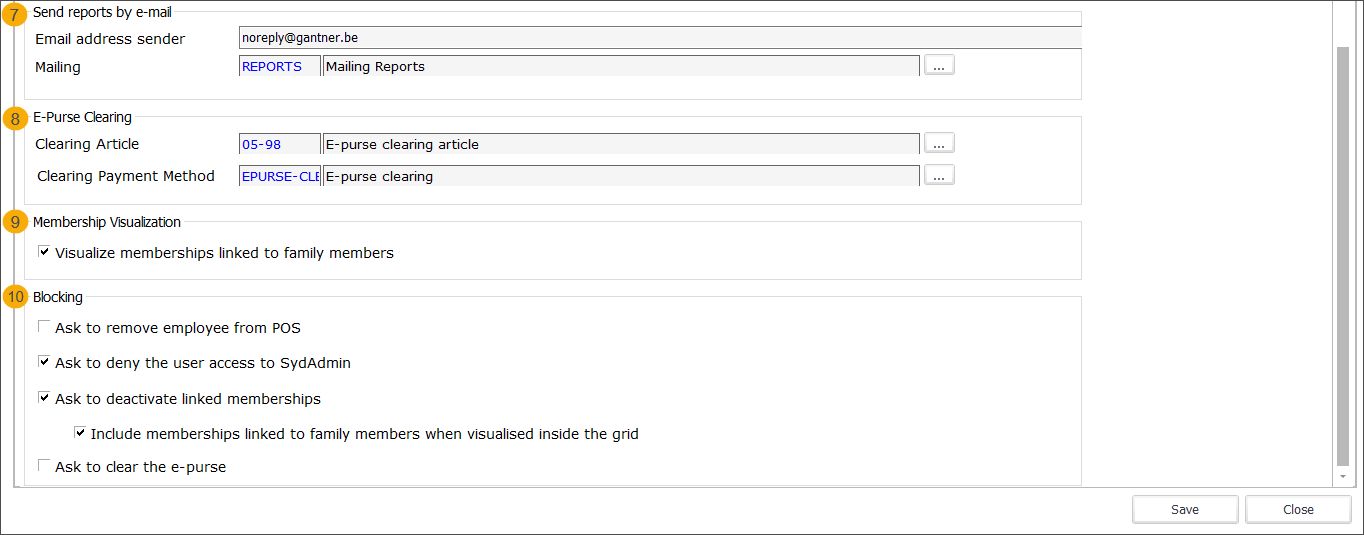
Section Send reports by e-mail (7)
This parameter allows you to set up automatic mailing of employee performance overview reports.
Email address sender | Specify the sender's email |
Mailing | Specify the mailing list that will be used to send the emails |
Section E-Purse Clearing (8)
Clearing article | An article that should be used to book the balance when clearing the e-purse. |
Clearing Payment Method | A payment method that should be used to book the e-purse balance. |
In the section Membership Visualization (9) select the option Visualize memberships linked to family members if you want to visualize the memberships linked to family members in the grid on the employee detail window.
In the section Blocking (10) you can specify what actions should be executed automatically when deactivating an employee account. You can set up Recreatex to ask up to 4 questions, presented as a series of pop-ups when saving the blocked employee record.
Even if a question is configured, it will only be asked if that particular option has been configured for the employee, e.g. if employee had no e-purse, the question to clear the e-purse will not be asked when blocking the employee's account.
Ask to remove employee from POS
Ask to deny the user access to SydAdmin
Ask to deactivate the linked memberships
Include memberships linked to family members when visualised inside the grid
Ask to clear the e-purse
Note
All these actions can also be performed manually. For a detailed explanation, see Employee management.
Stock
In the tab Stock, you can define basic parameters related to the module Stock and stock articles.
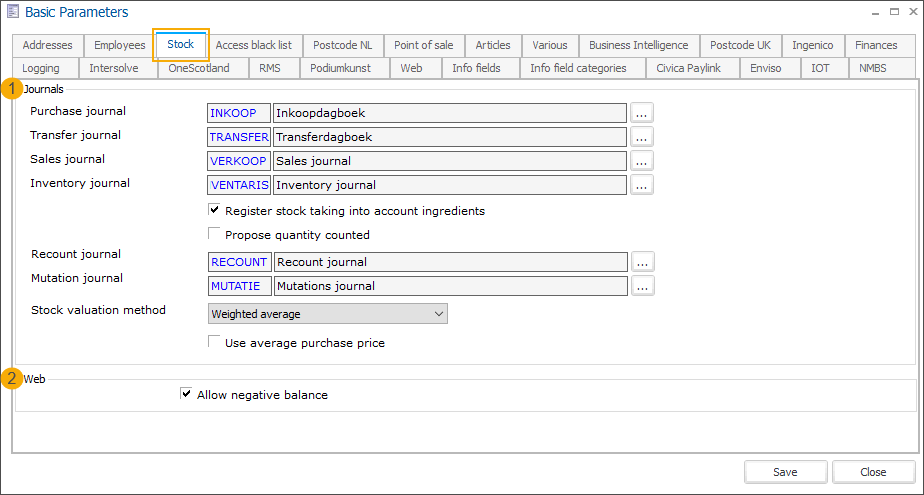 |
In the section Journals (1), specify to which article journals the different journal types are linked.
For the Inventory journal, you also have the option Register stock taking into account ingredients to register the stock of ingredients. If this option is selected and an article that contains ingredients (tab Ingredients on the article card) is sold, the stock of the ingredients used will be updated.
If you select the option Propose quantity counted, the current stock quantity of the article will be shown in the article inventory journal lines (field Quantity counted). The employee doing the inventory can then easily confirm or adjust the quantity after counting the stock of each article.
Note
The option Propose quantity counted applies the same way if you do the inventory using the mobile application mStock.
Stock valuation method - Select the option Weighted average to dynamically calculate the average stock price, taking into account stock movements (sales/purchase) and price changes.
E.g.: 19 articles A at the price of 11€ and 1 article A at the price of 15€: 19 x 11€ = 209€ + 1 x 15€ = 224€. The weighted average price of the available stock articles is 224€/20 = 11,2€.
Use average purchase price - This setting defines which price is visualised as the article purchase price in Stocks.
When not selected, the purchase price in the article journal lines will be the purchase price as defined on the article level (tab Purchase)
When selected, the purchase price in the article journal lines will be the average purchase price based on purchase order lines. This is useful e.g. if you have stock items with different prices per supplier.
In the section Web (2), select the option Allow negative balance to allow sales of stock articles on the Recreatex Webshop, Vintia Order App and Vintia Order Kiosk even if there is no stock available at the linked location. This option is by default not active.
Access black list
In the tab Access black list you determine which Recreatex users can have access to customers' blacklist information. For all users with access, an extra tab Black list becomes visible on the customer address card.
(License Integration with SAGEM USB Fingerprint required)
 |
The selection is saved automatically.
Postcode NL
The Postcode NL (Cendris) functionality provides automatic street name detection when filling in the postcode and vice versa.
To use this functionality:
the license Link NL postcode table (029) is required
the Cendris file has to be imported in SydAdmin via Tools > Import zipcodes.
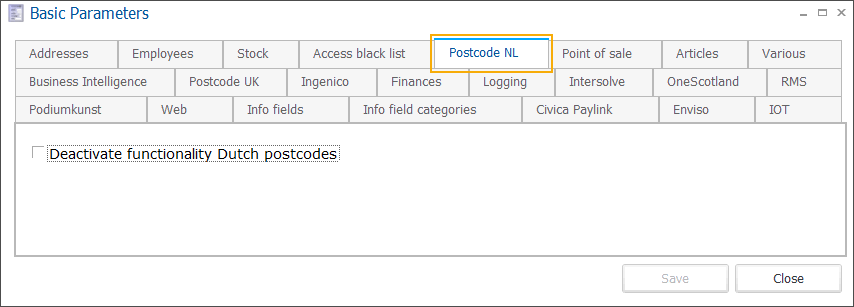 |
The functionality is then active by default but you have the possibility to deactivate it by selecting the option Deactivate functionality Dutch postcodes.
Point of sale
In the tab Point of sale you determine how the users are linked to points of sale. The settings in this tab are also used for the principle of locking points of sale, in order to prevent several Recreatex users would log in to the same point of sale on different workstations.
First, select the option Check logged in division (!) if your company has multiple divisions and click Save.
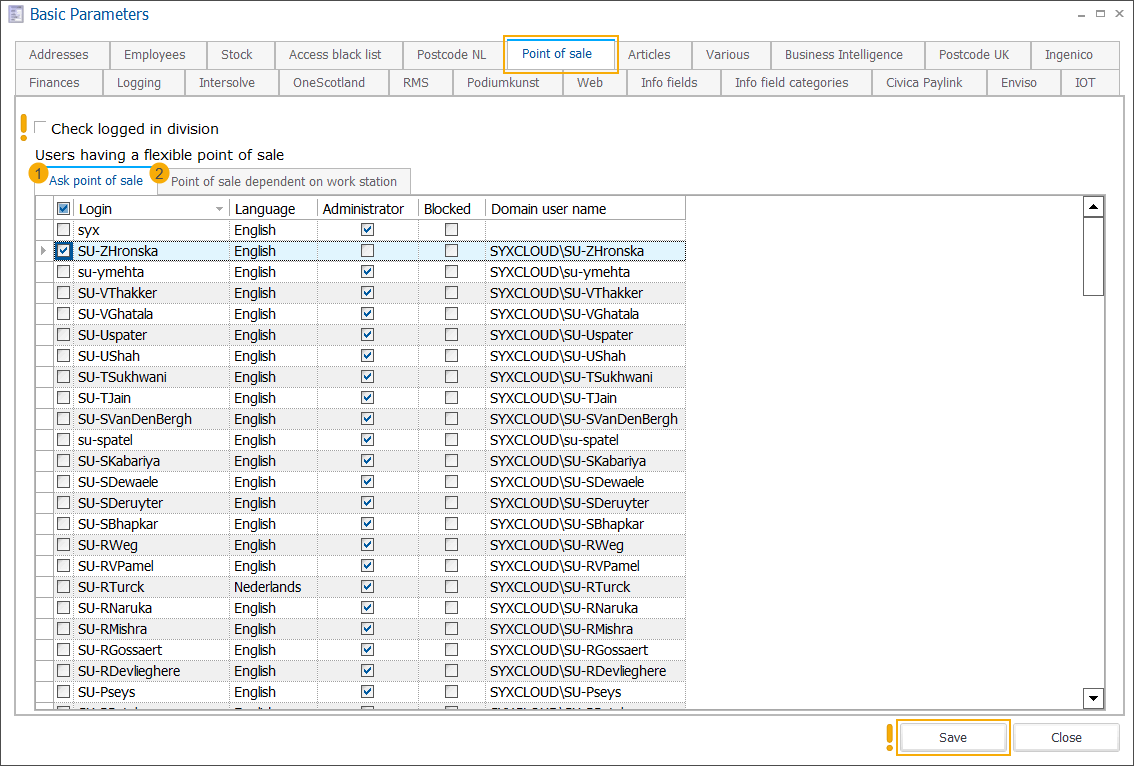 |
There are 2 possibilities to link the users to points of sale:
Important
Each login user can only use 1 of the possibilities. If you select the user for option 1 and then try to select the same user for option 2, the user will automatically be deselected for option 1.
Ask point of sale (tab) - select which users will see the list of points of sale when logging in to Recreatex and are allowed to pick a point of sale from the list.
When a user logs in, a list of points of sale will be shown depending on the division to which the user has logged in.
Point of sale dependent on work station (tab) - select users for which the correct point of sale will automatically be started when they log into a particular workstation.
You create the link between point of sale and the workstation by entering the name of the workstation in the field Workstation (in the module Sales > Settings > Points of sale > tab Various ).
As each point of sales is linked to a division, it is possible to link each workstation to 1 point of sales per division.
Your selection is saved automatically.
Articles
In the tab Articles you set up the basic parameters regarding articles.
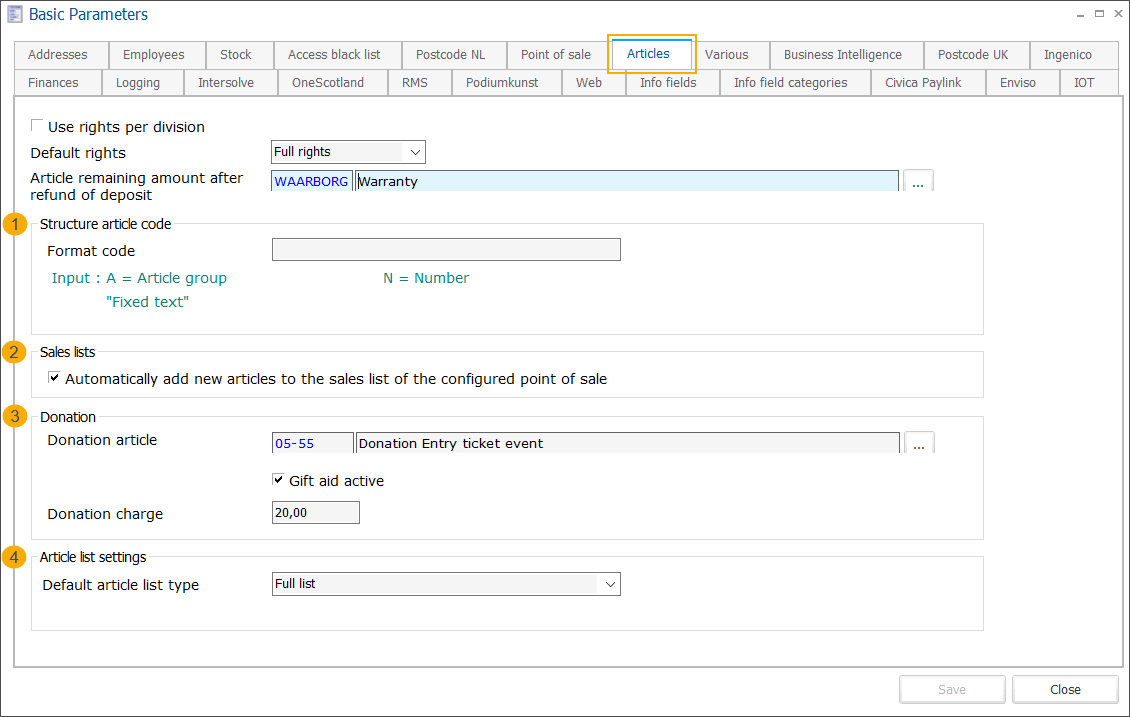 |
Use rights per division | Indicate whether you want to apply rights per division or not. If you activate this option, you can determine which articles can be shown/modified/not available within a certain division. See also Rights per division. | |
Default rights | Specify rights that should by default be applied for all divisions when creating a new article.
However, the current division of the logged-in user will always have full rights when creating a new article, even if the default rights are set to read-only or no access. This is to allow the user who created the article to do any necessary article configuration. See also Rights per division. | |
Article remaining amount after refund of warranty | Here you can determine on which (financial) article possible remaining amounts of warranties will be recorded after the refund. | |
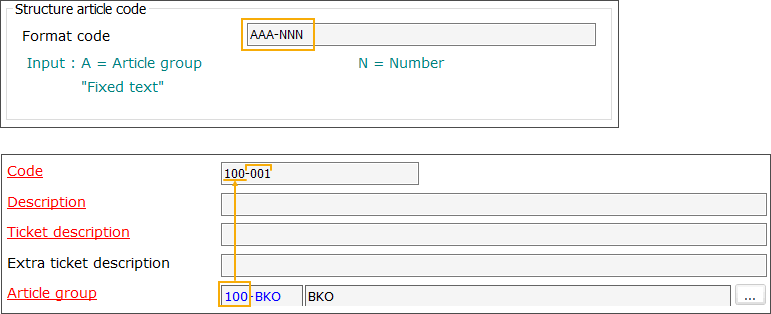
Format code | In the section Structure article code (1), you can define a default code structure for all new articles that are created within Recreatex. The structure can be a combination of article group name, automatically generated number and free text in the desired order. When a new article is created, the article code will automatically be generated after the selection of an article group. In the example below the code should consist of the first 3 characters of the article group name, followed by a hyphen and an automatically calculated order number (taking into account previous articles created with this structure): AAA-NNN = 100-001
| |
Automatically add new articles to the sales list of the configured point of sale | In the section Sales lists, you can choose to add new articles automatically to the sales list linked to the current point of sale. For more information about sales lists, see Sales lists and Find article |
In the section Donation (3),
Donation article | Specify the article that will be used to register the donation amount when an article configured as a donation article has been sold |
Gift aid active | If this option is active The Gift Aid scheme is only available in the UK for UK taxpayers only. |
Donation charge | The Donation charge parameter (in %) is specific for the use of the Gift Aid functionality (United Kingdom only). If the report Sales donations is called up, this parameter will be taken into account. |
In the section Article list settings, you can specify the Default article list type. When opening the article list in Recreatex (General > Basic data > Articles > Articles) you can choose to load:
Full list
Reduced list (better performance) - contains fewer fields/columns than the full list
The following columns can currently be included in the reduced list view:
Code
Stock article
Statistical code
Consolidation code article
Article group
Rental article
Statistical code descr.
Consolidation code activity
Article group description
Membership article
Purchase price
Consolidation code sales
Description
Lesson group article
Purchase price incl. VAT
Memb. peripheral string
Ticket description
Waiting list article
Info1
Uitpas event
Extra ticket description
Warranty article
Info2
Uitpas event description
Ticket template
Paid
Info3
Uitpas promotion
VAT
Division
Info4
Uitpas promotion description
VAT incl.
Show on Website
Info5
Uitpas promotion price
Current price
Show on Website Membership renewal
Manufacturer article code
Uitpas welcome advantage
Account
Show on Website Ticketing
Subsidy active
Uitpas welcome advantage description
Unit
Show on Website Membership creation
Business critical
Uitpas welcome advantage price
Access group
Department
Blocked
Enviso sync enabled
Composed
Various
In the tab Various you can set up several parameters that may be applied across Recreatex modules.
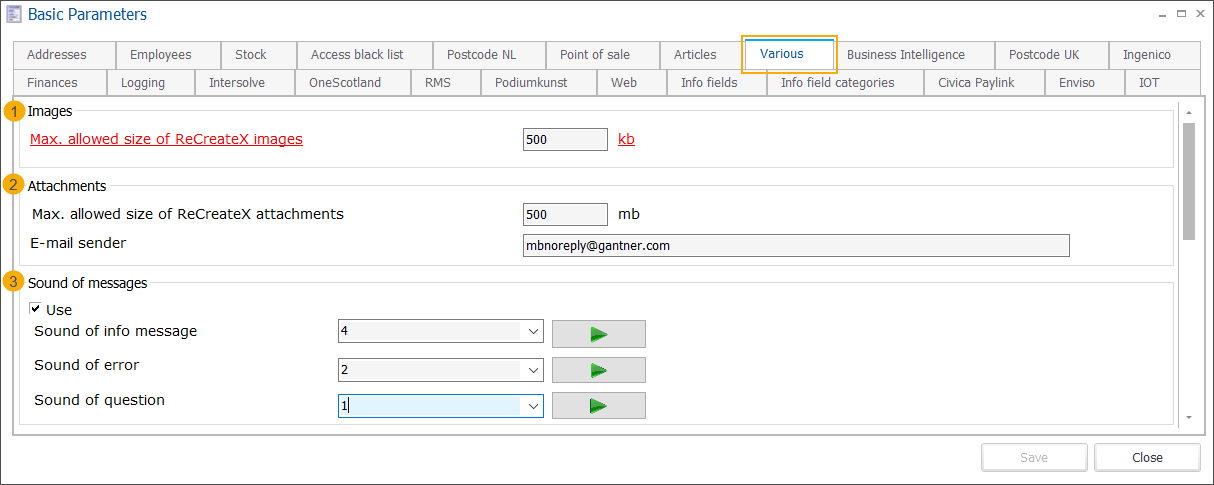 |
In the section Images (1), specify the Max. allowed size of Recreatex images to impose a restriction on the file size of images used in Recreatex. The value 0 means that no restriction has been set on the file size of images (not recommended).
The recommended maximum size for images is 500kb.
In the section Attachments (2)
Max. allowed size of Recreatex attachments | Impose a restriction on the file size of attachments used in Recreatex. The recommended maximum size for attachments is 5MB. The value 0 means that no restriction has been set on the file size of images (not recommended). |
E-mail sender | An email address from which notifications are sent to customers when an attachment has been added for a customer. |
In the section Sound of messages (3), select the checkbox Use to activate the sound setting for info messages, errors and questions within Recreatex (works with notifications that have no original Windows sound assigned).
You can choose from 5 standard Windows sounds: Default beep, Critical stop, Exclamation, Question, Asterisk
The actual sounds can be set in the Windows sound settings.
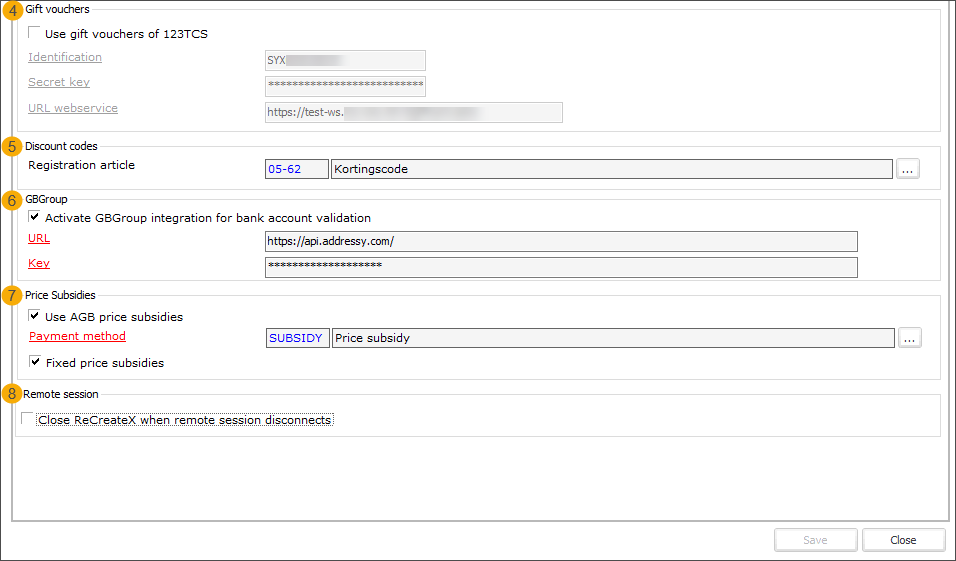
In the section Gift vouchers (4), set up the connection to use the 123TCS gift vouchers.
In the section Discount codes (5), specify a Registration article for discount codes.
In the section GBGroup (6), set up the validation of bank accounts for UK residents, using the GBG Loquate verification software.
Activate GBGroup integration for bank account validation | Select this option to activate the functionality. The license nr. 201 must be activated in your Recreatex application. |
URL | GBG Loqate URL |
Key | GBG Loqate Key |
Important
Make sure that the setting Type bank account is UK-format (in Modify country > tab Various). For more information, see Countries.
In the section Price Subsidies (7), you can activate and configure basic parameters for the AGB price subsidy system (Belgium only).
Use AGB price subsidies | Select this option to activate the use of AGB price subsidies. |
Payment method | Define a dedicated payment method for AGB. For more information on how to create a payment method, see Payment methods. |
Fixed price subsidies | Indicate whether the subsidy price is fixed. This allows you e.g. to apply the predefined subsidy amount even if the actual amount of sales is 0€. For more information, see AGB price subsidy optimisation |
For more information on how to apply this functionality in different Recreatex modules, see AGB price subsidy.
In the section Remote session (8), you can specify whether the Recreatex application should be closed upon disconnecting the remote session.
Close Recreatex when remote session disconnects |
|
Business Intelligence
In the section Connection, indicate whether the BI tool should also use the reporting database.
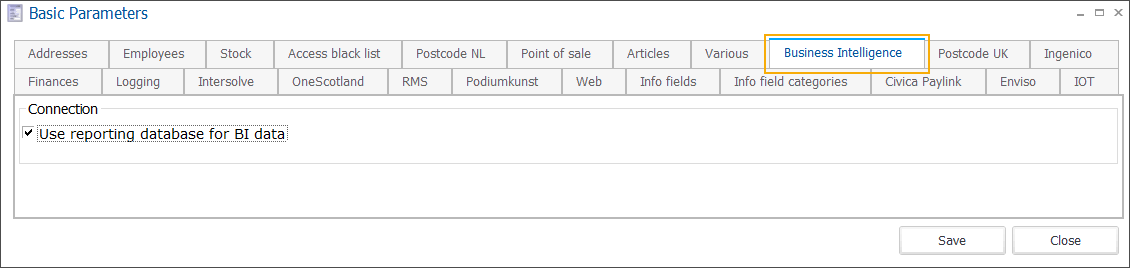
For detailed information about the BI tool, see Business Intelligence
Postcode UK
In the section Capture plus settings, you can set up the lookup and verification of UK residents' addresses using the GBG Loquate verification software. This functionality also requires activation of the module (license) nr. 201 in your Recreatex application.
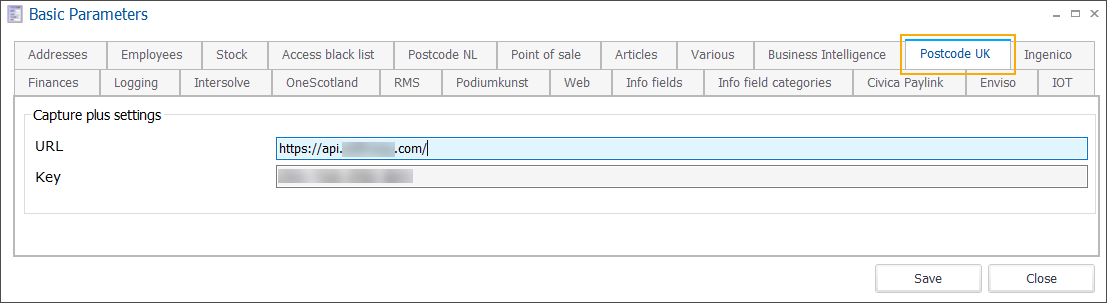
URL | GBG Loqate URL |
Key | GBG Loqate Key |
Note
This functionality can be used in Recreatex backoffice application (in the customer address card, UK address button) as well as in the Webshop.
Ingenico
In the tab Ingenico you can configure the Ogone Direct payment option for payments/refunds and the refund function for Ogone Direct payments via Ingenico Direct API.
Ogone Direct
One of the Ingenico payment technologies is Ogone Direct. Depending on the type of your subscription you may be allowed to do payments and/or refunds. These options must be activated in your Ingenico account, and you must complete the Ingenico backoffice setup to obtain all necessary credentials.
In the subtab Ogone Direct you configure your Recreatex backoffice to use Ogone Direct for:
payments / refunds
payments only
Note
If your subscription does not allow the refund functionality, it is possible to set up a refund functionality using Ingenico Direct API.
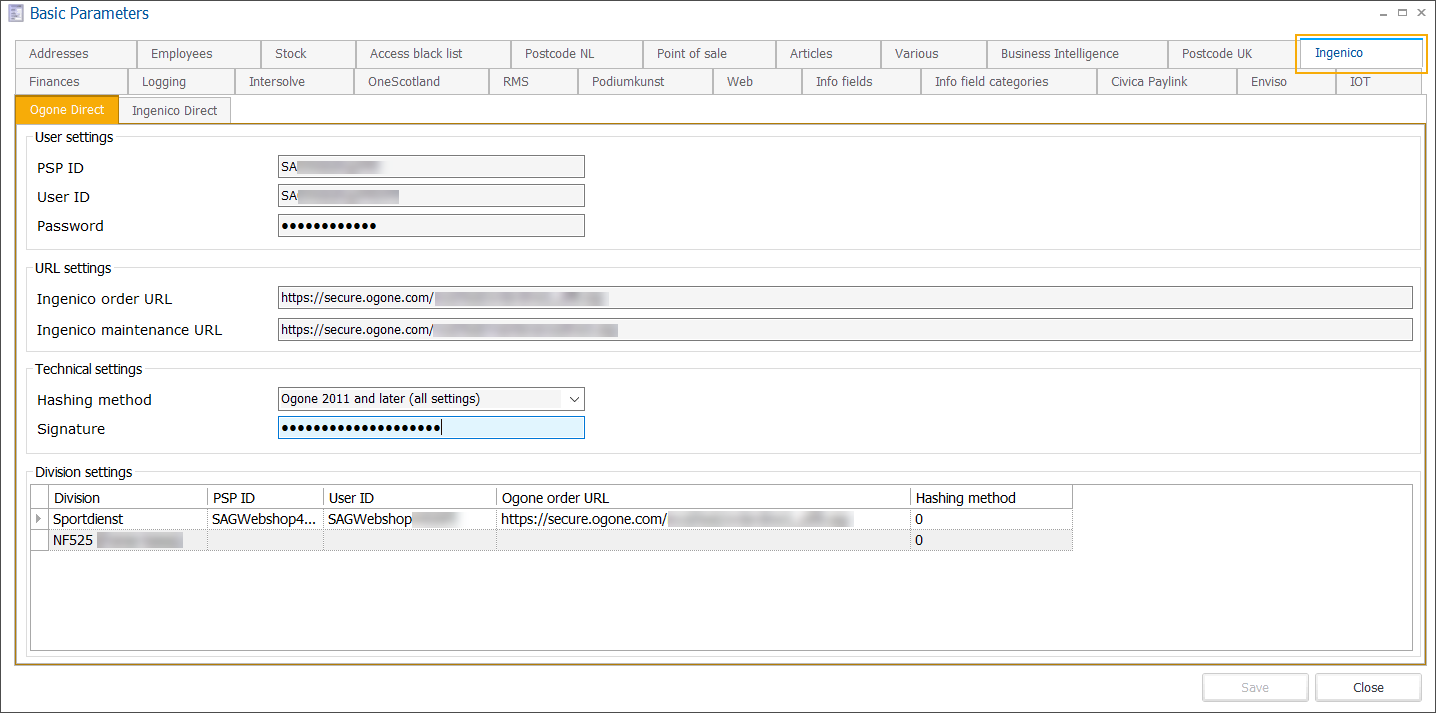
Section User settings:
PSP ID | your Admin user |
User ID | your API user |
Password | the password of your API user |
Section URL settings:
Ingenico order URL | "https://secure.ogone.com/ncol/test/orderdirect_utf8.asp" for the test environment "https://secure.ogone.com/ncol/prod/orderdirect_utf8.asp" for the production environment |
Ingenico maintenance URL | "https://secure.ogone.com/ncol/test/maintenancedirect.asp" for the test environment "https://secure.ogone.com/ncol/prod/maintenancedirect.asp" for the production environment |
Section Technical settings:
Hashing method | Use option Ogone 2011 and later (all settings) |
Signature | SHA-IN passphrase from your Ingenico backoffice configuration (on the Technical information page > Data and origin verification tab > Checks for DirectLink section). |
Section Division settings:
Next to the general configuration, you can also add Ogone Direct configuration per division.
Ingenico Direct
For customers that do not have the possibility to use the Ogone DirectLink refund option, a new integration has been added to the backoffice to refund payments validated via Ogone Direct (DirectLink - payments), via the Ingenico Direct API.
In the subtab Ingenico Direct you configure the Ingenico Direct API.
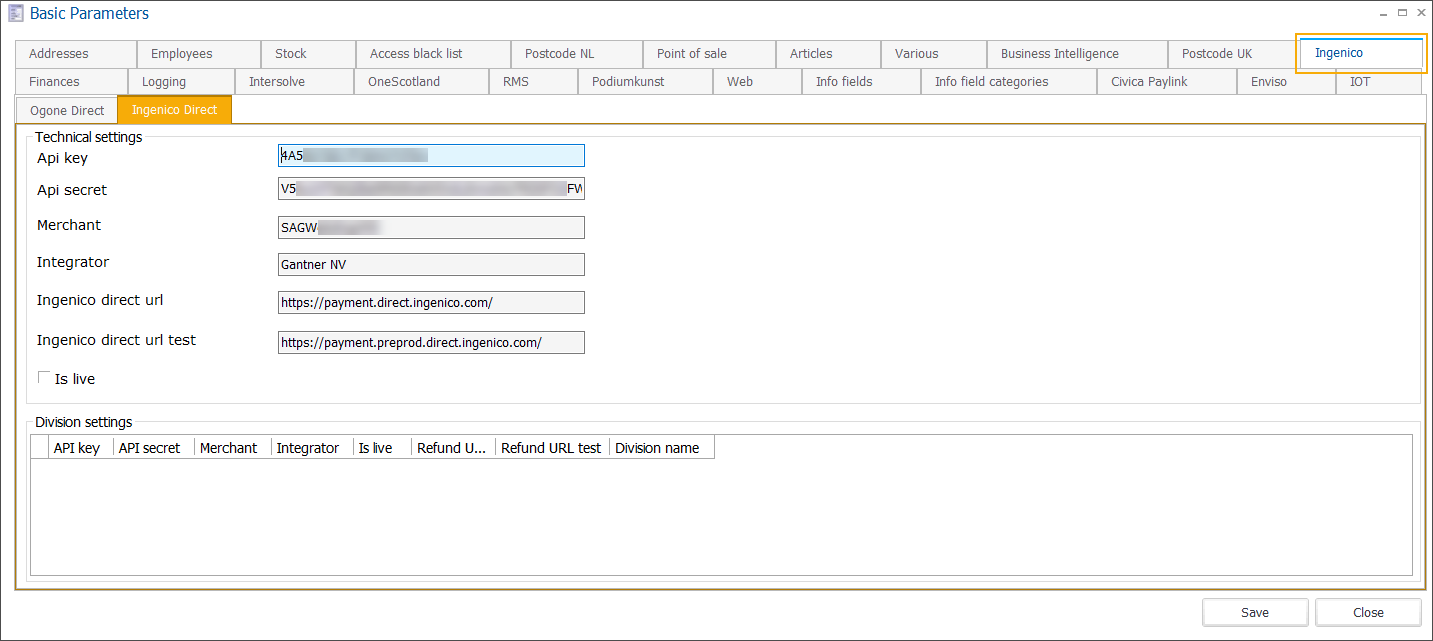
Section Technical settings
Api key Api secret | You can generate these values under your account on the Ingenico Backoffice portal. |
Merchant | Your PSPID (Unique Ingenico e-commerce merchant ID). |
Integrator | Your (company) name or any unique identifier that will be used for debugging and tracking requests sent to the Ingenico platform. |
Ingenico direct url | https://payment.direct.ingenico.com/ |
Ingenico direct url test | https://payment.preprod.direct.ingenico.com/ |
Is live | Check this option to activate the switch to the production environment. Leave the option unchecked for testing purposes. |
Section Division settings:
Next to the general configuration, you can also add Ingenico Direct API configuration per division.
Finances
In the tab Finances, you can define several general accounting-related settings.
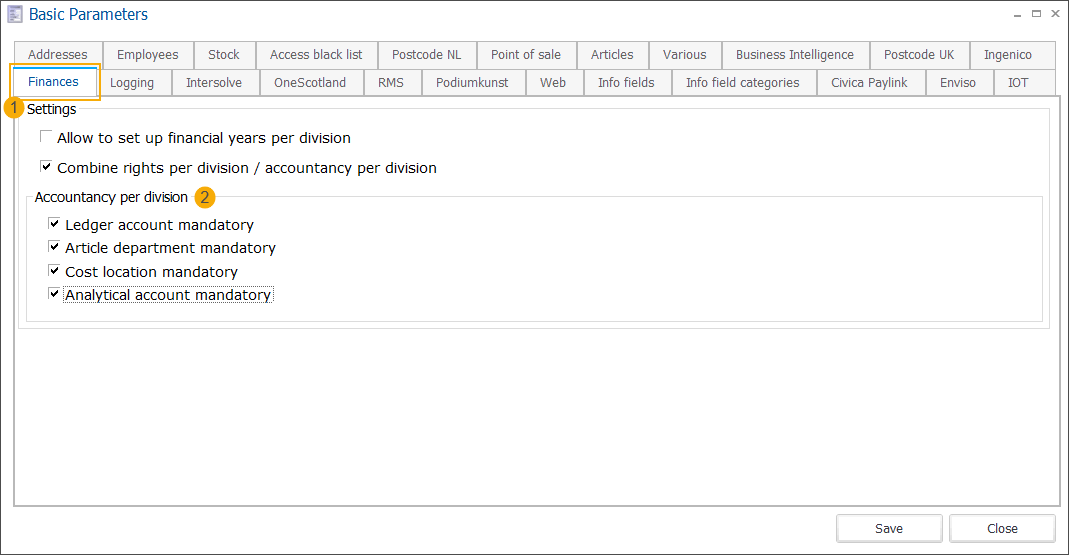
Section Settings (1):
Allow to set up financial years per division | Activating this setting will enable the Division field on the Modify financial year screen, which allows you to create financial years per division. See Financial years for more information. |
Combine rights per division/accountancy per division | This setting allows you to combine the information from separate tabs Allowed divisions* (rights per division info) and Accounting per division into a single tab. This option is available for:
*To be able to combine the 2 tabs into 1, both tabs have to be visible. To visualise the tab Allowed divisions, activate the parameter Use rights per division:
NoteWhen the combined tab Rights/accountancy per division is active, the separate tabs Allowed divisions and Accounting per division will disappear. |
Subsection: Accountancy per division (2) Here you can further specify which accounting information should be mandatory when using the combined tab Rights/accountancy per division. 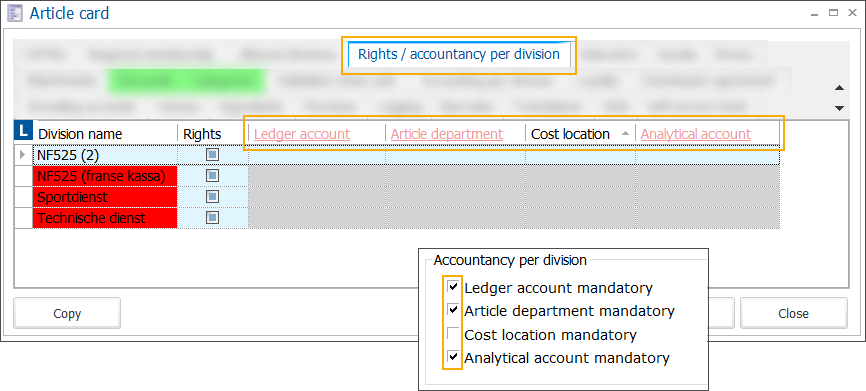 If you are using the separate tab Accounting per division, the mandatory/non-mandatory accounting information is visualised in the Modify accounting data per division window: 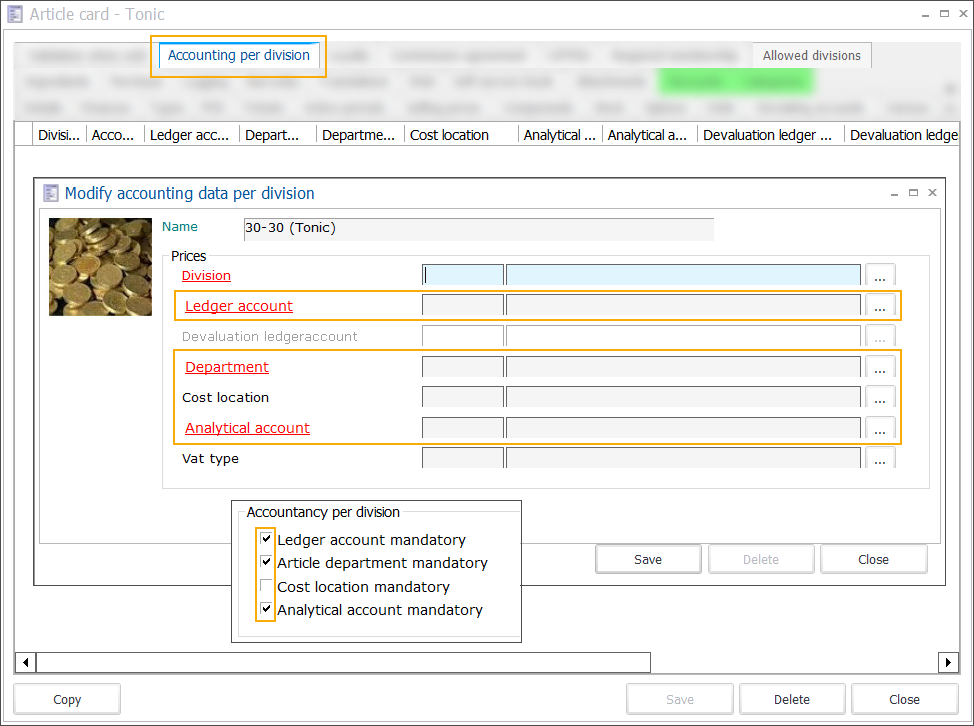 | |
Logging
In the tab Logging you can trace all modifications of the general parameters, including the date/time of the adjustment, type of modification, which field has been modified, old and new value, who has performed the modification and any comments (if included).

Intersolve
In this tab, you can define settings for all supported Intersolve solutions.
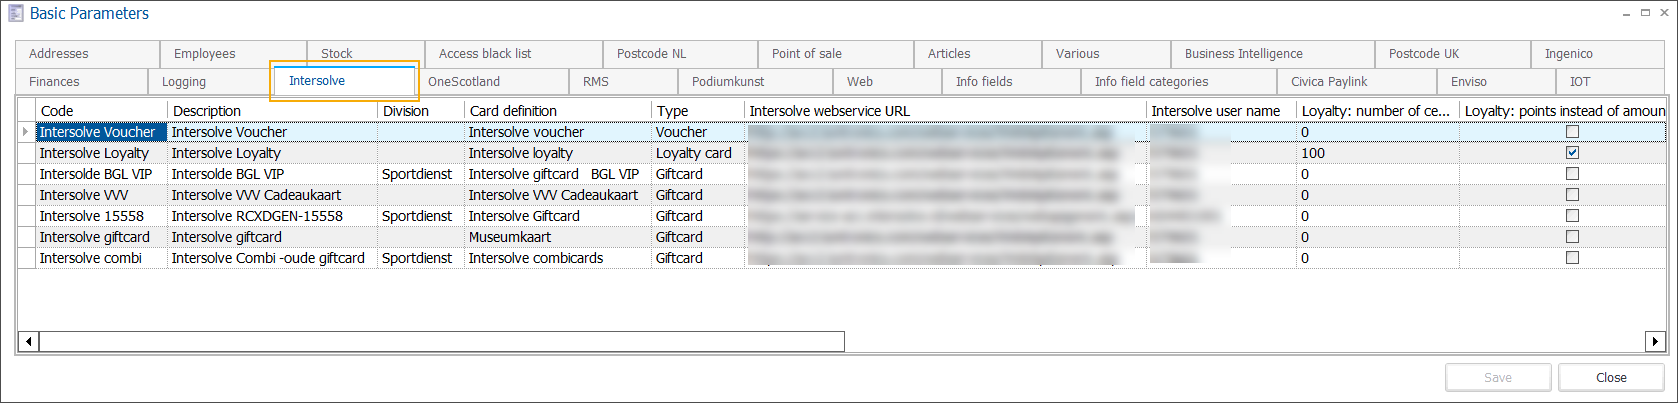
To create, modify or delete Intersolve settings use the available framework functionality.
The upper part of the modify screen is common to all types of configuration. Further, depending on the selected type, a specific configuration has to be provided for: gift cards, loyalty cards, or vouchers.
For detailed information about the configuration of Intersolve solutions, go to:
OneScotland
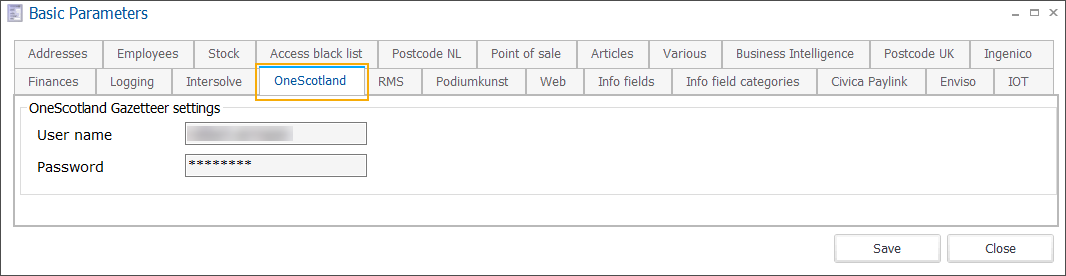
In this parameter, you can configure an address lookup functionality that uses the One Scotland Gazetteer (OSG) service.
One Scotland Gazetteer (OSG) provides up-to-date address data maintained by each of Scotland's 32 local authorities. To obtain the credentials you need to register with the One Scotland Gazetteer (OSG) service.
In the section OneScotland Gazetteer settings, you can then set up access to the One Scotland Gazetteer (OSG) service by filling in your credentials (username & password).
This functionality further requires activation of the license nr. 202 Integration with OneScotland.
Note
You can find the functionality in Recreatex backoffice application, behind the button OneScotland, at the bottom of the customer address card (module General > Customers).
RMS
In this parameter, you can set up a connection with the RMS (Resource Management Services) retail platform which allows you to keep the stock within RMS up to date with the sales from Recreatex.
In the section RMS settings, enter the URL, Store ID and Password provided by RMS.

For more information on possibilities of integration with RMS, see Interface RMS.
Podiumkunst (NL)
The interface between Recreatex and Podiumkunst.info allows the Recreatex user to link venues and events defined in Recreatex with the corresponding venues and events in Podiumkunst.info.
This integration requires module (license) nr. 155 - Podiumkunst.
In the tab Podiumkunst, enter the URL and the authentication credentials - Client ID & Client Secret. The current authentication method is OAuth2.
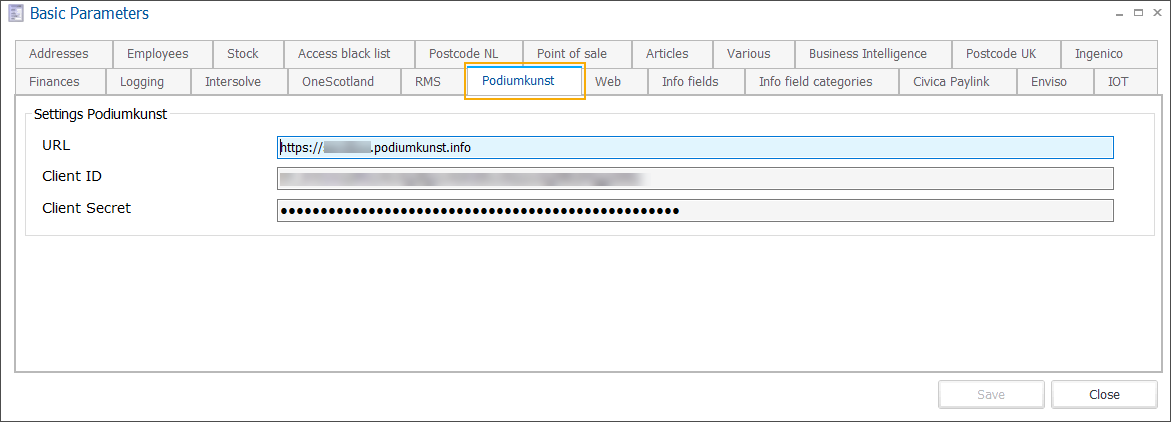
For more information on how to set up and use the Podiumkunst integration, see Interface Podiumkunst.
Web
The Web parameter allows you to impose certain restrictions for the webshop users.
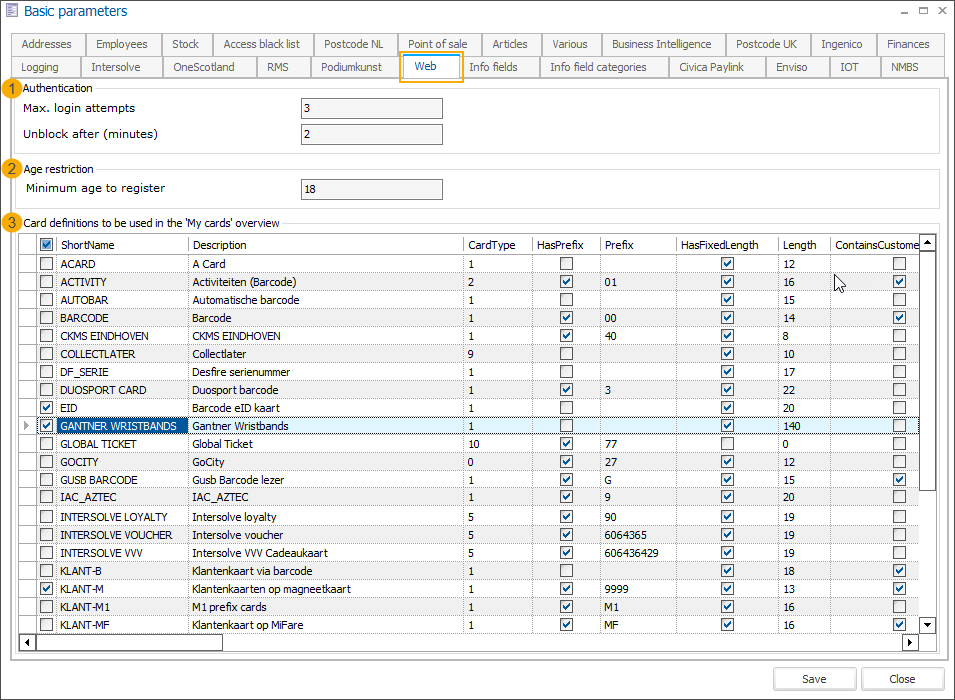
Section Authentication (1):
Max. login attempts | Specify the maximum number of login attempts after which the user should be blocked. |
Unblock after (minutes) | Specify how long the user should be blocked before being allowed to log in again. |
For additional information, see Maximum number of login attempts.
In the section Age restriction (2), you can define the minimum age for the users to be able to register on the Webshop. This setting is also taken into account by the Self-service kiosk.
In the section Card definitions to be used in 'My cards' overview (3) you specify all card types that may be visualized on the Webshop page My cards (History and overviews). By default, no cards are selected.
Important
Card definitions where the Card number generation parameter is configured as None, use the next, free existing card are not included in the overview and cannot be selected.
You find/configure the card definitions in the SydAdmin application under Management > Devices > Card definitions.
Info fields
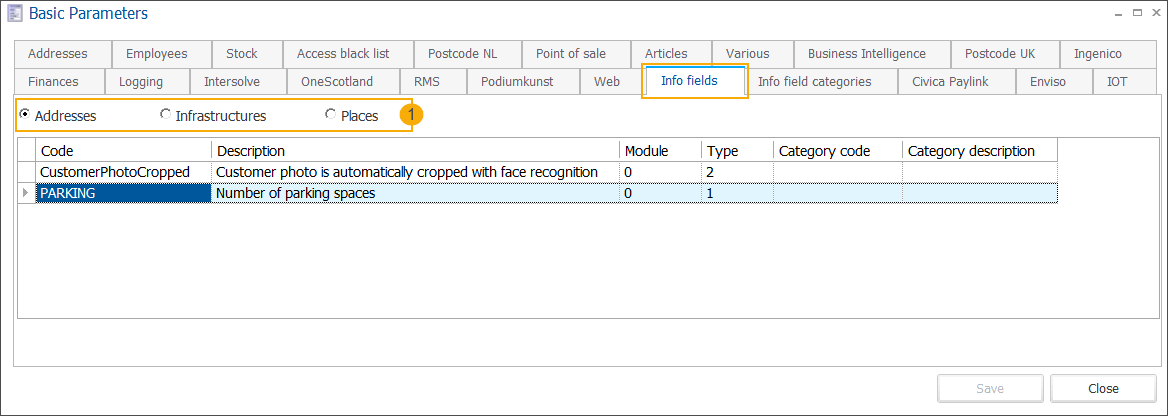
The Info fields parameter allows you to create dynamic info fields that can store additional information about your customers, infrastructures, and places.
Info fields can be created for the following modules:
Addresses - module General > Customers
Places - module Bookings (license required)
Infrastructures - module Bookings (license required)
Use the radio buttons (1) to switch between the different modules and related info fields.
To create, modify or delete info fields use the available framework functionality.
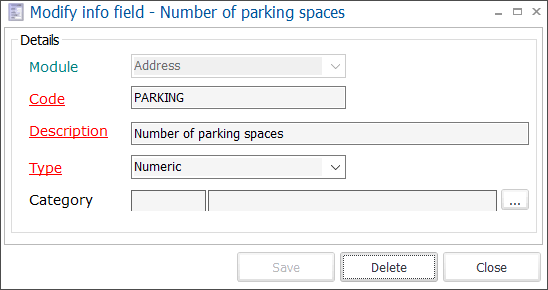
Module | With the radio buttons (1) you also indicate for which module you want to create an info field. The field Module in the Modify info field screen will be filled in automatically based on your choice and cannot be changed anymore on this screen. |
Code | The mandatory code must be unique and preferably descriptive enough so that you can identify the info field easily. |
Description | A description of the info field. |
Type | Select the type of value allowed for this info field:
|
Category | Select an info field category to group and organize your info fields. To create categories of your choice, go to General > Parameters > Info field categories. |
When created, the info fields become available in the tab Info field values on the modify screen of infrastructure, place, and on customer address card. In this tab, you can further specify/modify the actual value of the info fields.
Info field categories
In the tab Info field categories, you can create categories to group and organize your info fields. Categories also provide additional sorting and filtering possibilities, especially if you have a large number of info fields.

To create, modify or delete info field categories use the available framework functionality.
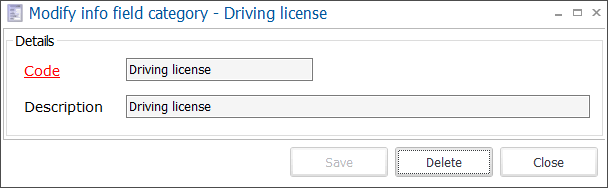
Code | The mandatory code must be unique and preferably descriptive enough so that you can identify the info field category easily. |
Description | A description of the info field category. |
For more information on how to use info field categories, see Info fields.
Civica Paylink
To enable the integration with Civica payment solution the following parameters have to be provided in Recreatex.
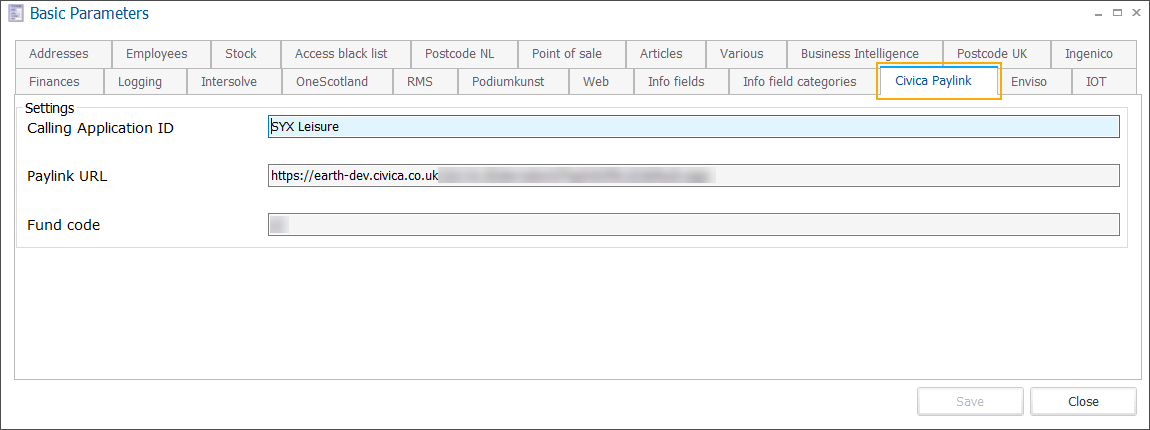
Calling Application ID | This ID identifies the application that is using the Webservice within the Civica system. The Civica system will use this information to determine a Machine_Id code, which is required by Civica to generate receipt numbers. |
Paylink URL | Address of the webservice. |
Fund code | This is the type of account within the income management system to which the account reference relates. The account type code is used by the distribution system to determine which system the transaction should be exported to and whether or not the general ledger should be updated with this payment. |
For a full setup of the Civica payment solution integration, please contact your Gantner consultant.
Enviso
With this parameter, you configure the venues with which you want to synchronize and the Enviso Pay refund functionality to allow refunds of Webshop purchases done with Enviso Pay.
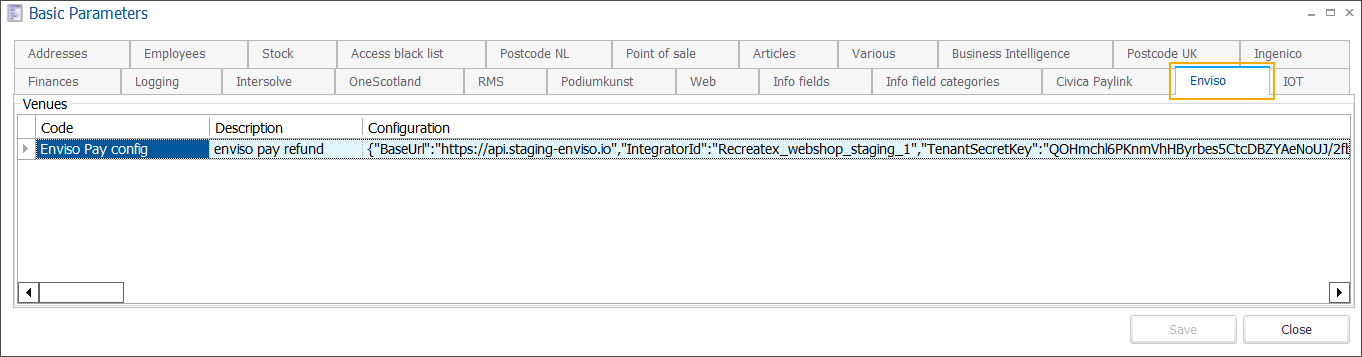
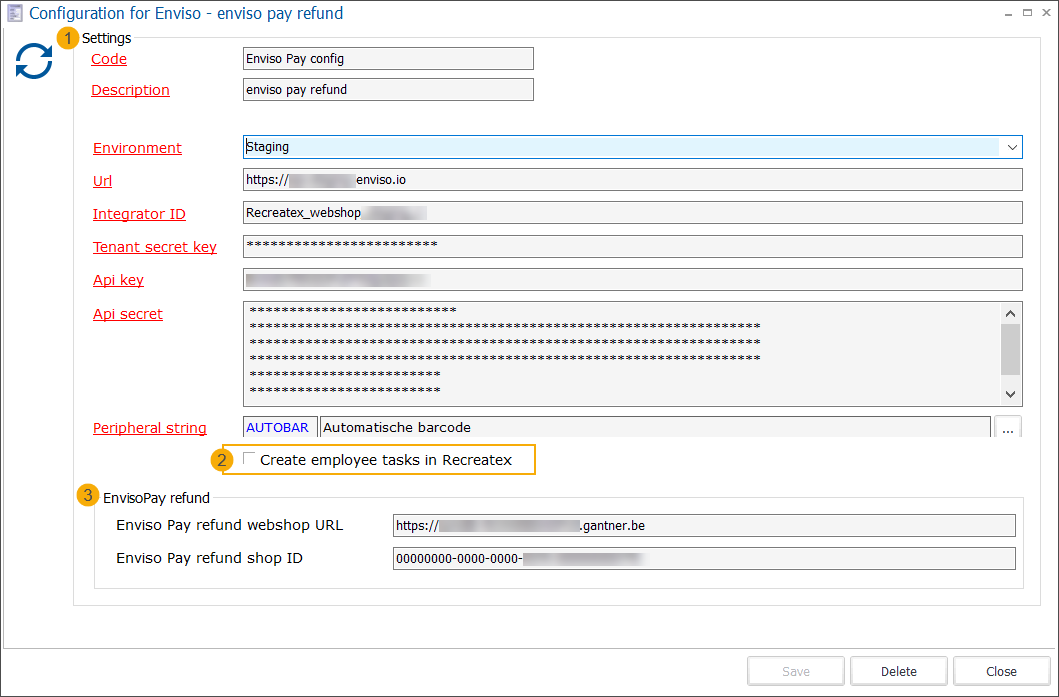
In the section Settings you configure the connection with Enviso. The configuration can be added per venue.
Code | The mandatory code must be unique and preferably descriptive enough so that you can identify the venue easily. |
Description | |
Environment | |
Url | |
Integrator ID | |
Tenant secret key | |
Api key | |
Api secret | |
Peripheral string | |
Create employee tasks in Recreatex | When a sale is imported from Enviso and it is linked to an exhibition configured with guides needed, you can choose to create employee tasks in Recreatex. (2) |
Subsection: EnvisoPay refund: here you can configure the Enviso Pay refund functionality. (3) | |
Enviso Pay refund webshop URL | |
Enviso Pay refund shop ID | |
IOT
With this parameter, you set up and activate the connection between Recreatex and the IOT (Edge) platform.

IOT Active | Check this option to allow the connection between Recreatex and the IOT (Edge) platform. |
IOT URL | URL of the IOT (Edge) platform provided by Gantner. |
Tenant Sync key | Provided by Gantner, can also be retrieved on the IOT (Edge) platform. |
Client name | Choose a name that will identify your client application on the IOT (Edge) platform. |
Check Connection | Verify whether the connection has been established correctly.  |
NMBS
To set up the NMBS train ticket functionality you need to perform several configuration steps in the backoffice as well as in the Webshop Manager.
In this parameter, you set up the connection to the NMBS environment.
Important
The NMBS train ticket functionality requires activation of the license ExternalSaleIntegration (nr. 100).
In Recreatex, go to General > Parameters > tab NMBS.

These settings will be used in the API to make calls to the NMBS service.
Section NMBS settings (1) | |
Environment | Options Test or Production |
Username | Credentials obtained from NMBS |
Password | Credentials obtained from NMBS |
Organism code | Credentials obtained from NMBS |
Certificate path | Gantner or customer, depending on the setup. The selected certificate will be uploaded and stored entirely in the database. |
Certificate password | Gantner or customer, depending on the setup. |
Section NMBS test endpoints (2) | |
TokenService test url | current URL: https://in-1059.api.acc-belgianrail.be:8265/A1059Tos/TokenService/1 |
ThirdPartyService test url | current URL: https://in-1059.api.acc-belgianrail.be:8265/A1059Thp/ThirdPartyService/1 |
Section NMBS production endpoints (3) | |
TokenService prod url | current URL: https://in-1059.api.belgianrail.be:8265/A1059Tos/TokenService/1 |
ThirdPartyService prod url | current URL: https://in-1059.api.belgianrail.be:8265/A1059Thp/ThirdPartyService/1 |