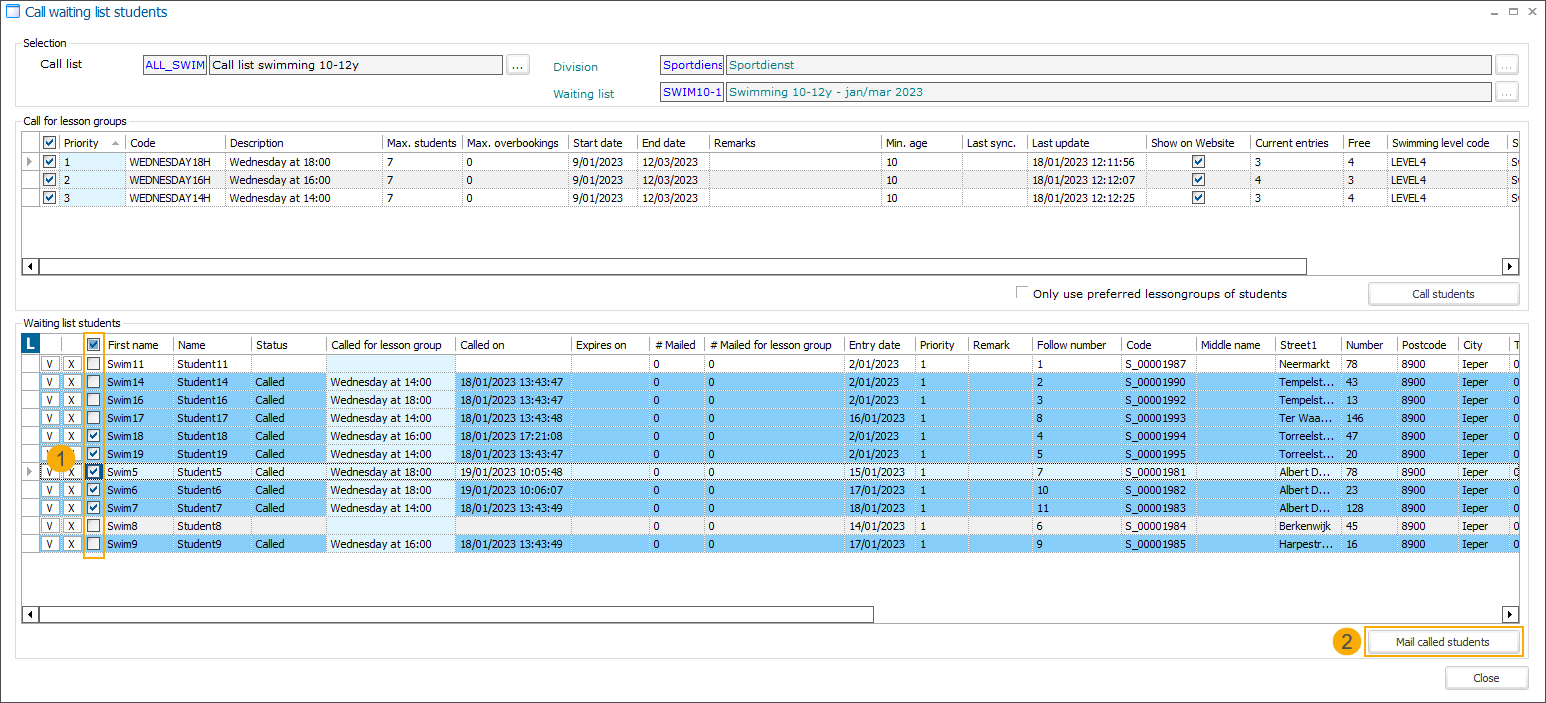
Call waiting list students
Go to Swimming courses > Processing > Call waiting list students > tab General
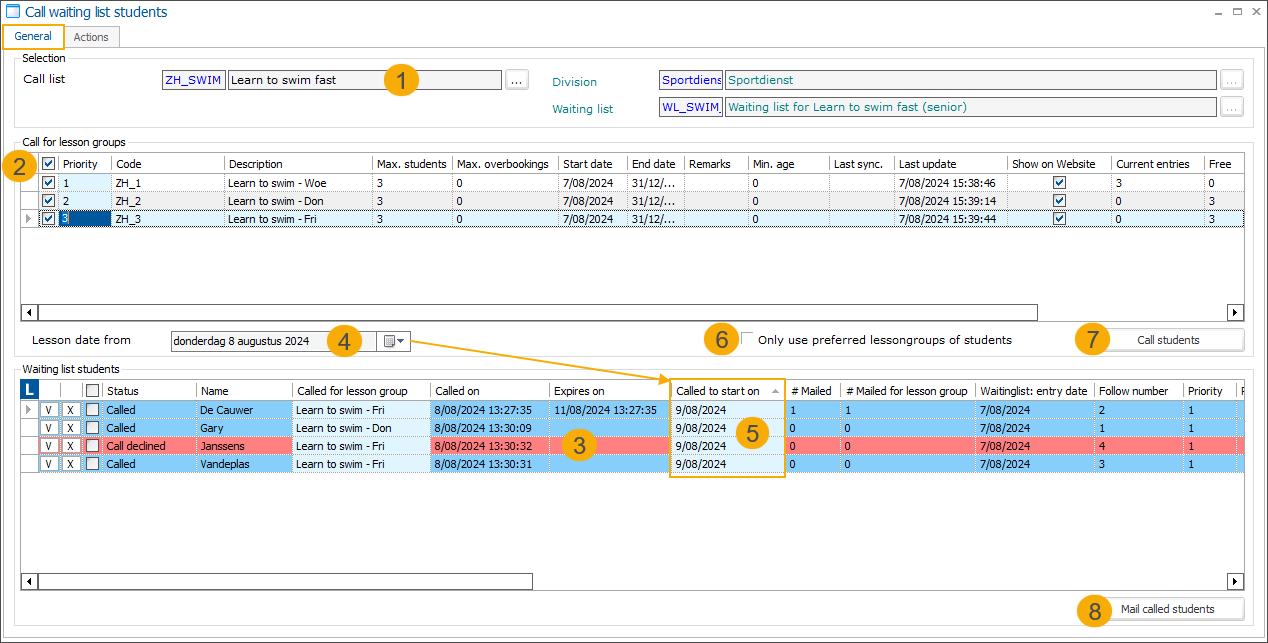
The processing functionality Call waiting list students includes the following options:
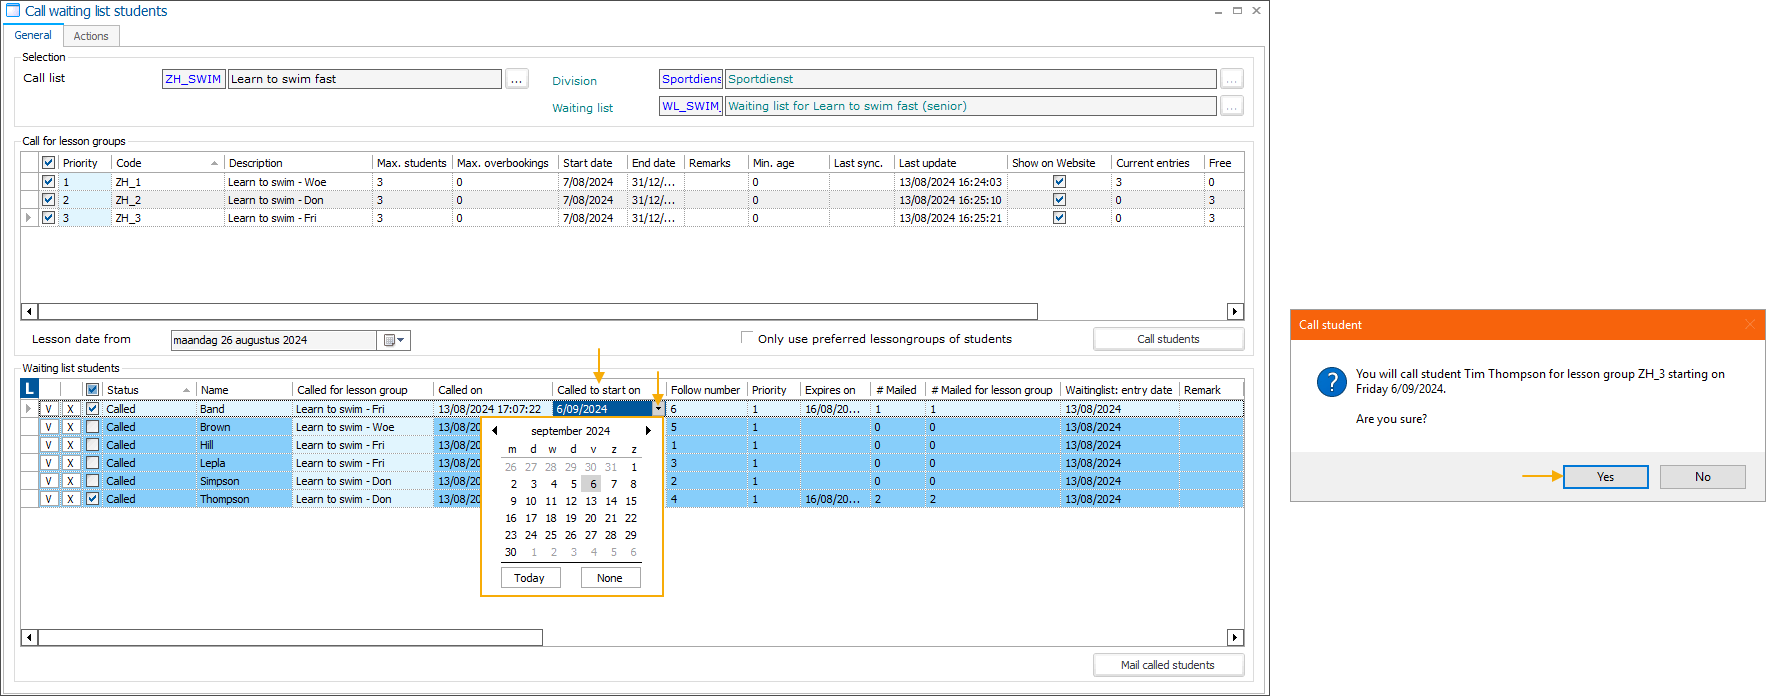
Select the call list. The division and the waiting list are preselected and cannot be changed.
The Call for lesson groups table now displays all groups configured for the selected call list. Select the groups for which you want to call the students.
If needed, you can also specify/adjust the lesson group priority here.
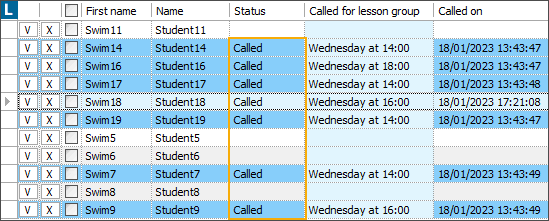
The table Waiting list students displays all students currently on the waiting list. Per student, you can see not only the current call status but also how many times the student has been emailed (total and per lesson group) and how many times the student has declined a call within this call list.
Lesson date from: Based on this date, the system will calculate the actual start of the lessons by looking at the times configured on the relevant lesson group.
For example, if the selected date is 09 August (Friday) and the lessons are scheduled on Wednesdays, the first possible start date will be 14 August (Wednesday). This date will then be displayed in the field Called to start on (5).
Default value: current day
Note
The start and end dates configured at the lesson group level are not considered when calculating the start date because they are not mandatory fields and may be incomplete or outdated.
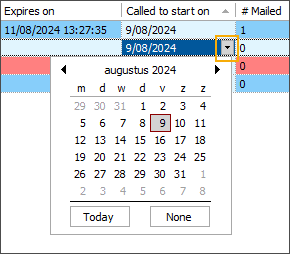
Called to start on: This date indicates when the lessons start.
Calculate this date automatically by filling in the Lesson date from. Using the Call students function will trigger the calculation of the start date based on the times configured on the relevant lesson group. If no times are configured, the Lesson date from value will be used instead.
If an exclusion calendar is linked to a lesson group, it will also be considered when determining the first possible lesson start date.
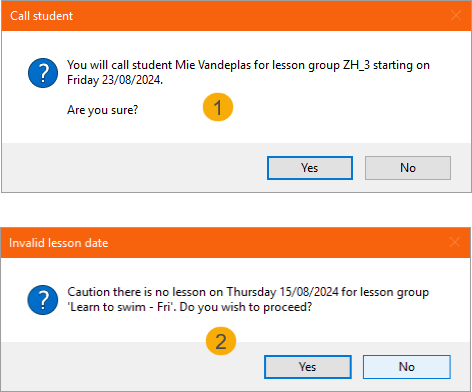
Select or adjust the date manually for each student using the date selector and confirm the selection (1).
If an exclusion calendar is linked to a lesson group, a warning is displayed when no lesson can occur on the selected date (2).
The lesson start date is also visualized on the level of a waiting list student, in the tab Call

Only use preferred lesson groups of students: When you select a call list (1), this setting will be taken over from your call list configuration. However, when processing, you still have the possibility to select/deselect this option here.
If selected, students will not be called if their preferred lesson group is not available.
Important
This also means that students without preferred lesson groups will not be called.
The automatic function Call students: runs the algorithm to match the students with lesson groups and sends emails to all called students.
You also have the possibility to assign students to available groups manually. The function Mail called students then allows you to send e-mails to all manually called students.
Call waiting list students automatically
To start, select the call list and the relevant lesson groups, specify the Lesson date from and revise whether the option Only use preferred lesson group of students is set correctly. See the topic Call waiting list students for a detailed explanation of these steps.
Next, click the function Call students. The following steps are performed automatically:
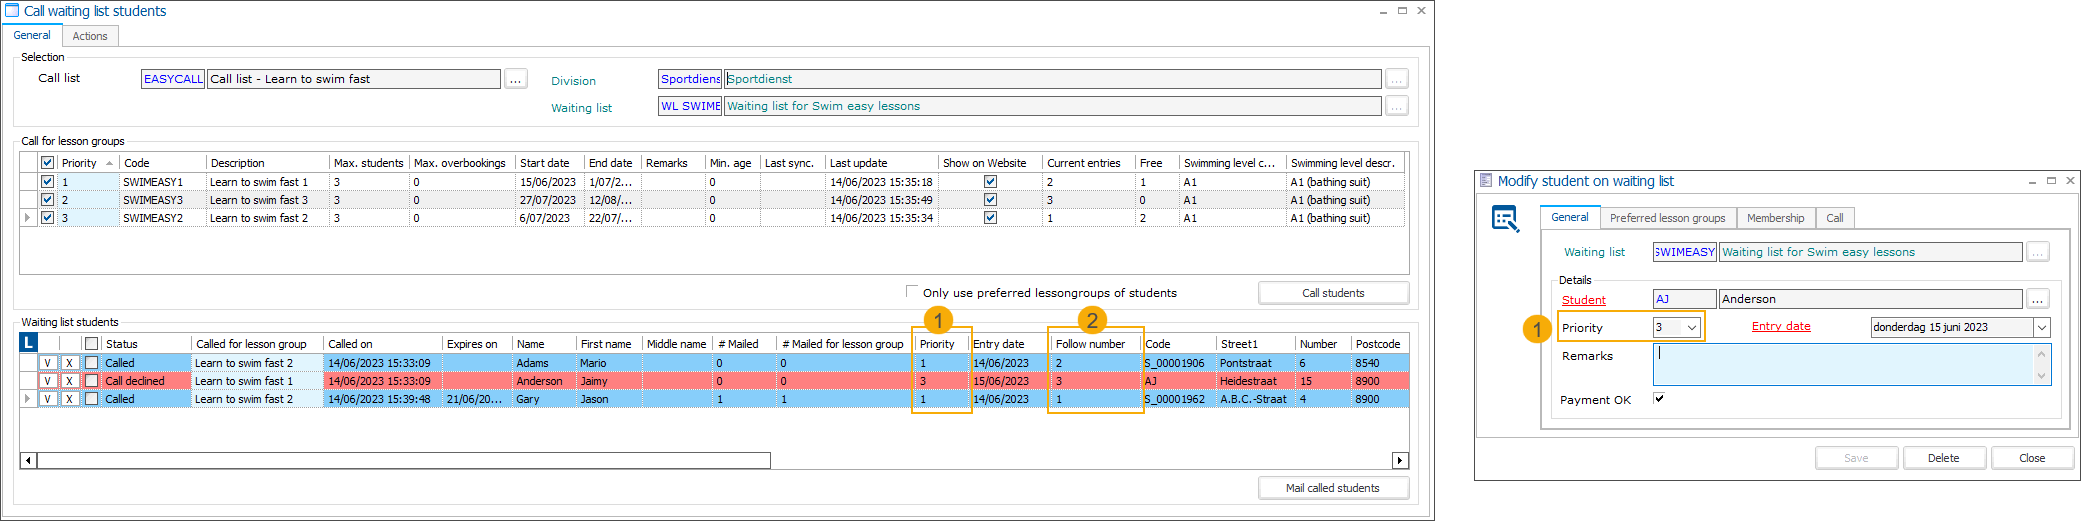
Find all the students that are callable, ordered by call order: default (by the highest priority and then by the follow number) or customized.
To modify the priority (1) of a student on the waiting list, open the student from the Waiting list students table overview and select the priority from the drop-down list.
The follow number (2) is defined automatically.
Note
Callable students are all students that have a status different from ‘Called'
No status - Students who have not yet been called
Declined - Students who declined the previous call
Call expired - Students whose call has expired without taking action.
Select all checked lesson groups, ordered by priority (highest priority (= highest number) comes first)
Check all callable students and find possible matches
Look for available lesson groups
Exclude lesson groups that have validation errors or warnings for that particular student. See possible validation messages below.
Exclude lesson groups that were declined by that student before.
Look for preferred lesson groups of a student
Check if the student has preferred lesson groups. If he does, check if those preferred lesson groups are available.
If a preferred lesson group is available, use the one with the highest priority and call the student for that lesson group.
If no preferred lesson group is available and the setting Only use preferred lesson groups of students is ON, do not call the student.
If no preferred lesson group is available and the setting Only use preferred lesson groups of students is OFF, call the student for the first available lesson group (the one with the highest priority).
Calculate the earliest possible start date for each lesson group based on the Lesson date from value.
When finished, the result is displayed on the screen in the form of an info message:
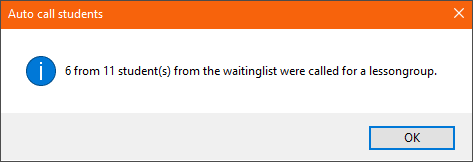
The automatic email containing the confirmation link is generated for each student and put in the mailing queue.
The status changes to Called for all called students and the correct lesson group start date is provided for each student in the field Called to start on.
Accepting and declining the waiting list calls
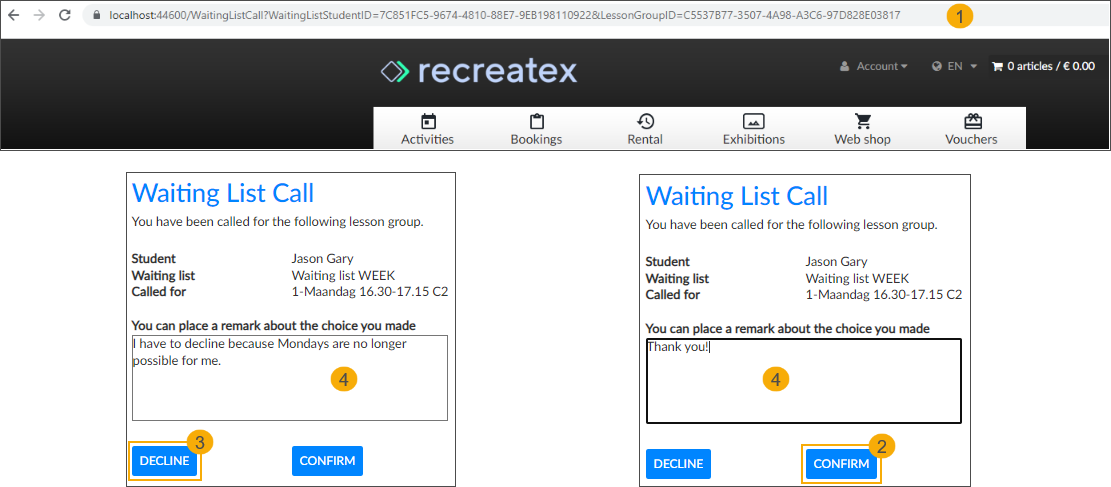
In the email, the called students receive a clickable link that will direct them to the Webshop confirmation page (1) where they can Confirm (2) or Decline (3) the call, without the need to log in to the Webshop.
Whether confirming or declining the call, students also have the option to add a remark. The remarks are stored in the Remarks field in Recreatex backoffice as follows:
In the waiting list student detail when declined
In the lesson group student detail when confirmed
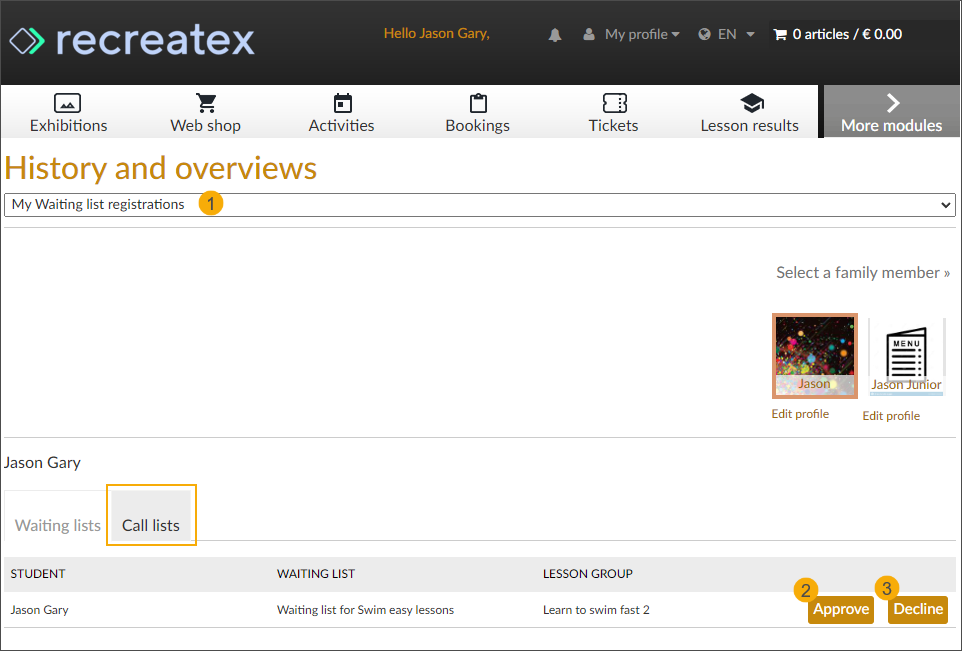
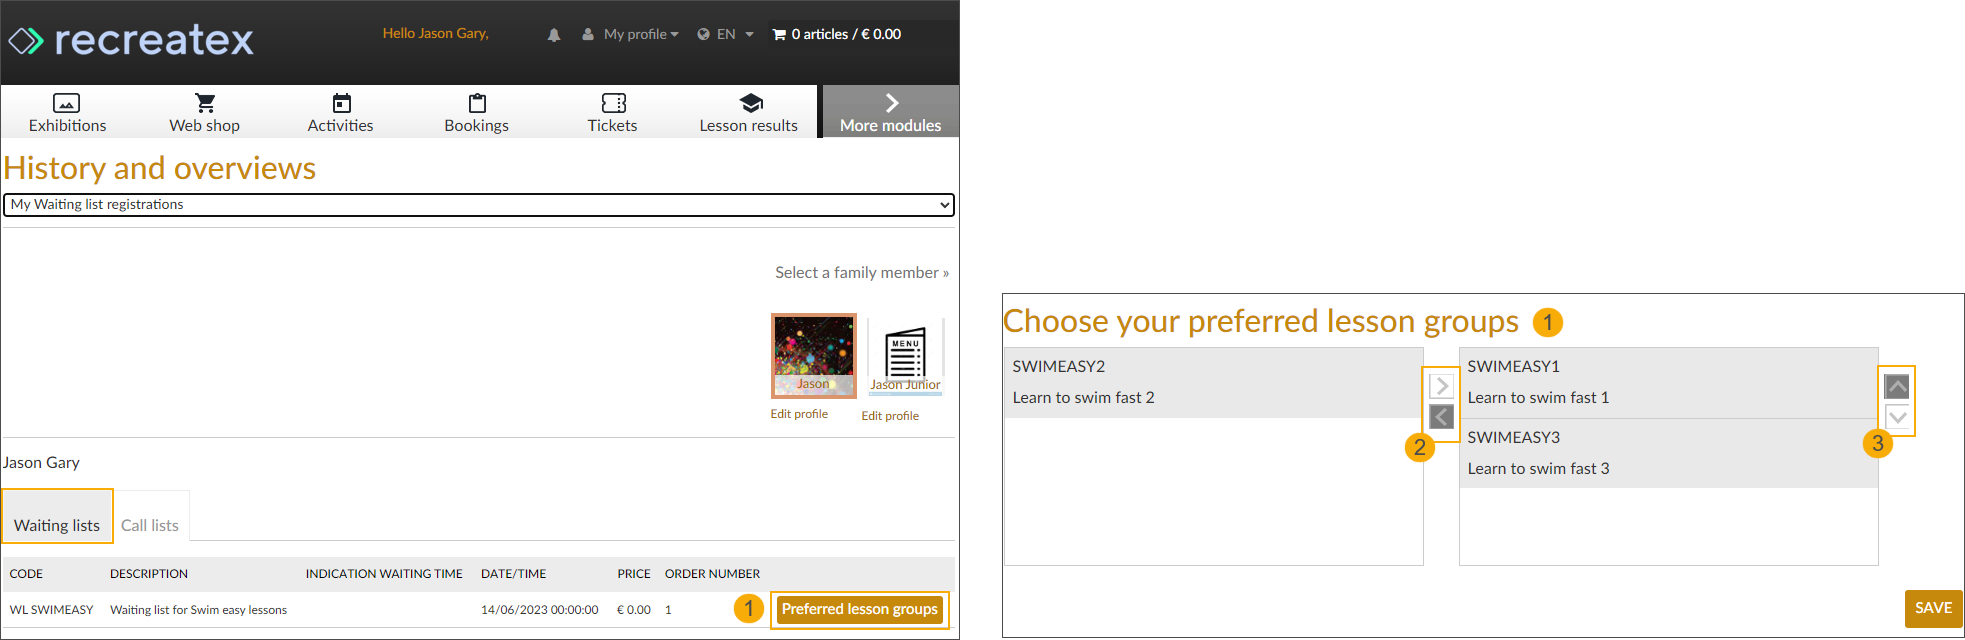
Next to the direct link, the students can also log in to the Webshop and manage the waiting list calls in History and overviews > My Waiting list registrations page (1) > tab Call lists.
Note
To make the Call lists tab available for the Webshop users, activate the setting Show waiting list calls in the Webshop Manager application, under Lesson scores > Settings > General settings.
Depending on the student's reply, the status of the call will change in the backoffice:
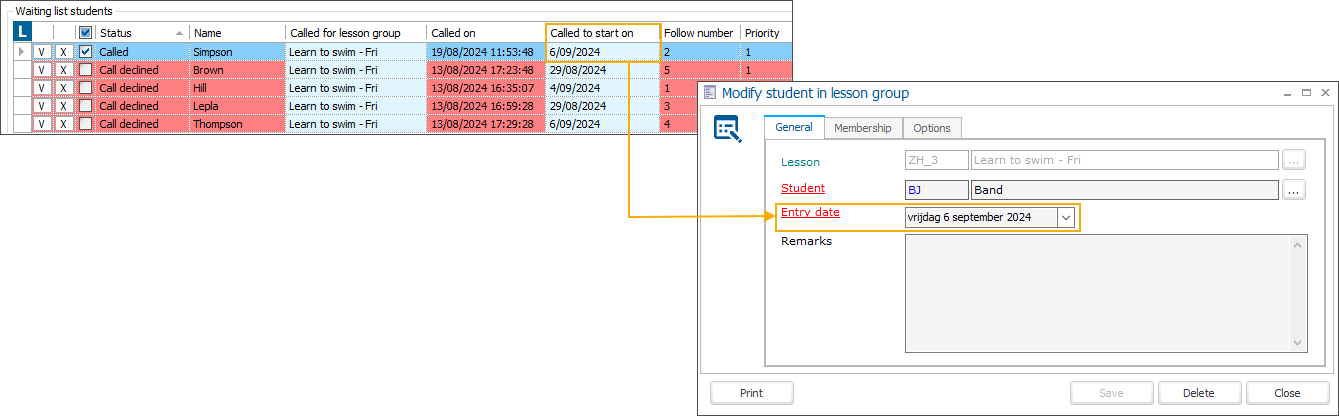
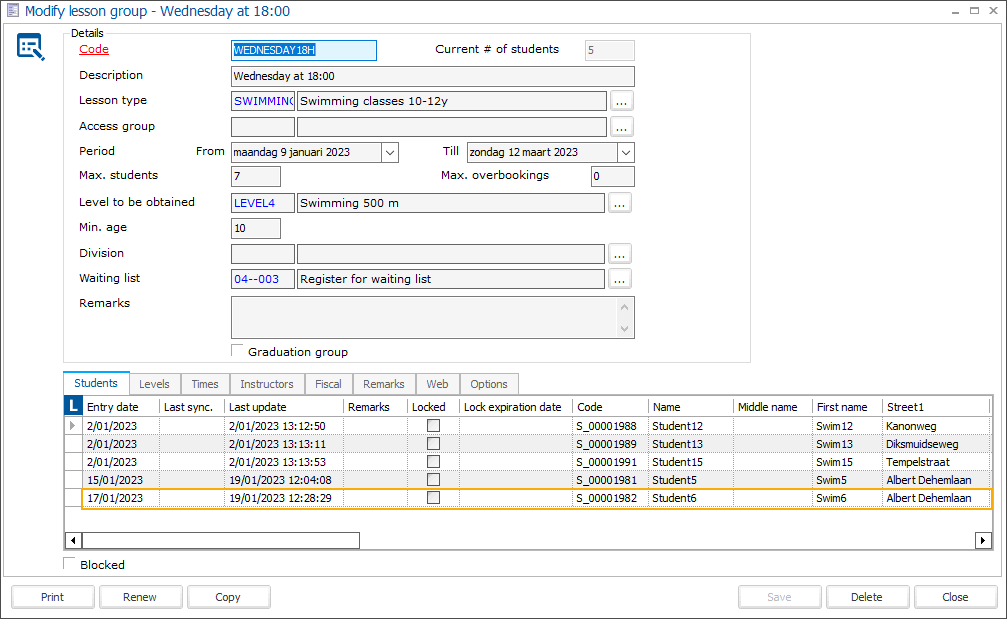
Accept: The student is automatically removed from the waiting list and moved to the accepted lesson group. The Called to start on date is entered as the Entry date.
Decline: The status changes to Call declined and the student may be called again for another lesson group
No response: The call/link expires after the predefined number of days and the status changes to Call expired. The student may now be called again for another lesson group.
Via the Webshop, apart from responding to the waiting list call, the students can also manage their Preferred lesson groups (1): in History and overviews > My Waiting list registrations page (1) > tab Waiting lists. Using the arrow buttons, the students can select/deselect (2) the lesson groups and change the priority (3) of the selected lesson groups.
Call waiting list students and process the feedback manually
Manually call waiting list students
To start, select the call list and the relevant lesson groups, specify the Lesson date from and revise whether the option Only use preferred lesson group of students is set correctly. See the topic Call waiting list students for a detailed explanation of these steps.
Next, select a group from the drop-down list in the column Called for lesson group and confirm your selection.
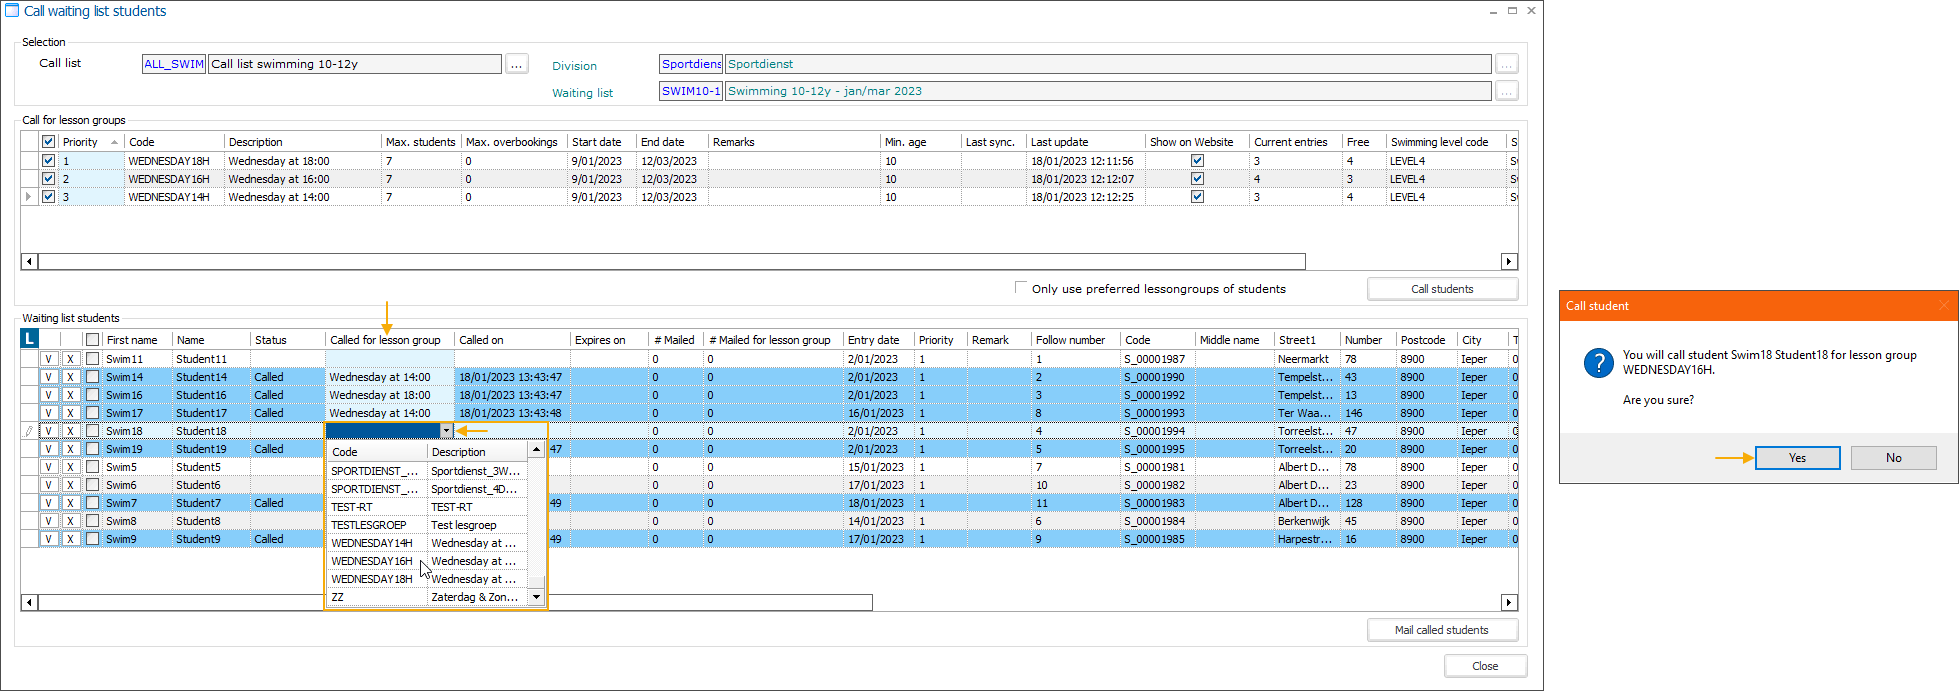
If you need to adjust the lesson group start date too, select the correct date under Called to start on and confirm your selection.
Validation steps are performed in the background to determine whether the selected group matches all criteria. This may result in one or more warning messages or errors:
Type | Message | Info |
|---|---|---|
Error | This lesson group is full. You cannot register more students. |
|
Warning | You are about to exceed the maximum number of students. Do you want to continue? |
|
Warning | You are about to register this student for a lesson group but the required swimming levels of the lesson group do not correspond to the swimming level of the student. Do you want to continue? | |
Warning | You are about to register this student for a lesson group although he/she does not have the required minimum age. Do you want to continue? | |
Warning | Invalid lesson date: Caution, there is no lesson on Weekday dd/mm/yyyy for lesson group Lesson group name. Do you wish to proceed? |
|
Error | The registration on the waiting list for {0} has not yet been paid, and cannot be transferred. |
Note
Errors are blocking. The student cannot be registered in the lesson group.
Warnings are not blocking. A pop-up message appears and it is up to the administrator to accept or decline the warning.
When a warning is accepted, the student is registered for the lesson group.
When a warning is declined the student remains on the waiting list.
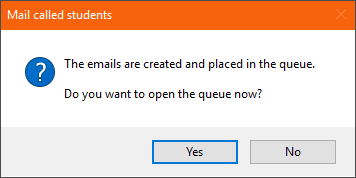
After selecting lesson groups for all relevant students, you can now send the e-mails. Select all students to whom you want to send an email and click Mail called students.
Note
You can only email students if they have an email address (filled in on the customer card), are called for a lesson group and have not declined yet.
The emails are created and placed in the queue. You can open the queue and send the emails immediately or let the queue execute the mailing at the predefined moment.
Manually accept calls for waiting list students
To accept a call from backoffice manually, click the accept button (V) next to that particular student, then click Yes to confirm the transfer.
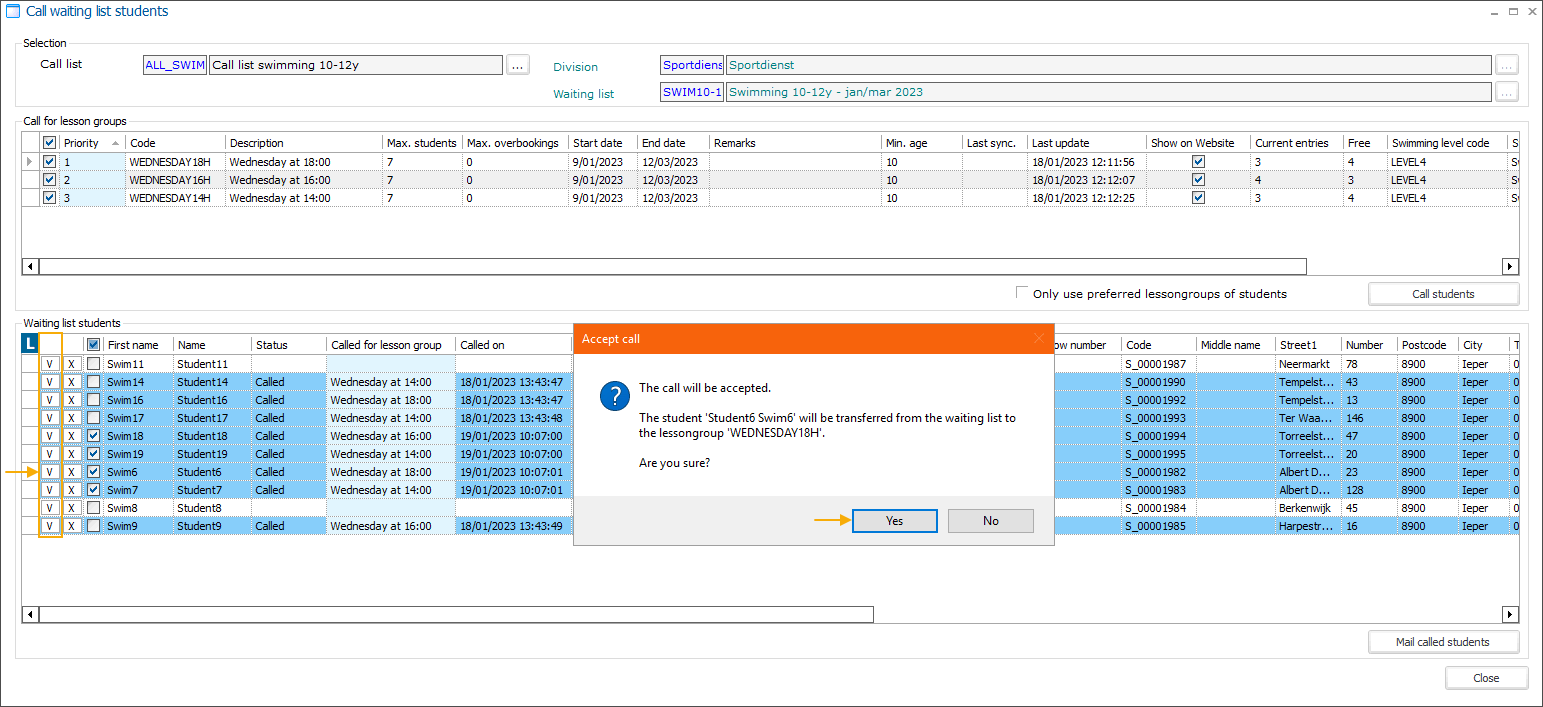
Validation will be executed to check whether the transfer is possible.
If validation errors or warnings are encountered, they will be displayed in form of pop-up messages.
If validation is successful, the student is transferred from the waiting list to the lesson group and is no longer visible in the call list. The Called to start on date is entered as the Entry date.
Note
Depending on your configuration, you may receive a question about whether the student has to be removed from all the waiting lists.
Manually decline calls for waiting list students
To decline a call from backoffice manually, click the decline button (X) next to that particular student, then click Yes to confirm.
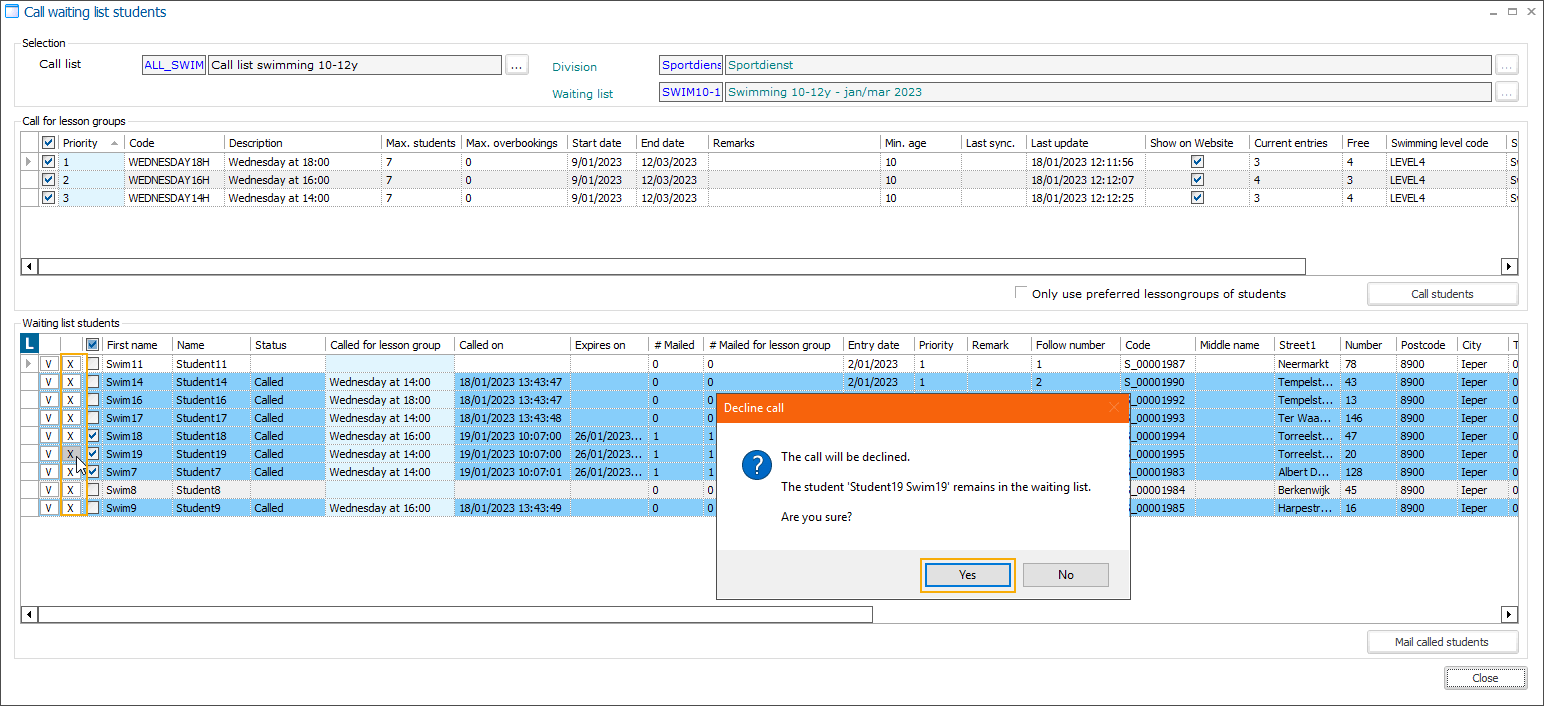
The status changes to Call declined and the student can now be called again if a place becomes available.

Important
If you choose to use the automatic function Call students, the manually declined lesson group will no longer be considered for this student.