Create and send SMS messages
The SMS functionality is available across various components within the Recreatex system:
SMS module: Manually created messages (generic option independent of other modules)
Timeslot ticketing module: Send SMS notifications regarding exhibition visits (e.g. visit cancelled, moved or as a reminder).
Sales admin module: An extension of the ordering functionality via point of sale (QR ordering app, F&B solution, POS) to notify customers when their order is ready.
Dynamic: An option to add merge fields from a custom Dynamic view, providing greater flexibility when composing sms messages.
Only manual SMS messages can be created directly in the SMS messages overview. To make the remaining types of SMS messages a specific configuration is required within the relevant module.
Create SMS messages: type Manual
You can create simple SMS messages for individual users directly in the SMS messages overview.
In Recreatex, go to the module SMS > SMS messages and open the overview.
Using the framework functionality (right-click + New or F2 key on your keyboard) open a new SMS message screen
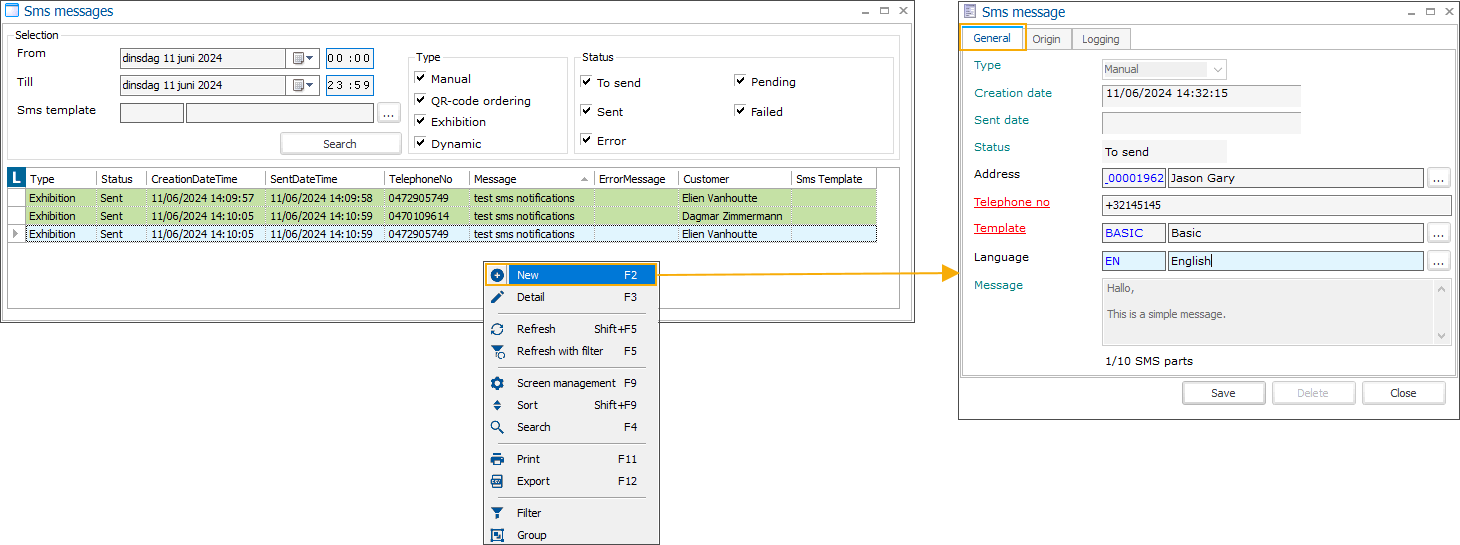
Type: is always Manual and cannot be changed.
Creation date: is automatically filled in with the current date/time when you open the SMS message screen.
Sent date: is populated automatically after the message has been sent.
Status: is populated and updated automatically.
Address: Selecting a customer will automatically populate the fields Language and Telephone no. if the information is available on the customer address card.
Only customers who have granted permission to receive SMS messages (setting SMS allowed checked) will be displayed in the list for selection.
Important
If you use Address merge fields in your SMS message template you must select the customer to allow the system to retrieve the relevant information from the customer address card.
Telephone no.: is mandatory and can be filled in or adjusted manually, if not available on the customer address card. The max. length allowed is 30 characters.
Template: is mandatory. Selecting a template will automatically populate the Message field with the text.
To create a template, go to SMS > Settings > SMS templates or create one directly, in the SMS templates overview, using the existing framework functionality (right-click + New or F2 key).
Message: The text of the SMS message is read-only. To adjust the message you need to modify the SMS template.
Click Save to add the message to the queue.
Create SMS messages: type Exhibition
The SMS notifications functionality allows you to send SMS messages directly from the Recreatex application to notify customers about their exhibition visits, such as sending reminders or efficiently communicating last-minute cancellations.
To access and use this functionality, you need the general setup and the module Timeslot ticketing.
In Recreatex, go to Timeslot ticketing > Processing > SMS notifications
In the Exhibitions SMS notifications screen define your selection criteria and search for relevant exhibition periods:
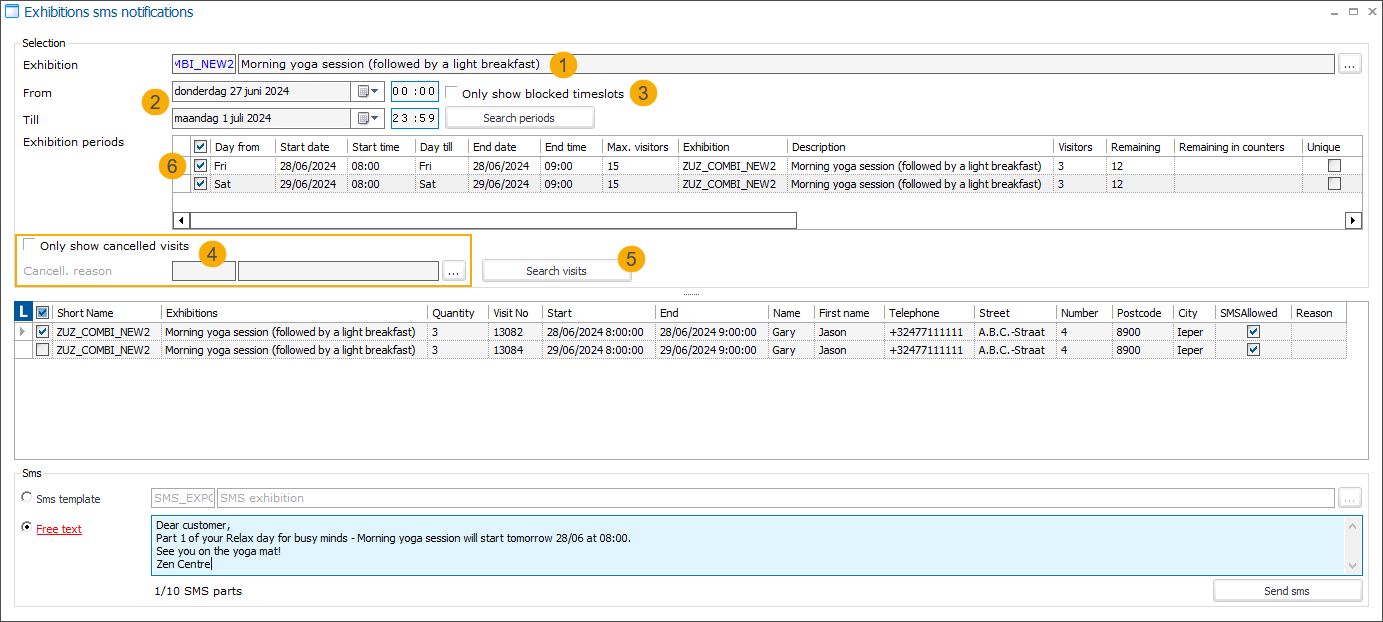
Exhibition (1)
You can select 1 specific exhibition. Without selecting an exhibition, periods of all active exhibitions will be included in the selection.
From date/time (2)
By default, the field shows the current day, the start of the day.
Till date/time (2)
By default, the field shows the current day, the end of the day.
Only show blocked timeslots (3)
Select this option to show only exhibition periods that are fully booked (Modify exhibition period > tab General > option Full is selected).
Click Search periods (4) to populate the Exhibition periods overview (5). All exhibition periods in the overview are selected by default. Deselect any, if needed.
Search for the relevant visits.
Only show cancelled visits
Filter the cancelled visits only, if you want to inform customers in case their visit has been cancelled.
Cancellation reason
Optionally, choose a specific cancellation reason to filter and display only those visits that were cancelled for that particular reason.
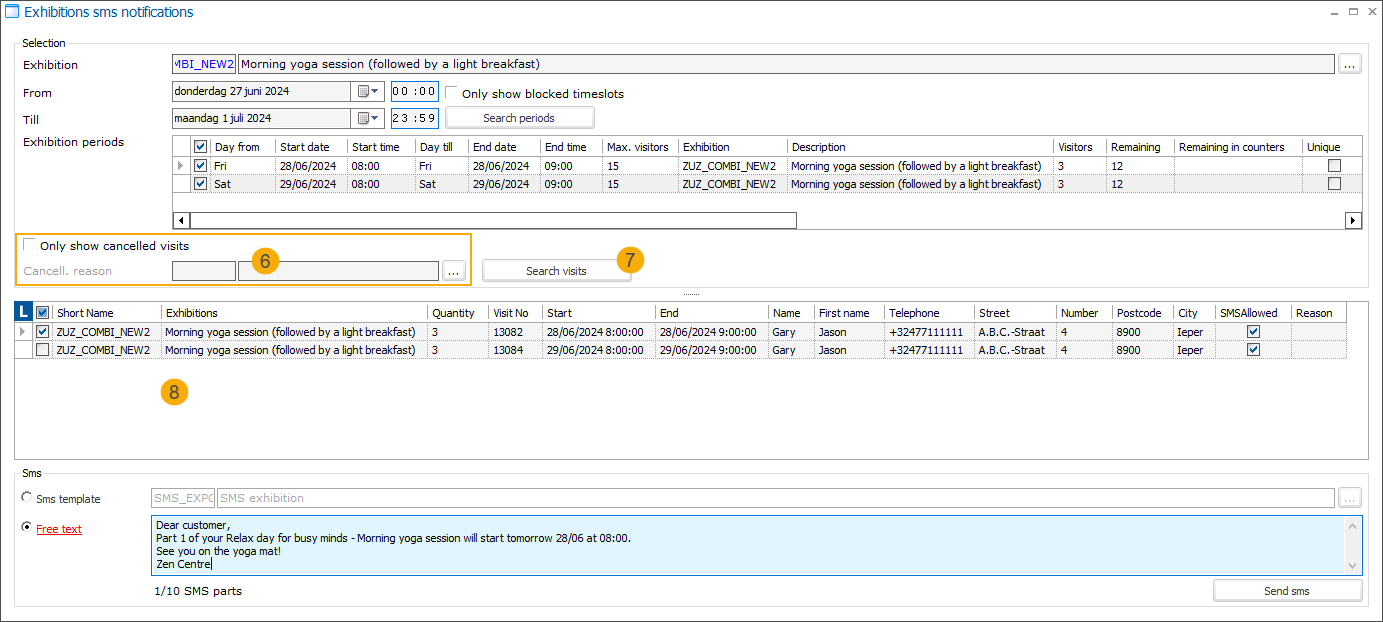
Click Search visits (7) to generate the list of relevant exhibition visits (8). Select all exhibition visits for which you want to send an SMS notification.
Exhibition visits highlighted in red indicate that the phone number of these customers is either missing or incorrect in the contact details. As sending SMS notifications for such visits is impossible, they cannot be selected in the list.
Exhibition visits highlighted in darker grey indicate that the customer did not give SMS permission, which is also reflected by the absence of a checkmark in the SMS allowed column.
In the section Sms, choose how you want to compose the SMS message:
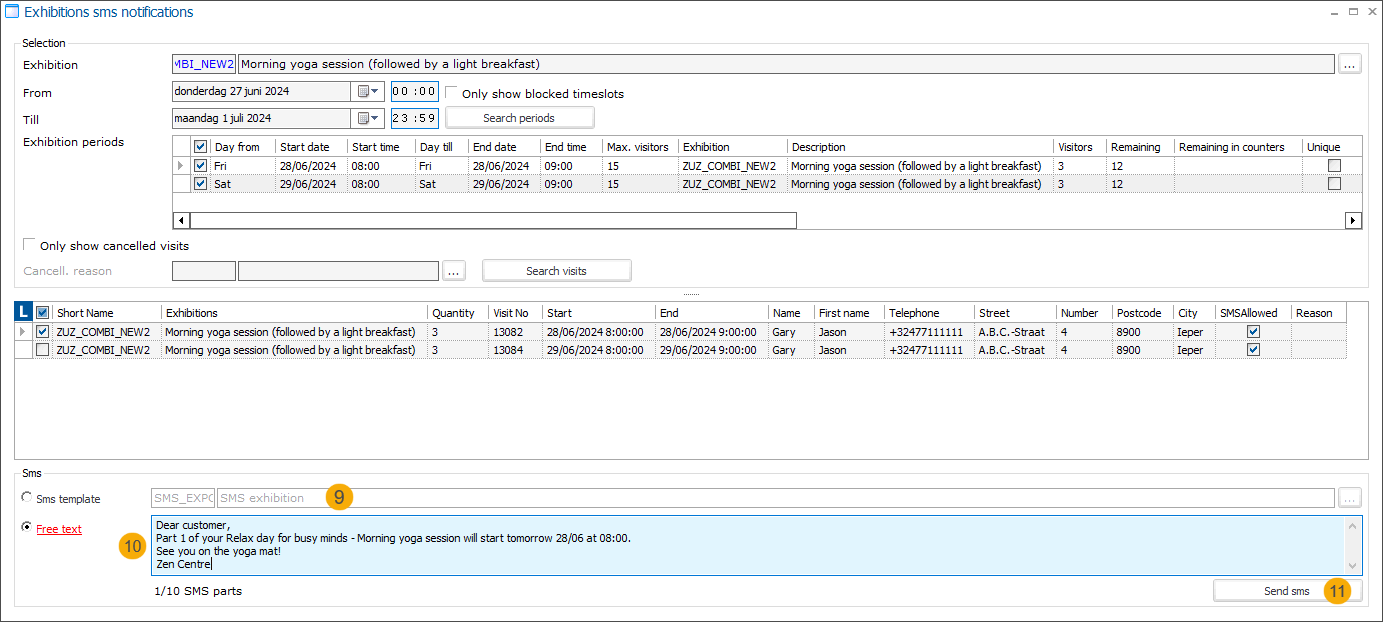
Sms template (9): Select a template previously created in the SMS module, under SMS > Settings > SMS templates
Free text (10): Type a simple SMS message directly. The max. length is 1530 characters, divided over a maximum of 10 SMS parts.
Note
For SMS notifications of the type Exhibition, you can use available merge fields from the following tables: Address, OrganisedVisits and ExpositionPeriods.
Click Send SMS (11) to generate the SMS messages and add them to the SMS messages queue for further processing.
Create SMS messages: type QR-code ordering
In a point of sale (POS) with order functionality enabled, the order enters an additional processing flow after payment: it is created as an open order and, after preparation, is marked as processed. Once processed, an SMS notification is triggered to inform the customer that their order is ready for pickup.
To access and use this functionality, you need the general setup and a point of sale with activated order functionality.
Configure SMS template
In the Sales admin module, go to Parameters > tab Order notification:
Specify deviating sms templates per sales zone if needed
In the SMS section, choose the SMS template that will serve as the fallback for any sales zone that does not have a dedicated template assigned.
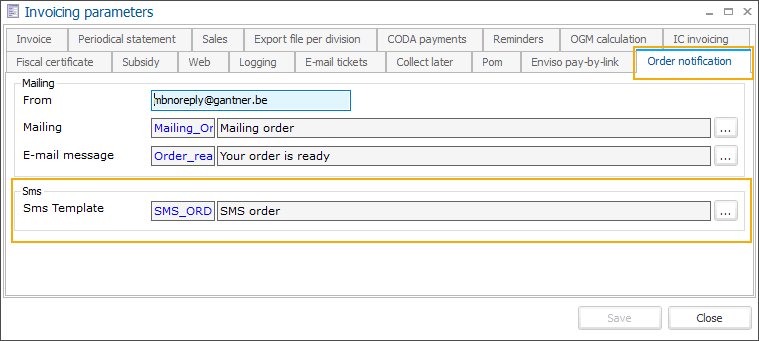
When an order is marked as processed, the SMS functionality sends a message based on the predefined template to the phone number provided by the customer (guest) during ordering or, if the customer has logged in, to the number stored in their customer account (field Tel. 1).
To find out more about how to create a message template, see SMS templates.
Create SMS messages: type Dynamic
With extended SMS functionality, you can utilise custom dynamic views to generate SMS messages and automate their delivery through predefined schedules. For example, you can set up a daily schedule to send a personalised "Happy birthday" message to all customers celebrating their birthday on a particular day.
To access and use this functionality, you need the general setup and a Dynamic selection (based on a well-configured dynamic view)
Important
The dynamic view must include the address field containing the phone number Tel. 1 (dbo.Addresses.Telephone1), as this is required for the plugin to know where to send the message.
Include the Language field (dbo.addresses.LanguageID) in the dynamic view so the plugin can retrieve and send translated SMS messages according to the customer’s language. If a translation is not available for a specific language or the Language ID is missing, the plugin will default to the original SMS template text.
Define SMS template
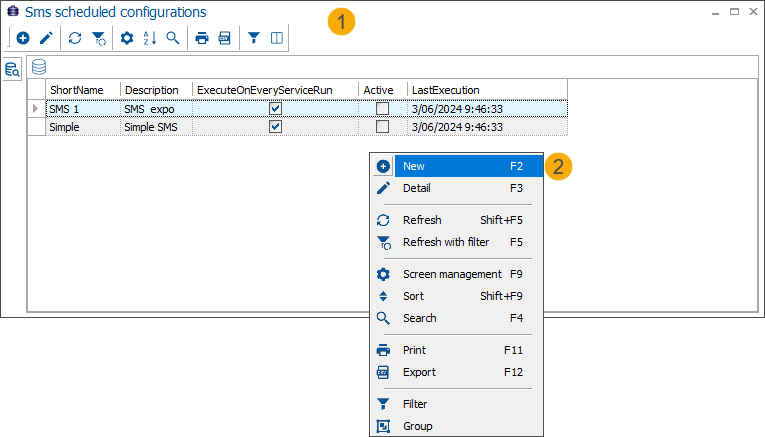
In Recreatex, go to SMS > Settings > Sms scheduled configurations to open the overview of all scheduled configurations (1). Use the existing framework functionality to create a new configuration (2).
In the SMS schedule configuration screen go to the tab General and fill in a unique Code and optional Description.
Create the SMS template.
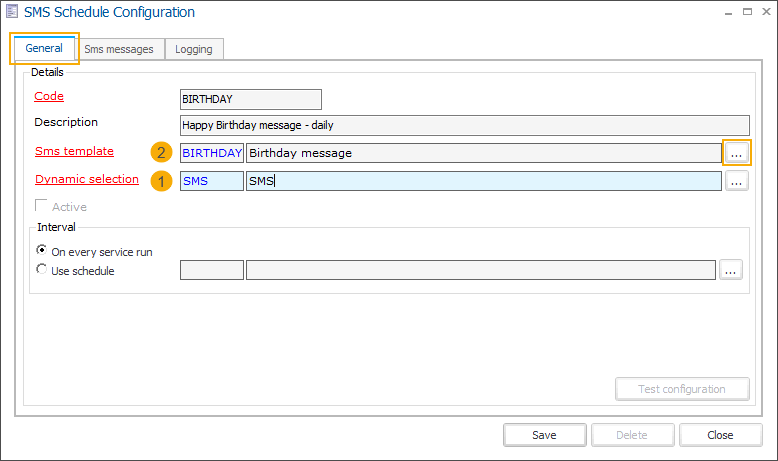
First, specify your Dynamic selection (1). For more information, see Dynamic view.
Next, click
 (2) to open the Sms templates overview. Using the framework functionality (right-click + New or F2 key), create a new template.
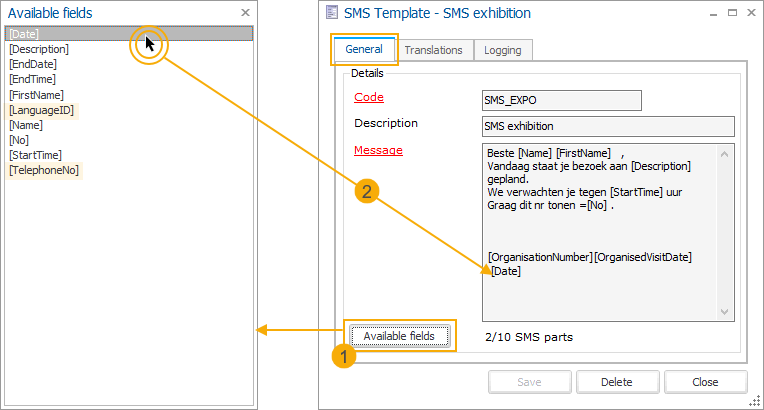
In the tab General, enter a unique Code and Description.
Type the text of your SMS in the Message box. You can type the merge fields from your Dynamic view manually, using the correct field text in square brackets or you can use the help behind the Available fields button (1).
Double-click a field to insert it at the end of your message (2). Then copy/paste the field to move it to the correct place in your message.
Important
If you do not select the Dynamic view first or if you are creating your templates directly, via SMS > Settings > Sms templates, the fields available behind the Available fields button will NOT be the fields from your custom Dynamic view. You will only see the default fields that can be used in the regular message types (Exhibition, QR-code ordering, Manual).
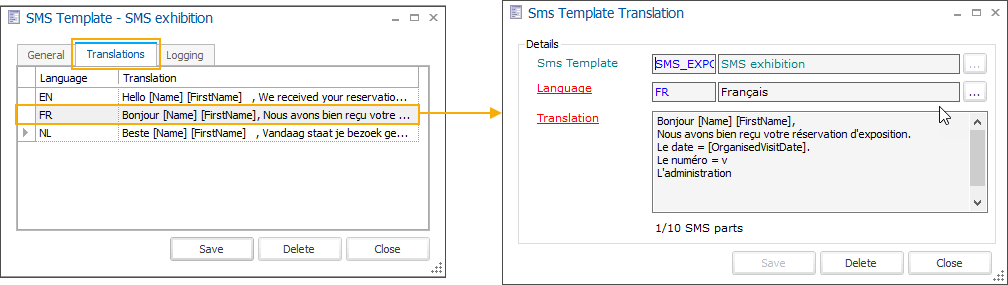
In the tab, Translations, provide translated messages for all relevant languages.
Under the tab Logging you can trace all modifications of the current template.
Click Save to add the template to the templates overview, then add it to your SMS schedule configuration.
Schedule SMS notifications
In the section Interval (1), define the schedule to be executed by the ScheduledSmsEngine plugin.

You can choose to let the plugin generate messages:
On every service run: If you select this option, the plugin will follow the (fall-back) schedule task(s) defined in SydAdmin.
Use schedule: By selecting your predefined Schedule template, you can customize the plugin's run interval, aligning it with the purpose of your messages.
Click Save (2). Saving the SMS schedule configuration will activate the Test configuration button.
Test SMS schedule configuration
Click the Test configuration button (1). This action takes you to the Sms messages tab, where the plugin generates test messages (2) without sending them to the queue. You can open a detail of each message to verify if the correct data have been inserted. If any adjustments are necessary, you can make them now.
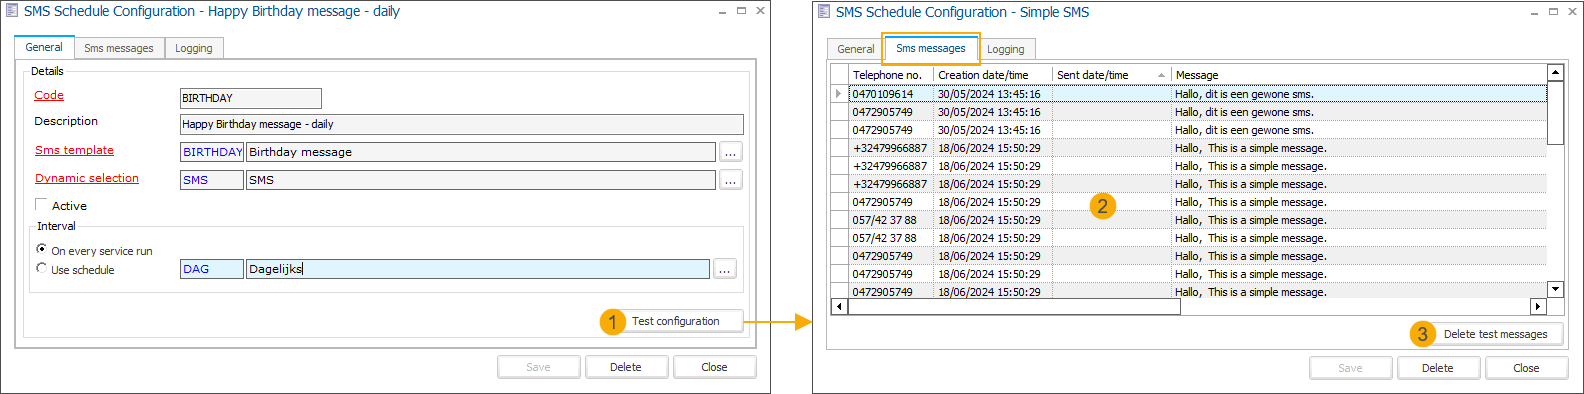
You can retest the configuration as often as necessary and delete the test messages by clicking the Delete test messages (3) button.
Note
Modifying the Dynamic selection or SMS template will deactivate the SMS schedule configuration and the Test configuration button. After saving the updated configuration, the Test configuration button will be reactivated, and the configuration needs to be tested again. Once completed, the Active option can be selected again.
Activate SMS schedule configuration
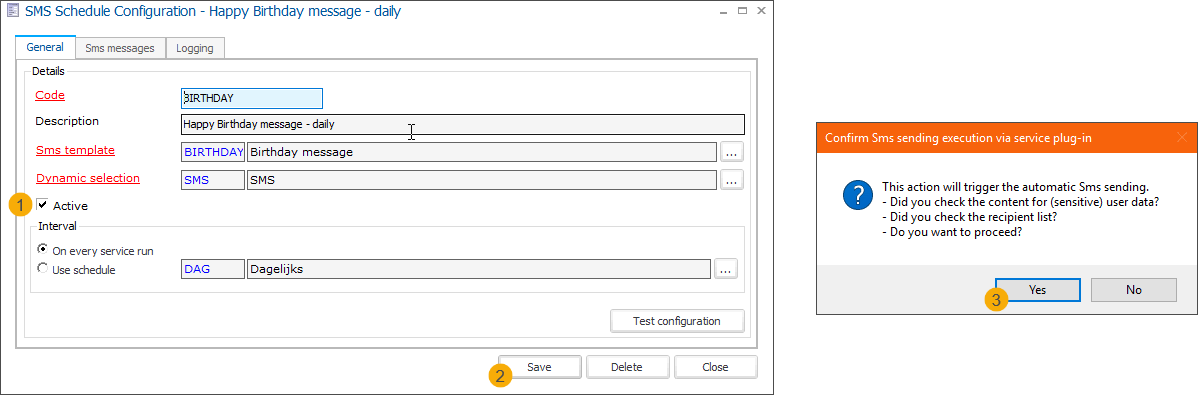
After a successful configuration test, the option Active (1) becomes available. Select the option, click Save (2) and Yes (3) to confirm the activation.
SMS messages will now be generated at scheduled intervals by combining the SMS template with additional information retrieved from the custom Dynamic view.
Delete SMS schedule configuration
An SMS schedule configuration cannot be deleted once it has been activated and live SMS messages have been sent to customers.