Choose a card type when purchasing a membership on the Webshop
When customers purchase or renew a membership via the Webshop they have the following options:
Add the new membership to their existing (physical) card.
Add the new membership to a new card (or other carrier):
Standard option - digital-only membership (e.g. QR code)
Other custom preconfigured options - magnetic stripe cards, wristbands, key fobs, etc.
The availability of various card types allows customers to find the suitable fit for their membership, including taking into account the cost difference between a physical membership card and a digital alternative (e.g. QR code), which is often less expensive.
The configuration is done in SydAdmin, Recreatex backoffice and Webshop Manager.
Configure card definition(s) available for the Webshop
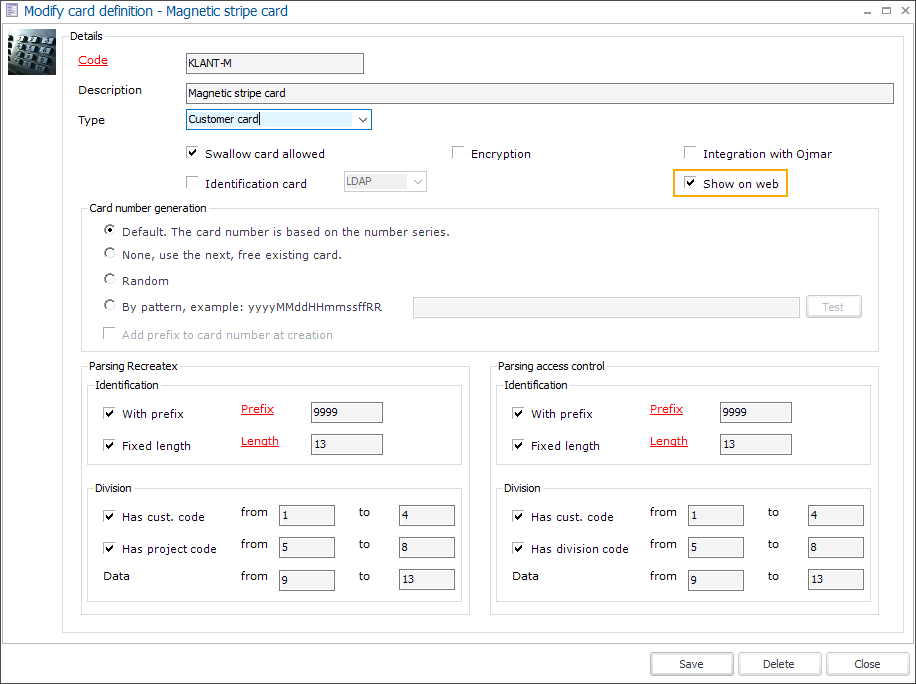
In SydAdmin, go to Management > Devices > Card definitions and make sure all relevant definitions are configured for Webshop use.
Add card definition(s) to the membership article
To configure all card options for a certain membership, in Recreatex go to the module General > Basic data > Articles > Articles and open the relevant membership article. Under the tab Web > subtab General, go to the section Card creation.
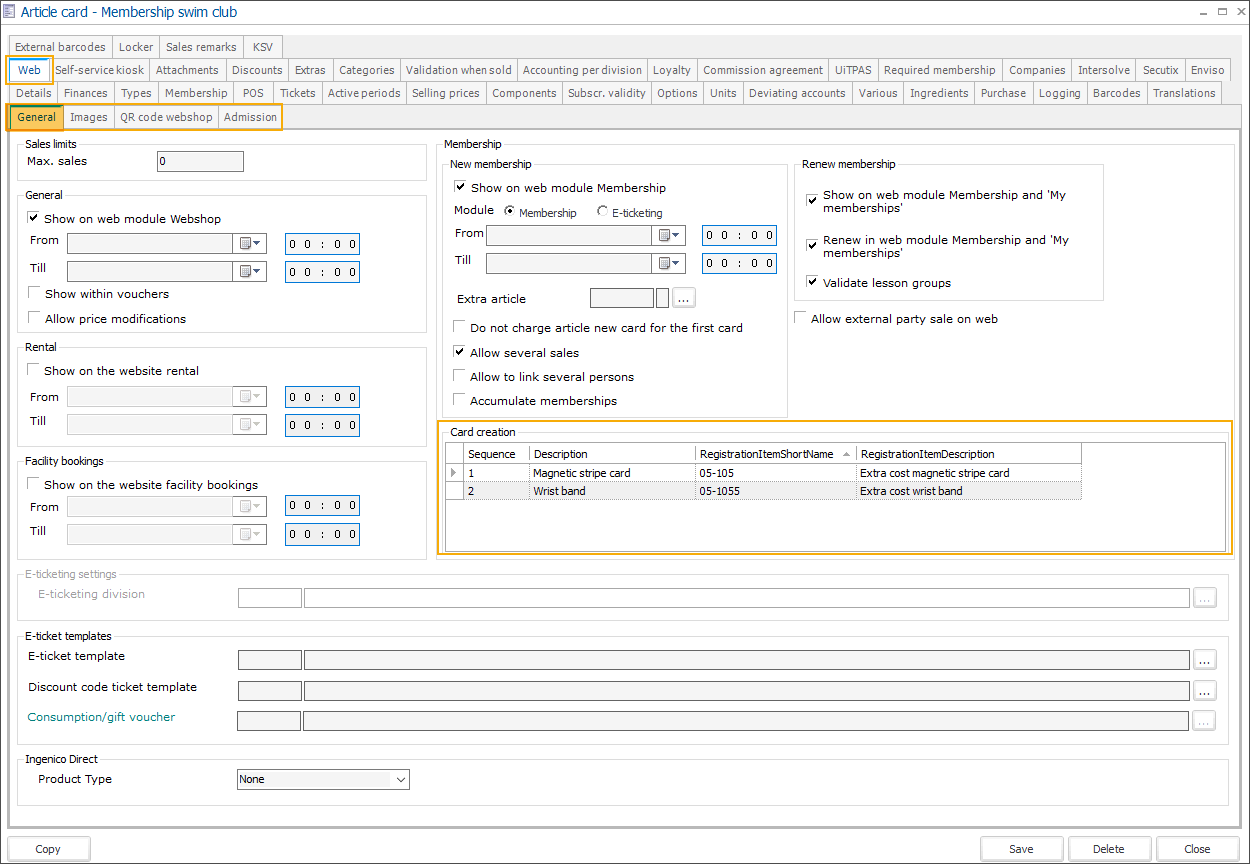
Using the available framework functionality add all relevant card options for this membership.
For each card option you need to configure:
Card definition (1): Only card definition with the setting Show on web active can be selected here (see step 1).
Note
Each card definition can only be used once within the same membership article.
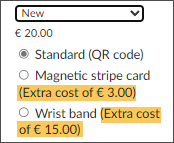
Registration item (2): Select an article to register the sales of this card option. Here you can also define the additional price for this type of card. This price will automatically be added to the card type: (Extra cost of {0})
Description (3): Provide a name for your card option. This description will be used on the Webshop if no translations have been provided for the individual languages.
Sequence (4): If you have multiple card options, here you can define the sequence number of the current option. This number will be used on the Webshop to sort and display the options in the desired order.
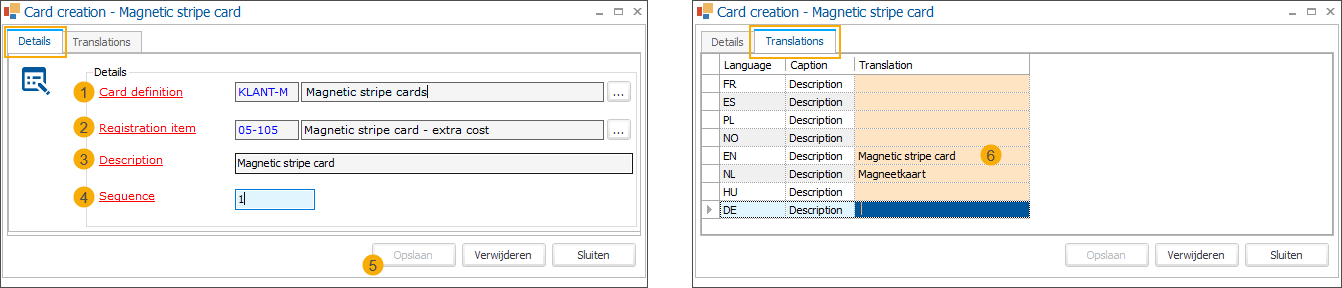
Click Save (5) to add the card option. In the tab Translations (6) you can now add translated descriptions for all relevant languages.
Save your membership article.
Important
To be able to use these pre-configured card definitions based on a specific card range you have to turn off the setting Automatically create card number on your membership article (tab Tickets > section Access ticket).
Define card ranges to be used on the Webshop
In Recreatex, go to Membership > Parameters > tab Web > section Online card creation ranges.
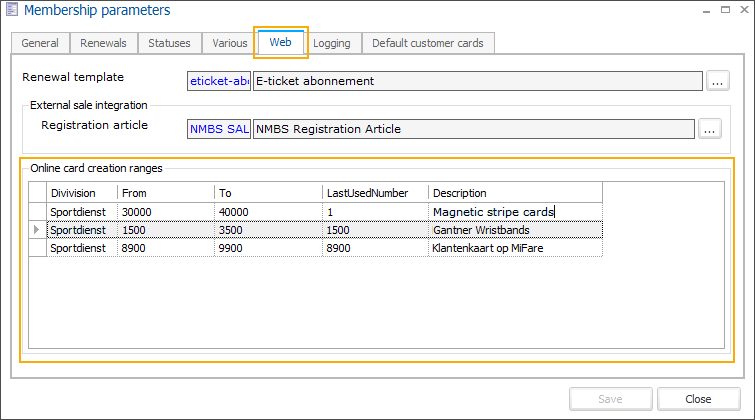
Use the available framework functionality to create online card range(s) for all needed card definitions. This way you reserve card ranges for online use only.
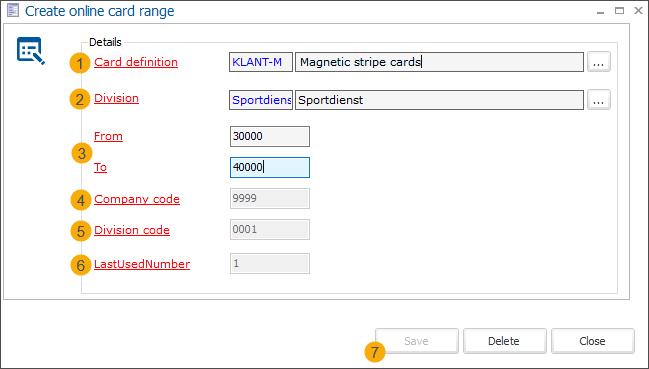
For each card range, you need to select:
Card definition (1): You can create multiple ranges for the same card definition within the same division, however, these ranges may not overlap.
Division (2): You can create ranges for multiple divisions.
From/To (3): The start and end number of the range.
Company code (4) and Division code (5) are populated automatically when you select a division (2).
LastUsedNumber (6) is adjusted automatically to provide information about the last number used for card creation.
Click Save to add the new card range to the list.
When a card range has been created, the available cards are created and added to a table that is used by the Webshop to manage the processing of card orders during the checkout flow.
Note
It is not possible to delete a range if a card has already been generated in the checkout flow using a number from that range.
Allow standard card option (digital-only random generated card number)
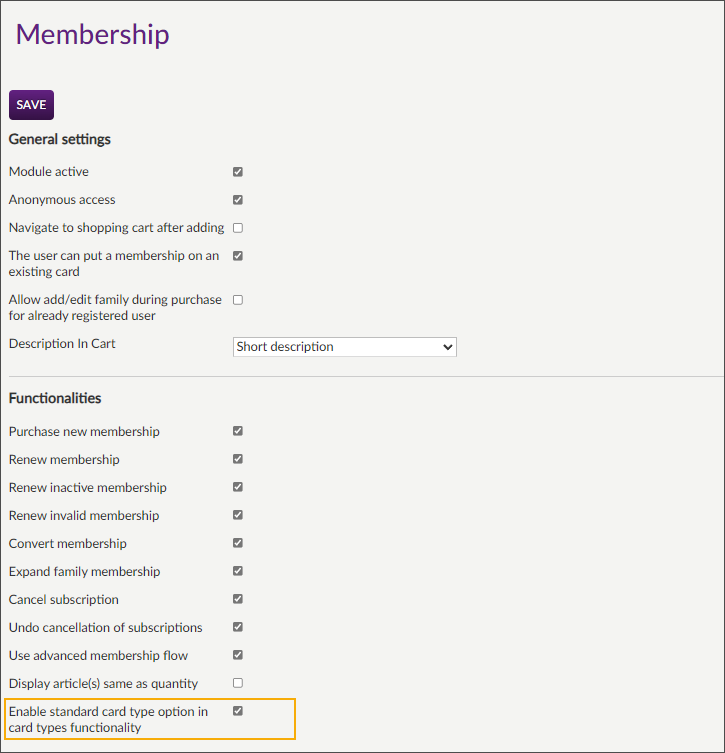
If you also want to give your customers the possibility to choose a digital-only membership in the form of a QR code or barcode generated randomly and printed on the order confirmation, you need to activate the setting Enable standard card type option in card types functionality in the Webshop Manager, under Membership > Settings > section Functionalities.
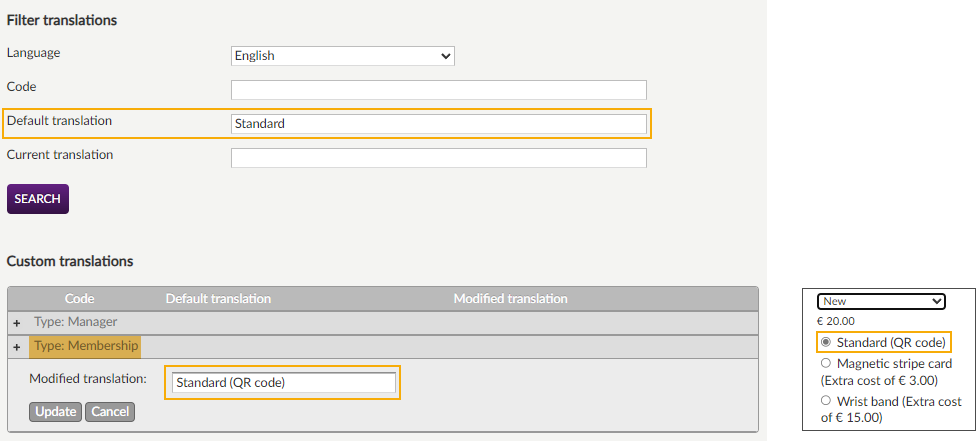
Tip
On the webshop, the standard card option has a default label Standard. To provide more clarity for your customers about this type of card you can modify the label translation in the Webshop Manager, under General > Translations > section Custom translations.
Selecting membership card options on the Webshop
Customers select the desired membership and the quantity. In the next step of the ordering flow, they are provided with the option to select a type of card to put the membership(s) on.
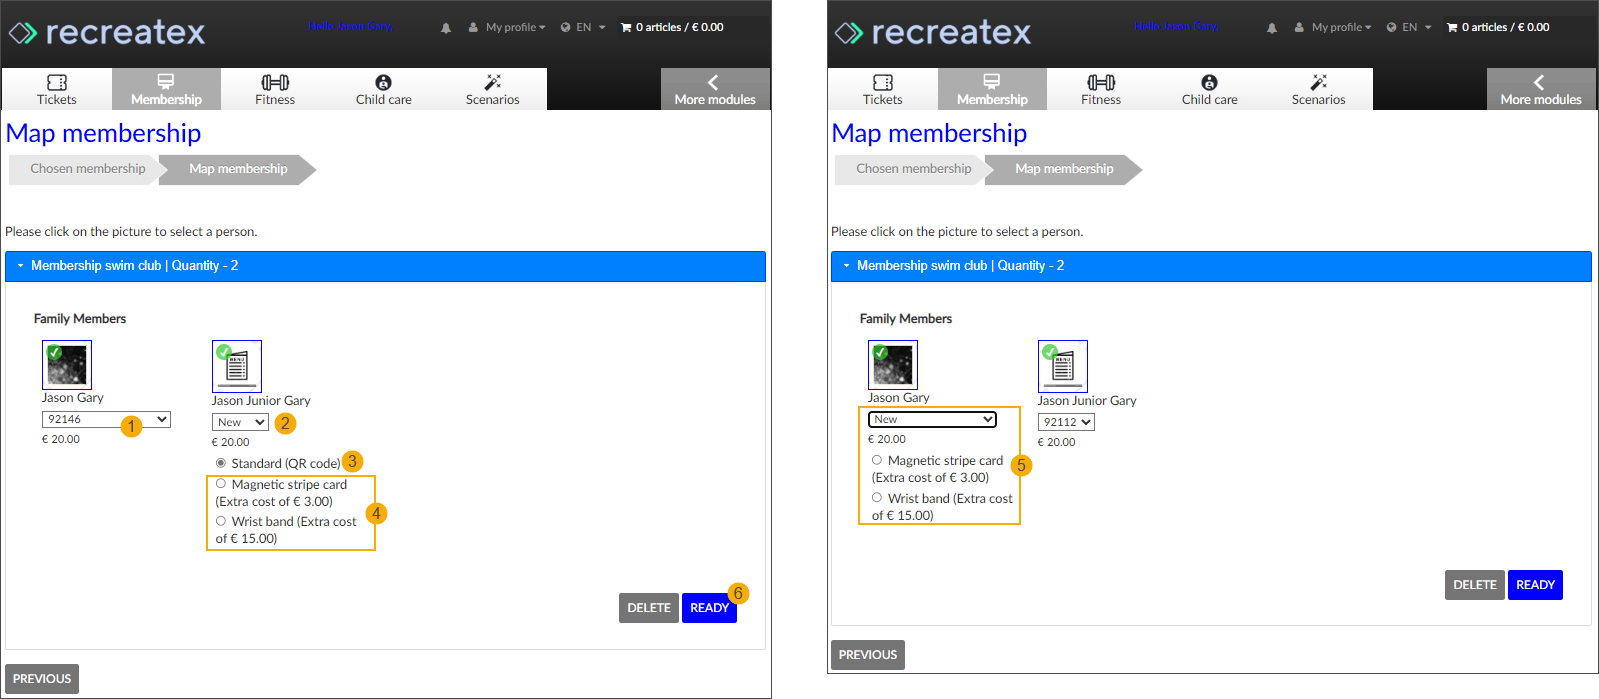
If the option The user can put a membership on an existing card is active, the customer will have the choice to link the membership to an existing physical card. The most recent valid card available will be preselected. (1) - existing functionality
Opting for New from the drop-down list will present all possible options for a new card. Customers make their choice using the radio buttons.
If the Standard option is active, it will be shown as the first option and it will be preselected (3). The remaining configured options will be displayed under the Standard option (4)
If the Standard option is not active, only the card options configured in the backoffice will be shown, in the predefined order and no option will be pre-selected. (5)
Clicking the button Ready (6) will validate the card selection and the customers can now add the order to the shopping cart.
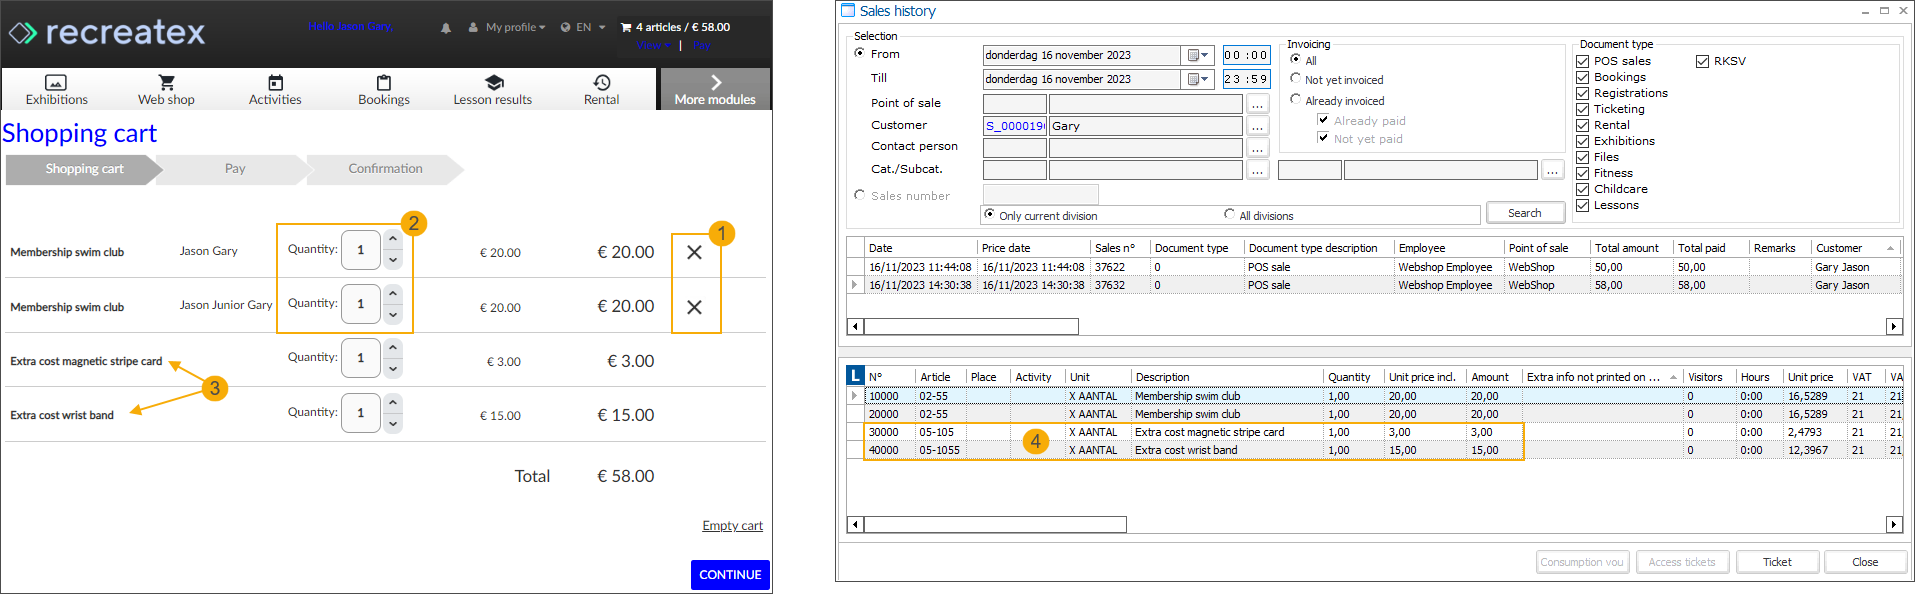
In the shopping cart overview, the customers still have the possibility to delete the selection (1) but can no longer adjust the quantity (2). The additional cost of each card is added as a separate line (3) and in the backoffice processed accordingly as a separate sales line (4).
The membership is linked to the correct card type and number from the predefined range.