Combi tickets for multiple exhibition visits
You now have the possibility to combine multiple exhibitions and offer your customers combi tickets at attractive discount prices.
Configure combi exhibitions - backoffice
Before you start creating combi exhibitions:
make sure the individual exhibitions have been created.
on the exhibition level, define separate prices that can be applied when an exhibition visit is sold as a part of a combi ticket.
When selling the same exhibitions individually as well as part of a combi exhibition, you may want to define separate prices for each purpose. The exhibition price rates reserved for the combi exhibition can be marked as Only allowed in combi exhibitions.
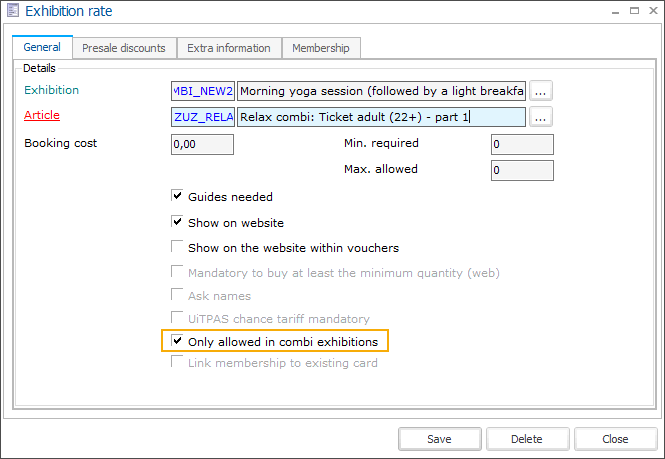
For combi exhibitions, you will always be able to choose any predefined rate, regardless of the setting but when selling the exhibitions individually, the rates (and related prices) marked as Only allowed in combi exhibitions will be hidden to avoid mistakes at the POS.
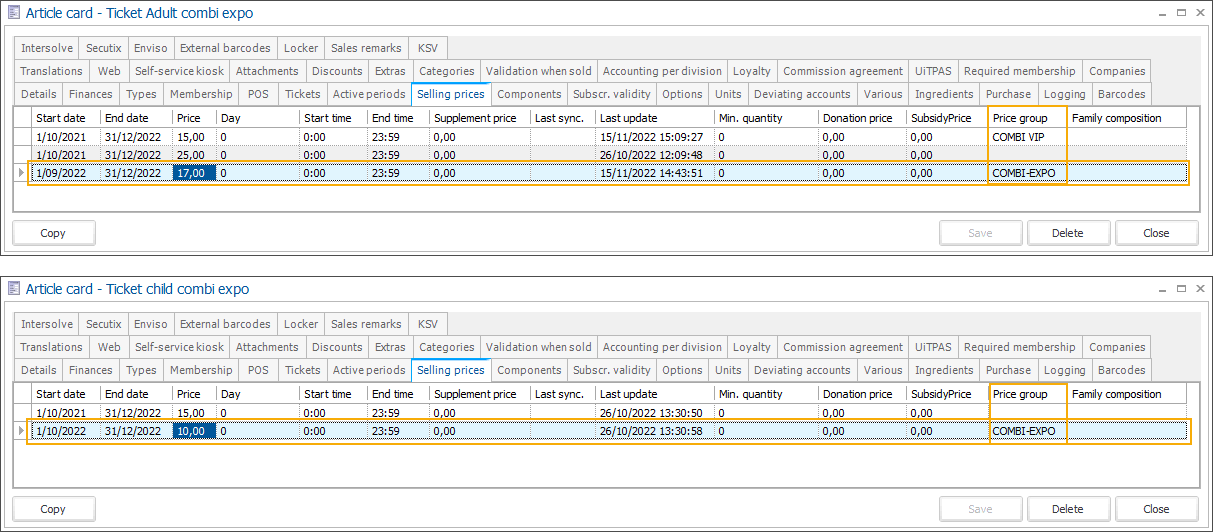
When defining the actual selling prices on the price article linked to the exhibition rate, you can link selling prices to a price group which will allow you to group and easily apply prices to a specific combi exhibition.
In Recreatex, go to Exhibitions > Combi exhibitions to open the overview screen of all combi exhibitions.
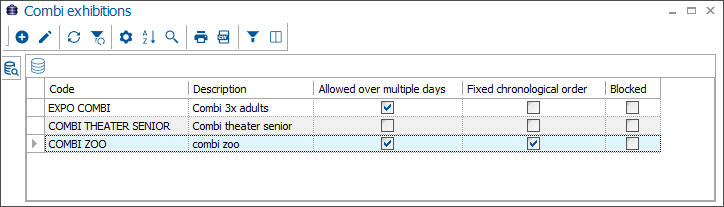
To create, modify or delete combi exhibitions use the available framework functionality.
In the tab General, specify the basic configuration of the combi exhibition.
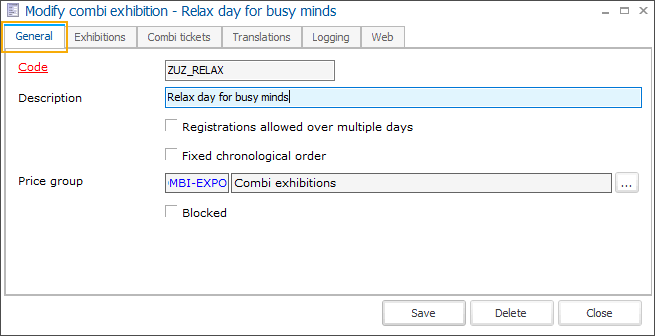
Code
The short name must be unique.
Description
Description of the combi exhibition
Registrations allowed over multiple days
Indicates whether it is allowed to select exhibition timeslots spread over multiple days.
Important
This setting must be activated if you configure the Min./Max. time before (on exhibition level) longer than 24 hours.
Fixed chronological order
Indicates whether the visitor must follow the included exhibitions in a specific order.
Price group
If you select a price group, the ticket prices will be calculated using the prices linked to this price group.
If you intend to use deviating prices, remove the price group here (or leave it empty if not yet in use) and apply it in the section deviating prices.
Blocked
Possibility to (temporarily) block a combi exhibition. The combi exhibition will no longer be available in the list but can be visualized using the right-click function and selecting the option Incl. blocked.
Click Save before you continue.
In the tab Exhibitions, create the step(s) and then link at least 1 exhibition to each step, depending on the concept of your combi exhibition.
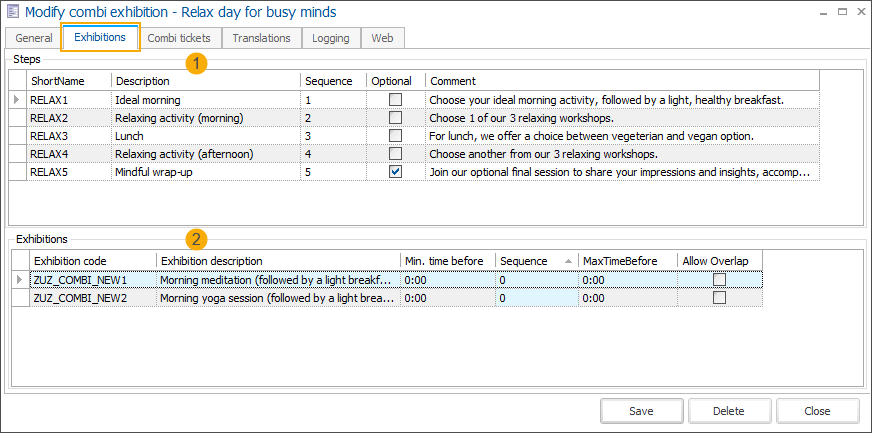
Steps: Create a new combi exhibition step (right-click + New or F2 key). In the tab General you can find the configuration of the exhibition step:

Combi exhibition (1)
Here you can see the combi exhibition for which the step has been created.
In the section Details (2), provide the following information:
Code
The code is mandatory and must be unique.
Description
Description of the combi exhibition step
Sequence
By providing a sequence number, you determine the order in which the steps are displayed at the POS.
Comment
You can add more detailed information for the customer.
Optional step
If a step is marked as optional, customers can choose to skip this step without choosing any exhibition.
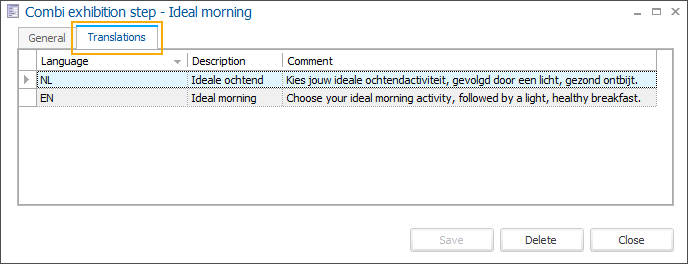
In the tab Translations, provide translations of the description and comment field to all relevant languages. The Webshop uses these translations to show the information in the user's language.
Exhibitions: For each step, you can add 1 or more exhibitions. When purchasing the combi tickets, customers are allowed to choose one exhibition per step.
Add a new exhibition to the combi exhibition step (right-click + New or F2 key).
Combi exhibition
Here you can see the related combi exhibition
Step
The step is mandatory and preselected when you open the Modify exhibition screen. You can, however, easily rearrange the exhibitions if needed by assigning them to different steps.
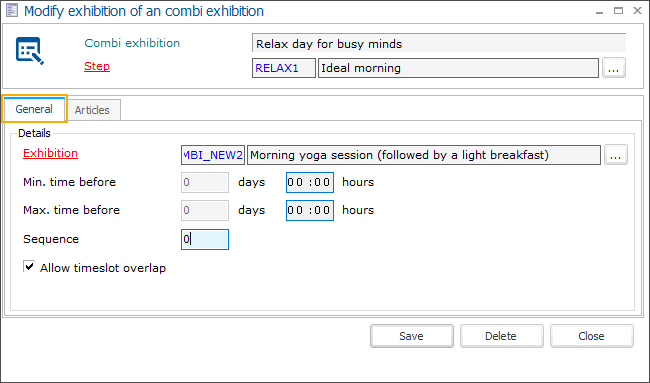
In the tab General, specify the details of the exhibition linked to the step. For each added exhibition you can further specify:
Exhibition
Select the exhibition that should be part of the combi exhibition
Min. time before (days & hours)
The minimum time between the end of the previous time slot and the beginning of the following time slot (of the current exhibition). It will allow the visitor to comfortably move from the location of one exhibition to the location of another exhibition.
The specified minimum time before will be considered when filtering the available timeslots.
Ensure that the setting Registrations allowed over multiple days is activated on the combi-exhibition level if you set the time for more than 24 hours.
Max. time before (days & hours)
The maximum time between the end of the previous time slot and the beginning of the following time slot (of the current exhibition).
The specified maximum time before will be considered when filtering the available timeslots.
Ensure that the setting Registrations allowed over multiple days is activated on the combi-exhibition level if you set the time for more than 24 hours.
Sequence
You can assign a sequence number to control the order in which exhibitions are presented to customers. For example, if you want to highlight or promote a specific exhibition, assign sequence number 1 to ensure it appears at the top of the list.
Allow timeslot overlap
When the setting is disabled, standard logic applies, and timeslots for different exhibitions cannot overlap. If a certain timeslot is already booked for the previous exhibition, the same and overlapping timeslots will not be available for the selection of the subsequent exhibitions.
When this setting is enabled, the timeslots of this exhibition will not affect the availability of timeslots for other exhibitions, allowing them to overlap.
If you select this exhibition first, the overlapping timeslots for subsequent exhibitions will be available for selection.
If you select this exhibition last, the timeslots of this exhibition will be available for selection even if they overlap with timeslots of previously chosen exhibitions.
In the tab Articles, you can add automatic and optional articles per exhibition.
Automatic articles
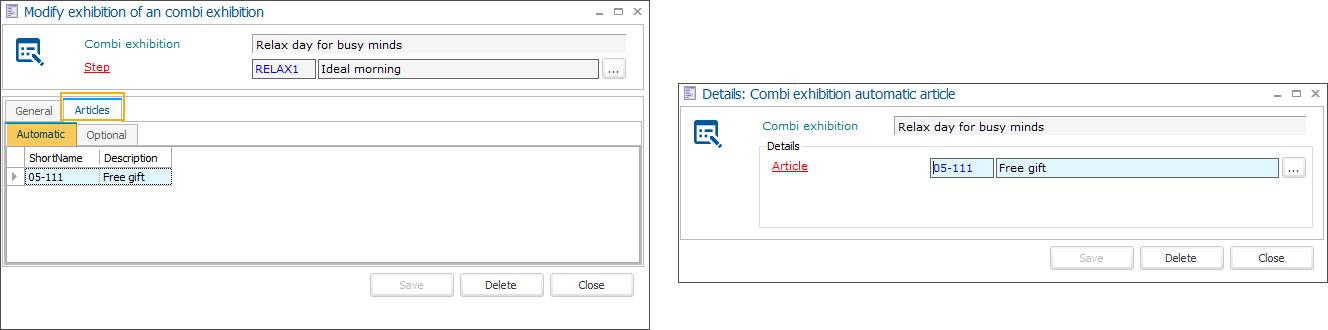
Optional articles
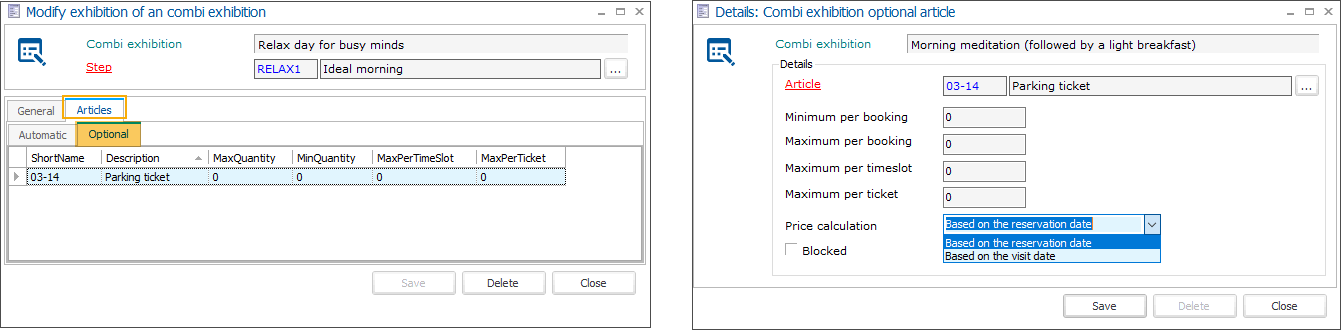
You have the option to set the minimum/maximum number that can be purchased of this optional article and decide if the price should be calculated based on the price available on the booking day or the day of the visit.
Repeat step 3 to add all steps and exhibitions that should be included in your combi-exhibition.
Note
Steps that have no exhibitions linked are excluded from the ordering flow of the related combi exhibition.
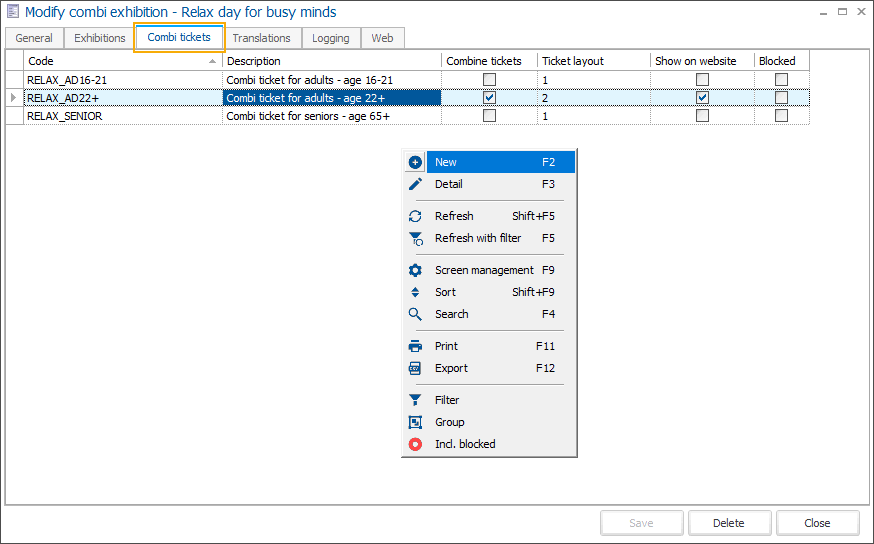
In the tab Combi tickets, define all types of combi tickets that should be available for your combi exhibition (e.g. combi tickets for adults, children, seniors and so on).
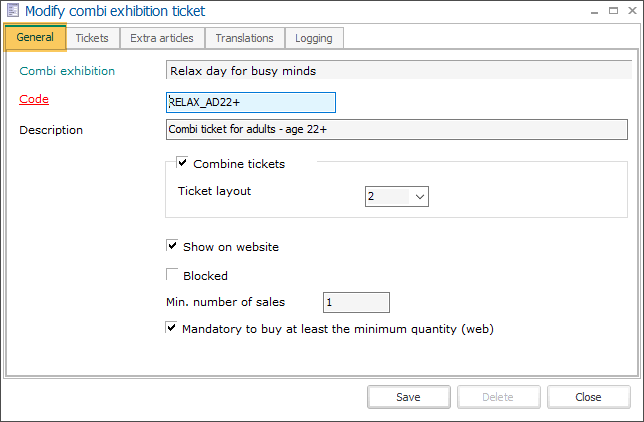
In the Modify combi exhibition ticket screen, go to the tab General to specify the basic configuration of the combi ticket.
Combi exhibition
The name of the current combi exhibition is read-only.
Code
The Code of the combi exhibition ticket must be unique.
Description
Description of the combi exhibition ticket.
Combine tickets
You can combine tickets for the individual exhibitions into a single ticket (1 barcode) or create a separate ticket for each part of the combi exhibition.
Ticket layout
If you choose to combine the tickets, you will have to specify a separate ticket layout.
Note
To create a suitable layout for a combined single ticket per visitor you will have to modify one of the available Crystal Reports layouts.
Show on website
(Not yet implemented)
Blocked
Possibility to (temporarily) block a combi ticket. The combi ticket will no longer be available in the list but can be visualized using the right-click function and selecting the option Incl. blocked.
Min. number of sales
Option to define the minimum number of tickets that must be purchased for this type of ticket.
Mandatory to buy at least the minimum quantity (web)
If the Min. number of sales is defined, this setting gives you the possibility to choose how strictly you want to enforce the purchase of the minimum required number of tickets on the Webshop.
If checked: The minimum number of tickets to purchase is mandatory, meaning that the minimum number of tickets is preselected and cannot be reduced.
The minimum number of tickets of this type will thus automatically be included in each ticket purchase for this combi exhibition.
If unchecked: The minimum number of tickets to purchase is mandatory on the Webshop if a customer chooses to purchase tickets of this type.
The number of tickets can be selected but if lower than the required number, a blocking message is displayed.
Click Save before you continue.
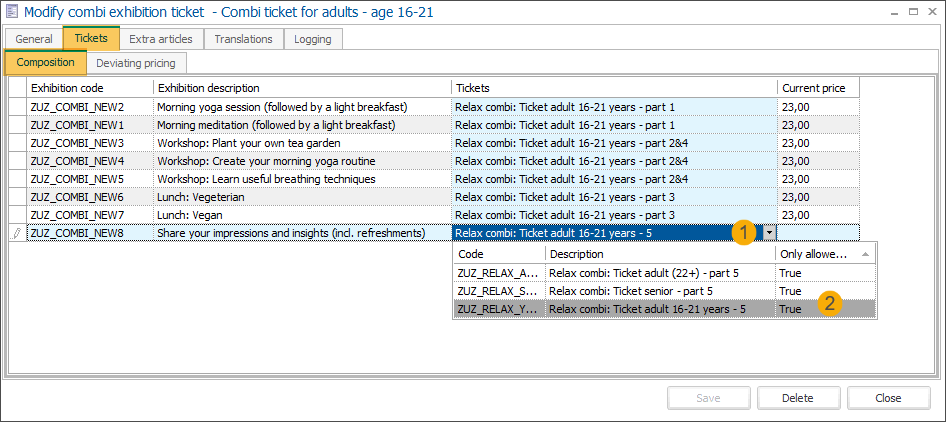
In the tab Tickets > Composition, select the ticket price rate per exhibition. Click the arrow in the column Tickets (1), next to each exhibition to open a drop-down list with all available price rates configured on the exhibition level.
If you have marked any price rates as Only allowed in combi exhibitions, they will be marked as True in the drop-down list (2)
In the tab Tickets > Deviating prices, you can configure a wide range of deviating prices per combi ticket.
Fill in the total combi-ticket price (1) and optionally add a price group (2), e.g. to give an additional discount. Click Set price (3) to generate the prices. The total price is proportionally divided among all exhibitions.
If you change the total price and/or the price group and click Set price again, the prices will be recalculated.
Important
Only price groups of the type not defined (0) or POS (4) can be selected here.
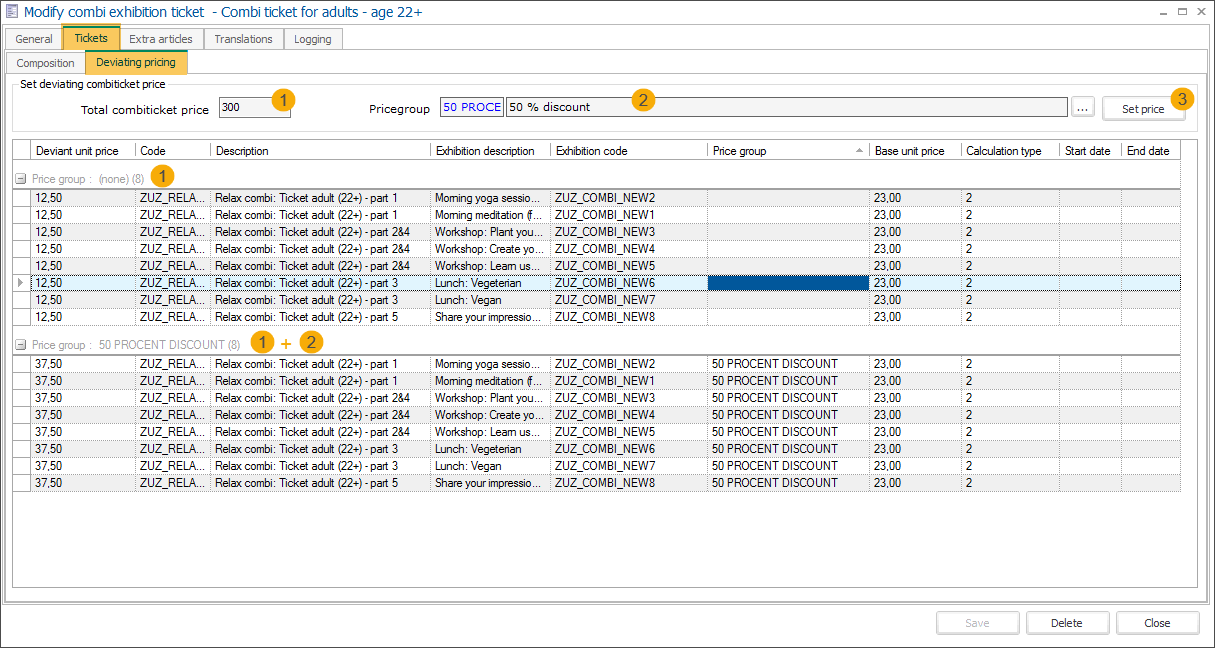
The created prices can be further individually modified or deleted.
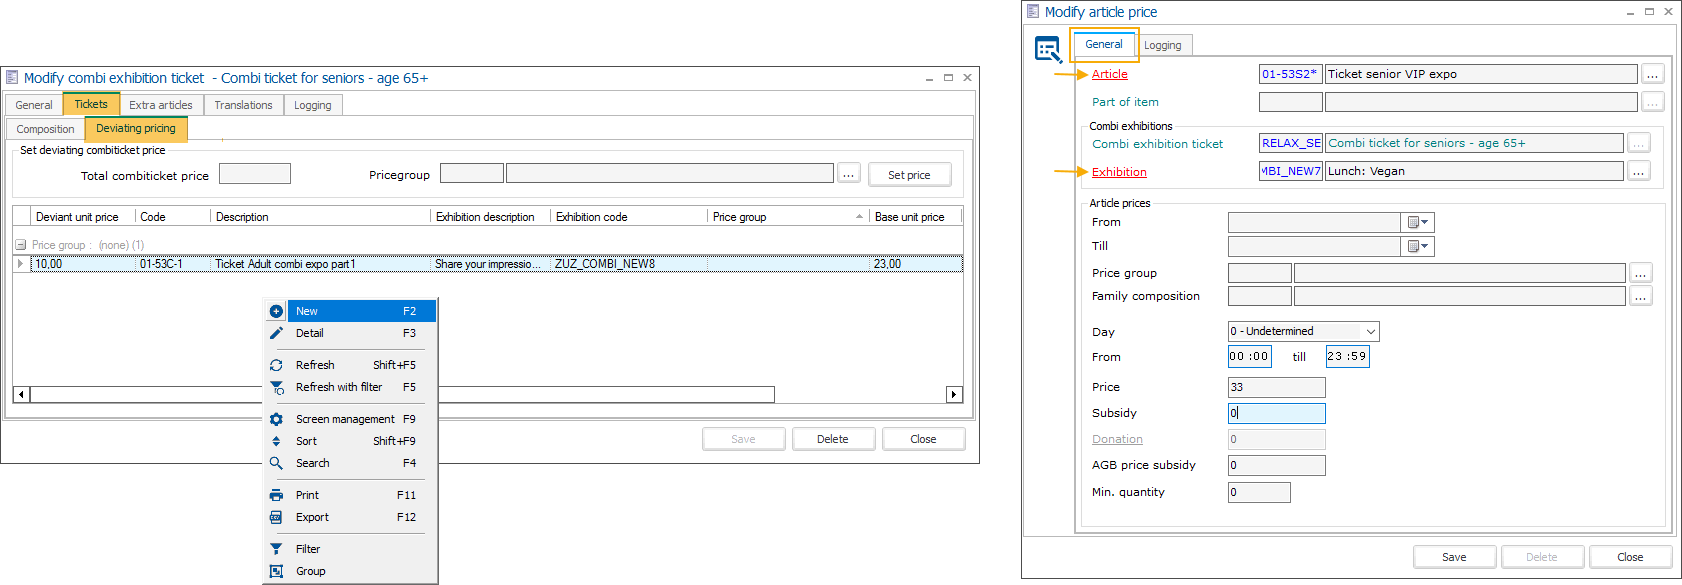
Add deviating price manually (right-click + New or F2 key). Here you can define the price per exhibition using a wide range of criteria, such as minimum purchased quantity or purchase period.
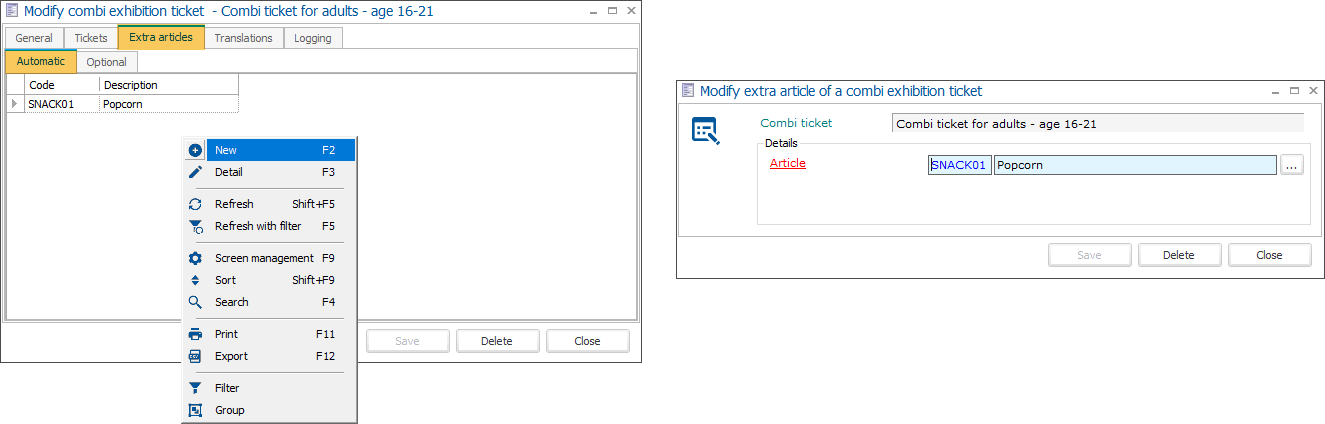
In the tab Extra articles you can add automatic and optional articles per combi ticket.
Automatic articles
Optional articles
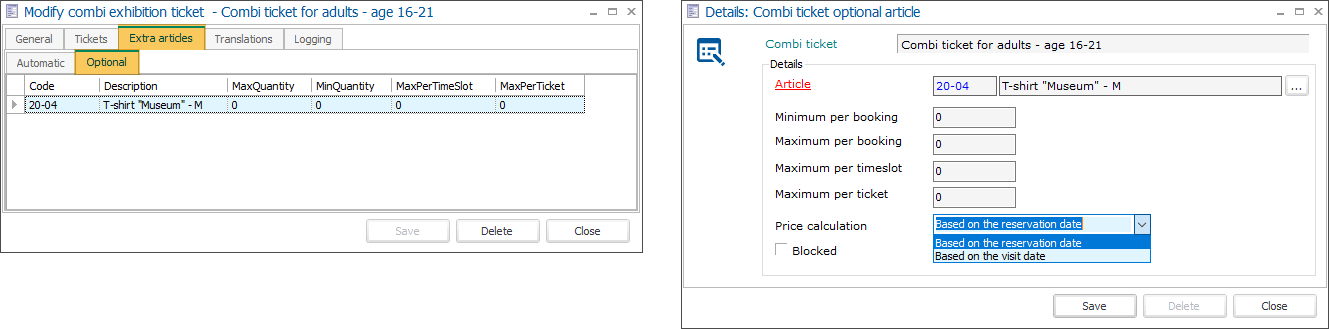
You have the option to set the minimum/maximum number that can be purchased of this optional article and decide if the price should be calculated based on the price available on the booking day or the day of the visit.
In the tab Translations, you can add translated descriptions of the combi ticket in multiple languages.
In the tab Logging you can trace all modifications of the combi ticket, including the date/time of the adjustment, type of modification, which field has been modified, old and new value, and who has performed the modification.
In the tab Translations, you can add translated descriptions of the combi exhibition in multiple languages.
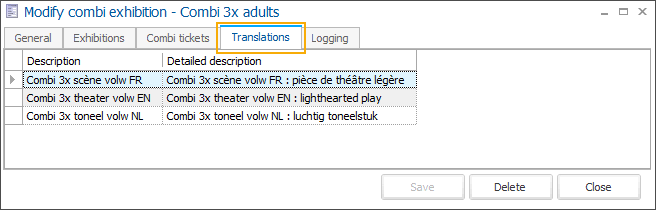
In the tab Logging you can trace all modifications of the combi exhibition, including the date/time of the adjustment, type of modification, which field has been modified, old and new value, and who has performed the modification.
Sell combi exhibition tickets at the POS
Important
The combi-exhibition flow is only supported for points of sale using the Modern POS menu layout.
You can find the setting under Sales > Settings > Points of sale > modify the point of sale > tab Various > setting Layout POS menu.
Add the combi exhibition to the POS.
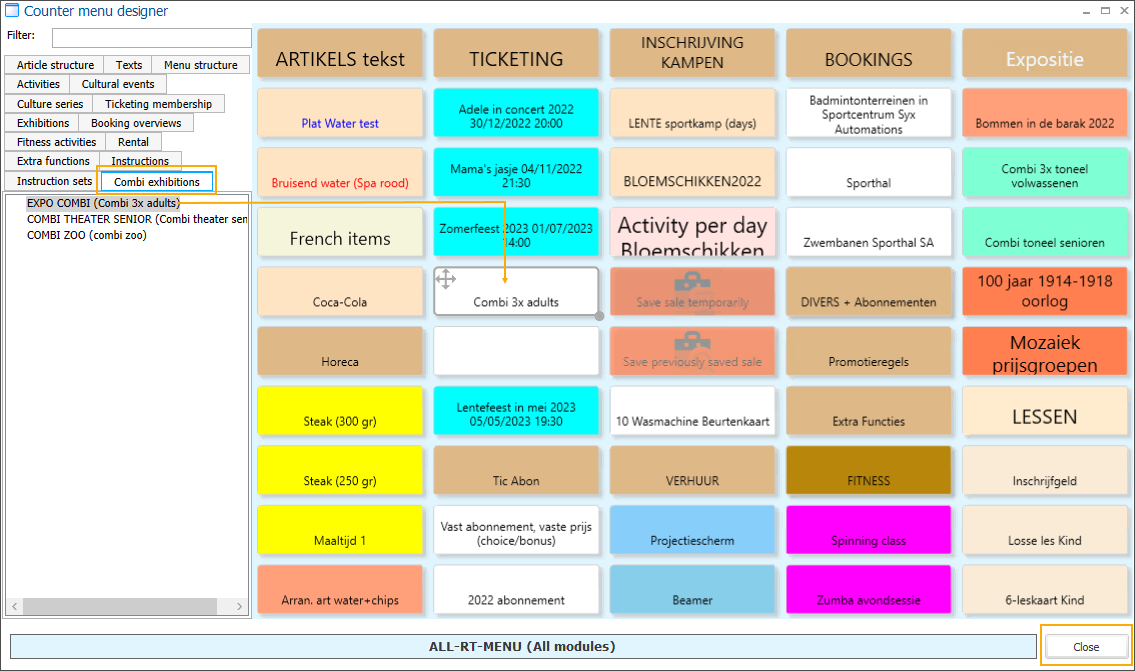
In Recreatex, go to the module POS > Settings > POS menus and open the relevant POS. Then click the button Settings to open the Counter menu designer.
Under the tab Combi exhibitions select the combi exhibition and drag and drop it on the counter menu.
Select the combi exhibition and specify the type and amount of combi tickets.
First, specify the types of combi tickets that you want to purchase (1) and the number of visitors for each ticket type (2).
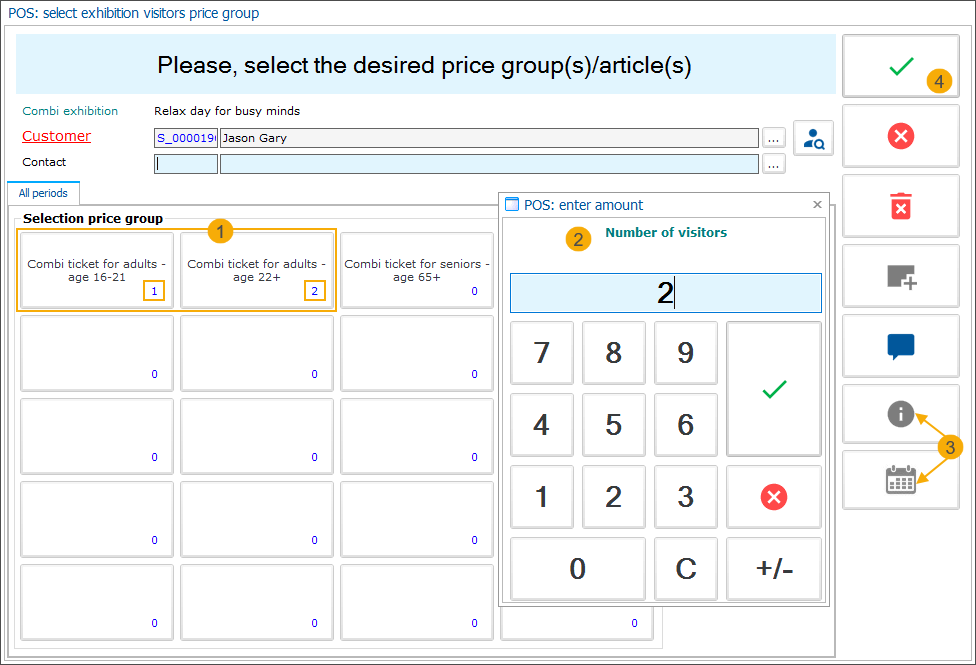
Notice that the calendar function (3) and the information button (3) are not available because there are multiple exhibitions included in the combi exhibition.
Confirm your selection by clicking the green checkmark (4) on the vertical toolbar.
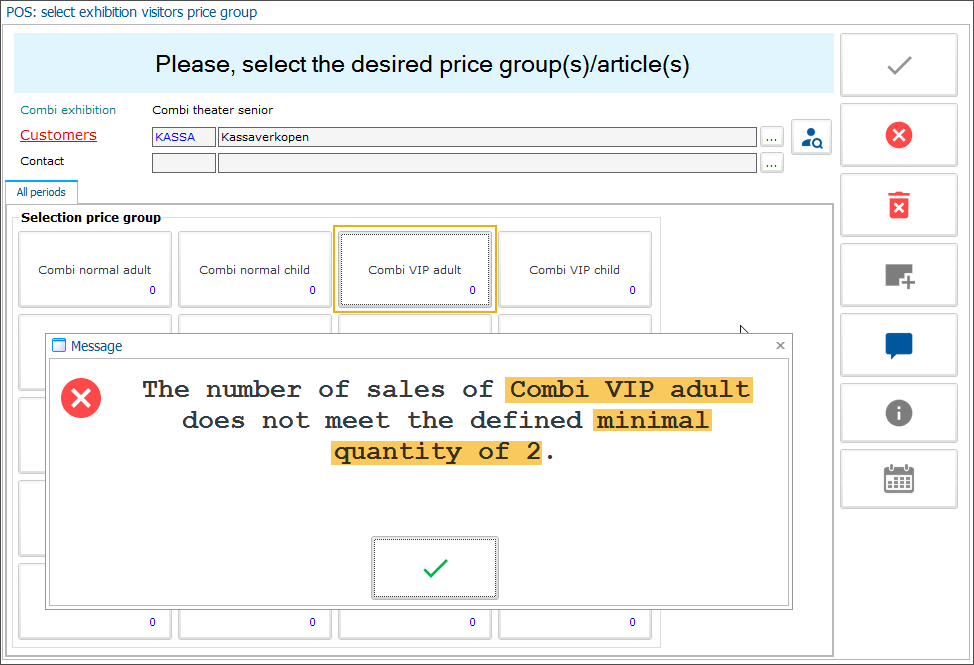
Note
If you have configured a mandatory number of tickets that must be purchased for the selected ticket type, a blocking message will be displayed if the number of tickets specified is lower than defined by the setting Min. number of sales (Combi exhibition ticket > tab General).
In step 1 choose one of the presented exhibition options (2).
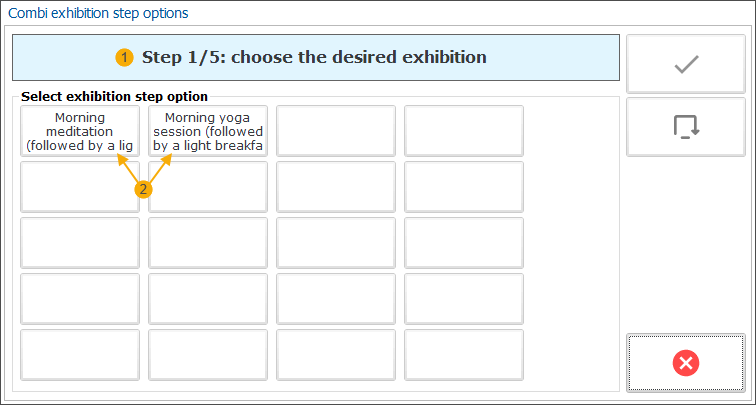
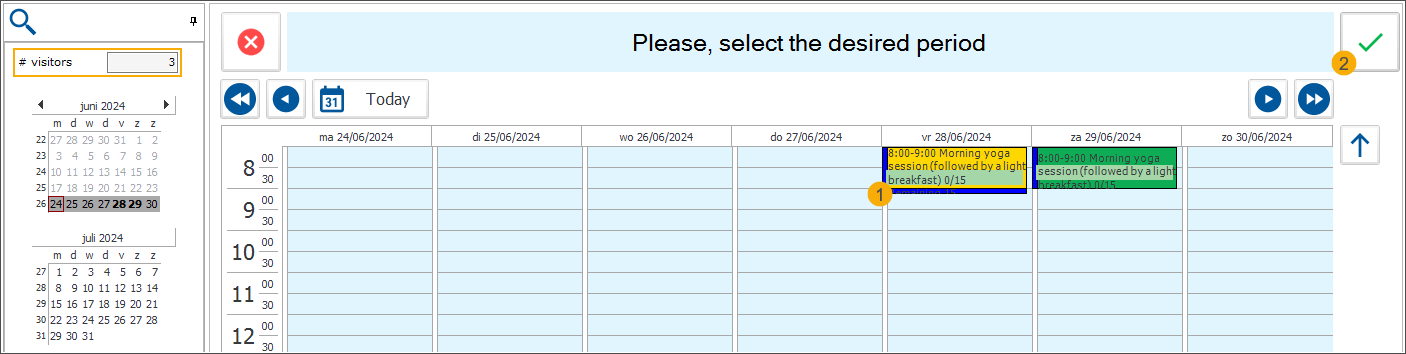
You will automatically be forwarded to the calendar view of the selected exhibition. The displayed time slots take into account the specified number of visitors.
Select the desired time slot (1) and confirm by clicking the green checkmark (2).
If you have configured optional articles on the level of individual exhibitions, the choice will be presented after the timeslot selection.
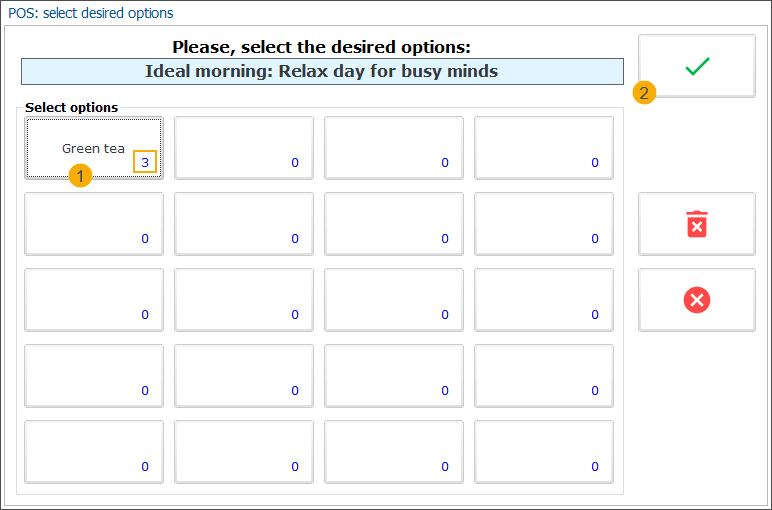
Specify the number of articles the customer wants to include or leave 0 if the customer does not wish to include any optional articles (1). Then click the green checkmark (2) to confirm the choice and move to the next step.
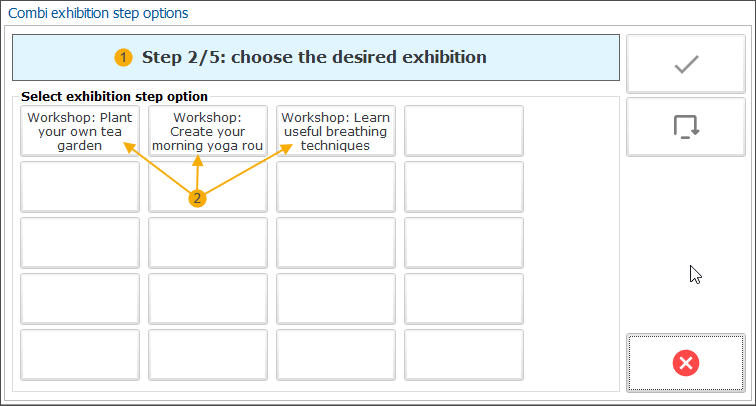
In step 2 again, select one of the presented options.
The calendar view of the 2nd exhibition will open automatically. You can see the highlighted timeslot of the first exhibition (1) and all available time slots for the 2nd exhibition.
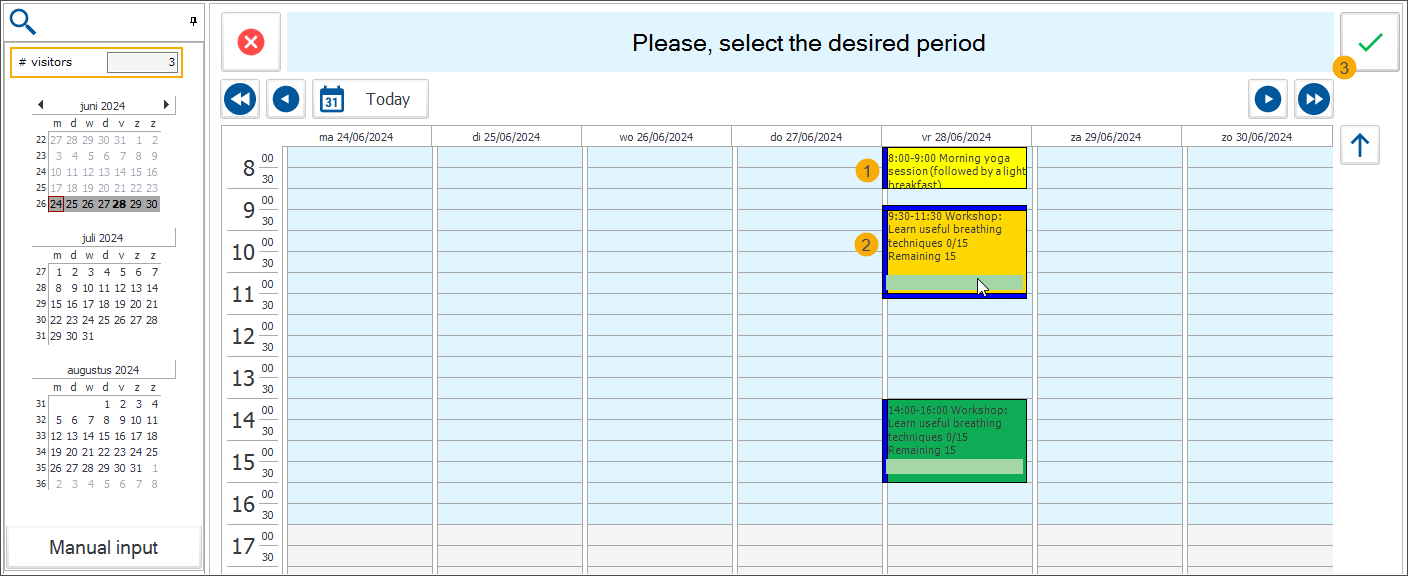
Select the desired time slot (2) and confirm by clicking the green checkmark (3).
Note
From the 2nd exhibition (step), the available time slots are filtered not only by the specified number of visitors but also by the settings specified (or not) during the configuration of the combi exhibition:
Registrations allowed over multiple days: if allowed, time slots will be shown not only for the date of the first exhibition but for other days too. Otherwise, only time slots on the same day will be shown.
Fixed chronological order (+ sequence defined for each step): If specified, only time slots available after the time slot of the previous exhibition will be shown.
Minimum time before: if configured, only time slots that are not overlapping with the specified extra time, will be shown.
Continue the selection for the remaining steps.
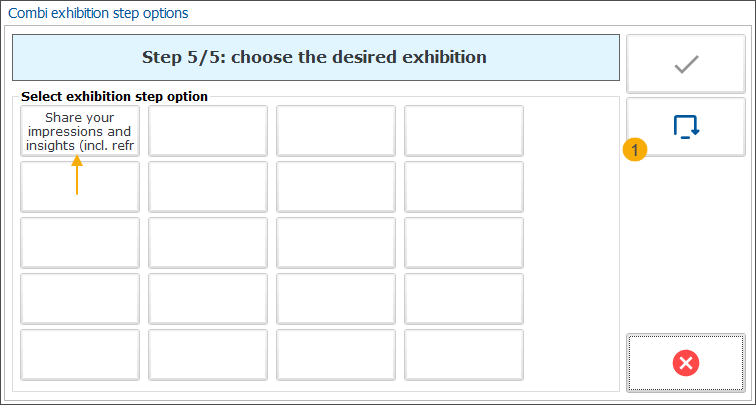
If you have included an optional step in your combi exhibition configuration, the customer will have the option to skip (1) this step without selecting any of the presented options.
If you have configured any optional articles on the level of a combi-exhibition ticket, the articles will be available for selection after completing the selection for the last step.

Specify the number of articles the customer wants to include or leave 0 if the customer does not wish to include any optional articles (1). Then click the green checkmark (2) to confirm the choice.
Process the payment and print the tickets.
In the order overview (1), you can see the exhibitions in chronological order followed by the automatically sold articles (2) and the optional articles (3). You can only delete the complete combi exhibition, not the individual parts (4).
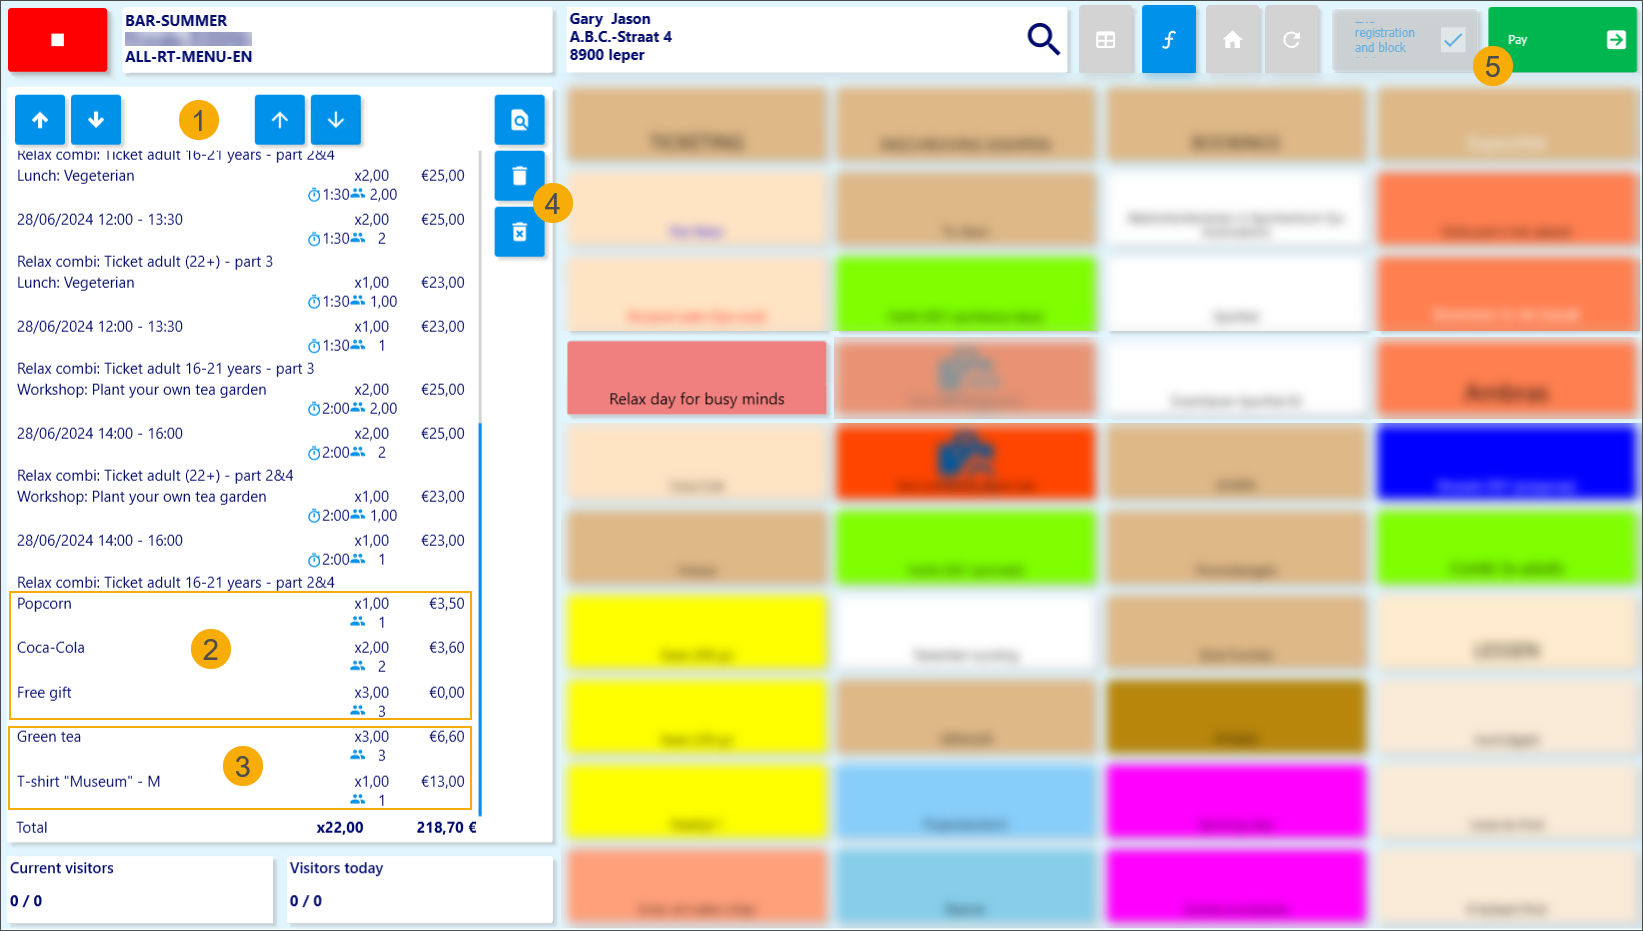
Click Pay (5) and follow the payment flow to finish the order.
The chronological order of the exhibitions is also maintained on the receipt.
Depending on your configuration, you can generate a separate entry ticket/barcode for each part of the combi exhibition or combine the tickets into 1 ticket per visitor.
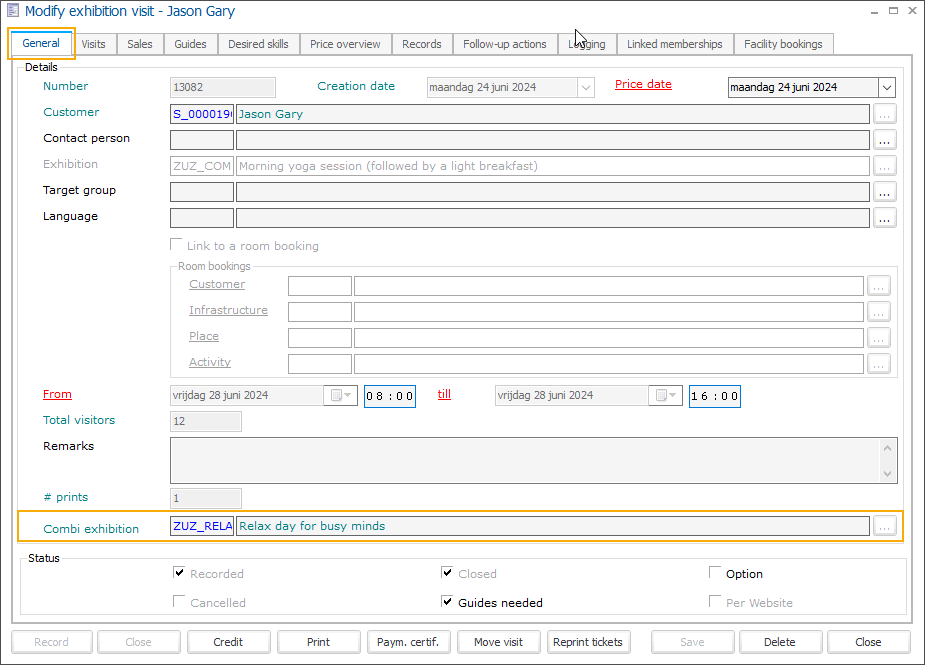
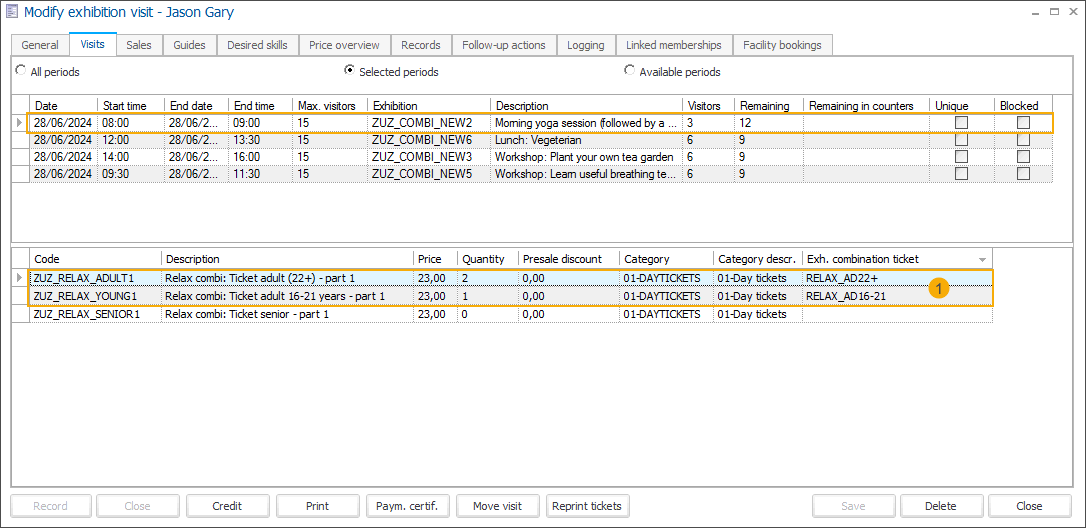
In the backoffice, a field Combi exhibition is available on the exhibition visit level (tab General) to indicate that the visit is part of a combi exhibition.
In the tab Visits, you can see all tickets per exhibition visit. A combi ticket will have additional information in a separate column Exh. combination ticket (1).
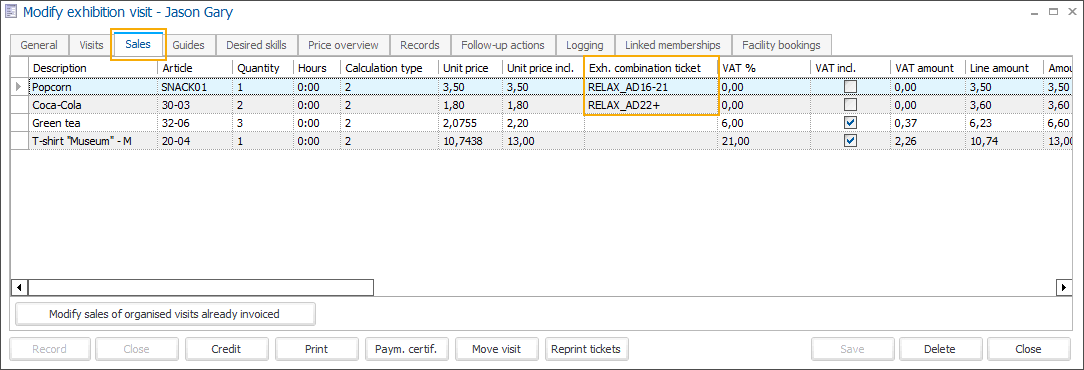
All automatically sold and optional articles are visible in the tab Sales. The articles configured on the combi ticket level have the ticket information in a separate column Exh. combination ticket.
Sell combi exhibition tickets on the Webshop
Next to Recreatex backoffice and POS, combi exhibition tickets can now also be sold on the Webshop.
To set up this functionality correctly, make sure the following configuration has been completed:
Backoffice configuration
Make sure the exhibitions included in the combi exhibition are available on the Webshop: Modify exhibition screen > tab Web > setting Show on Website.
Create and configure your combi exhibitions and the related tickets in Recreatex backoffice. See Combi tickets for multiple exhibition visits for detailed steps.
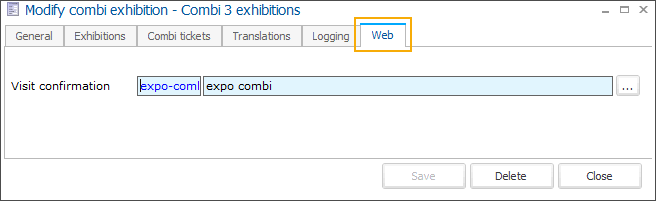
Additionally, select a visit confirmation template under the tab Web in the Modify combi exhibition screen.
Webshop configuration
To make the combi exhibitions available for Webshop customers enable the following settings in the Webshop Manager application, under Exhibitions > Settings:
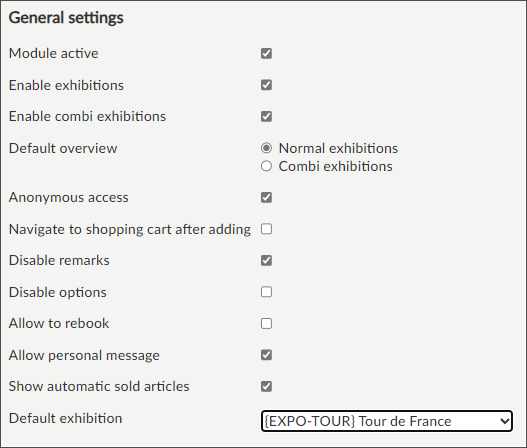
Enable combi exhibitions | Combi exhibitions will become available in a separate section in the module Exhibitions and in My Exhibitions (History and overviews). |
Default overview | If you display the combi exhibitions next to your regular exhibitions, you can choose which overview should be opened by default when a customer enters the Exhibitions module.
|
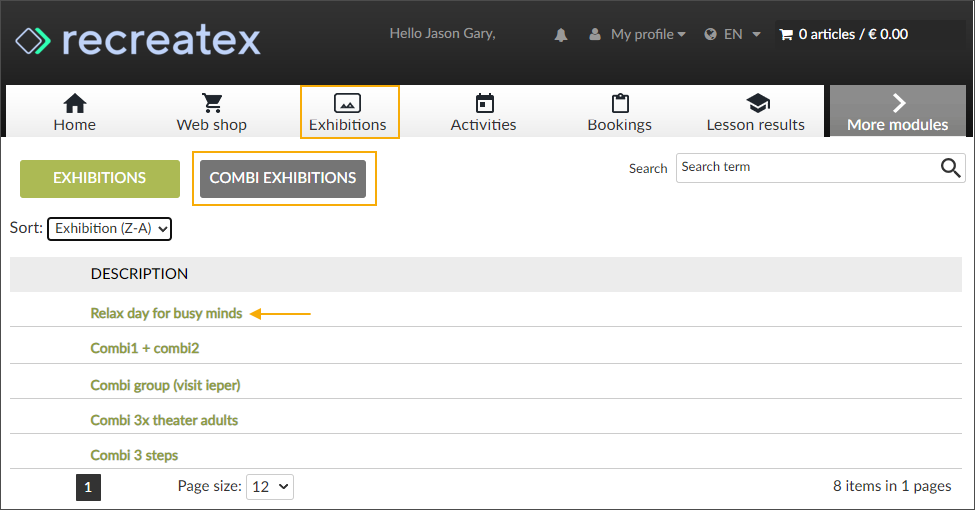
Combi tickets ordering flow
In the module Exhibitions, go to Combi exhibitions and select the desired combi exhibition. Our example is a combi exhibition consisting of 3 parts.
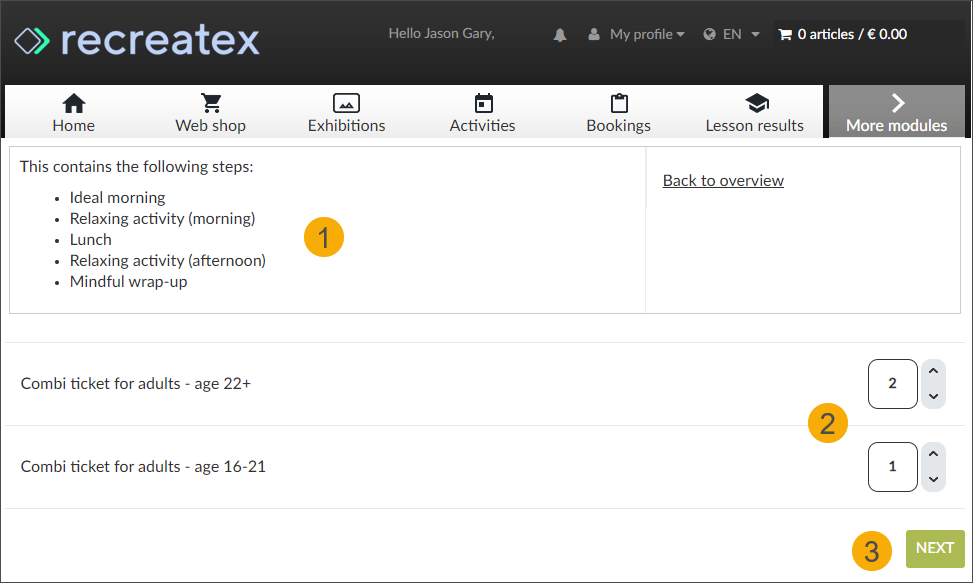
On the ticket selection screen, you can see the overview of all the steps included in this combi exhibition (1). Select the type and number of tickets (2) and click Next (3).
Note
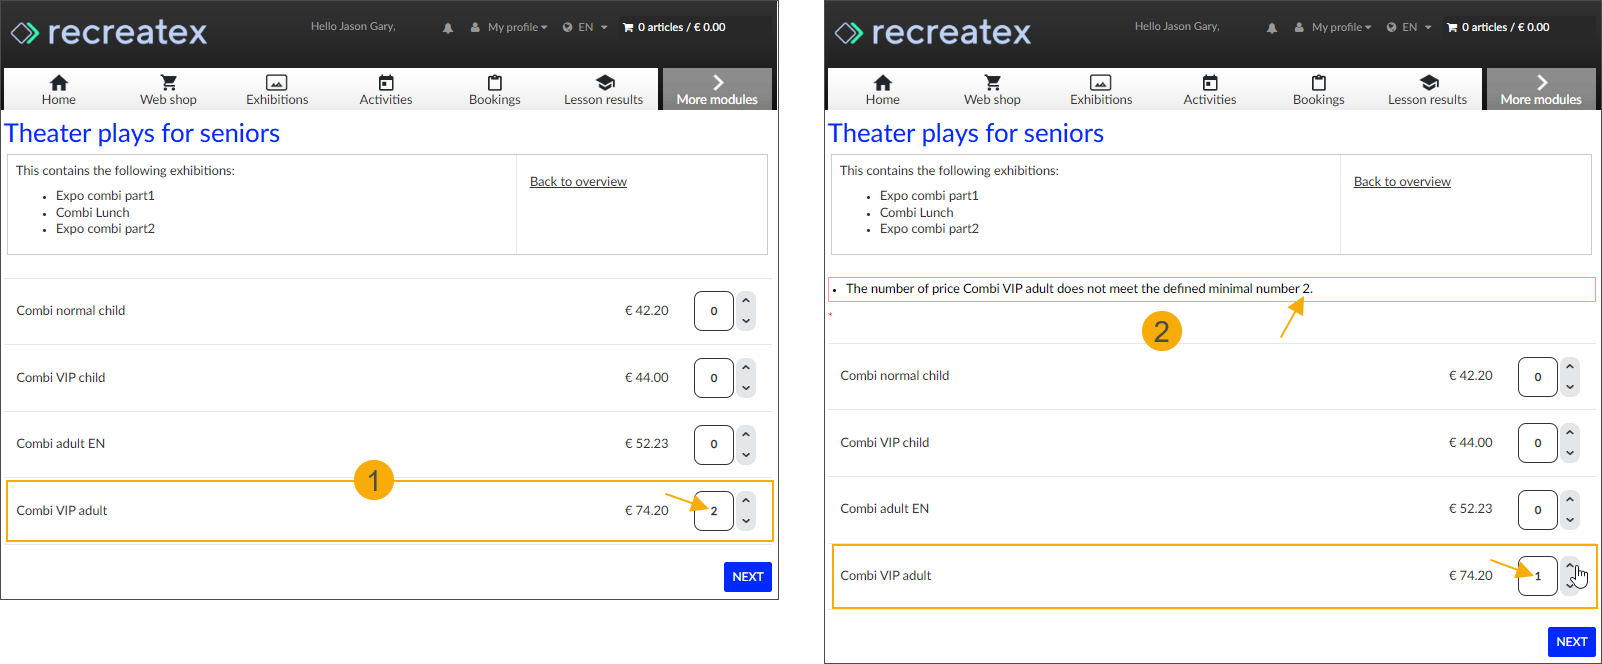
If you have configured a minimum number of tickets that must be purchased, defined by the setting Min. number of sales (Combi exhibition ticket > tab General) for any of the ticket types, the behaviour on the Webshop will further depend on the setting Mandatory to buy at least the minimum quantity (web):
If checked: The minimum amount of tickets to purchase is mandatory, meaning that the minimum number of tickets is preselected and cannot be reduced.
The minimum number of tickets of this type will thus automatically be included in each ticket purchase for this combi exhibition.
If unchecked: The minimum amount of tickets to purchase is mandatory on the Webshop if a customer chooses to purchase tickets of this type.
The number of tickets can be selected but if lower than the required number, a blocking message is displayed.
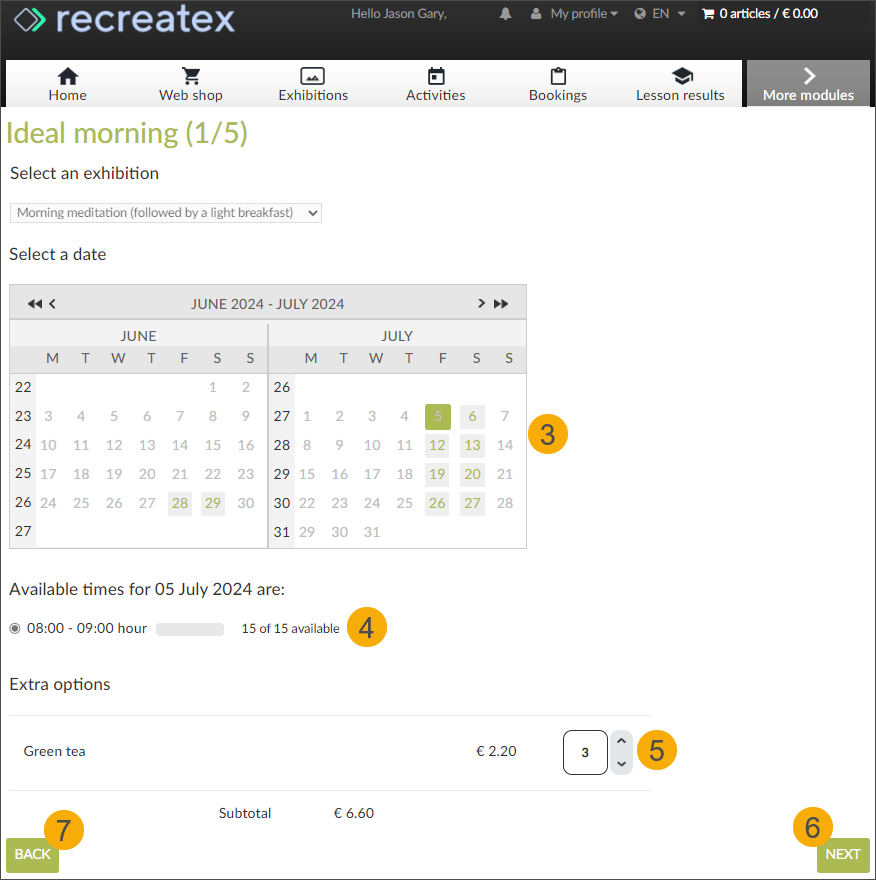
You will be guided through the steps of the combi exhibition one by one (1). Select 1 exhibition from the list of options (per step) (2).

The next selection screen will open automatically. Pick the date (3) and an available timeslot (4). If optional articles (5) are configured for this exhibition, you can select them here as well.
Click Next (6), to continue to the next step.
Click Back (7), to return 1 step back. If you want to adjust the number of tickets, depending on how far you are in the ordering flow, you may need to click the button several times to return to the ticket selection screen.
After each step, your selection is added to the overview at the top of the screen (1) and visualized on each subsequent screen. If there is an optional step included, you will see the option to skip the step entirely (2), without making a selection. Click Next (3) to continue.
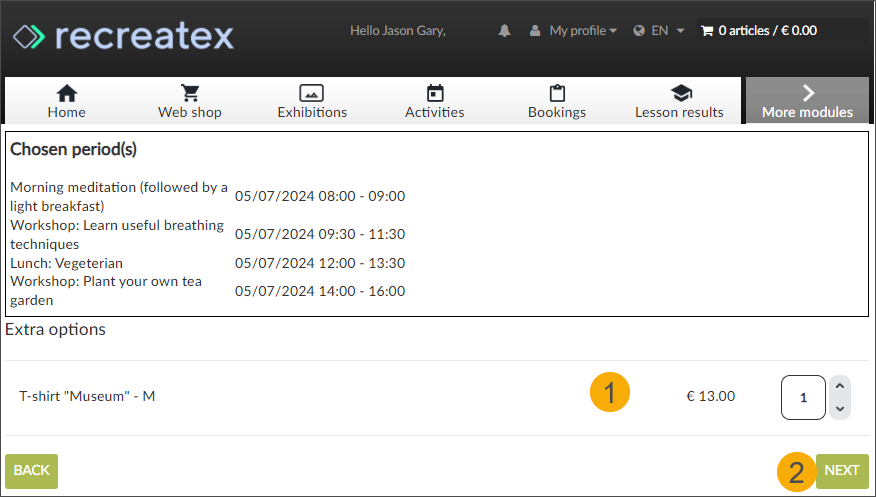
After completing your selection for the last step, you can select optional articles (1) that have been configured on the combi-ticket level. Click Next (2) to finalise your order.
In the Summary, you can see the overview of all selected timeslots (1), including the automatic and optional articles that have been selected per exhibition (2). Further, you can see all selected tickets and their prices (3), including the automatic and optional articles selected on the combi-ticket level and a the bottom, the total price of your order (5).

Click Add to shopping cart (5) and follow the checkout flow to pay and receive your tickets.
Click Back to tickets (6) to return to the ticket selection screen and restart the ordering flow.
Combi tickets overview
When buying exhibition tickets on the Webshop your tickets are available immediately after the successful payment on the Confirmation page and in your email.
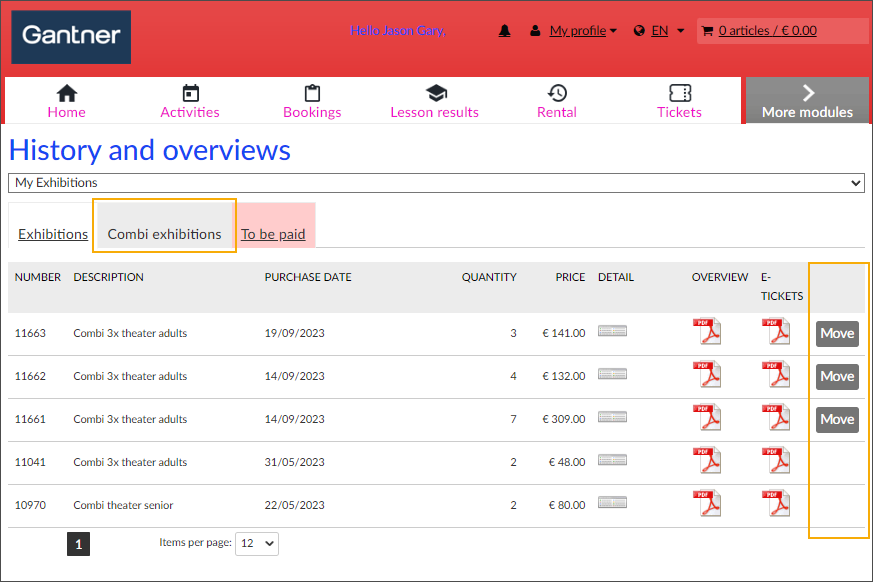
However, if you need to retrieve your tickets later for any reason or check the details of your order, you can always find this information under My profile > History and overviews > My Exhibitions > Combi exhibitions (1).
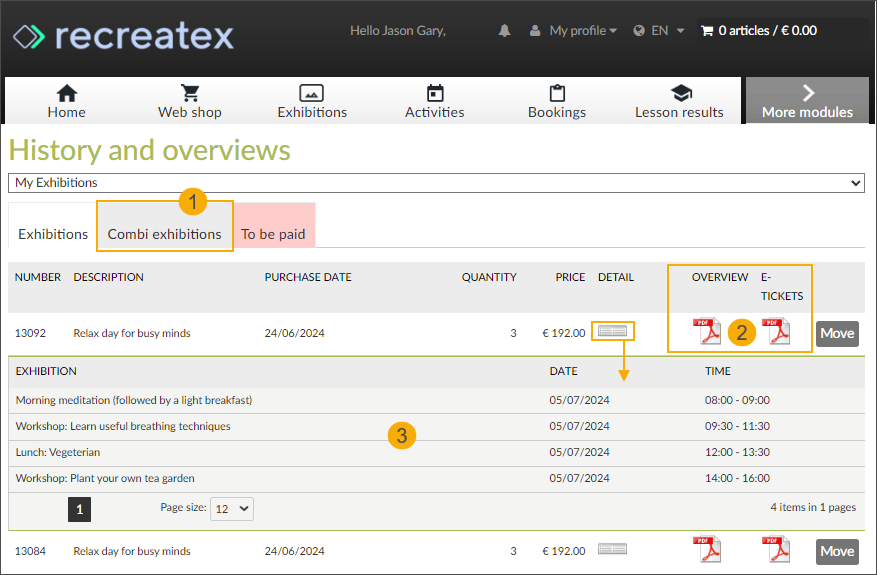
Download your order confirmation and the e-tickets in PDF format (2). Note, that the columns Overview and E-tickets are only visible if activated (History settings: Show e-Tickets in history and Show booking certificate in history).
Click the icon in the column Details to expand a handy overview of the date and timeslot of each exhibition (3).
Move combi-exhibition visit - backoffice
You can move the complete combi-exhibition visit or its parts to a different time slot if requested.
Important
Make sure that the logged-in employee is allowed to modify an exhibition period.
Go to General > Basic data > Employees > Employees > open the detail screen of the employee account and under the tab Exhibitions activate the setting Employee may modify the exhibition period in the exhibition calendar.
Go to Exhibitions > Visits and look up your combi exhibition visit.
In the Modify exhibition visit screen, click Move visit at the bottom of the screen to open the Move combi exhibition visit window.
In the tab Exhibition selection, the tickets are grouped per exhibition time slot.
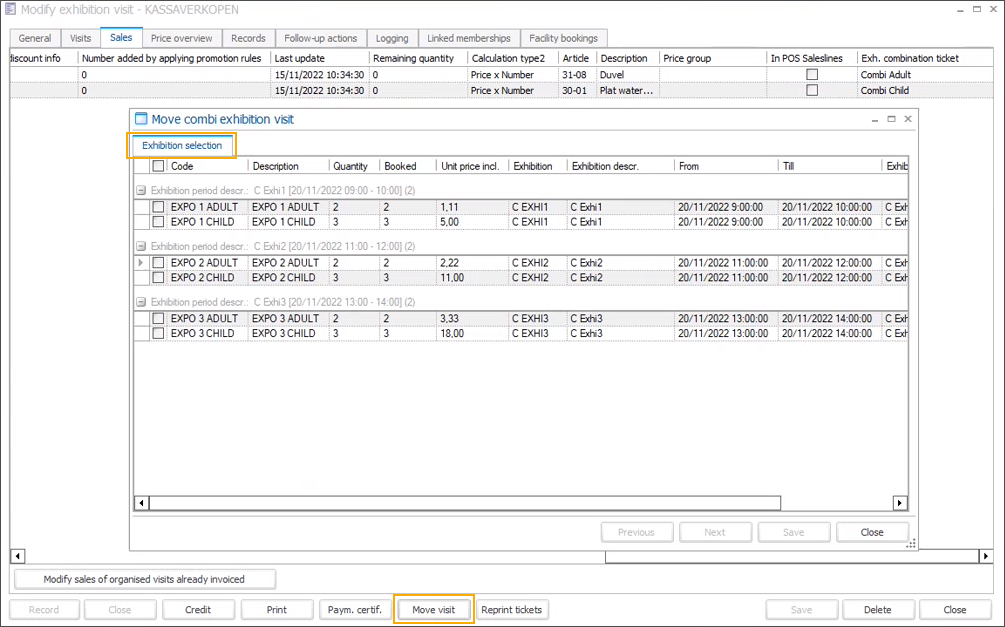
Select the exhibition time slots that you want to move:
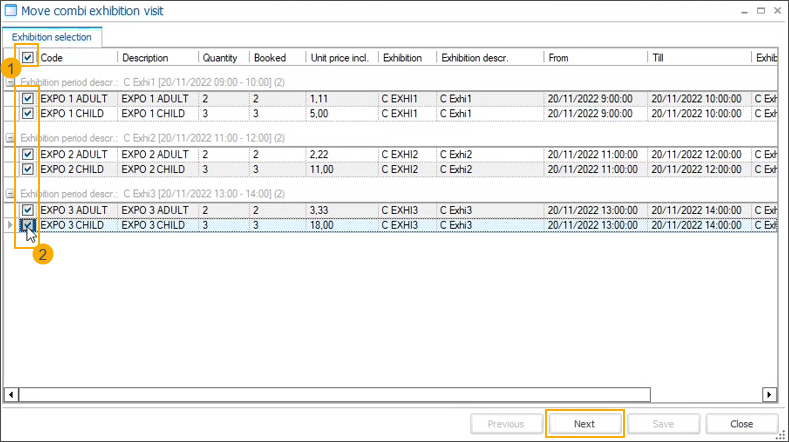
Move all exhibition time slots: mark the checkbox in the table header (1) to select all time slots and the related tickets at once.
Move some of the exhibition time slots: select a ticket per time slot that you want to move. As it is not possible to move individual tickets, the rest of the tickets for that particular exhibition time slot will be selected automatically. (2)
Click Next to continue.
In the calendar view, you will see time slots marked with different colours, depending on their status.
confirmed time slots that will not be moved (1)
time slots to be moved (2)
available time slots (3)
selected new time slots (4)
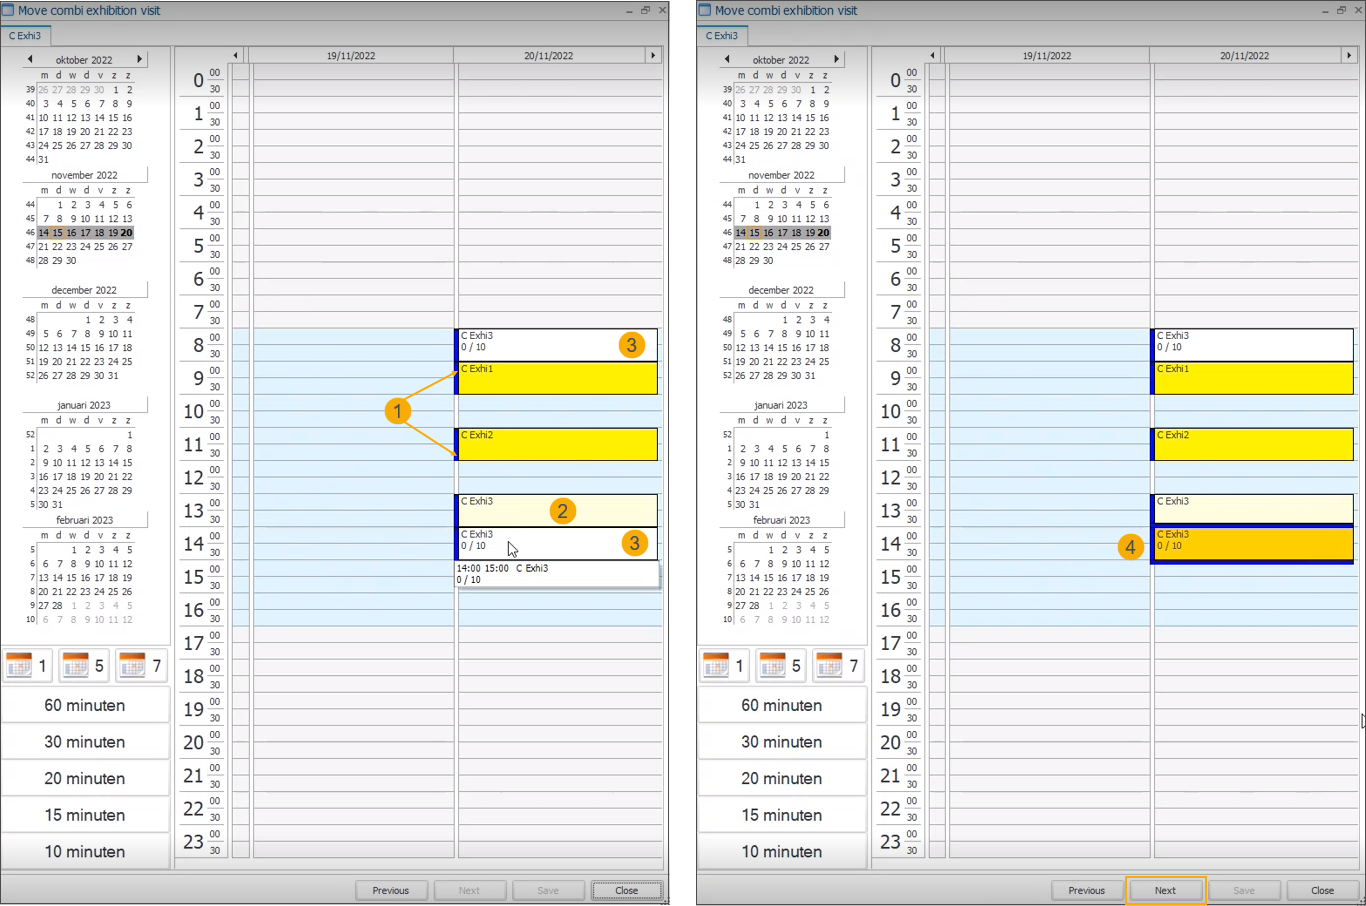
Select new time slots and click Next to continue.
In the Summary, you can check the overview of all changes. Click Save to confirm the new exhibition time slots.
Move combi-exhibition visit - Webshop
The customers can move the complete combi-exhibition visit or its parts to a different time slot online.
Important
Make sure that the option Allow to rebook has been activated in Webshop Manager > Exhibitions > Settings > section General settings.
My Profile > History and overviews > select My Exhibitions > overview > tab Combi exhibitions.
If rebooking is still possible, there will be a Move button available next to each combi-exhibition visit that can be moved.
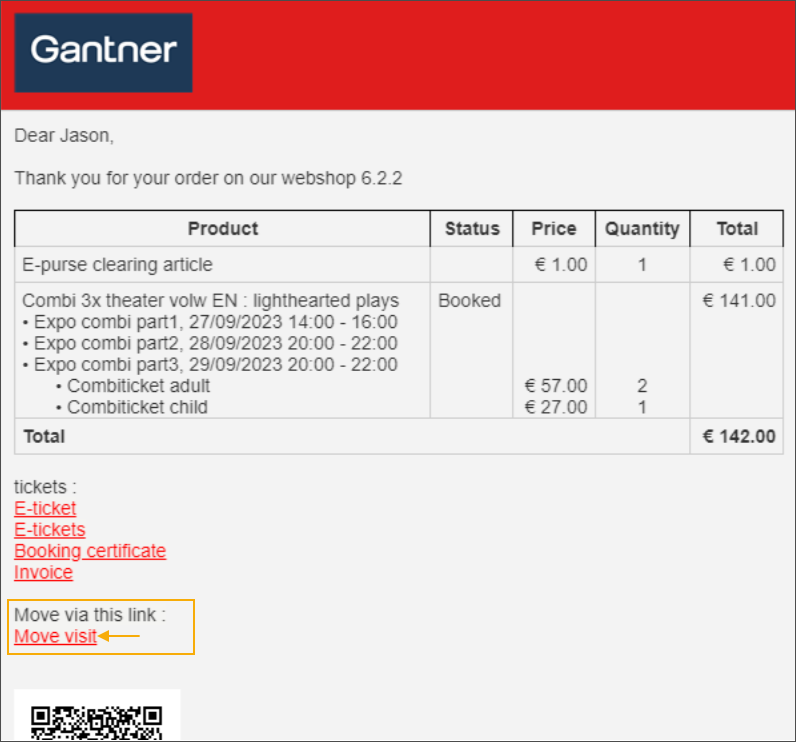
Customers can also use the rebooking link included in their original email confirmation to go directly to the rebooking flow on the Webshop.
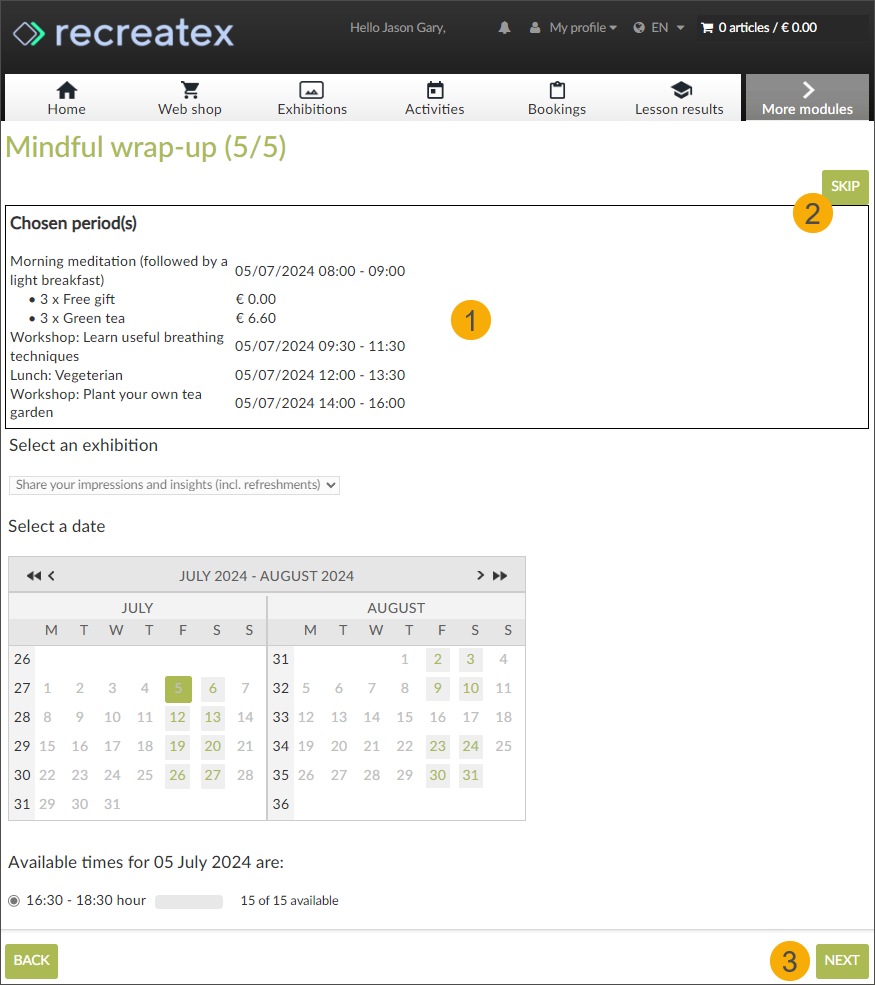
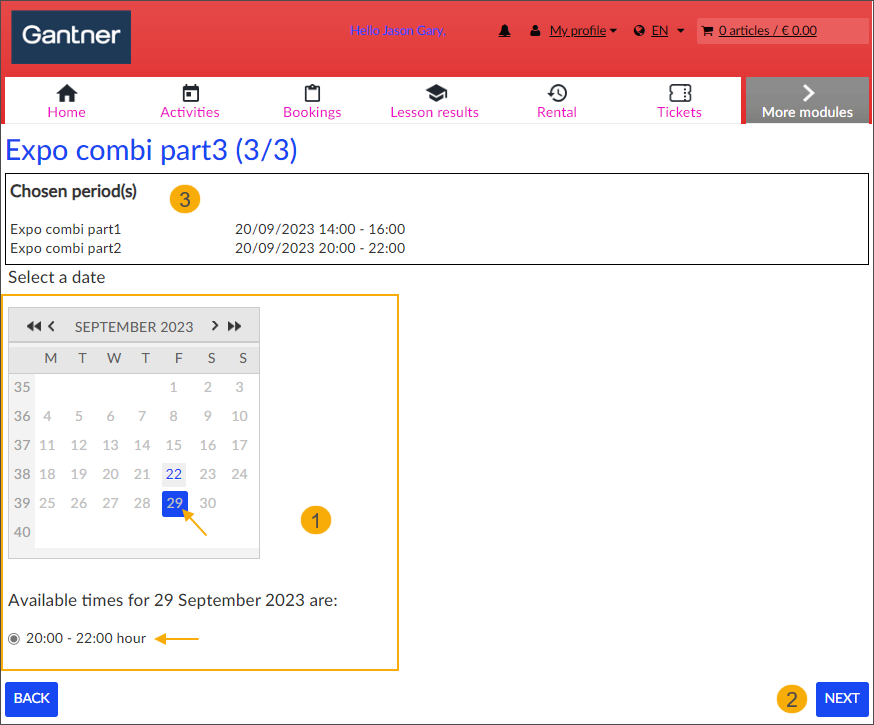
The rebooking flow is similar to the rebooking flow of regular exhibition visits. For each combi-exhibition visit customers can select a new date and timeslot from the available periods (1) and click Next (2).
Each new selection is visualised in the Chosen period(s) overview.
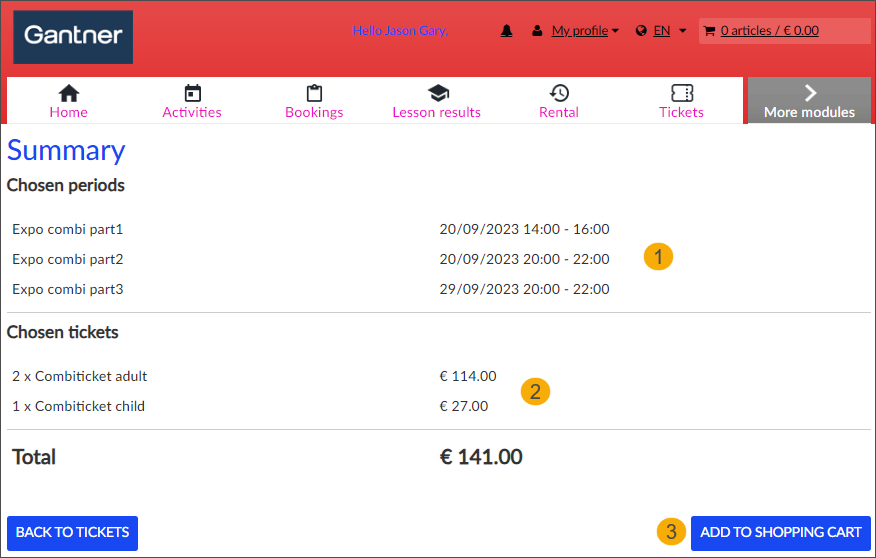
In the Summary customers can see the overview of the new selected timeslots and related ticket prices. Clicking the Add to shopping cart button (3) will trigger the price recalculation.
In the Shopping cart, customers can see the updated price which may include e.g. rebooking costs or additional charges for more expensive tickets.
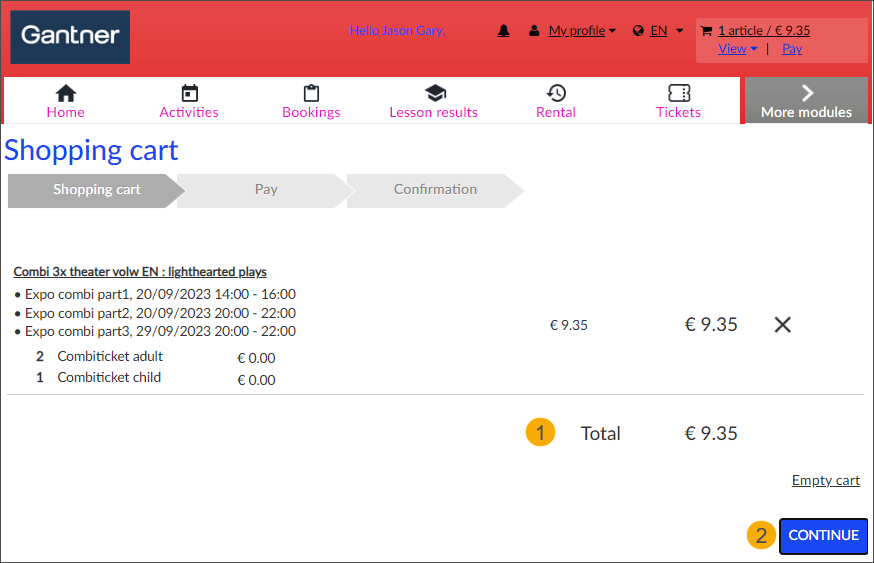
Clicking the Continue button will start the payment flow.
After successful payment, the customers will receive a new email confirmation with updated timeslots and e-tickets.