Configure sales articles
The products sold in your Vintia Order Kiosk are all created and configured as articles in the Recreatex backoffice application. The article object can have many functions within Recreatex and allows for complex configurations, but in this section, we will focus only on the settings relevant to the Vintia Order Kiosk.
Before you begin
Before configuring articles for the Vintia Order Kiosk, ensure the following:
Article is not blocked – Verify that the article is not marked as Blocked. You can find this setting in the article configuration. See the article card settings for more information.

Rights per division – Check that the article is allowed for the division under which the Vintia Order Kiosk operates. This ensures proper access and availability. For detailed information, see Rights per division.
Edit article descriptions
The article description is mandatory.
Go to the module General > Basic data > Articles > Articles and open the article card. In the tab Detail , review the field Description and adjust the text if necessary.
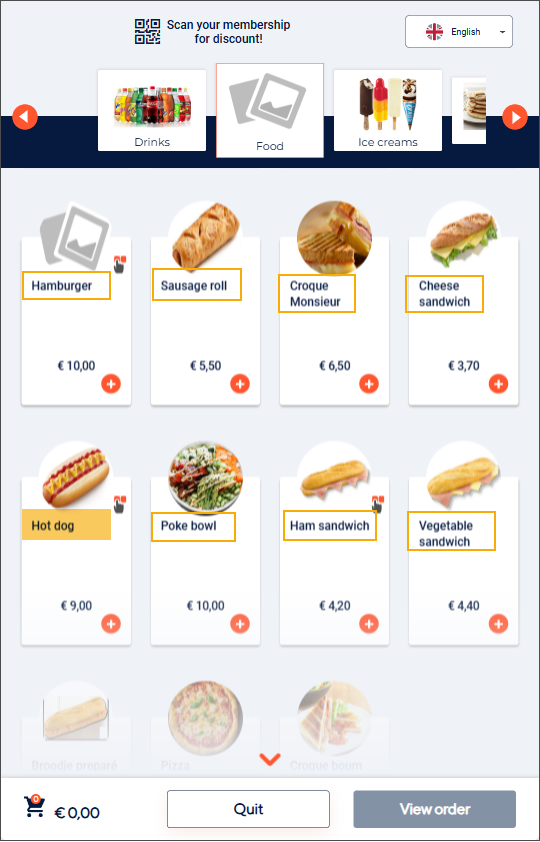
Provide an accurate and correctly spelt description that will be displayed on the kiosk.
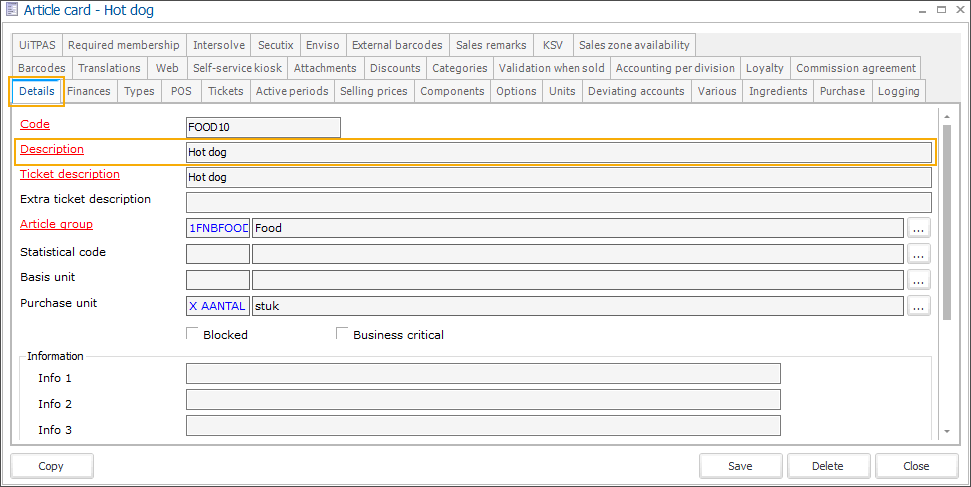
Use the Hide descriptions on cards setting in F&B Manager to adjust how longer article descriptions appear on product tiles.
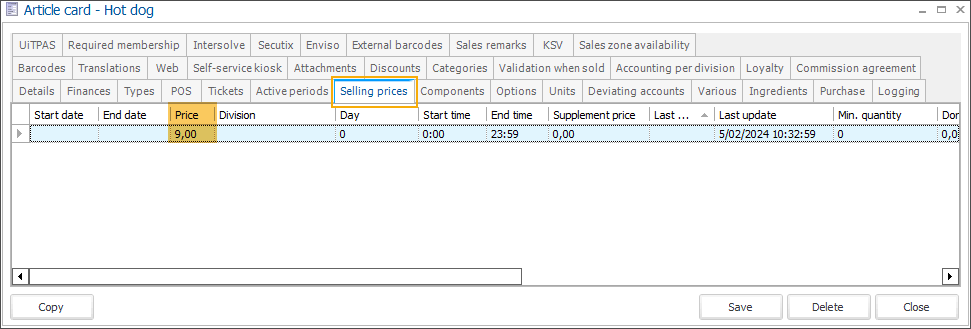
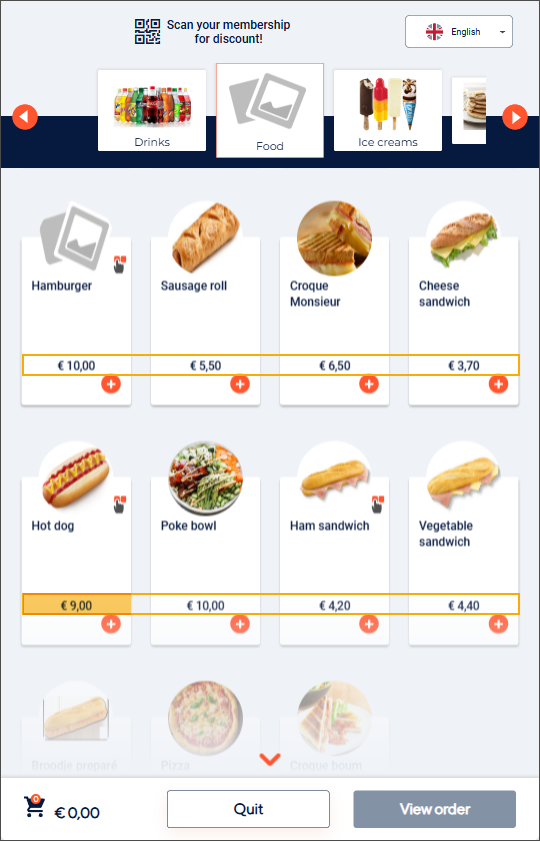
Configure selling prices
Selling prices are mandatory.
Go to the module General > Basic data > Articles > Articles and open the article card. In the tab Selling prices, modify or add prices that will be displayed on the kiosk.
Add an image
An image is recommended.
Go to the module General > Basic data > Articles > Articles and open the article card. Under the tab Web > Images, you can upload an image per article.
Adding images to your articles can enhance the customer experience and speed up the ordering process.
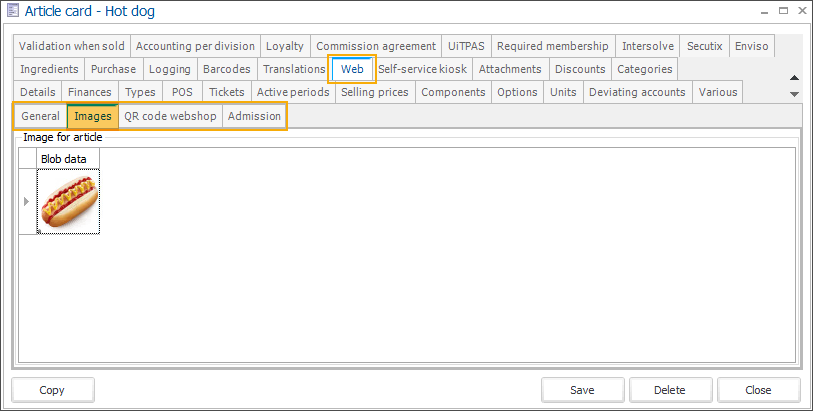
If an article has multiple images, only the first image will be shown on the kiosk (article list page, article detail and basket).
If no image is available, a placeholder image will be displayed.
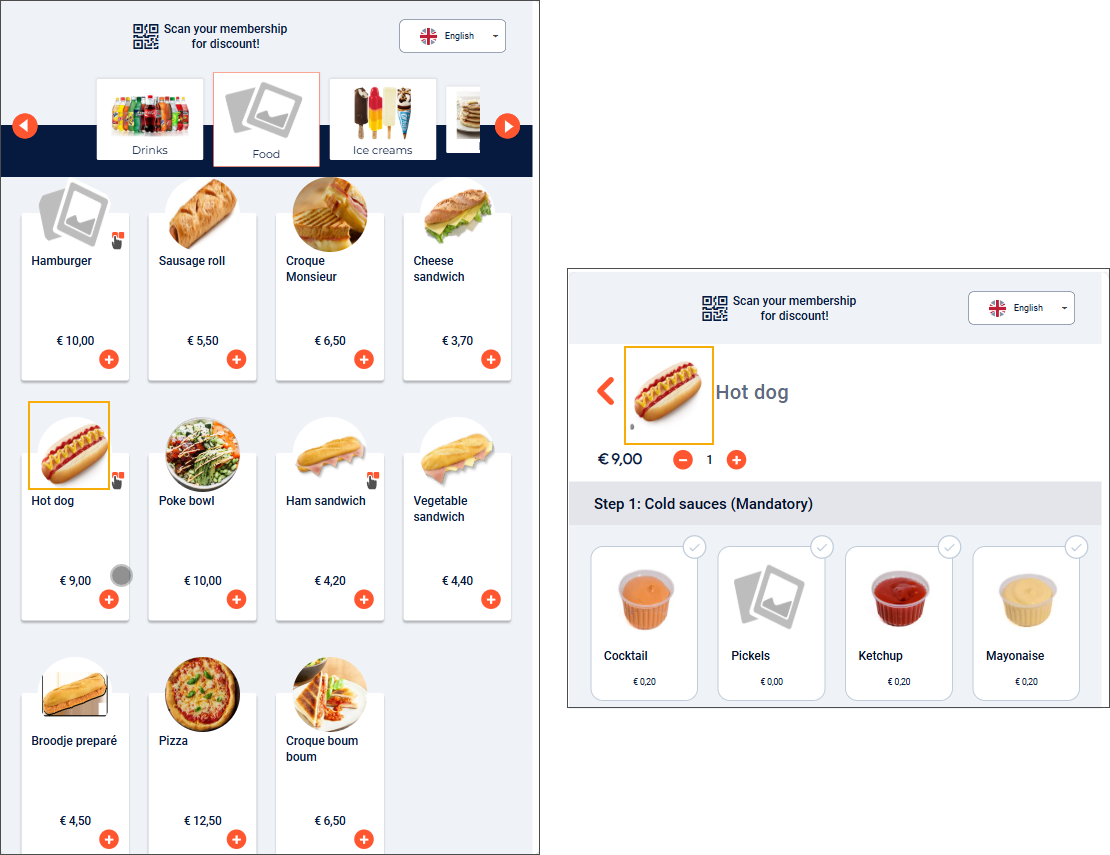
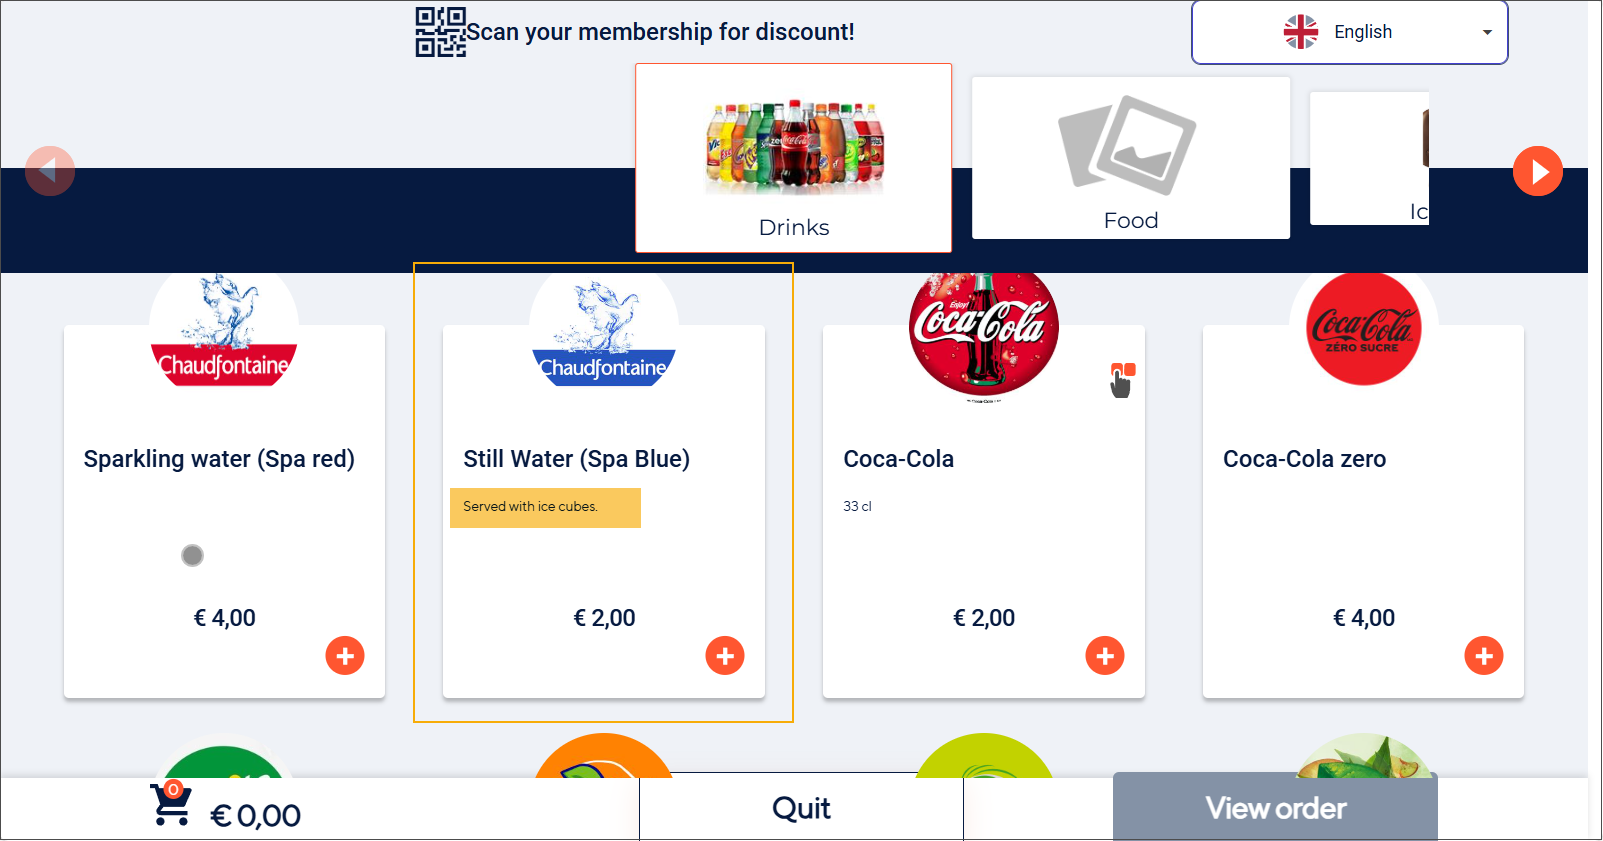
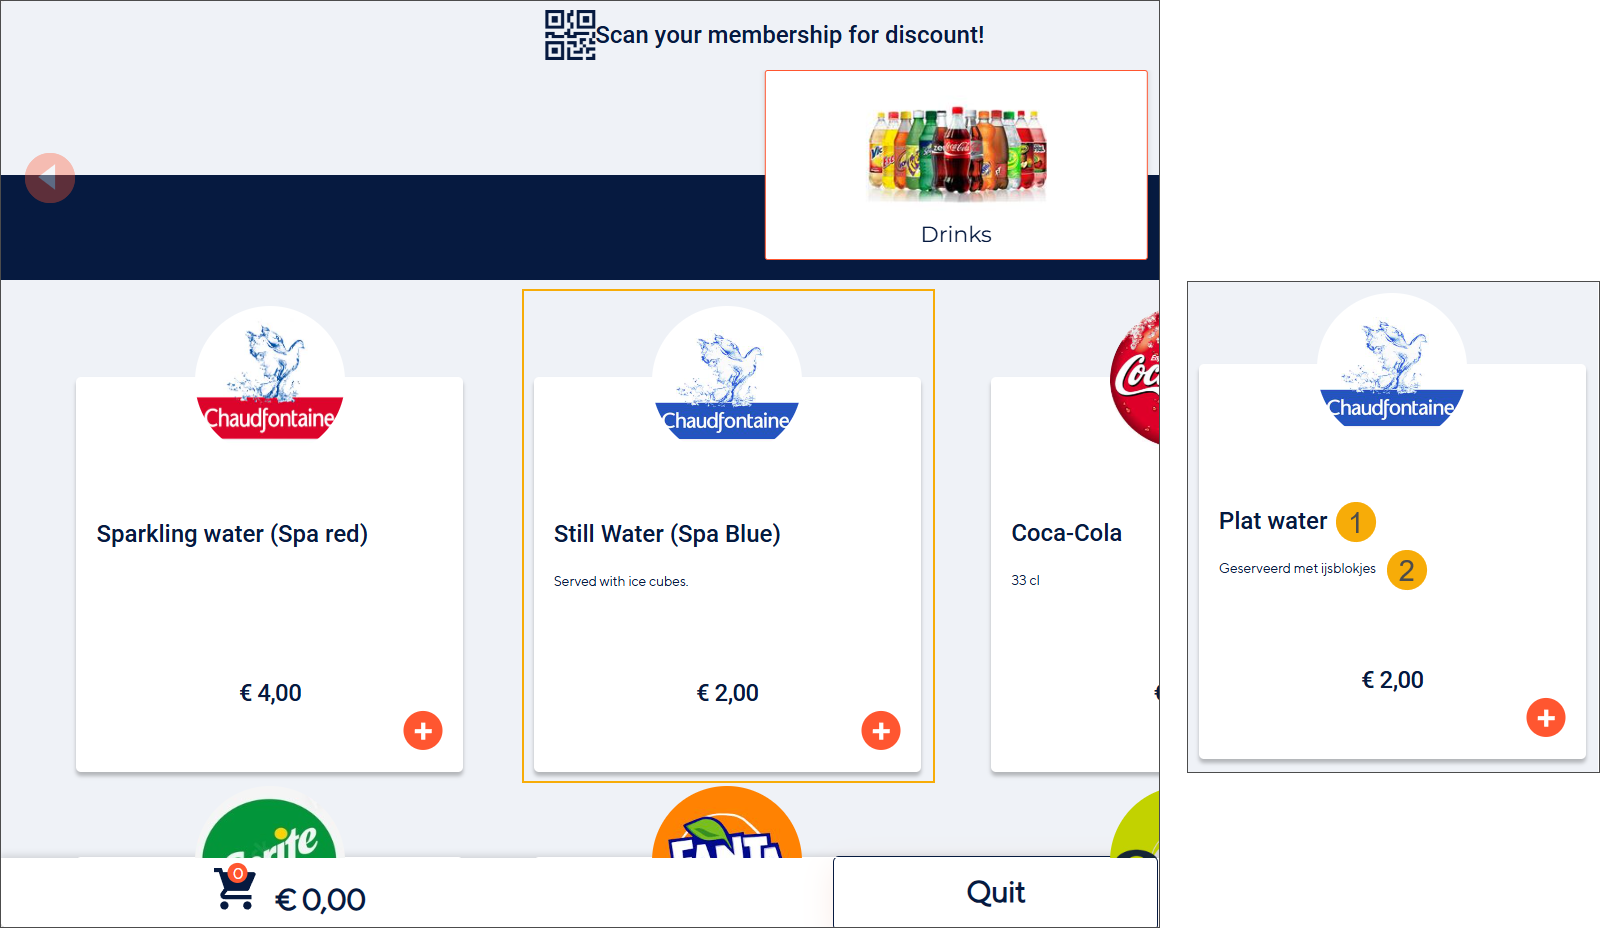
Add detailed description
A detailed description is recommended.
Go to the module General > Basic data > Articles > Articles and open the article card. In the tab Various, add a Detailed description.
With a detailed description, you can provide additional information for the main sales articles. If the same article is used as an option for a main article, the detailed description is not displayed.
Anmerkung
The Detailed description must be 152 characters or fewer to ensure full display.
The detailed description is displayed on the product tiles of the main sales articles.
Using the Hide descriptions on cards setting in F&B Manager, you can control how article descriptions and detailed descriptions appear on product tiles.
Add translations
Translations are recommended.
Go to the module General > Basic data > Articles > Articles and open the article card. In the tab Translations, edit or add new translations for each relevant language.
Provide translations of the Description to show translated names of the articles on the menu and translations of the Detailed description to display additional product information in the selected language.
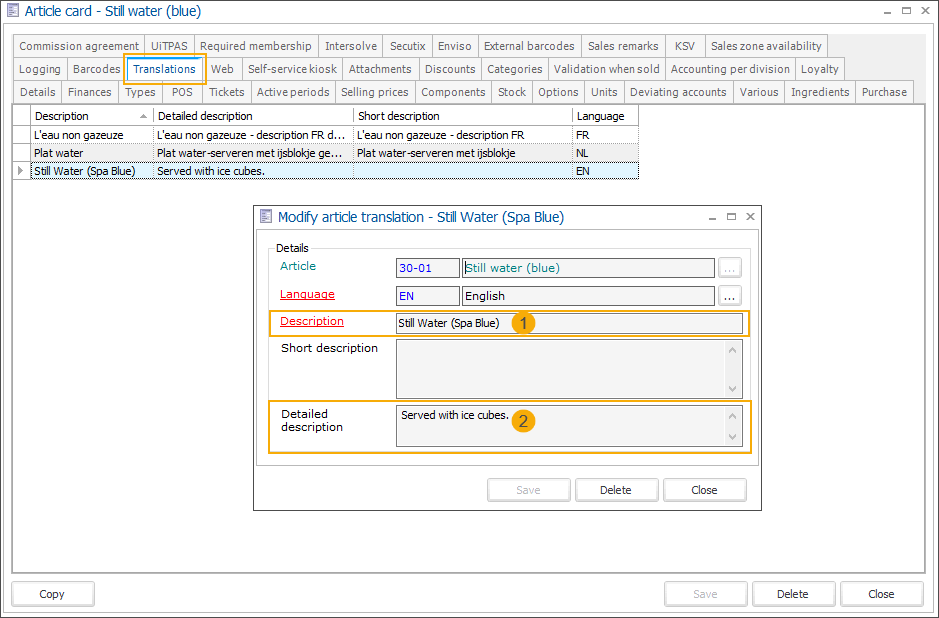
Wichtig
If no translations are provided for a particular language in the tab Translations, the kiosk will display the Description provided in the tab Details and the Detailed description from the tab Various.
Set up options and possibilities
Adding article options and possibilities is optional.
Go to the module General > Basic data > Articles > Articles and open the article card. In the tab Options, specify which additional options are available per article (1).
Anmerkung
It is currently recommended to limit the number of options to a maximum of 7 to ensure a clear and visually appealing display on the kiosk.
Select the options in the exact order you want them to appear on the kiosk screen. (2)
Anmerkung
The system automatically assigns a sequence number upon selection, which cannot be edited. To change the order, you must deselect all options and reselect them in the desired sequence.
To create or modify the options, use the Recreatex framework functionality: right-click menu > New (or F2 key) and right-click menu > Detail (or F3 key).
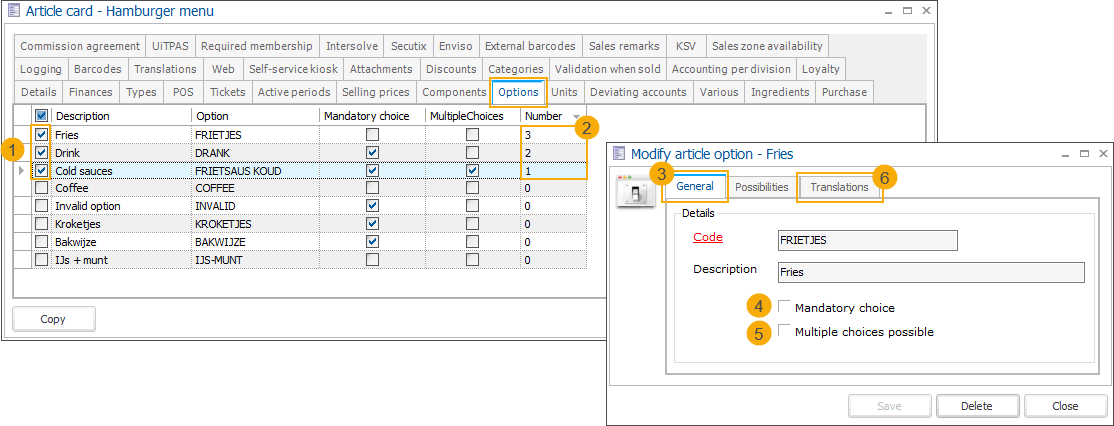
The settings in the tab General (3) allow you to control how customers make selections based on the type of food and beverages you offer (e.g. menus, customizable dishes, or drink selections.
Mandatory choice (4): If enabled, the customer must select at least one of the predefined possibilities before proceeding.
Multiple choices possible (5): If enabled, the customer can select one or more possibilities from the list.
Add translations for your options under the tab Translations (6).
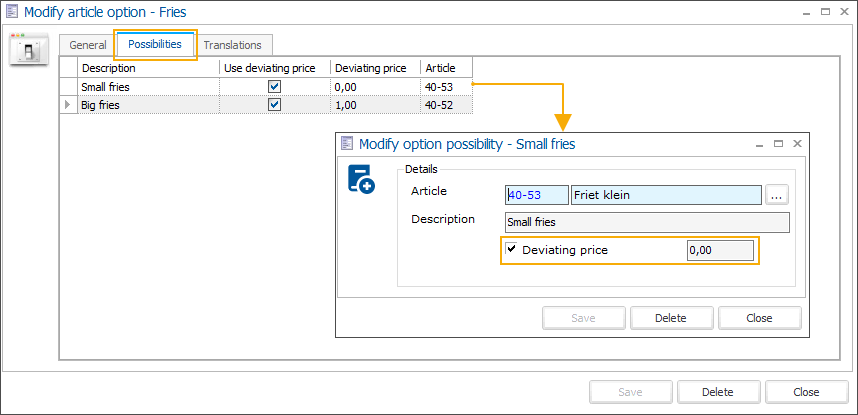
Per option, you can further specify a number of choices under the tab Possibilities.
Anmerkung
Each option must include at least one valid possibility to ensure proper configuration.
You can easily add option possibilities by adding only a Description. However, if an option possibility requires a translation, price, and image, it has to be created as an article.
If an option possibility is created and added as an article, it is possible to set a Deviating price that will override the price defined in the related article.
On the kiosk screen, an icon indicates whether the article includes additional options.
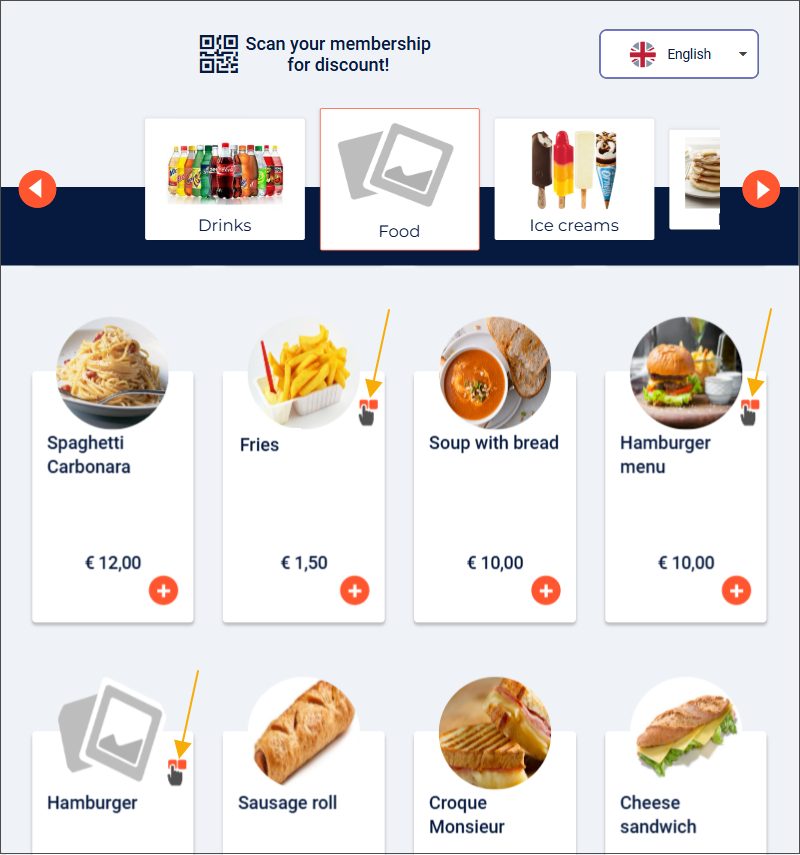
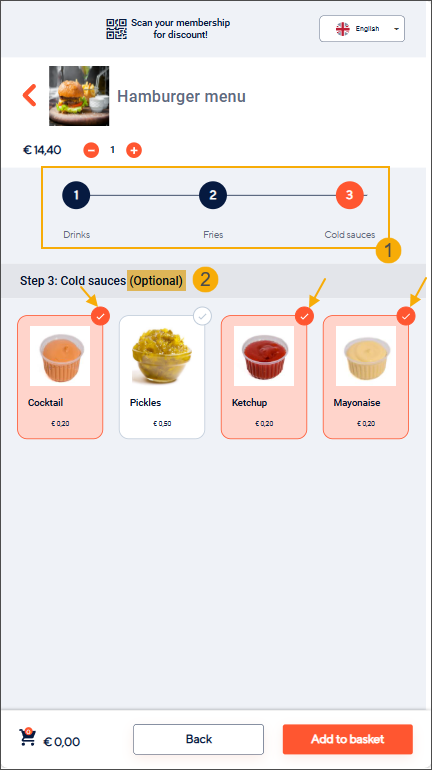
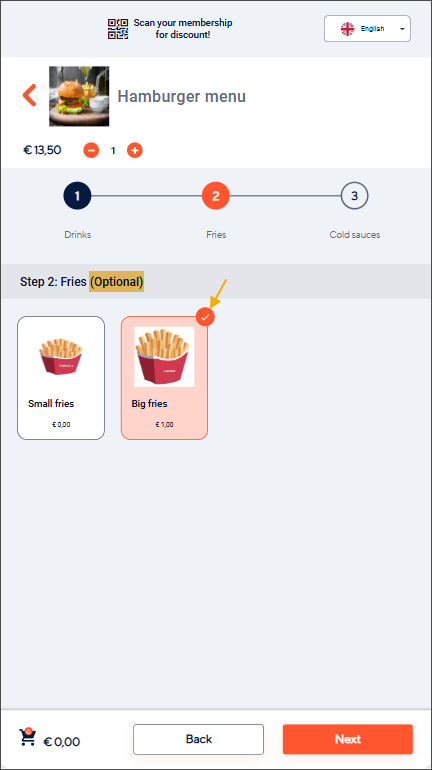
The options are presented as a sequence of steps that guide the customer through the selection process. (1)
Each step (option) shows the configured choices (possibilities). Customers can also clearly see whether a step is mandatory or optional. (2)
Mandatory choices
Multiple choices possible
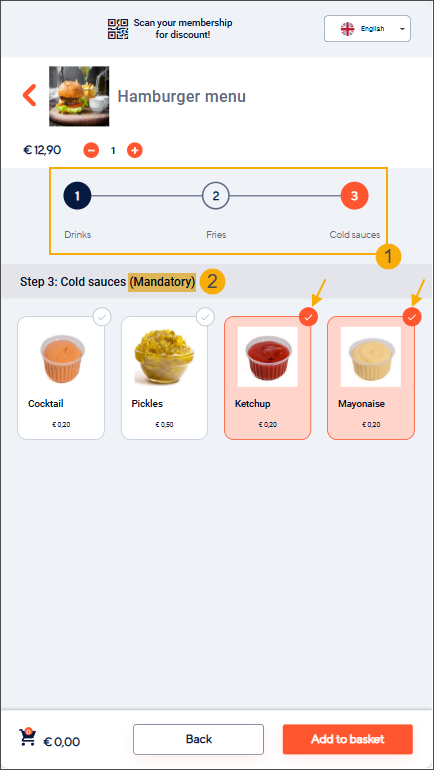
Customers must select at least 1 possibility before proceeding.
The customers can deselect possibilities until only one remains, ensuring that at least one possibility is always selected.
Single choice only
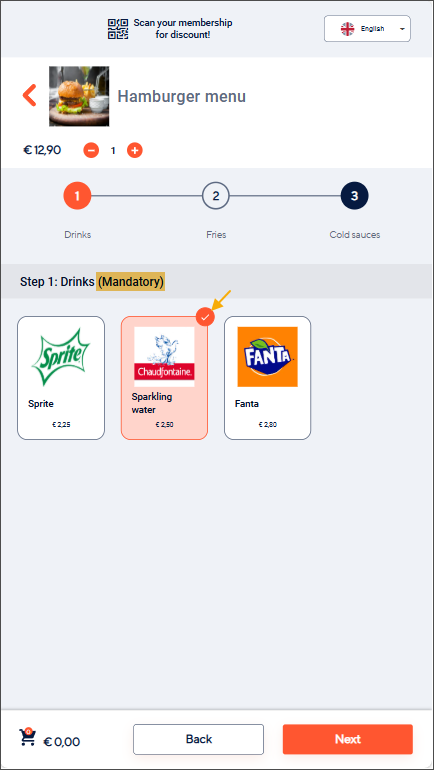
Customers must select 1 possibility before proceeding.
Selecting another possibility will deselect the previous choice.
Optional choices
Multiple choices possible
Customers can select several possibilities or nothing to skip the option and proceed.
Customers can deselect all possibilities to skip the option.
Single choice only
Customers can select 1 possibility or nothing to skip the option and proceed.
Selecting another possibility will deselect the previous choice.
Customers can deselect the possibility to skip the option.
Specify allergens
Specifying allergens is recommended.
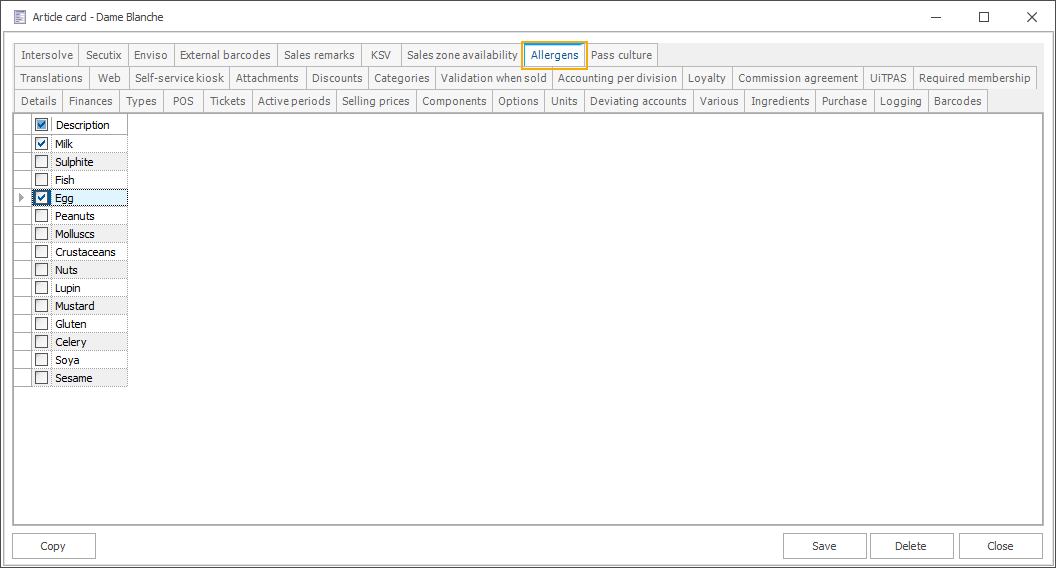
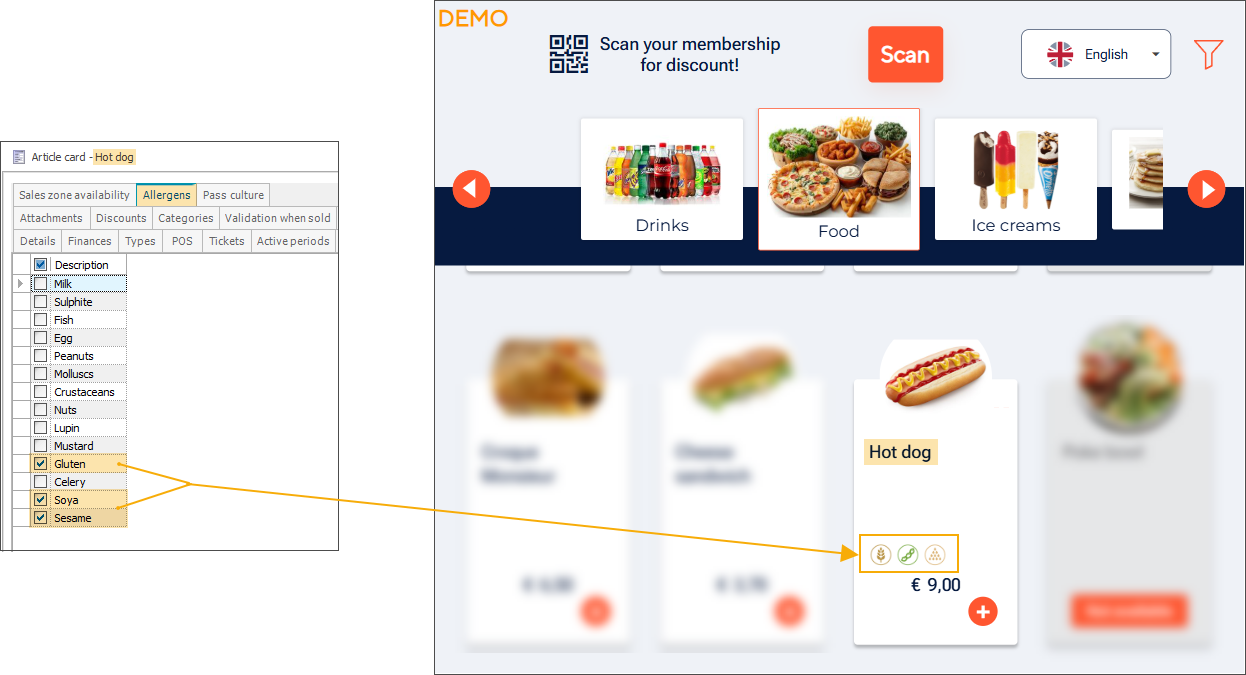
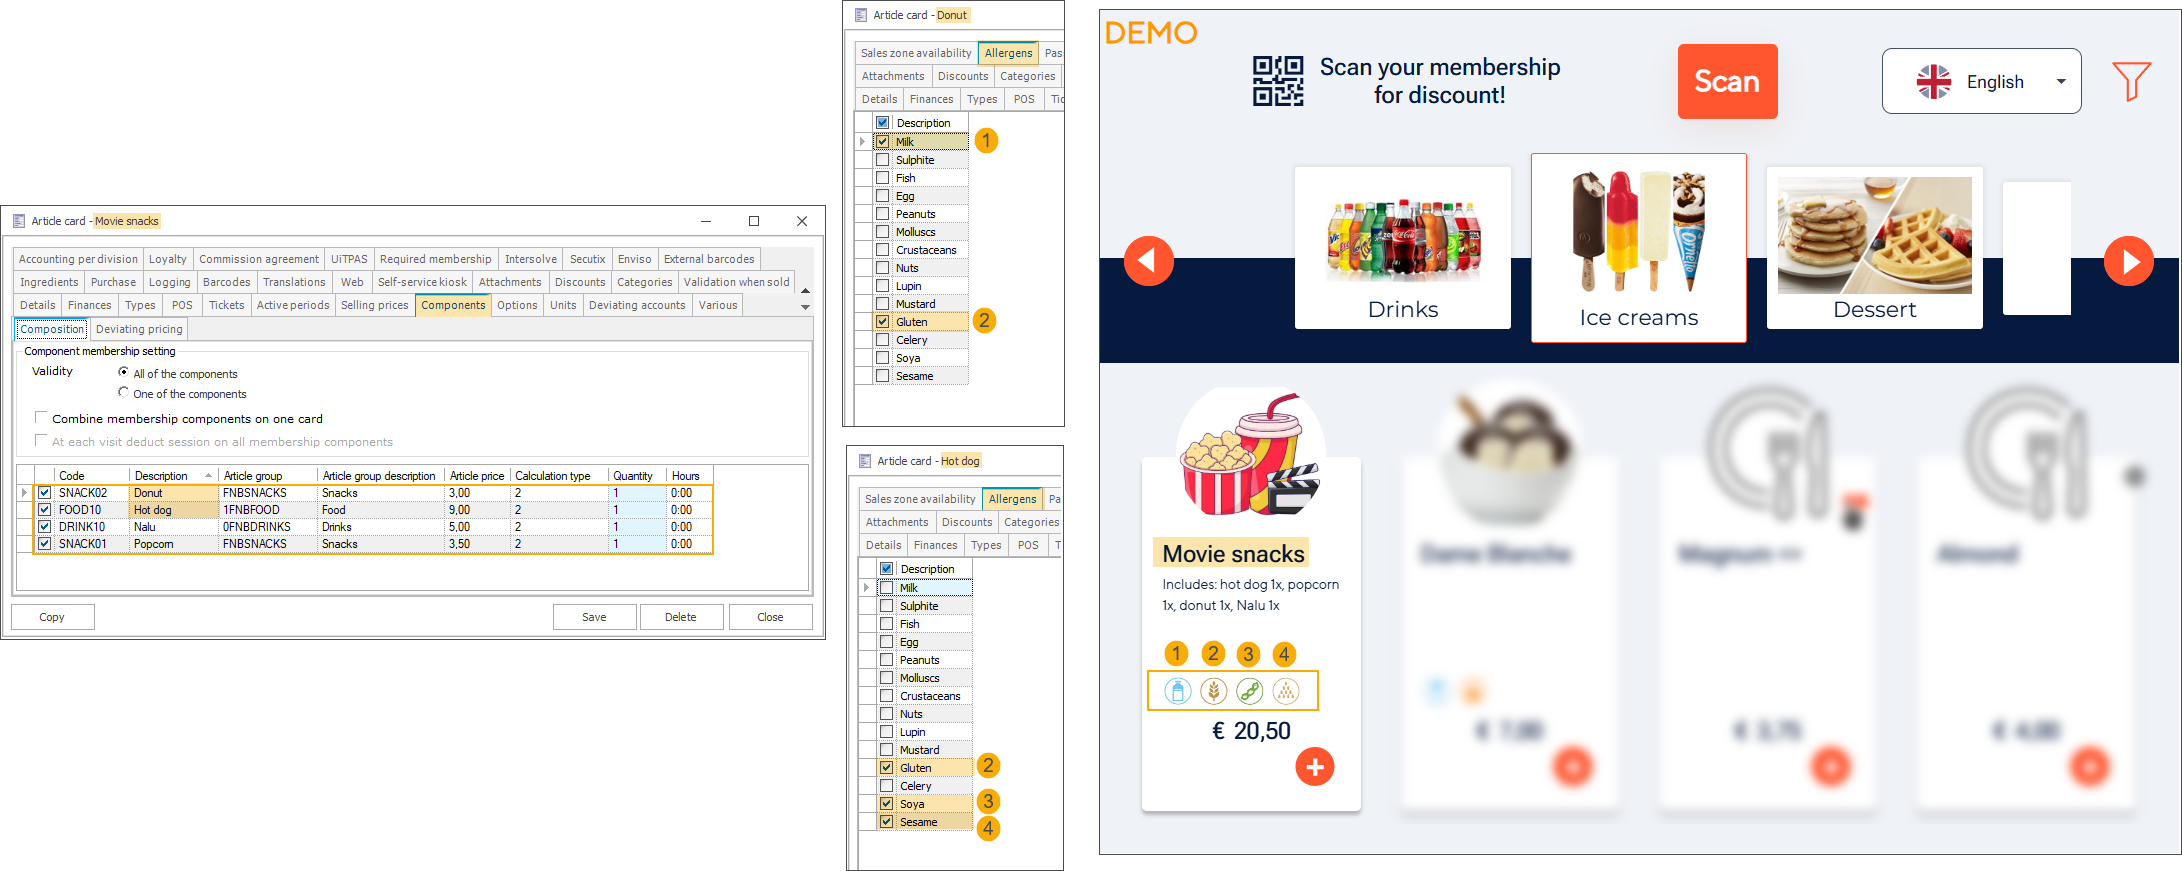
In the module General, go to Basic data > Articles > Articles and open the article card of a sales item that contains allergens. In the tab Allergens, select the relevant allergens from the predefined list of 14 official EU allergens (milk, sulphite, fish, egg, peanuts, molluscs, crustaceans, nuts, lupin, mustard, gluten, celery, soya, sesame).
Repeat these steps for each article with known allergens.
Providing allergen information for your products helps customers make informed, safe choices and supports those with dietary needs.
Allergens defined at the article level are displayed for:
sales items
For simple sales items without components or options, allergens are displayed on the main product tile.
components
For sales items based on composed articles, the allergens of all components are displayed on the main product tile.
options
For sales items based on articles with options, allergens for the main article are shown on the main product tile (1). When selecting options, their allergens are shown on the relevant option tiles (2), and the allergens of the main article are listed in the Allergens dropdown (3).
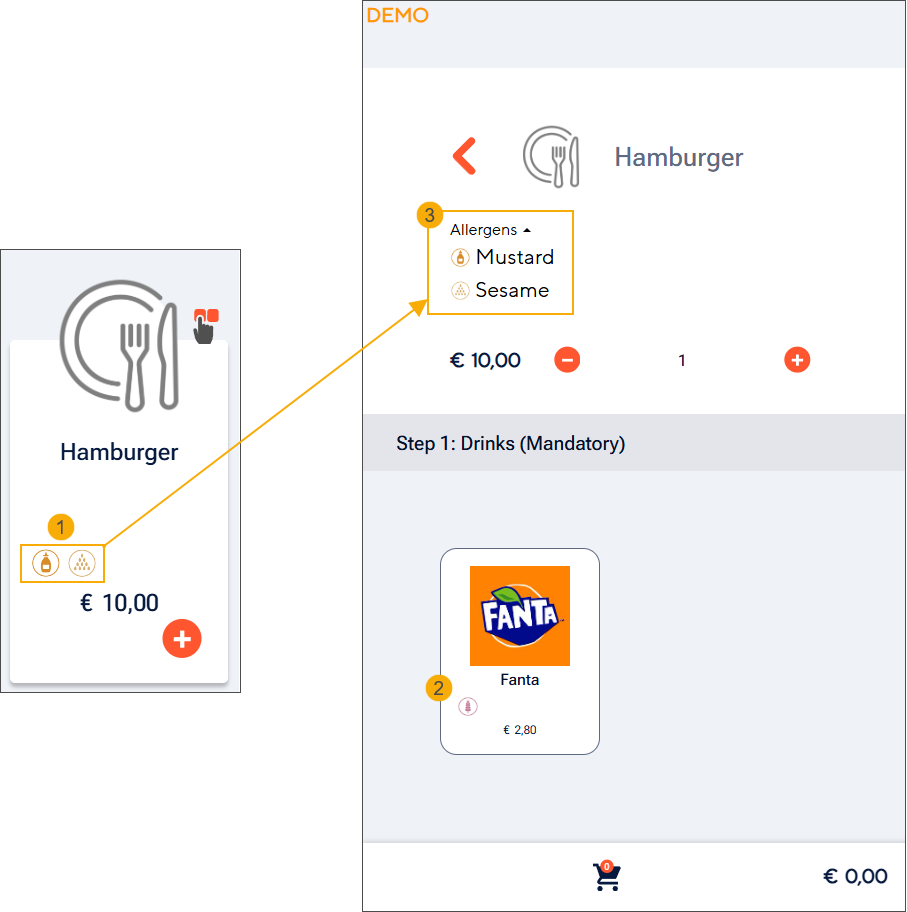
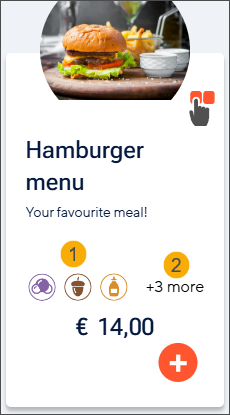
The allergens are shown on the product tiles, using WCAG‑compliant icons (1). If there is not enough space to display all allergens, an indicator shows that additional allergens apply (2).
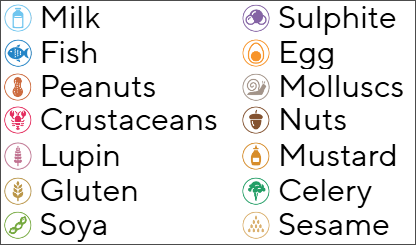
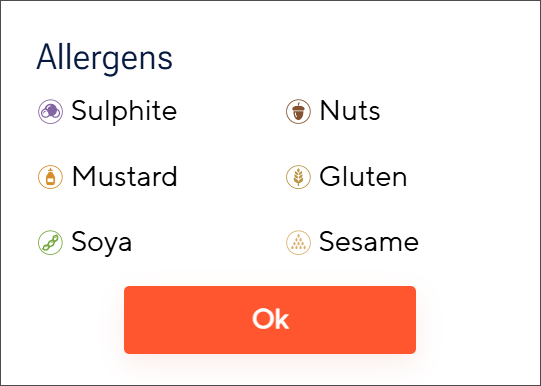
The 14 official EU allergens and their WCAG‑compliant icons.
Clicking anywhere on the allergen section opens a pop‑up showing the complete allergen list with icons and the related allergen names.
When the kiosk language is changed, the allergen translations are updated automatically.
Customers can filter products to exclude items containing specific allergens.
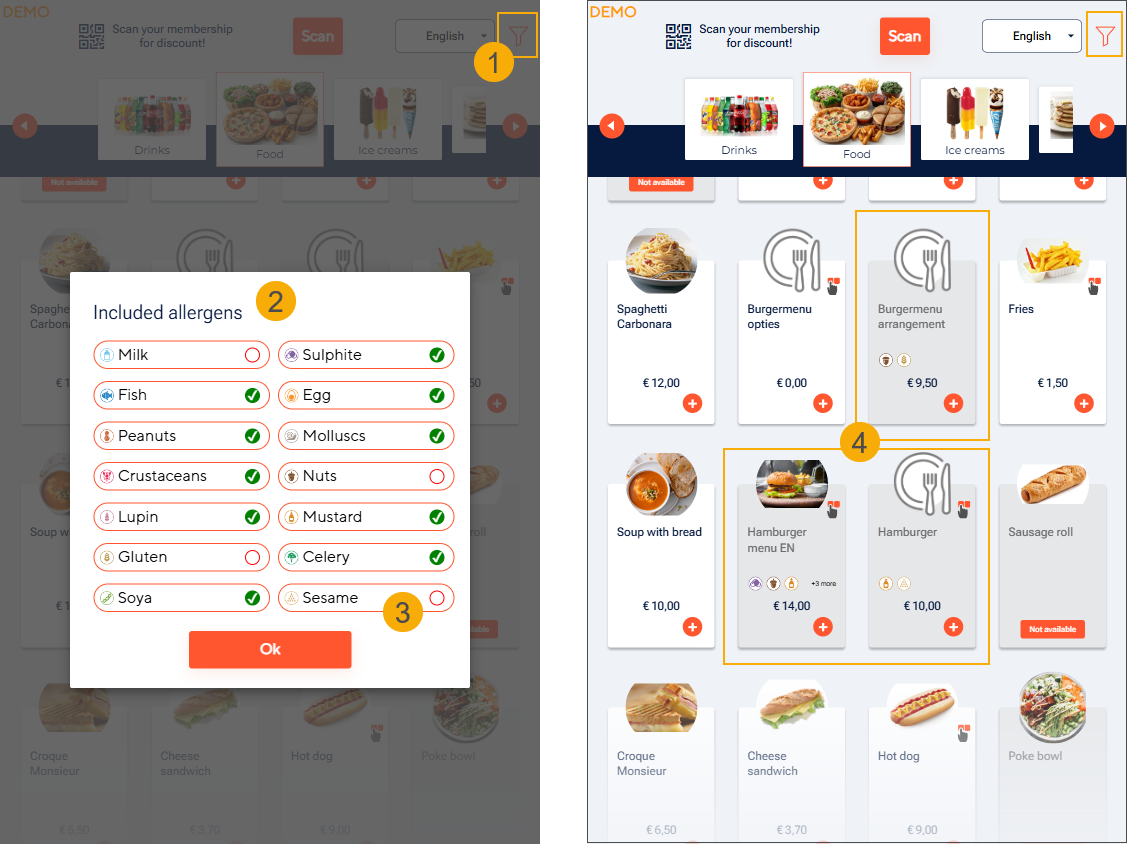
By clicking the filter icon in the top-right corner (1), the Included allergens pop‑up is displayed (2), containing all 14 allergens.
All allergens are selected by default, meaning the product list is not filtered and initially shows all products, including those containing allergens.
Customers can deselect one or more allergens to apply the filter (3). When an allergen is unchecked, products containing that allergen become disabled (4):
They remain visible but cannot be selected
The product tiles appear in a darker colour
Anmerkung
Products filtered out by the allergen filter use the same tile colour as unavailable products. This colour is defined by the Disabled item colour setting in the F&B Manager.
Label Allergens unsuitable is shown on the tile to indicate the presence of the allergen.
Components: If a product contains an allergen in one of its components, the main product tile becomes disabled.
Options: If an allergen is present only in an option, the main product tile remains unchanged. The affected options become disabled.
If a customer adds a product to the basket before applying allergen filters, the product remains fully purchasable, even if it contains the filtered allergens. The tile updates only after the customer changes their selection:
For main products (and products with components): once removed from the basket, the tile becomes disabled.
For options: if the customer applies allergen filters while an option is already selected, that option stays selected and can still be purchased. The tile becomes disabled only when the customer switches to a different option.
Clicking the Reset button (5) returns the Included allergens pop‑up to its default state, with all allergens selected.
The selected allergens are retained for the duration of the kiosk session, and the same filter is applied across all categories.
The Included allergens pop‑up is automatically translated when the customer changes the kiosk language.