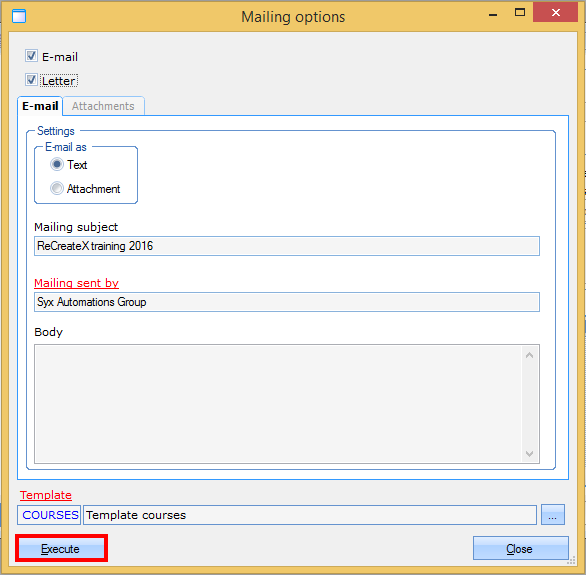
Execute mailing
In order to generate the content of your mailing on the basis of the called-up addresses, you have to click on Execute in the window Mailing options:
 |
Depending on the type of mailing, clicking on Execute will lead to a different result:
If you have created a mailing without a template, all necessary e-mails will immediately be created and put in the queue when clicking on Execute (see Send Mailing > E-mail), and are in other words ready to be sent.
If you have created a mailing with a template and if it will be sent only by e-mail, the necessary e-mails will be created on the basis of the added merge fields (database fields) when clicking Execute and all e-mails will be put in the queue.
If you have created a mailing with a template and if it will be sent only by post, two Word documents will be opened by clicking on Execute. The first document is the template you have selected for the mailing. The second document Form letters contains the effective letters that can be sent.
If you have created a mailing with a template and if it will be sent both by e-mail as by post, two documents will also be opened in function of the letters to be sent (addresses without e-mail address) when clicking on Execute, AND the necessary e-mails will be generated and put in the queue.
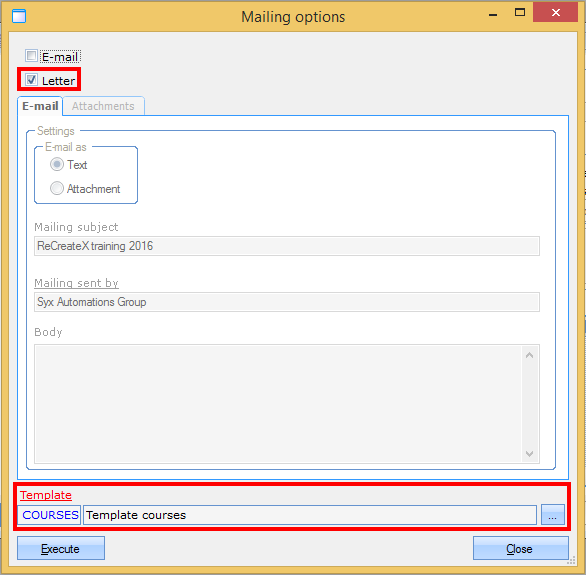
If you use a label template (only select the setting Letter for this), two Word documents will be opened. The first document is the label template. The second document contains the effective labels that have been generated on the basis of the added merge fields (database fields).
Warnung
If you want to use a new template, you will first have to link it to the Recreatex database. (see Link new mailing template and Link new label template)
Link new mailing template
If you want to link a new mailing template to the Recreatex database, it is sufficient to execute a test mailing.
In order to execute a test mailing with the new mailing template, you only have to select Letter in the window Mailing options and select the mailing template in question.
 |
Then, click on Execute.
Two Word documents will be opened: a document with the mailing template and a document with Form letters.
Close the document Form letters.
While executing the test mailing the mailing template will automatically be linked to the Recreatex database and in this template the tool bar below will be shown by default. If you click on Insert Merge Field the list with database fields will appear. The complete list of merge fields can be found in the last chapter of this manual.
 |
Add all required database fields to the template in this way. If you have used temporary fields (see Make a template > Mailing template), you have to replace these by the correct database fields. If you do not do this, the temporary text will also be included in the final letters and/or e-mails.
Save the mailing template and close the document.
As of now, you will be able to use the linked mailing template for an effective mailing and when creating the document Form letters, all correct database data will automatically be loaded.
Warnung
To modify the content of a mailing, you always have to start from the template and never from the document with form letters.
Link new label template
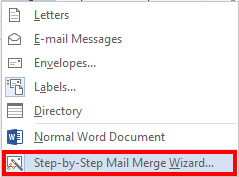
In order to link a new label template to the Recreatex database, you have to proceed in the same way as for linking a mailing template. If the label template is reopened, however, after clicking on Execute you have to click on Start mail merge instead of Insert Merge Field:
 |
In the list that appears, you select Step-by-Step Mail MergeWizard
 |
In the right part of the document the wizard Mail merge will now appear and, dependent on your Word version, this wizard is in Step 1 of 6 or Step 3 of 6.
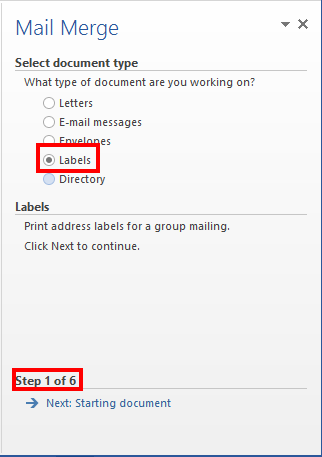
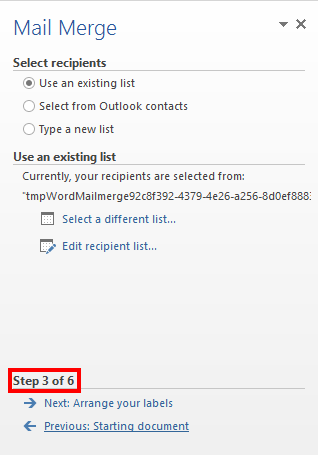
If the wizard is in Step 3 of 6, you have to return to Step 1 of 6 and check if the document type is effectively set to Labels.
If in Step 1 to 6 the document type is defined as Labels, you can click on Next at the bottom of the window: Starting document:
 |
Then, add the desired database fields for the first label.
In order to apply the database fields to the text labels in the correct way, you have to click on Update labels. In this way, you also avoid that each address is generated on a separate page.
 |
Once all database fields have been added, you have to save the label template (it is not necessary to execute the other steps in the wizard) and close all Word documents. Now you have to execute the mailing again to generate all labels on the basis of the database fields.