The customer card
If you create a new customer or consult an existing customer, you always do so on the basis of the customer card. Below, you see an example of the customer card:
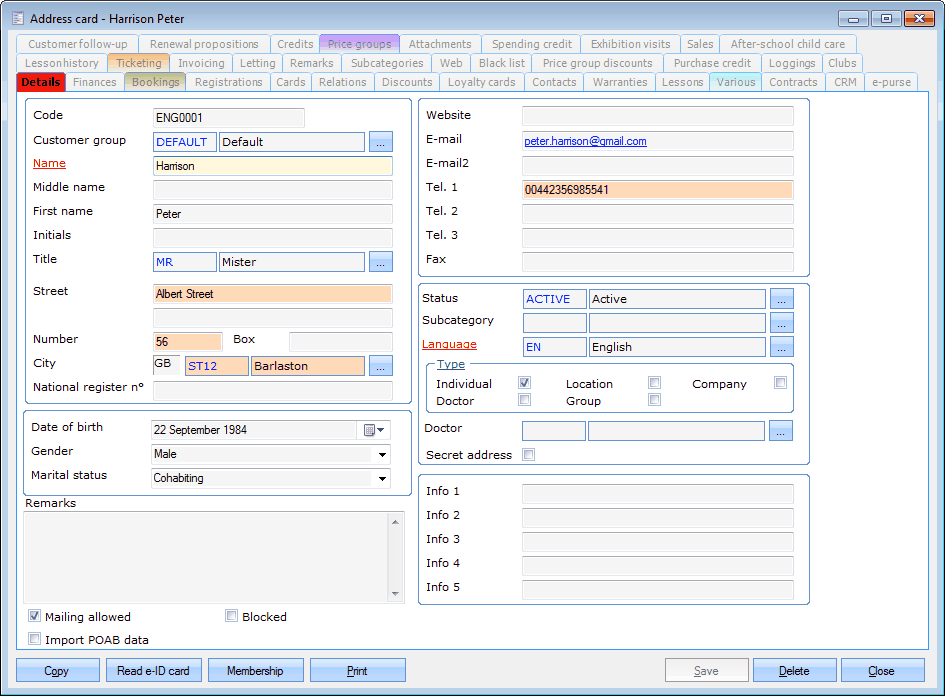 |
The customer card counts different tabs that all influence the use of the customer in Recreatex. It is advised to always first fill in the tab Details and to click on Save before filling in all other tabs.
Anmerkung
The data that are filled in (obligatory or not) on the customer card are used throughout the different parts and modules of Recreatex and assure that these data are filled in automatically on the cards if needed. Some of these data are unconditionally linked to the customer and can only be modified on the customer card. Other data are only default (standard) data that simplify the filling in of a card but that still can be changed on the card in question.
Details
In the tab Details fill in the basic customer data.
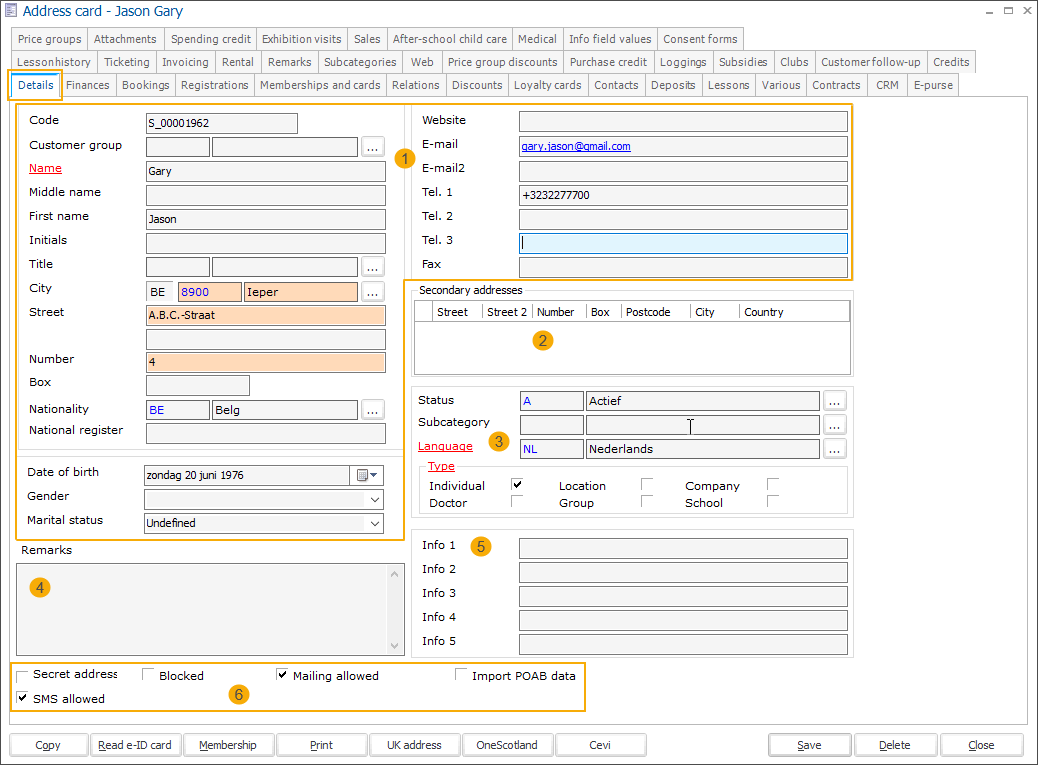 |
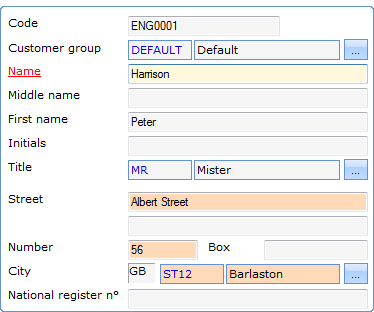
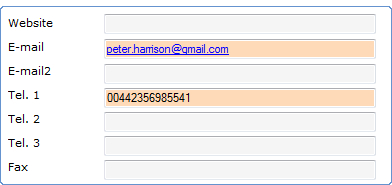
In the upper section of the screen, you can provide detailed customer information, including name, address, contact and demographic information.
 |
 |
Anmerkung
The underlined fields are mandatory and internally determined by the Recreatex software. The fields marked in light red are obligatory as well but have been imposed by the Recreatex application administrator. The fields that have been imposed by the administrator can for example be used to check for double customers, but also to avoid that certain required data are not filled in.
In the section with Date of birth, Gender and Marital status you can fill in these extra data. The date of birth is used to check the customer's age in the different Recreatex modules (for example for fiscal certificates or registrations for certain activities).
 |
In the section with amongst others the fields Status and Subcategory you can link a type and status to the customer.
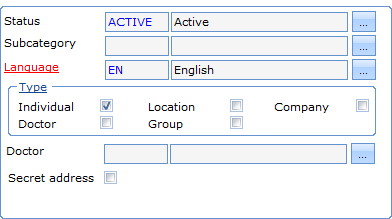 |
Status | The status of the customer is mainly used for registrations and for the link with the population database. You can determine a default status in the basic parameters. (see Managementmanual 'GENERAL - Management') |
Subcategory | The subcategory of the customer. |
Anmerkung
It is possible to indicate several subcategories under the tab Subcategories.
Language | This is the language in which the customer wants to be addressed. |
Type | Here you can determine the customer type. The following types are possible:
Achtung
|
Doctor | The doctor of the chosen customer that you can contact in case of problems. |
Secret address | You can define the address of the chosen customer as a secret address by means of which only employees having sufficient rights can consult and/or modify the data of this customer. |
In the section Remarks you can fill in extra information in the information fields provided for.
 |
The setting Mailing allowed allows you to determine if the customer wants to receive mailings or not.
 |
The setting Blocked allows you to determine if the customer is still visible in your customer database. If a customer is blocked, it is no longer possible to register sales on this customer or to call up lists from this customer.
 |
The setting Import POAB data allows you to determine if you want to import the data for the new customer from the POAB database (module POAB integration required).
 |
Finances
In the tab Finances all financial data of the customer can be filled in.
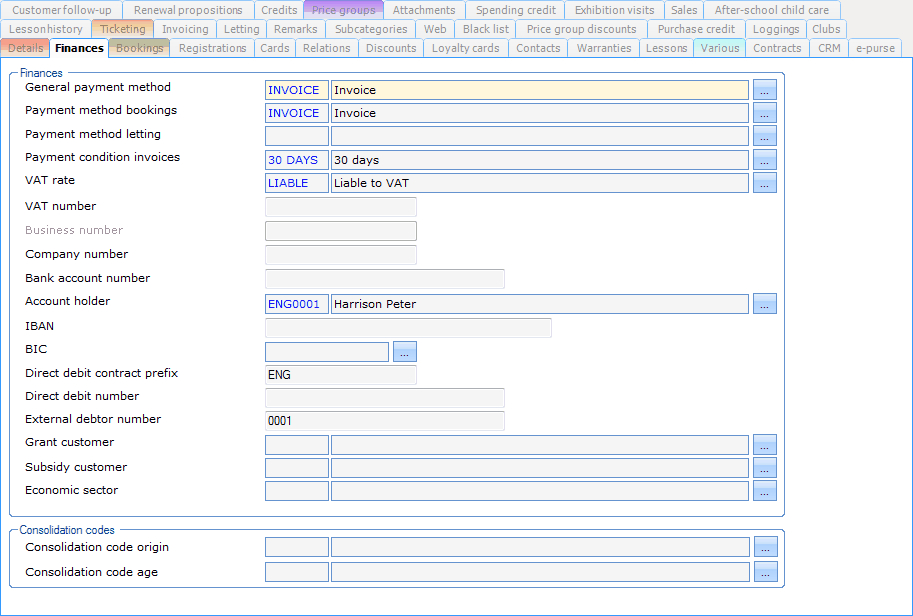 |
In the section Finances you can fill in all financial data of the customer.
General payment method | The way in which the customer wants to pay generally. |
Payment method bookings | The way in which the customer wants to pay by default for facility bookings. |
Payment method letting | The way in which the customer wants to pay by default for rentals. |
Payment condition invoices | The condition by means of which the expiry date of an invoice has to be calculated. |
VAT rate | The indication whether a customer is liable to VAT or not. |
VAT number | The VAT number of the customer. |
Business number | The business number of the customer. This field can only be filled in in case of customers of the type Company. |
Company number | The company number of the customer. This field is necessary for the WINSEC link. |
Bank account number | The bank account number of the customer. |
Account holder | The account holder of the customer's bank account. |
IBAN | The customer's International Bank Account Number. |
BIC | The international Bank-Identifier-Code of the customer's bank. |
Direct debit contract prefix | The prefix for the direct debit contracts. |
Direct debit number | The direct debit number. |
External debtor number | The accounting number of this customer, that either can be obtained from the accounting department, or either can be generated automatically when saving a new customer. (see manual 'GENERAL - Management'Management) |
Grant customer | If you, as an organisation, work with grants (in case of which the main customer pays a part of the article price and the grant customer pays the grant), you can specify the grant customer linked to the main customer here. The grant customer is the customer who pays the part Grant price of the sales article (to be defined on the article card - see manual 'GENERAL - Articles'Articles) in case of a sale to the main customer. If filled in, a second sale in the name of the grant customer will be generated in addition to the sale in the name of the sales customer. |
Subsidy customer | If you, as an organisation, work with subsidies for facility bookings, (in case of which the main customer (of the type Group) pays a part of the facility booking and the subsidy customer pays the subsidy), you can specify the subsidy customer linked to the main customer here. The subsidy customer is the customer that pays the subsidy (percentage of the price) of the facility booking of the main customer. If filled in, a second sale in the name of the subsidy customer will be generated in addition to the sale in the name of the sales customer. See also Subsidiesparagraph 'Subsidies'. |
Economic sector | In function of the financial export link Alfa (more specifically the Policy and management cycle) it is possible to fill in the economic sector in which the customer is active. |
The Consolidation codes allow you to call up a general Microsoft Excel overview of turnover and of visitor numbers in the form of basic graphs and pivot tables. (see Sales manual 'GENERAL - Sales')
 |
Bookings
In the tab Bookings all default data in function of (facility) bookings of the customer can be filled in. (module Facility bookings required)
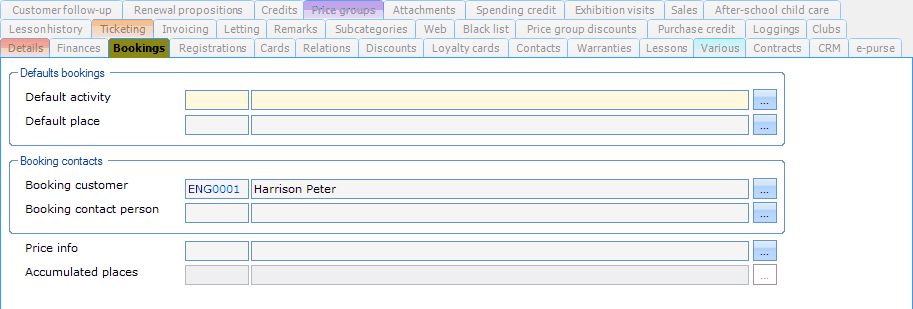 |
In the section Defaults bookings you can determine the default activity and the default place for bookings of this customer.
 |
In the section Booking contacts you can determine who is the default customer and/or contact person in case of facility bookings.
 |
Next, you can, if you wish so, fill in the linked price info and consult the informative field Accumulated place.
 |
Anmerkung
If you select the price info, the linked price group is automatically filled in.
Registrations
The tab Registrations contains all data concerning the customer's registrations. (module Registrations required)
 |
In the section Defaults it is possible to fill in the participant group and the linked price info that have to be respected in case of registrations by the customer.
 |
In the section Registrations you see an overview of all recorded registrations of the customer.
 |
Anmerkung
If you wish so, this overview also allows you to create, modify or delete/cancel registrations using the framework functionalities.
Cards
In the tab Cards you will find an overview of all the cards and the linked membership of the customer. (module Membership required)
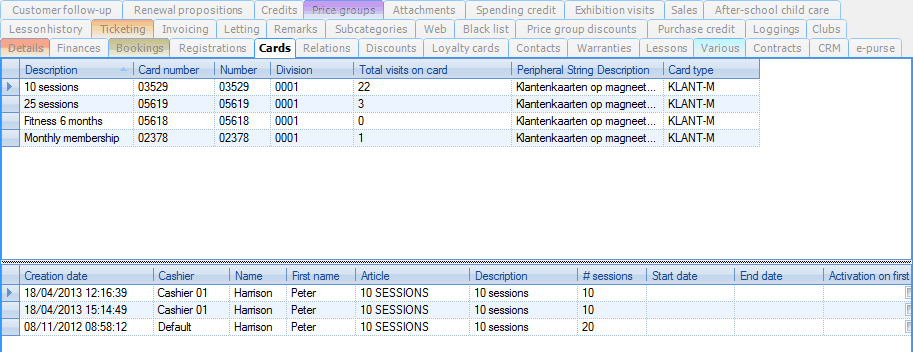 |
In the upper part of the window, you see an overview of all the customer's cards.
 |
In the lower part of the window, you find an overview of the membership articles that are linked to the selected card.
 |
Relations
In the tab Relations you can set up the relations and/or the company link of the customer.
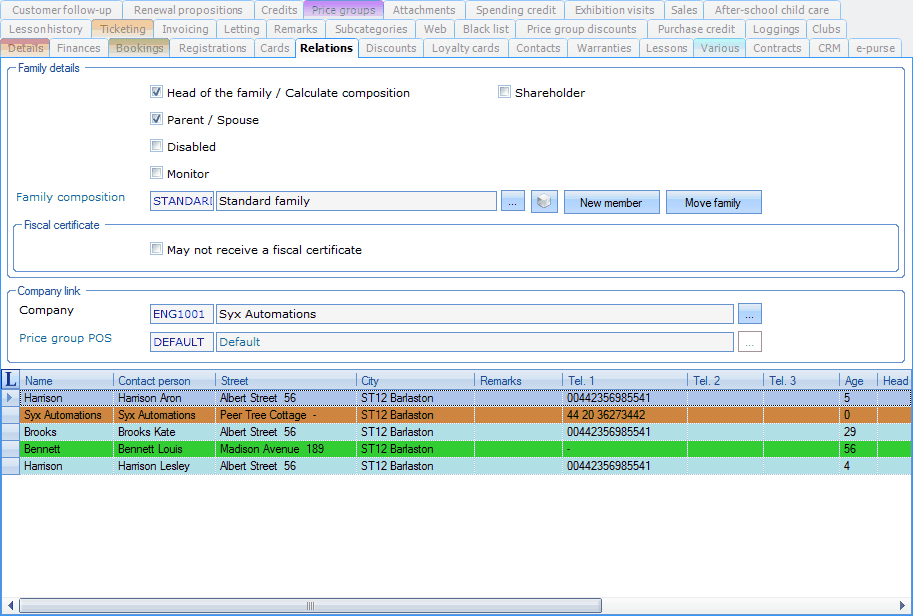 |
In the section Family details you can indicate the characteristics of the customer that determine the calculation of the customer's family composition.
 |
Head of the family/Calculate composition | The customer is head of the family. If you want to have the family composition calculated, one of the family members has to be indicated as head of the family. |
Parent / Spouse | The customer is a parent or spouse. If you define the customer as head of the family, this setting is automatically ticked off. |
Disabled | The customer is a disabled person. |
Monitor | The customer is a monitor, generally of a certain person or family. |
Shareholder | The customer is a shareholder of a certain company. |
Family composition | The family composition currently chosen or automatically calculated. |
Anmerkung
If one of the family members has been indicated as head of the family, the family composition is automatically calculated on the basis of the relations of the head of the family.
Keeping the family compositions up to date can be useful in function of setting up divergent prices for specific families or in function of lists and statistics.
The characteristics of the relations of the chosen customer can easily and quickly be modified in function of the family composition by ticking off the desired characteristics in the lower part of the window.
| If the family composition has been filled in/modified manually, this button allows you to calculate and fill in the correct family composition. | |
| This button allows you to add a new relation of the type 'Family', in case of which several data of the head of the family are automatically copied. | |
| If a family's composition changes due to a divorce or death, this button allows you to link the entire family to another customer. The chosen customer will automatically be indicated as the new head of the family. |
In the section Fiscal certificate it is possible to indicate that the current customer, being a parent, may not receive a fiscal certificate (in the scope of after-school child care/activities). This can, for example, be required in case the parents are divorced and thus only one parent may receive a fiscal certificate.
 |
In the section Company link you can indicate in which company the chosen customer works or of which company the chosen customer is a shareholder.
If you link a company here, this customer will appear as a company member on the customer card of the company in question (tab Company members).
 |
Achtung
If a Company is linked to a customer, the POS price group of the company is shown for your information and automatically filled in for the chosen customer.
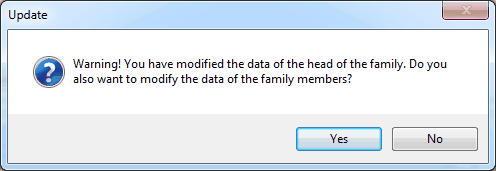
If the customer also has relations of the type Family, the question below will be asked and, if you wish so, the price group of the chosen company will also be filled in for all family relations of the chosen customer.
 |
In the lower part of the window, you will find an overview of all the customer's relations, for example:
 |
If you wish so, you can also modify the characteristics of the relations visualised by ticking off the desired characteristics.
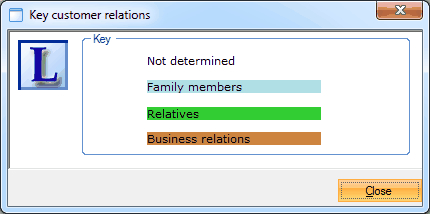
If you click on  in the upper left-hand corner of the relations overview, the key of the colours used in this overview will appear.
 |
You can create, modify or delete relations at all times using the framework functionalities.
(see manual 'FRAMEWORK'Framework)
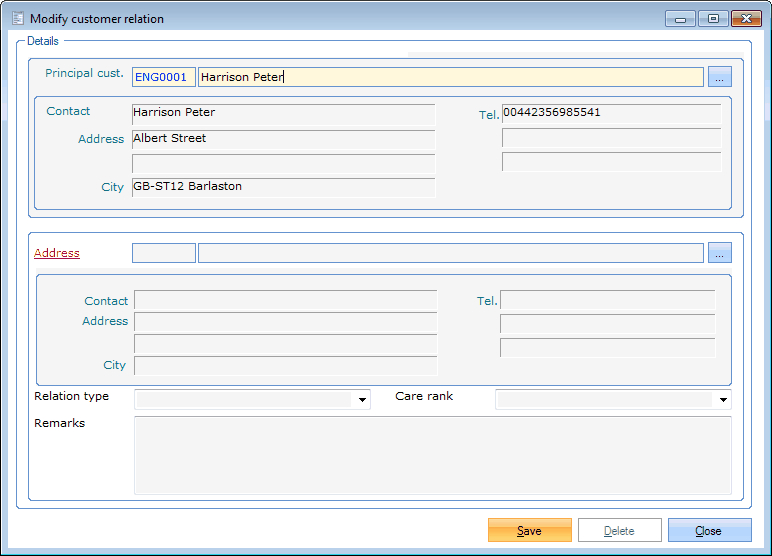 |
In the upper part of the window, the data of the chosen main customer are automatically filled in.
Address | Here you can choose the customer that you want to link to the main customer as a relation. | |
Relation type | Here you can choose the relation type between the chosen customer and the main customer.
| |
Care rank | In case the current relation is a child that will also be registered in the module After-school child care, you can fill in the care rank of the child here. | |
Remarks | It is also possible to add extra information concerning the relation. |
Discounts
In the tab Discounts you can find all discounts and/or discount cards of which the customer disposes and that have to be taken into account when registering for an activity (Module Registrations required). See also chapter 'Settings', paragraph 'Discounts'Discounts.
 |
You can create, modify or delete discounts at all times using the framework functionalities.
(see manual 'FRAMEWORK'Framework)
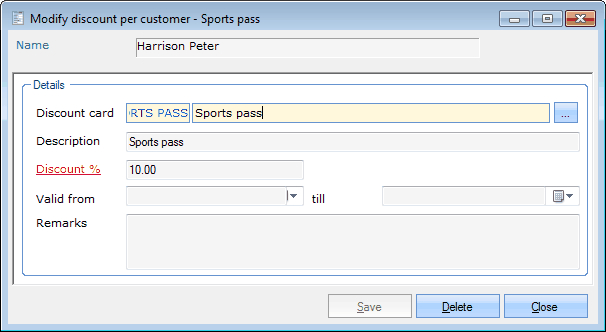 |
Name | The customer currently selected (indicative). |
Discount card | The discount card you want to link to the customer. |
Description | A description of the chosen discount. |
Discount % | The discount percentage you want to link to the customer. If you select a discount card, the discount percentage of the given discount card is automatically copied. It is, however, still possible to change this percentage. |
Valid from... till | The period in which the discount is valid. If you select a discount card, the period of the given discount card is automatically copied. It is, however, still possible to change this period. |
Remarks | Extra information concerning the discount. If you select a discount card, the remarks of the given discount card are automatically copied. It is, however, still possible to change these comments. |
Anmerkung
If several discounts are linked to the customer (all valid in the same period or without a specific period), and if the customer registers for an activity that qualifies for a discount, the system will take the discount having the highest percentage.
Loyalty cards
In the tab Loyalty cards you will find an overview of all loyalty cards of which the customer disposes and that are updated automatically per participation to an activity (module Registrations required). See also chapter 'Settings', paragraph 'Loyalty cards'Loyalty cards.
 |
You can create, modify or delete loyalty cards at all times using the framework functionalities.
(see manual 'FRAMEWORK' Framework)
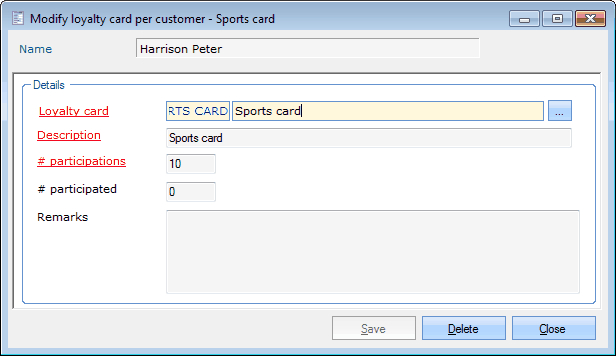 |
Name | The customer currently selected (indicative). |
Loyalty card | The loyalty card you want to link to the customer. |
Description | A description of the chosen loyalty card. |
# participations | This is the number of participations that is required for a full loyalty card. |
# participated | The number of times the customer has already participated to an activity that qualifies for the loyalty card. |
Remarks | Extra information concerning the loyalty card. |
Contacts
In the tab Contacts you can see all contact persons of the customer as well as the customers of which the customer is a contact person himself.
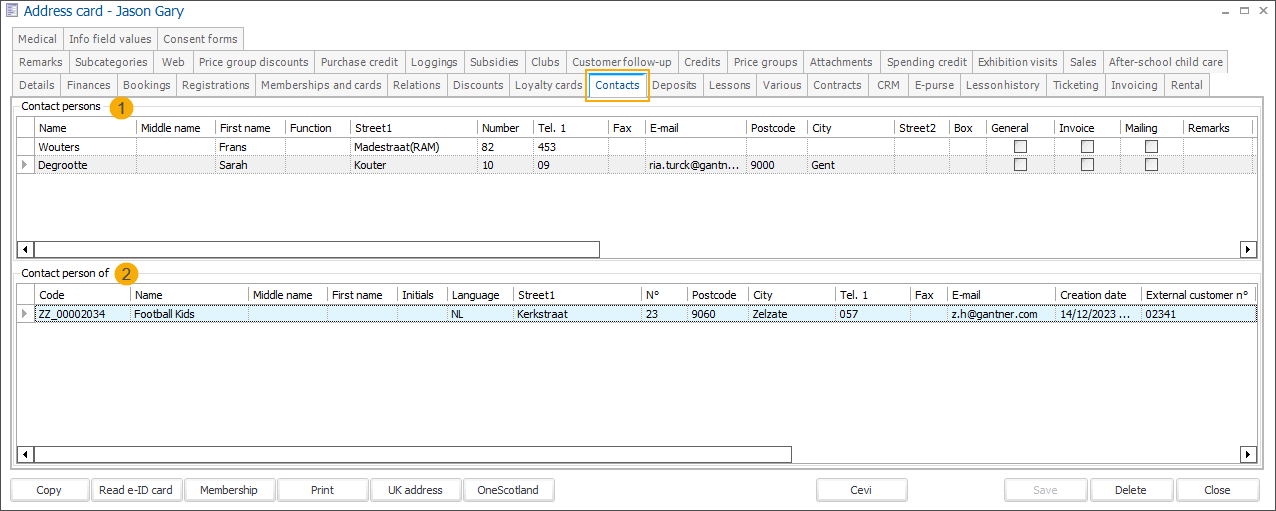
In the section Contact persons (1) you see the overview of all contact persons of the chosen customer.
In the section Contact person of (2) you see the overview of all persons of which the chosen customer is a contact person.
 |
You can create, modify or delete contact persons at all times (in de section Contact persons) using the available framework functionality.
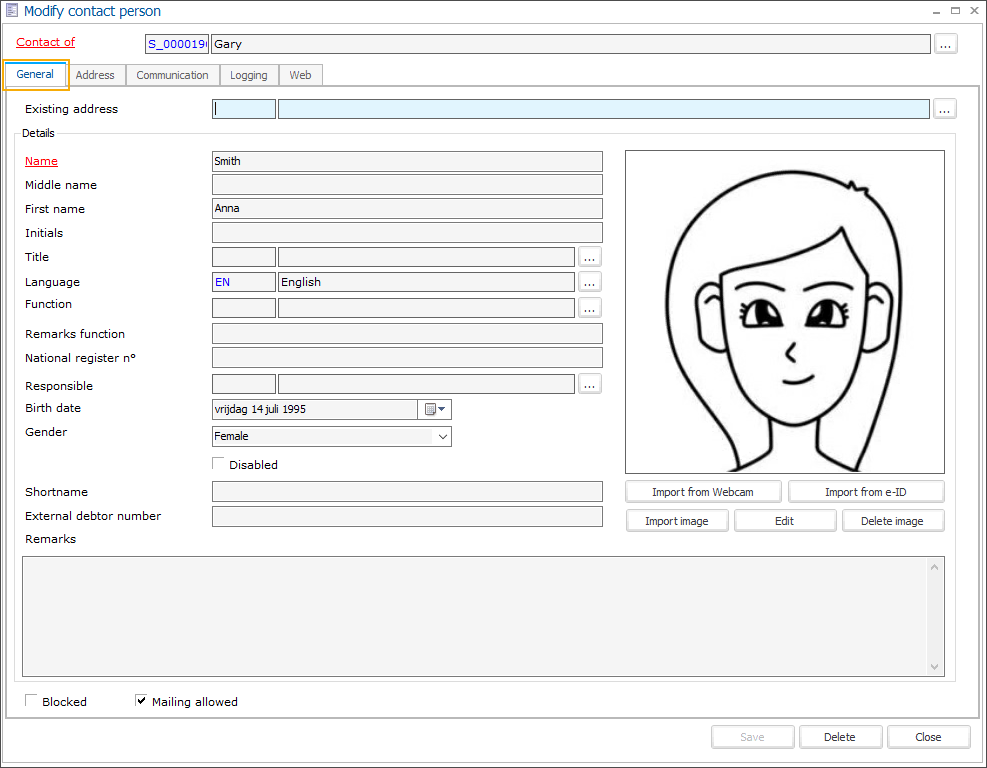
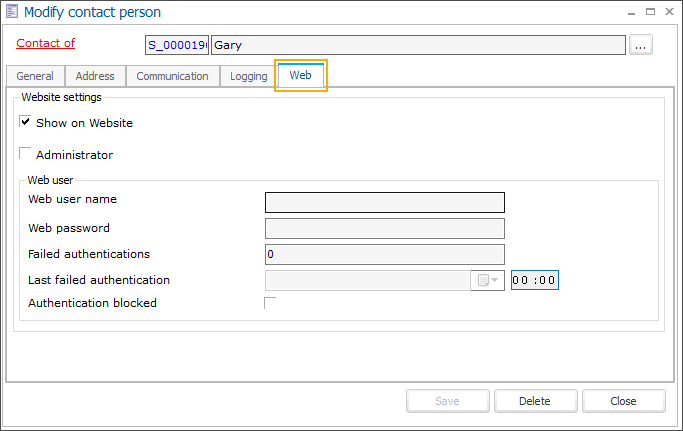
In the tab General you can choose to add an existing customer as a contact person, to create a new contact person or to block the current contact person. In the tabs Address and Communication you can find more information concerning the contact person. In the tab Logging you can find all registered modifications of the contact person's data.
In the tab Address, the section Address type (2) allows you to indicate which type of contact person you want to create, modify or delete.
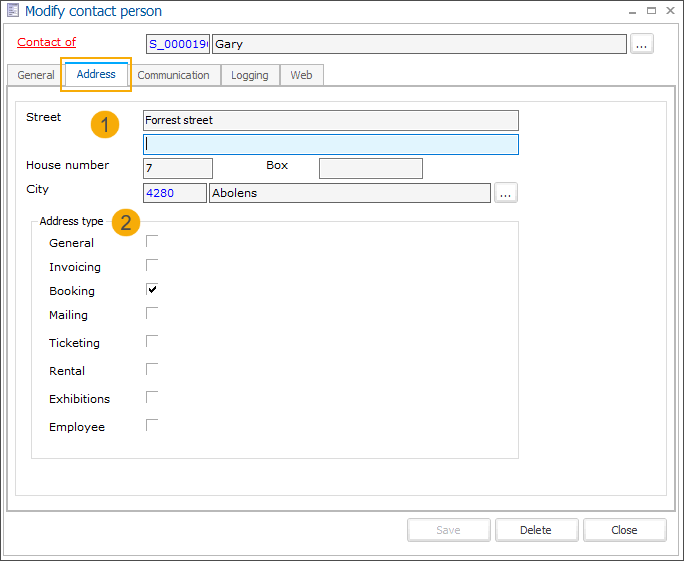
General | May the chosen contact person be addressed for general purposes? |
Invoicing | May the chosen contact person be selected as a contact person for invoicing? (see tab Invoicing) |
Booking | May the chosen contact person be selected as a contact person for bookings? (module Facility bookings required) |
Mailing | May the chosen contact person be selected as a contact person for mailings? (module Mailing required) |
Tab Web
Warranties
In the tab Warranties you will find an overview of all warranties charged and returned to the customer, as well as the outstanding warranty balance.
 |
It is possible ta call up the warranty details by double-clicking on the warranty line in question (or by clicking, followed by <Enter> or <F3>).
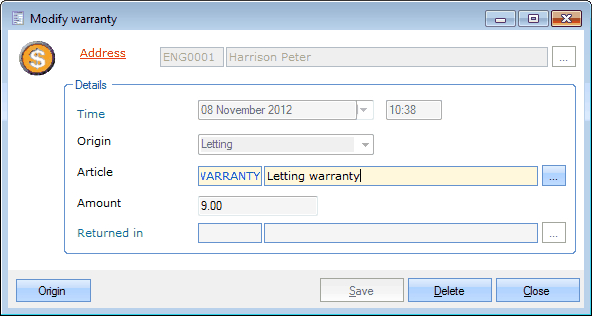 |
For your information, all details of the warranty are shown and, if you wish so, you can call up the sale/booking/order in question to which the warranty is linked by clicking on Origin.
Anmerkung
Outstanding warranties can always be returned to the customer via General > Basic data > Customers > Processing > Return warranties. See also chapter 'Processing', paragraph 'Return warranties'.
Lessons
In the tab Lessons you will see an overview of the swimming level of the customer as well as extra remarks. Moreover, you can find the lesson groups and waiting lists for which the customer has registered and an overview of the stickers the customer has already received. (module Course management required)
 |
In the section Level the current swimming level of the customer is automatically filled in, based on the course levels linked to the lesson groups to which the customer has participated. If you wish so, the swimming level can be manually modified.
 |
In the tab Current lesson groups you can consult the lesson groups for which the customer is currently registered.
 |
In the tab Current waiting lists you can see on which waiting lists the customer is currently registered.
 |
In the tab Stickers you will see an overview of all the stickers the customer has already obtained.
 |
You can create, modify or delete stickers at all times using the framework functionalities.
(see manual 'FRAMEWORK' Framework))
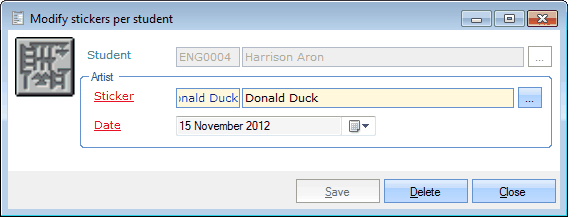 |
Student | This name is automatically filled in and is the customer to which you want to link a sticker. |
Sticker | Here you can choose the sticker you want to link. |
Date | The date on which you link the sticker. |
Various
In the tab Various you can add extra information about the customer.
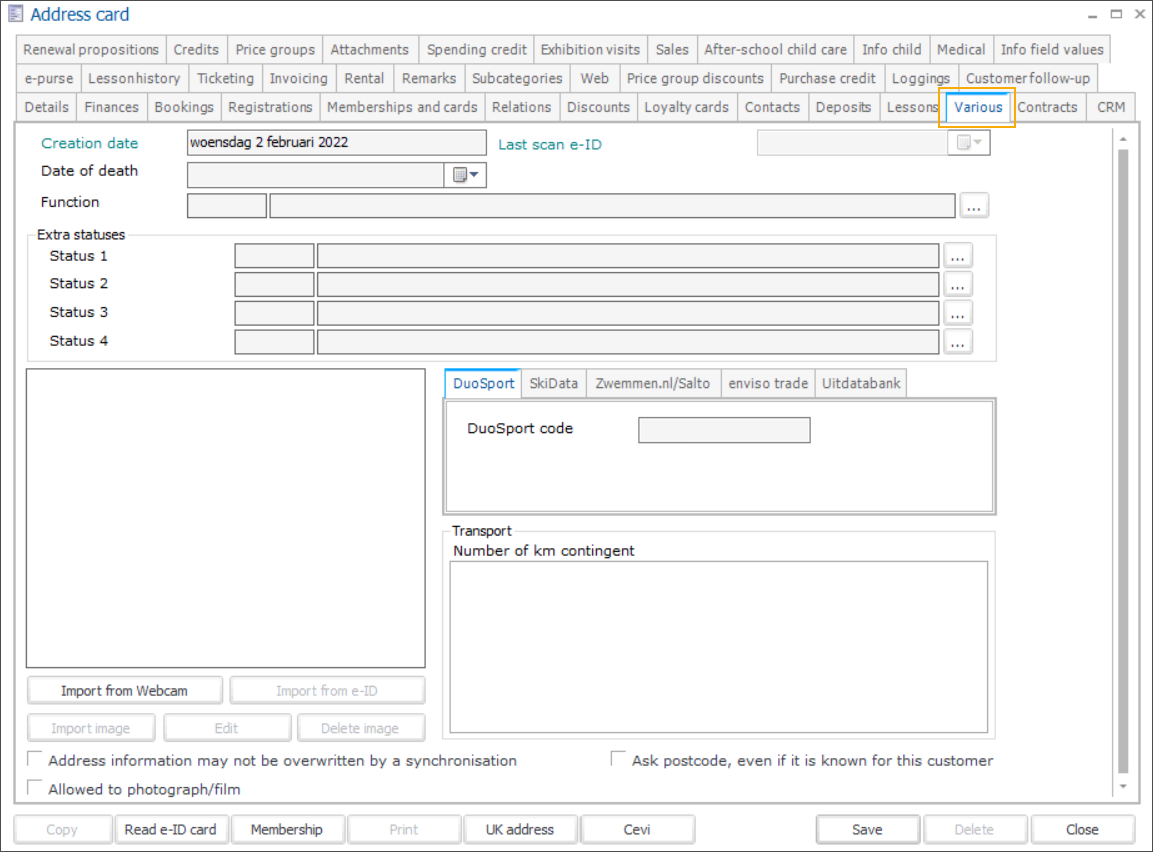
Creation date | is filled in automatically but can be changed manually if needed. |
Last scan e-ID | is filled in and updated automatically after every readout of an e-ID via connected card reader. |
Date of Death | Filling in the date of death will block the customer automatically across the Recreatex application. AnmerkungYou can block a customer by marking the option Blocked directly in the tab Details of the customer card. However, in case of death, filling in the date of death provides a more accurate option where the blocking reason is also visualized in the log.  |
Function | You can create a list of functions or job titles, e.g. for your employees. |
Extra statuses | You can add up to 4 additional statuses per customer, next to the default status provided in the tab Details of the customer card. |
Image import, edit and delete options |  You can add, edit and delete a picture of the customer. Pictures can be imported using a webcam, eID or pictures stored on your computer. |
Address information may not be overwritten by a synchronisation | Select this option to prevent overwriting of the address information in Recreatex when synchronizing data with external databases. |
Allowed to photograph / film | Select this option to give a permission to photograph or film a child. TippWhen a child is registered for an activity, you can see this information in a separate column in registrations overview per activity. |
Ask postcode, even if it is known for this customer | Per customer you can specify the postcode under the tab Details However, using this option allows you to register a different postcode for a particular sale, e.g. if a customer is making a purchase for a company with different address and postcode. TippYou can generate an overview of sales per postcode in the module Sales > Reports > Sales per postcode. |
In the section External link you can determine the code with which you link the customer to DuoSport. (module DuoSport required)
 |
In the section Skidata interface you can determine the customer's code for the access control with the Skidata interface. (module Access control interface Skidata required)
 |
In the section Transport you can determine the number of contingent kilometers that is available for the chosen customer. (module Bus transport required)
 |
Contracts
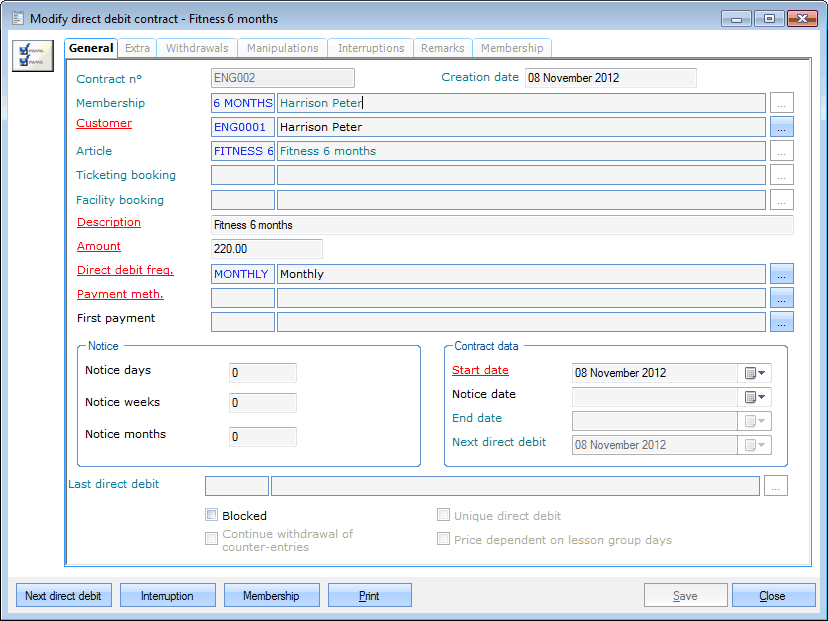
In the tab Contracts you can consult all direct debit contracts of the customer. (module Direct debit required)
 |
It is possible to open a certain direct debit contract by double-clicking on the direct debit contract in question (or by clicking on it, followed by <Enter> or <F3>).
 |
For more information concerning direct debit, we refer to Direct debitthe manual 'DIRECT DEBIT'.
CRM
In the tab CRM (Customer Relationship Management) you can find an overview of the mailings, invoices, registration/booking certificates that have been sent to the customer.
 |
Anmerkung
This list is only a logging overview; it is thus not possible to open the details of the record in question from this window.
In the section Defaults Contracts you can fill in the sales manager who is responsible for customer contacts.
In the tab Budgets you will find an overview of the budgets that are provided for the current customer
 |
You can create, modify or delete budgets at all times using the framework functionalities.
(see manual 'FRAMEWORK'Framework)
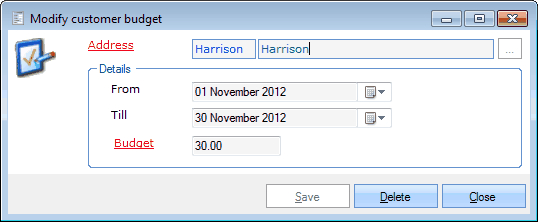 |
From... Till | The period in which the created budget is valid. |
Budget | The value of the budget. |
E-purse
In the tab E-purse you can see the amount that is currently available on the customer's e-purse, as well as the transactions already done. For more information on e-purse processing, see manuals 'GENERAL - Management' and 'GENERAL - Articles'Management and Articles.
 |
Lesson history
In the tab Lesson history you can consult the lesson history of the current customer. (module Course management required)
 |
Ticketing
In the tab Ticketing all ticket bookings of the customer are visualised (module Ticketing required).
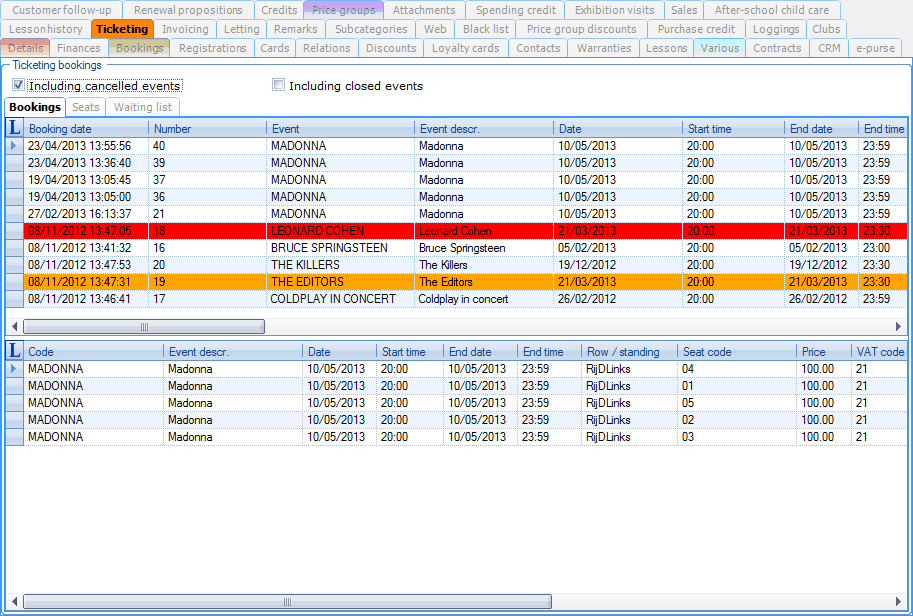 |
You can call up the overview of all ticket bookings, including cancelled and/or closed events or not.
Anmerkung
If you wish so, this overview also allows to create, modify or delete/cancel ticket bookings by making use of the framework functionalities.
In the lower section of the bookings overview, you can see the seats linked to the selected event.
In the tab Seats you can find all seats of the selected customer.
 |
In the tab Waiting list you can see on which waiting list(s) the customer is currently registered.
 |
Anmerkung
The setting Including closed events is also taken into account for the visualisation of the waiting list data. The setting Including cancelled events, however, is not taken into account.
If you wish so, the waiting list overview allows you to create, modify or delete waiting list records using the framework functionalities. The detail of a waiting list record even allows you to directly create a ticket booking on the basis of the waiting list data.For more information on waiting lists for ticketing events, we refer to Ticketing - Usethe manual 'TICKETING - Use'.
Invoicing
In the tab Invoicing you can see the default invoicing data, as well as the data for invoicing per term. (module Invoicing required)
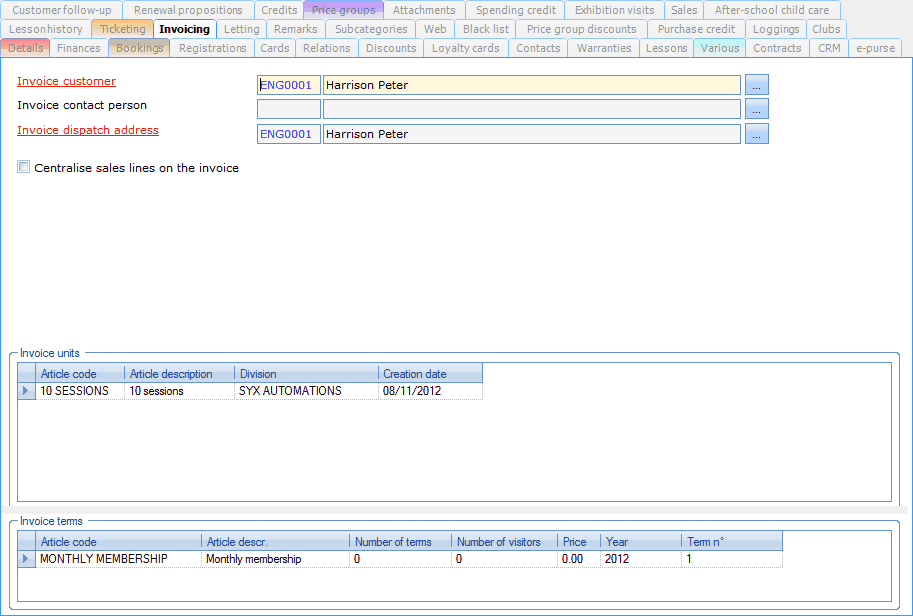 |
In the upper part of the window, you can fill in the invoice customer and the contact person as well as the address to which the invoice has to be sent. You can also choose to centralise (group) all invoice lines into one detailed invoice line.
 |
In the section Invoice units you can determine which articles have to be invoiced per term. (module Financial administration required)
 |
In the section Invoice terms you can determine which articles and which amount you want to invoice per one or several terms. (module Financial Administration required)
 |
Warnung
In order to set up invoicing per unit or per term, the default payment method of the customer has to be a payment method with Invoice processing.
Letting
In the tab Letting you will see an overview of all registered rental orders of the current customer (module Letting required) as well as all sorts of information on the orders' statuses.
 |
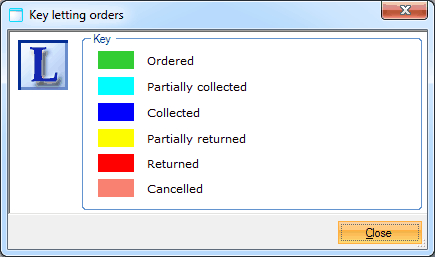
If you click on  in the upper left-hand corner of the orders' overview, a key of the colours used in this overview will appear.
 |
Anmerkung
If you wish so, this overview also allows to create, modify or delete/cancel rental orders by making use of the framework functionalities.
Remarks
In the tab Remarks you can find all remarks concerning the customer. These remarks can not only be consulted on the customer card but also after scanning a card of the customer (module Membership required).
 |
You can create, modify or delete remarks at all times using the framework functionalities.
(see manual 'FRAMEWORK' Framework)
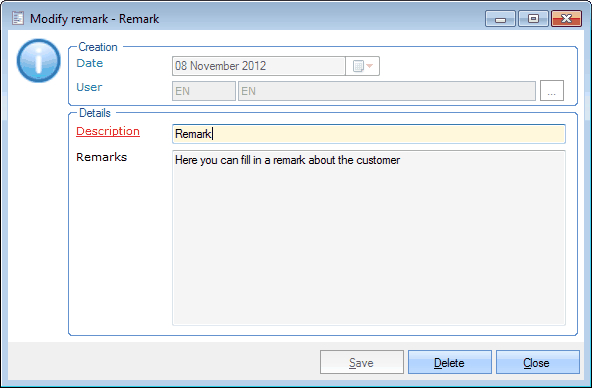 |
Section Creation | Here you can see when the remark has been created and by whom. |
Description | A description of the chosen remark. |
Remarks | In this field you can fill in the remark itself. |
Subcategories
In the tab Subcategories you can tick off all subcategories to which the customer may belong. This is especially useful for setting up and sending mailings (module Mailing required).
 |
On top of the window you can choose to visualise all subcategories or only the selected subcategories.
 |
The possible subcategories are managed under General > Basic data > Customers > Settings > Customer categories (see also chapter 'Settings', paragraph 'Customer categories').
Web
In the tab Web you can manage certain web data of the customer.
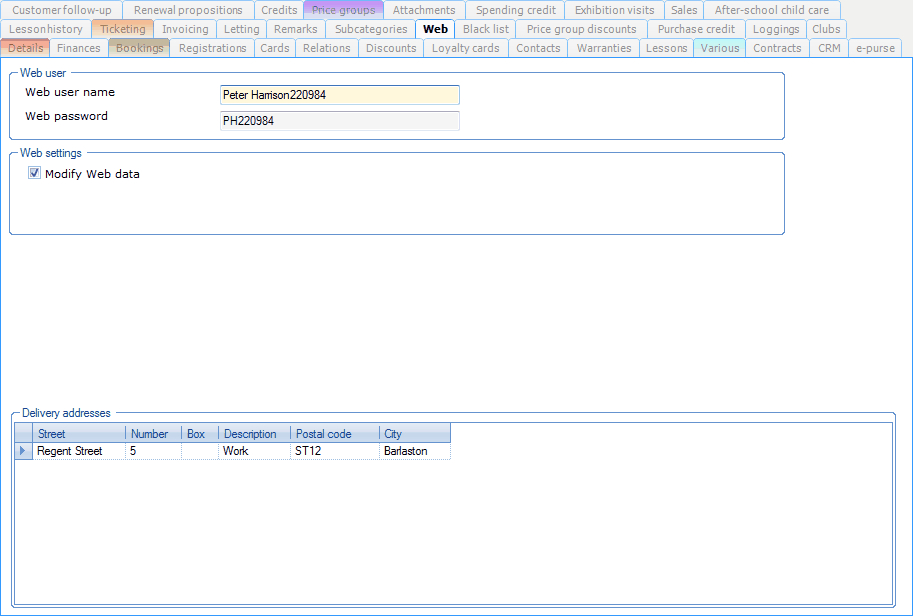 |
In the section Web user you can fill in the user name and the password with which the user can connect himself online.
 |
Anmerkung
If required, you can define in the basic parameters (General > Parameters) that a webID (user name) and a password have to be generated automatically each time a new customer is saved. See also Managementmanual 'GENERAL - Management'.
In the section Web settings you can determine whether the customer is allowed to change his own customer data online.
 |
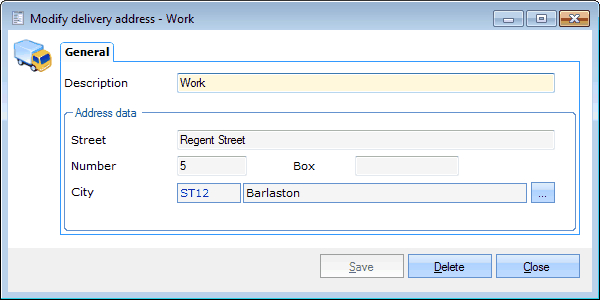
In the section Delivery addresses you can create one or several addresses that differ from the standard address of the customer. If the customer does purchases in the ReCreateX web modules, he can then, if required, select one of these delivery addresses.
 |
You can create, modify or delete delivery addresses at all times using the framework functionalities.
(see manual 'FRAMEWORK' Framework)
 |
Black list
In the tab Black list you can determine which fingerprints have to be registered in case a "black list" is used and/or see if the customer is - temporarily or not - on the black list. (module Integration with SAGEM USB fingerprint required)
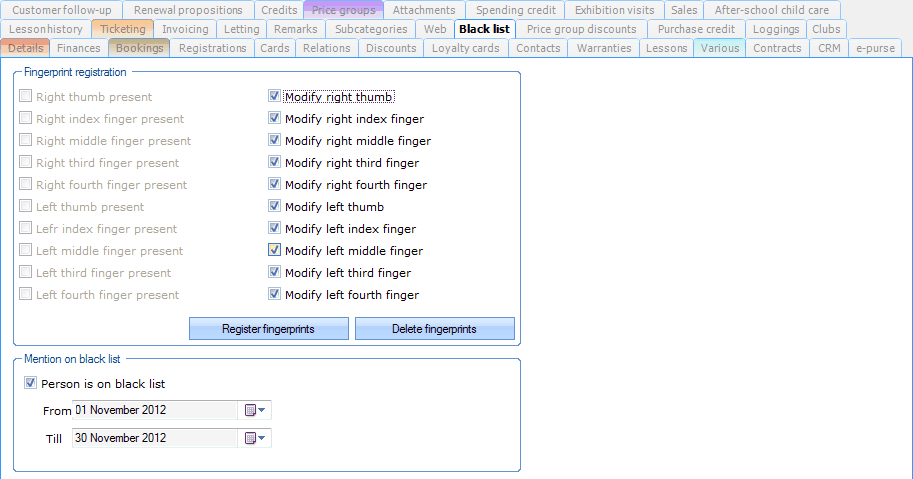 |
In the section Registration fingerprints you can determine in the right column which fingers you want to register or delete. After pressing the button Register fingerprints the system will ask you to scan and register the fingers one by one. The registered fingers are then ticked off in the left column of the section. If you want to delete registered fingerprints from the system, you have to click on Delete fingerprints.
In the section Mention on black list you can determine if the current customer is put on the black list or not and during which period.
Price group discounts
If a price group article has been sold to the customer (see manual 'GENERAL - Articles'Articles), you can find all temporarily linked price groups under the tab Price group discounts.
 |
Purchase credit
In the tab Purchase credit you can consult the actual credit balance of the customer as well as all transactions of the purchase credit linked to the customer.
 |
Warnung
In case of a sale with payment method Purchase credit the entire value is always deducted from the purchase credit article.
Company members
The tab Company members is only available in case of customers of the type Company.
The tab offers you an overview of all Recreatex customers that are linked to the company
 |
You can link or delete company members (customers of the type individuals) at all times using the framework functionalities.
(see manual 'FRAMEWORK' Framework)
 |
Anmerkung
A customer can also be linked to a company in the tab Relations of the customer card (field Company). Once a company has been linked to a customer, this customer is automatically added to the overview of company members of the company in question.
Loggings
In the tab Loggings you can find all registered modifications of the customer data.
 |
Subsidies
The tab Subsidies is only available in case of customers of the type group.
Under the tab Subsidies you can link several recognitions to a customer. A recognition is always part of a subsidy category. If several recognitions are valid within a certain period and within the same subsidy category, the highest active percentage will be taken in case of a booking.
 |
You can create, modify or delete subsidies at all times using the framework functionalities.
(see manual 'FRAMEWORK' Framework)
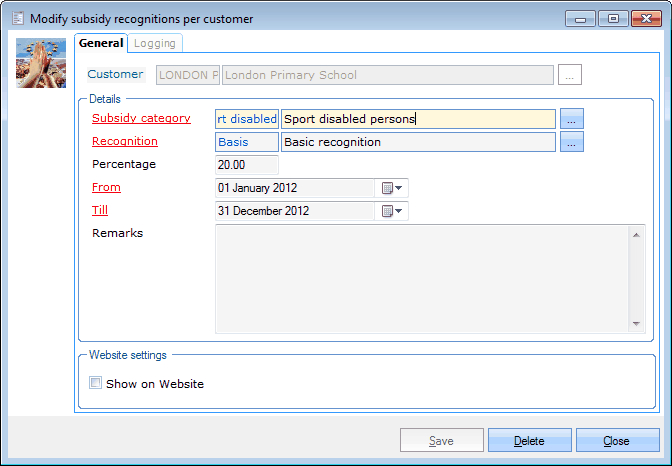 |
Customer | The currently selected customer (indicative). |
Subsidy category | The category of which the subsidy is part. |
Recognition | The specific recognition the organisation enjoys. |
Percentage | The subsidy percentage. |
From ... Till | The period during which the chosen subsidy is valid. |
Remarks | If you want to you can add extra remarks. |
Show on website | This setting allows you to determine if the chosen subsidy recognition is visualised on the website or not. |
Club specifications
The tab Club specifications is only available in case of customers of the type group.
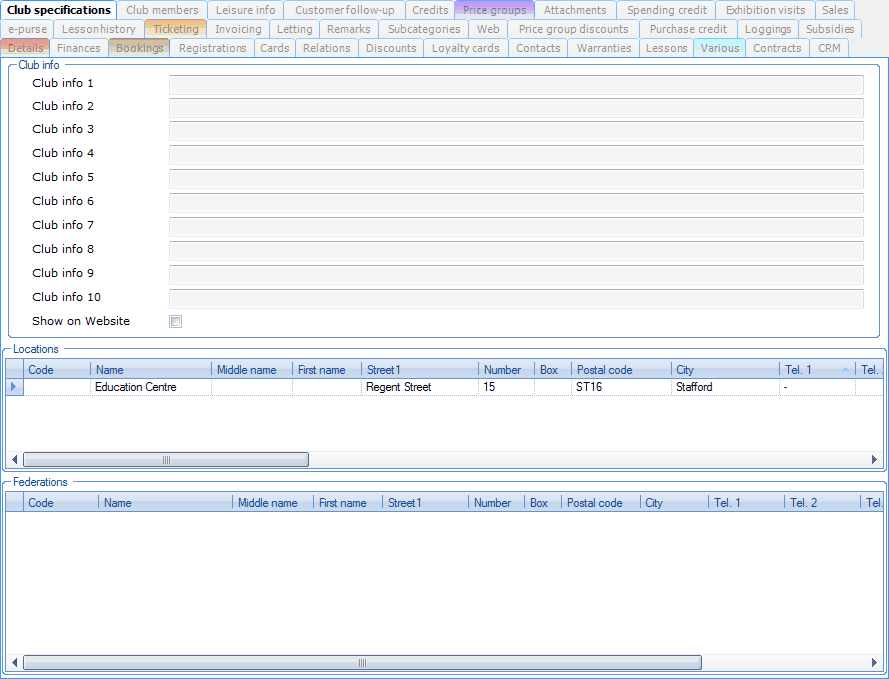 |
In the upper part of the window there are 10 free info fields and you can choose to visualise the selected group on the website or not (module WEB club info required).
In the section Locations you can add several locations where the group (club) is active.
You can link, modify or delete locations at all times using the framework functionalities.
(see manual 'FRAMEWORK' Framework)
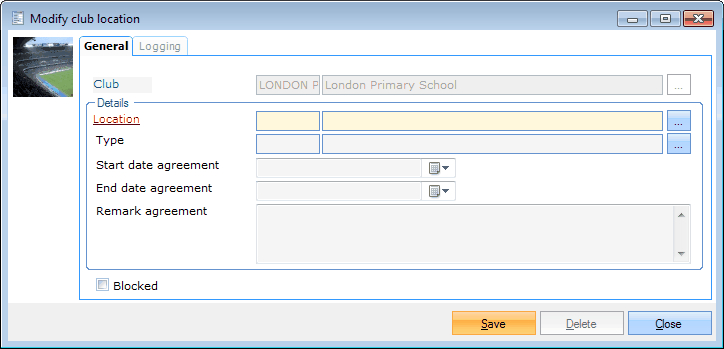 |
Club | The chosen group (club) to which you want to link a location. |
Location | An address card of the type 'Locations' that you want to link to the chosen group. |
Type | The type of agreement that has been concluded. |
Start and end date agreement | The start and end date of the chosen agreement. |
Remark agreement | If you wish so you can add additional information on the agreement. |
Blocked | If the location is no longer used by the chosen group, you can block it. |
In the section Federations you can add several federations (=addresses) with which the group (club) is affiliated.
You can create, modify or delete federations at all times using the framework functionalities.
(see manual 'FRAMEWORK' Framework)
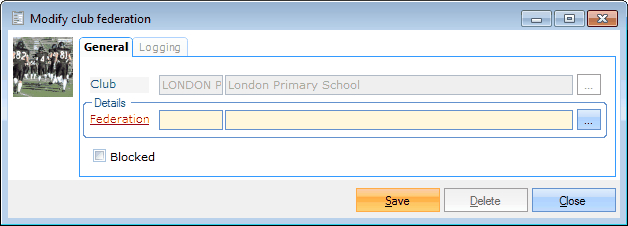 |
Club | The chosen group to which you want to link a federation. |
Federation | The federation with which the chosen group is affiliated. |
Blocked | If the chosen group is no longer affiliated with the federation, you can block it. |
Club members
The tab Club members is only available in case of customers of the type group.
Here you can link club members to the chosen group.
 |
You can create, modify or delete club members at all times using the framework functionalities.
(see manual 'FRAMEWORK' Framework)
 |
A member is always an existing customer in your customer database.
Leisure info
The tab Leisure info is only available in case of customers of the type group.
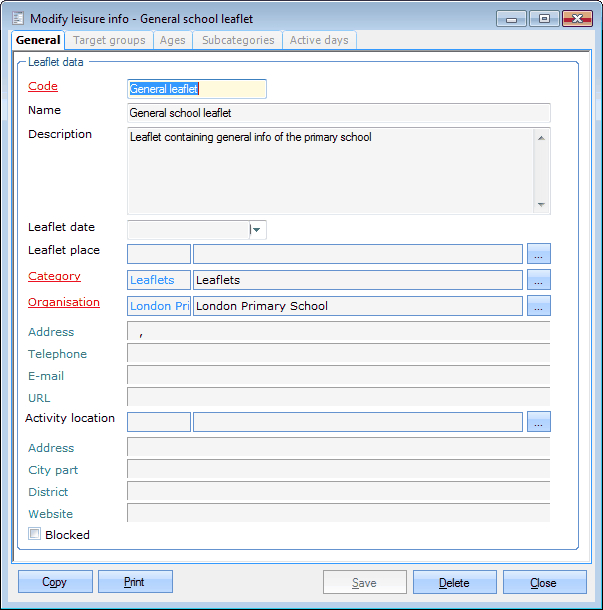
This tab allows you to link specific leisure info to the current group (for example a sports club).
 |
You can create, modify or delete leisure info items at all times using the framework functionalities.
(see manual 'FRAMEWORK' Framework))
 |
Clubs
In the tab Clubs you can see all groups of which the customer is a member.
 |
You can create, modify or delete links with groups at all times using the framework functionalities.
(see manual 'FRAMEWORK'Framework)
 |
Club | The group of which the customer is a member. |
Customer follow-up
In the tab Customer follow-up you can see all actions that have been taken in order to keep in contact with a certain customer.
For more information on customer follow-up we refer to the manual 'GENERAL - Management', chapter 'Parameters', paragraph 'Customer follow-up'Customer follow-up.
 |
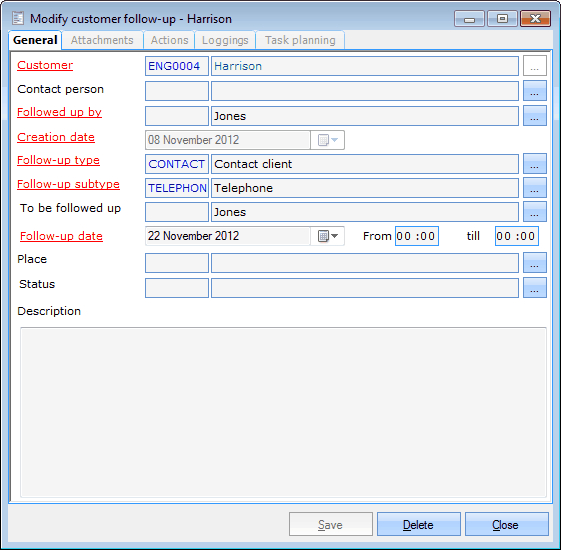
You can create, modify or delete customer follow-up lines at all times using the framework functionalities.
(see manual 'FRAMEWORK' Framework)
 |
Warnung
The possible methods to create or modify a customer follow-up depend on the parameter settings that determine whether some fields are obligatory or not and whether the tab Task planning is available or not. (see Managementmanual 'GENERAL - Management'.
General
In the tab General you can determine all general follow-up data.
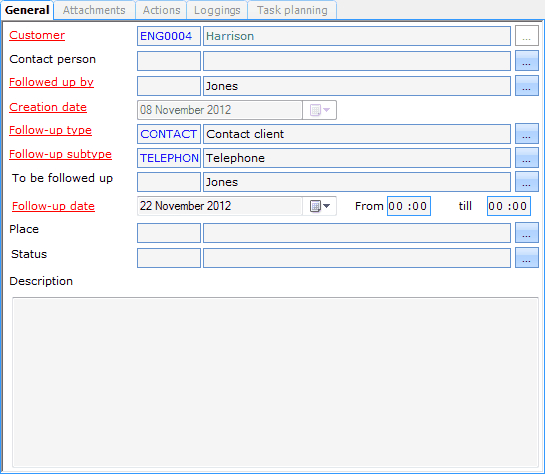 |
Customer | The currently selected customer (indicative). |
Contact person | Here, you can select one of the contact persons of the customer to be followed up. |
Followed up by | Which employee has taken care or will take care of the follow-up. If you create a new follow-up, you can select a default employee. |
Creation date | The creation date of the follow-up. |
Follow-up type | The follow-up type that has been executed or has to be executed. |
Follow-up subtype | A more detailed definition of the follow-up type. |
To be followed up | Who will take care of the next follow-up? Dependent on the parameter settings, this selection is obligatory or not. |
Follow-up date | The follow-up date. Dependent on the parameter settings, the definition of a date is obligatory or not. |
From ... Till | The duration of the follow-up. Dependent on the parameter settings, the definition of a duration is obligatory or not. |
Place | It is possible to indicate where the next follow-up will take place. |
Status | It is possible to select the current status of the follow-up. |
Description | It is possible to add an extra description. |
Attachments
In the tab Attachments it is possible to add attachments to the chosen follow-up. This may be for example a visitor report that has been created after a customer follow-up.
 |
You can create, modify or delete attachments at all times using the framework functionalities.
(see manual 'FRAMEWORK' Framework)
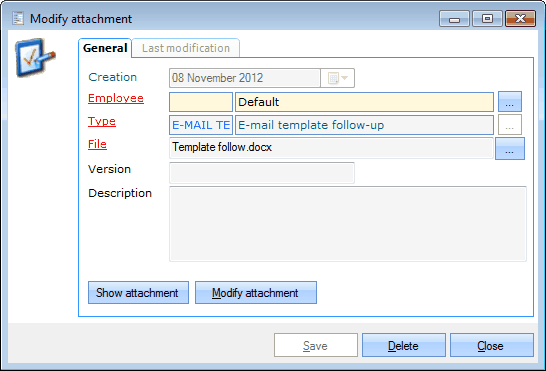 |
Creation date | The creation date of the attachment. |
Employee | The owner of the attachment. |
Type | The attachment type. |
File | The file location of the attachment. |
Version | If you wish so, you can fill in the version of the attachment. |
Description | It is also possible to add an extra description about the attachment. |
The buttons Show attachment and Modify attachment allow you to respectively open the selected attachment (in this case the attachment is opened in read only mode) or to modify it.
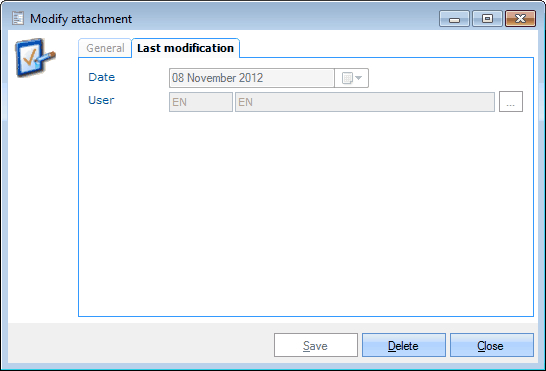 |
Date | The date of the last modification. |
User | The user that has executed the last modification. |
Actions
In the tab Actions you can determine which actions have to be taken during the chosen follow-up.
 |
You can create, modify or delete actions at all times using the framework functionalities.
(see manual 'FRAMEWORK' Framework)
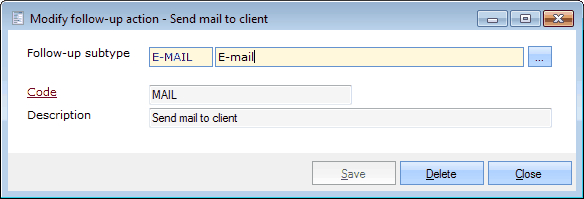 |
Follow-up subtype | The subtype of the follow-up to which you want to link the action. |
Code | Is unique and mandatory. It is advised to choose a relevant code so that you can immediately derive from the code which action is concerned. |
Description | A description of the chosen action. |
Loggings
In the tab Loggings you can find all registered modifications of the follow-up.
 |
Task planning
The presence of the tab Task planning when creating or modifying a follow-up depends on parameter settings that link the customer follow-up to the task planning. (see manual 'GENERAL - Management'Management).
Moreover, these parameters determine the function of the tab Task planning.
If the parameters have been set up to create tasks that you can plan next, the tab Task planning functions as a window in which tasks can be created or modified.
 |
You can create, modify or delete tasks at all times using the framework functionalities.
(see manual 'FRAMEWORK' Framework) and 'GENERAL - Employees')
If the parameters have been set up to link one or several employees to the follow-up, the tab Task planning functions as a window in which the appropriate employees are listed in function of the chosen work type and can then be ticked off.
 |
Extra
The tab Extra is only available in case of customers of the type location.
Here, you can add additional data concerning the geographic situation and the owner of the location, as well as any other remarks.
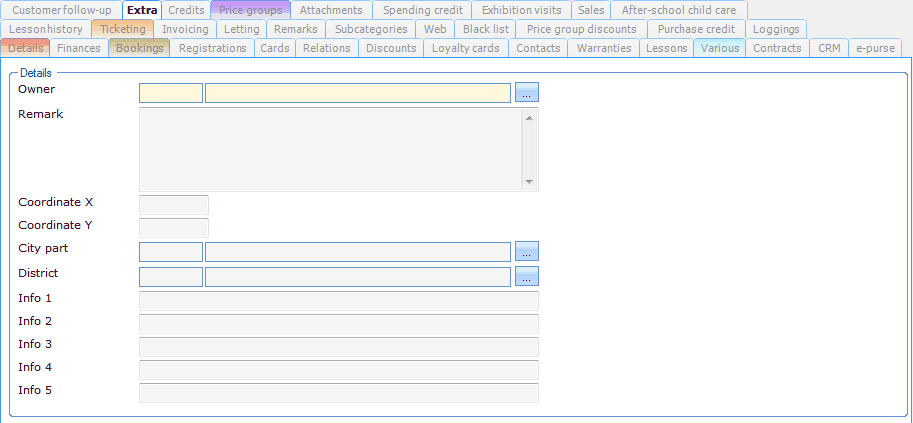 |
Owner | The owner of the chosen location. |
Remark | It is possible to add remarks concerning the chosen location. |
Coordinate X, Y | The geographic coordinates X and Y of the chosen location. |
City part | The city part in which the chosen location is situated. |
District | The district in which the chosen location is situated. |
Info 1, 2, 3, 4, 5 | Additional information fields. |
Renewal propositions
In the tab Renewal propositions you will find an overview of all renewal propositions. (module Membership required)
 |
Credits
In the tab Credits you can find an overview of all charged and returned credits, as well as the currently outstanding balance of the credits. (module Fitness required)
 |
Price groups
In the tab Price groups you will find an overview of all price groups that apply to the chosen customer.
You can also specify for which specific module the price group is valid and, if you wish so, specify a period during which the price group is valid.
 |
Warnung
It is not obligatory to fill in a start and end date. If you define a period without start date, you define the entire period before the end date.
If you define a period without end date, you define the entire period after the start date.
You can link, modify or delete price groups at all times using the framework functionalities.
(see manual 'FRAMEWORK' Framework)
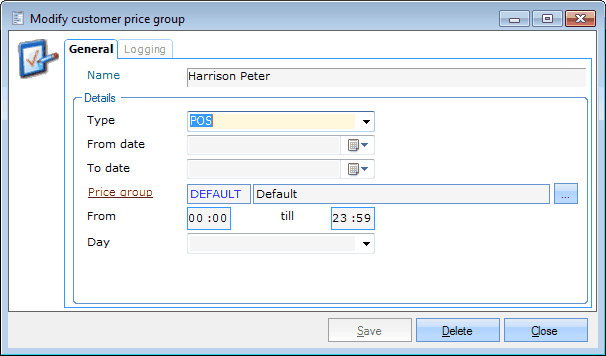 |
Name | Is filled in by default and refers to the customer for who you want to modify or create the price group. |
Type | The module for which you want to set up the price group. |
From date / To date | The period in which the given price group is/was valid. |
Price group | The price group that is linked. |
From ... Till | The hours during which the price group is valid. |
Day | The day on which this price group is valid. |
In the tab Logging you can see when the price group line has been modified.
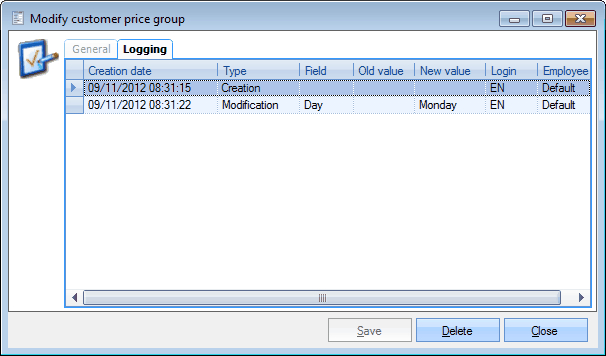 |
Warnung
If you click on Delete you do not only delete the chosen price group line but also the logging.
Attachments
In the tab Attachments you can see an overview of all attachments that are linked to the chosen customer.
 |
You can link, modify or delete attachments at all times using the framework functionalities.
(see manual 'FRAMEWORK' Framework)
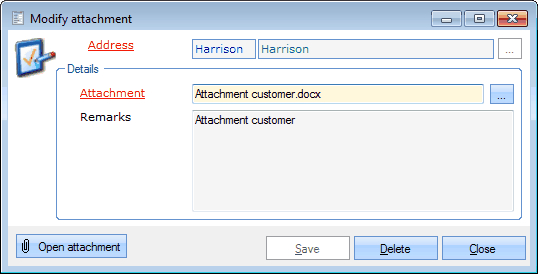 |
Address | Is filled in by default and refers to the customer for who you want to modify or create the attachment. |
Attachment | The reference to the document you want to link. |
Remarks | It is also possible to add additional remarks. |
If you click on the button Open attachment you can consult the selected attachment (the attachment is opened in read-only mode).
Spending credit
In the tab Spending credit you can find an overview of the current spending credit balance of the customer, as well as all financial transactions of the spending credit that have been recorded.
 |
For more information on spending credit, we refer to the manual Recreatex - Function spending credit (available on demand).
Exhibition visits
In the tab Exhibition visits you will see an overview of all registered/booked exhibition visits of the current customer (module Exhibitions required).
 |
Anmerkung
If you wish so, this overview also allows to create, modify or delete/cancel exhibition visits by making use of the framework functionalities.
Sales
In the tab Sales you can find an overview of all sales that have been registered on the current customer.
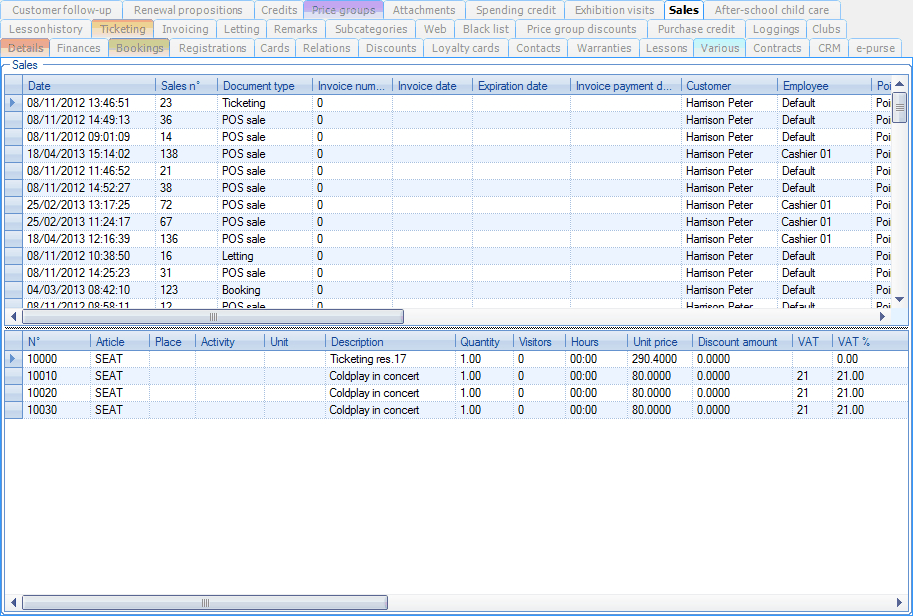 |
In the upper part of the window the sales are listed while in the lower part you can find the details of the selected sale.
For more information on following up sales, we refer to Salesthe manual 'GENERAL - Sales'.
After-school child care
The tab After-school child care shows certain customer data relating to after-school child care (module After-school child care required). The data that appear depend on the customer AND on the fact if the current customer is defined as Parent/spouse or not (tab Relations).
After-school child care tab in case of a child (nor Head of the family, nor Parent/spouse have been ticked off in the tab Relations):
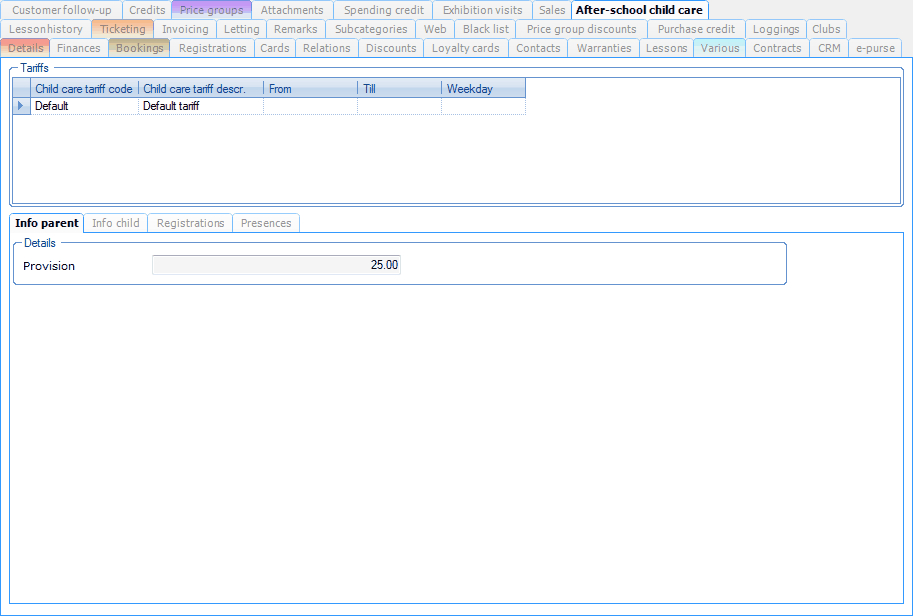 |
In the upper part of the window you will see an overview of the child care tariffs linked to the customer:
 |
The child care costs are always calculated on the basis of the tariff linked to the customer.
You can link, modify or delete care tariffs at all times using the framework functionalities.
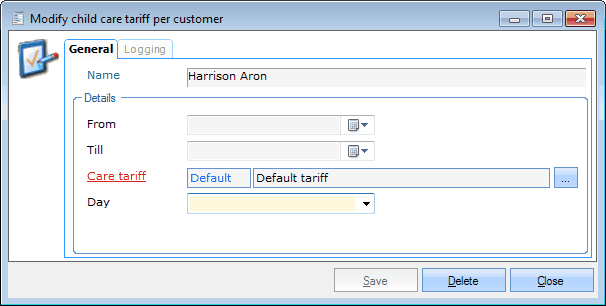 |
In the window above, you can link the desired care tariff. By working with periods or days, it is possible to link several tariffs dependent on the time to the customer.
In the tab Info parent you will see the current e-purse provision. This provision indicates to which amount the e-purse balance has to be revalued if it falls below this provision (limit).
 |
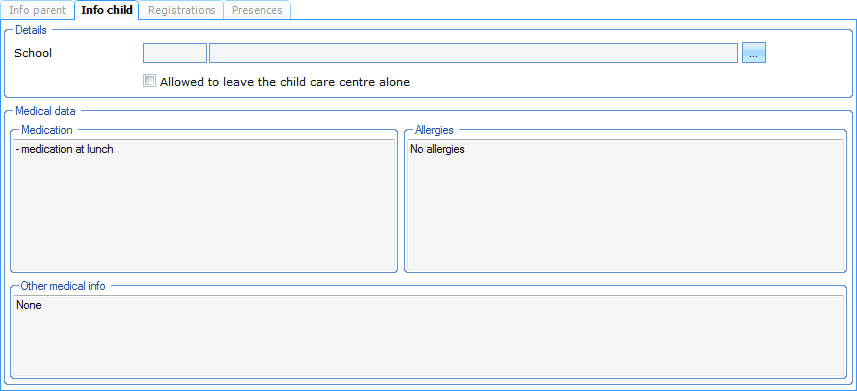
The tab Info child contains child care related data of the child:
 |
In the tab Registrations you will see an overview of the registrations:
 |
Anmerkung
If you wish so, this overview also allows you to create, modify or delete new child care registrations using the framework functionalities.
The tab Presences shows you an overview of the registered presences.
 |
After-school child care tab in case of a parent (Parent/spouse is ticked off in the tab Relations):
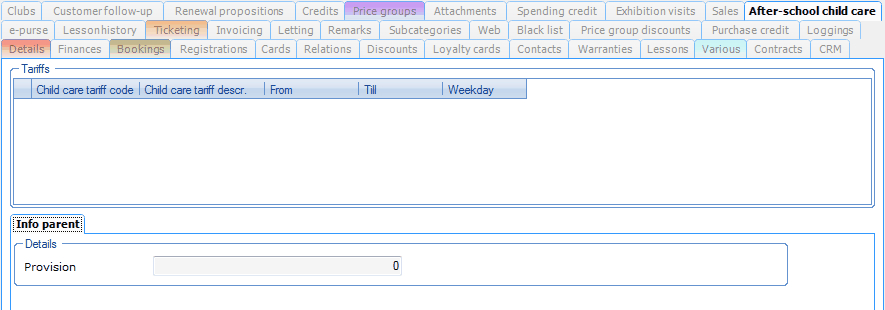 |
In this case, you will only see the tab Info parent with the e-purse provision.
Copy an existing customer card
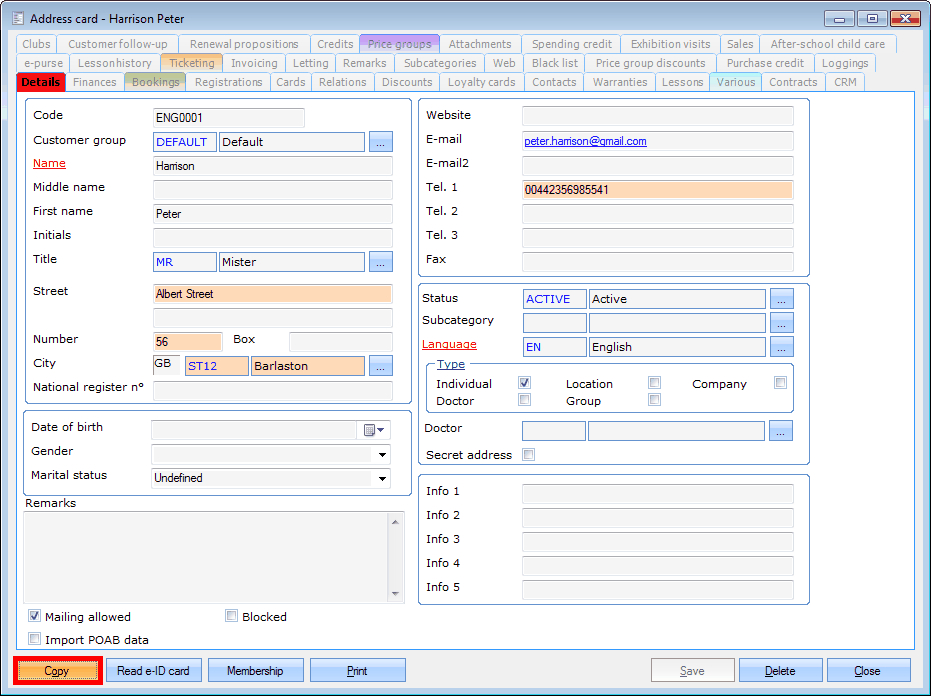
In order to copy an existing customer card, you have to click on the button Copy.
 |
The following message will appear:
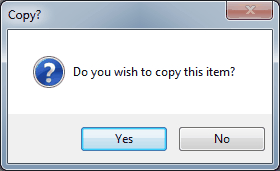 |
After confirmation the current customer card is copied and opened immediately. An asterisk (*) appears next to the Name on the address card in order to mark that the current customer card is a copy of the previous one.
 |
Next, you can modify the data on the copy and if you click on save, the new card will be saved as such.
Warnung
If you copy a customer card, please make sure that the data on the copy are modified as quickly as possible in order to avoid double customers in the system.
Dependent on the direct debit parameters, the Code (if filled in) is initially copied to the tab Finances as Direct debit contract prefix when creating a new customer card. If you copy thus a customer card of which the code has been filled in and if you try to save the new customer card after modification, the following message might appear:
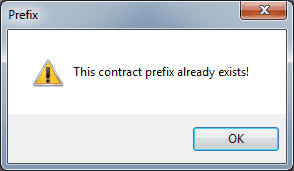 |
Check in this case whether the Direct debit contract prefix of the copied customer card is different from the prefix of the original customer card. ReCreateX indeed does not allow double direct debit contract prefixes.
Create a customer card by e-ID
It is possible to import customer data into Recreatex per e-ID (Belgian electronic identity card) (module Integration with e-ID reader required).
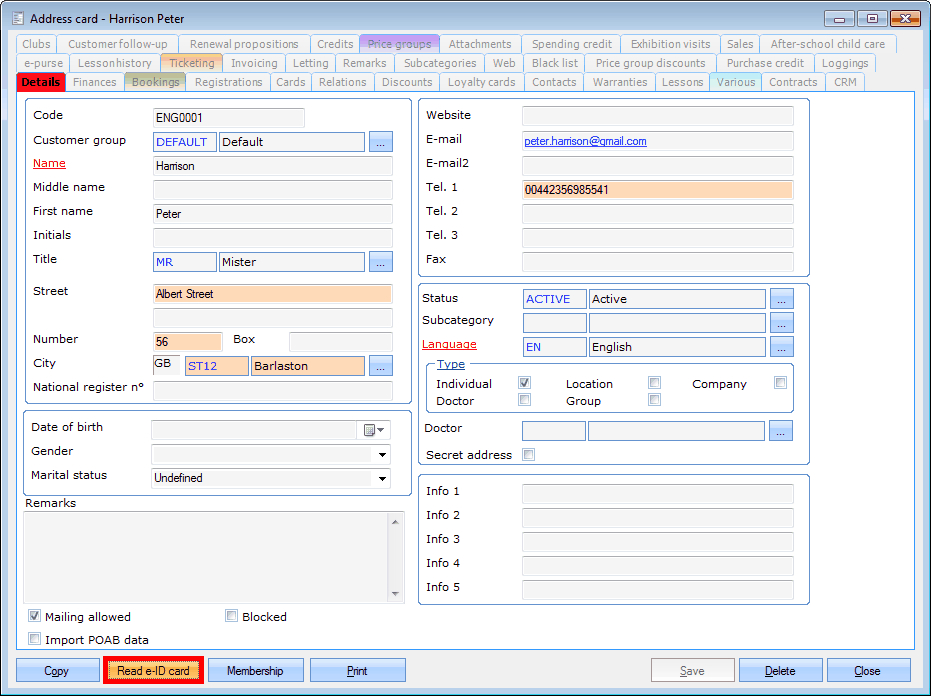
In order to import customer data per e-ID, you have to insert the electronic identity card into the appropriate reader and click on the button Read e-ID card.
 |
The following message will appear:
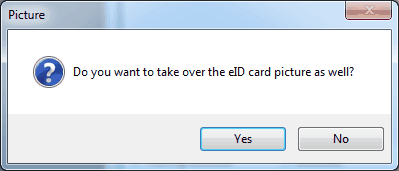 |
Here, you can decide if you also want to copy the customer's picture when reading the e-ID card.
If the e-ID card has been read, all required data are immediately filled in on the customer card.
Call up membership info
In order to quickly consult the available membership info of a certain customer, it is possible to call up this information via the customer card (module Membership required).
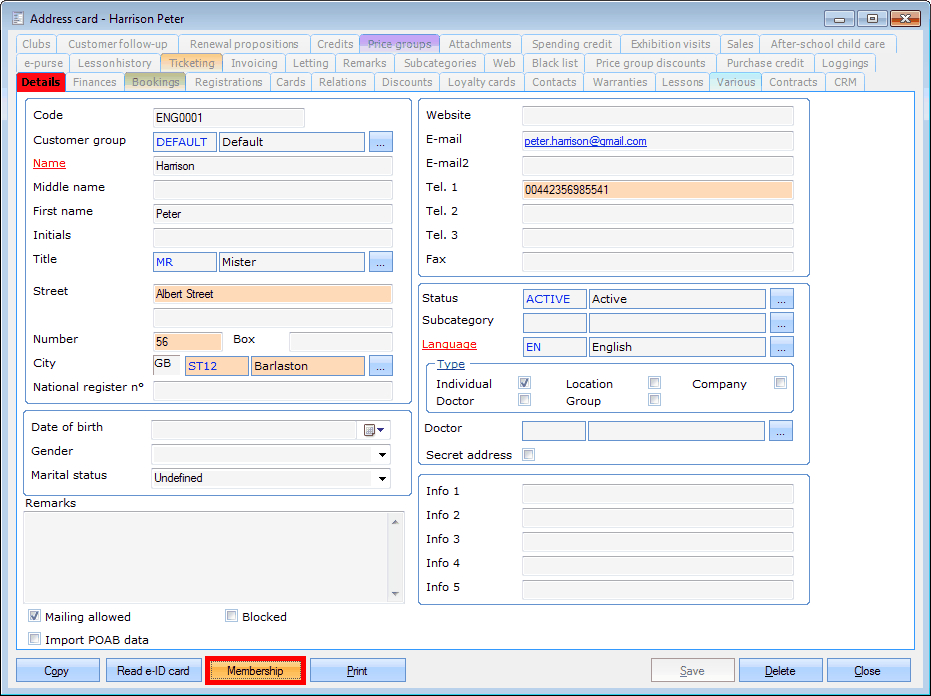
In order to call up the membership info of the current customer, you have to click on the button Membership.
 |
The window below will appear:
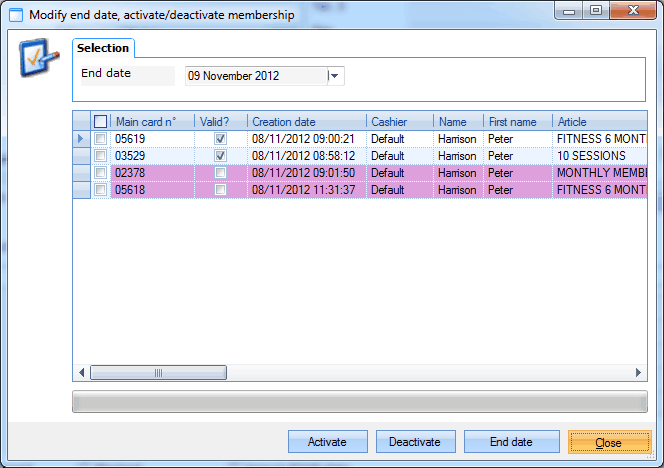 |
This window allows you to modify certain membership characteristics linked to the customer. It is for example possible to activate or deactivate membership or to change the membership end date.
For more information on this topic, we refer to the manual 'MEMBERSHIP'Membership.
Print a customer card
In order to print the current customer card, you have to click on the button Print.
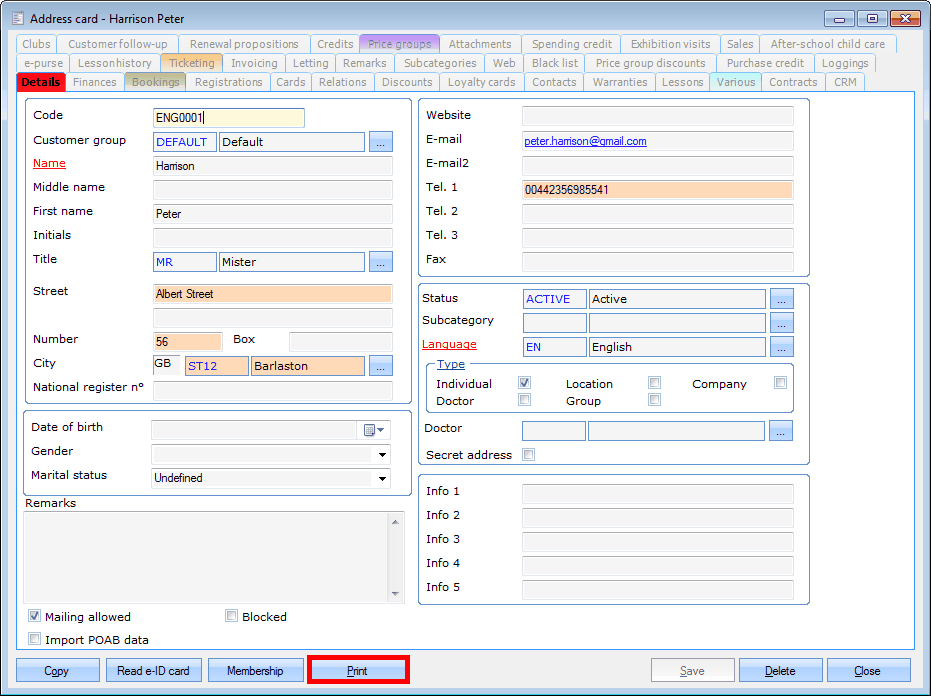 |
The customer card is immediately printed.
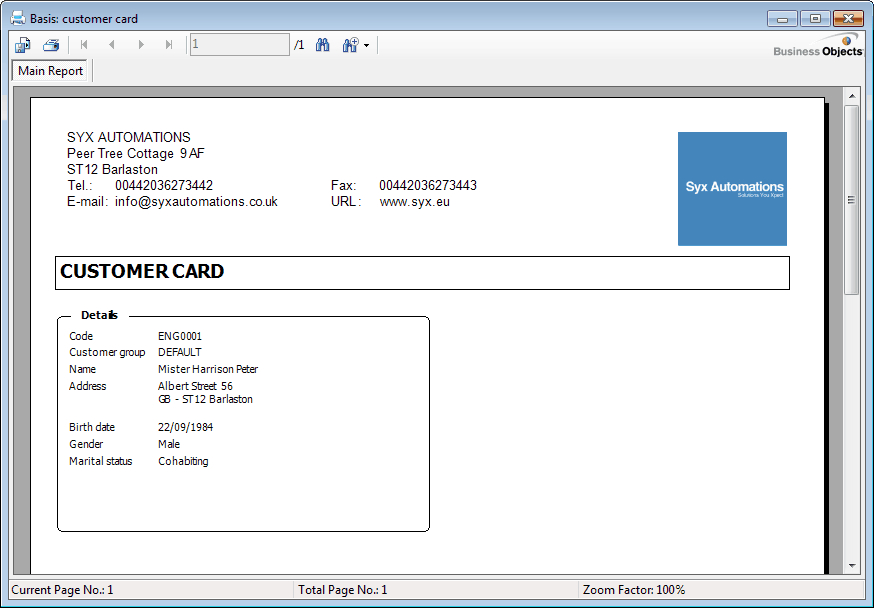 |
Delete a customer card
Warnung
Customer cards can only be deleted if they have not yet been used. Customer cards that have already been linked to other data in the ReCreateX database, can thus not be deleted.
It is, however, possible to block a certain customer card so that the item in question is no longer visualised in the overview windows.
In order to delete the current customer card, you have to click on the button Delete.
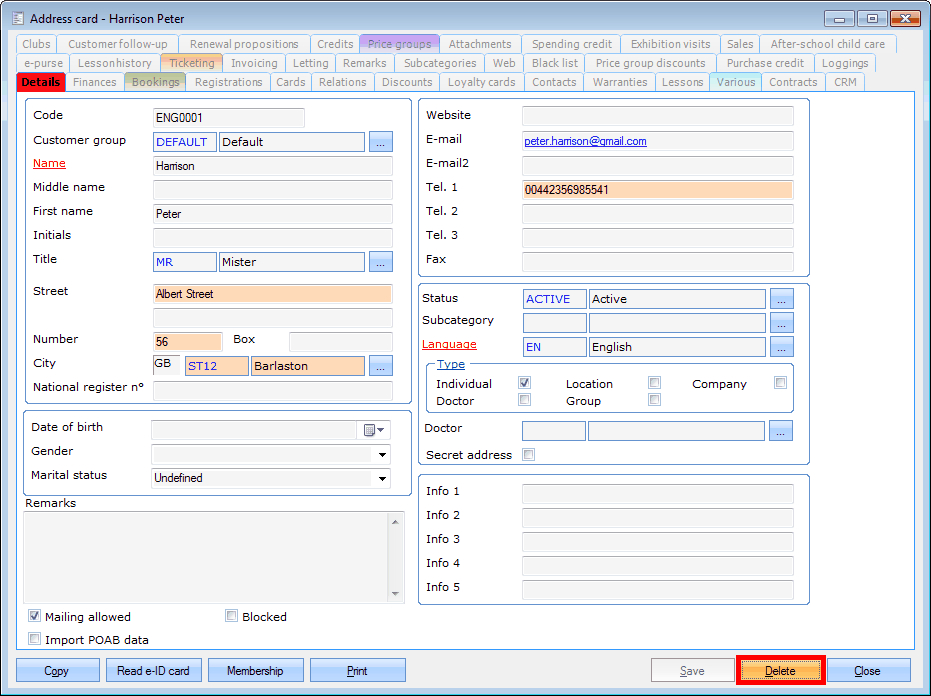 |
The message below will appear:
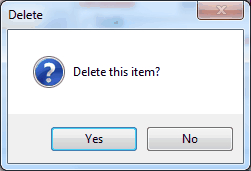 |
After confirmation, the customer card is irrevocably deleted.


