General
The tab General contains all basic data of the activity.
 |
This tab is subdivided into different sections:
Code and description
The upper part of the window Modify activity contains amongst others the code and description of the activity.
 |
Code | Is unique and mandatory. It is advised to choose a relevant code so that you can immediately derive from the code which activity is concerned. The complete activity code can be filled in in three fields, of which the second field (generally) contains the year. The activity code (fourth field) will automatically be generated on the basis of these first three fields. This code is mainly used for accelerated registrations (see Registrations - Usemanual 'REGISTRATIONS - Use'). AnmerkungIn the parameters you can define the default values for the first two fields of the activity code, as a result of which these fields will always be automatically filled in when creating a new activity. (see 'Parameters') |
Description | Here you can fill in the description of the activity. This description will appear amongst others on the receipt and in the different overviews. |
Moreover, you will see some data (indicative) concerning the registrations that have already been made for this activity (green text). The values in these fields are taken from the database and can consequently not be modified.
Location and periods
Warnung
If you have determined the period, days and times for the activity, the required dates have to be generated in Recreatex by clicking on the button (Re)create days. You can always find the generated dates under the tab Days. You will not be able to recreate days if registrations have already been linked to the chosen activity.
The left part of the window Modify activity contains the location of the activity as well as the period in which the activity takes place:
 |
Location | The physical location in which the activity takes place. If you select the location, you will be able to choose from the address cards of the type Location. (see Customersmanual 'GENERAL - Customers') |
Start & end date | Here you can define the period in which the activity takes place. It is possible that a certain activity takes place several times within a certain period. |
In the section Days you can determine on which days and hours the activity takes place:
 |
Warnung
It is not sufficient to only fill in the days or hours. You always have to make sure that both the days are ticked off and the hours filled in. Always fill in the hours in the left column, even if the activity only starts in the afternoon.
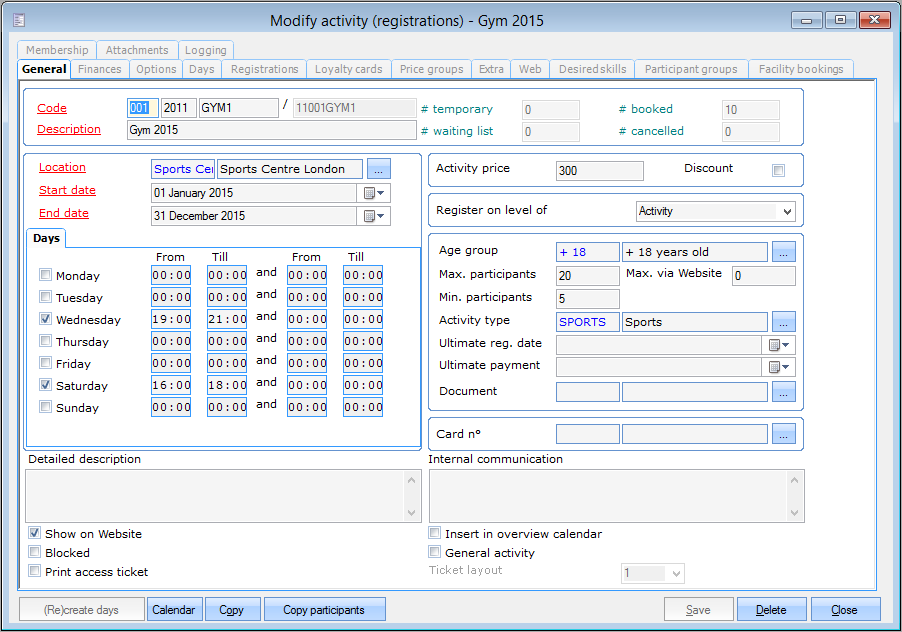
By means of the given period, days and hours, you thus define when the current activity will take place. In the example of this manual, the activity Gym 2015 takes place each week (on Wednesdays between 19h and 21h and on Saturdays between 16h and 18h) in the location Sports centre London, and this in the period from 1 January 2015 until 31 December 2015.
Use of the schedulers
There also is another method to create activity days and times, by means of the scheduler. The advantage of the scheduler is that you can define activity days and times in an extensive way. You can use the simple or multiple scheduler, a choice you can make in the parameters (see 'Parameters').
Use of the simple scheduler
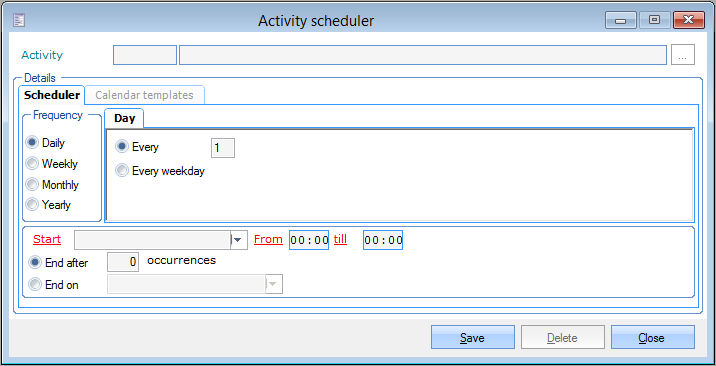
If you use the simple scheduler, you have to define the days and times in the interface below:
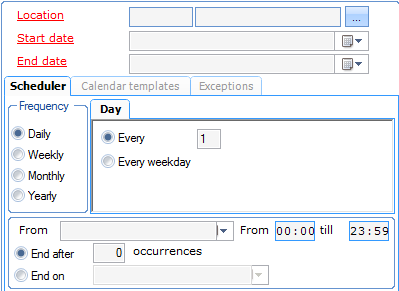 |
Under the tab Scheduler you can determine the frequency, date and time of the activity. Here you can determine the frequency of the activity days and dependent on the chosen frequency, you will have to define specific settings.
Frequency Daily:
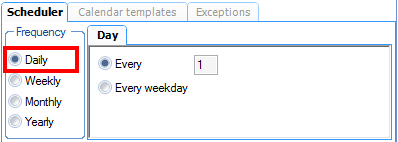 |
Every ... day(s) | The activity takes place every x days. |
Every weekday | The activity takes place every weekday. |
Frequency Weekly:
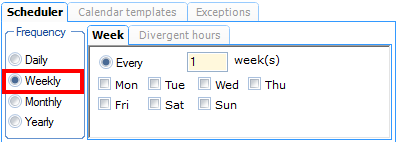 |
Every ... week(s) | The activity takes place every x weeks and each time on the selected days. |
In case of activities that take place on a weekly basis, it is also possible to define divergent hours per weekday. For this you have to fill in the hours under the tab Divergent hours.
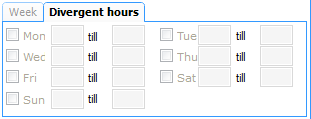 |
Frequency Monthly:
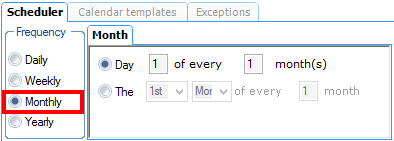 |
Day ... of every ... month(s) | The activity takes place each xth day every x months. |
The ... of every ... month(s) | The activity takes place each xth day of the week every x months. |
Frequency Yearly:
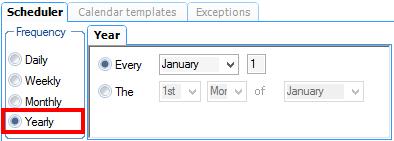 |
Every ... | The activity takes play on each x date of the year. |
The ... of ... | The activity takes place each xth day of the week of month x. |
You also have to determine how many times the activity will take place.
 |
From | The start date of the period in which the activity takes place. The value of the Start date of the activity is taken over here by default. |
From ... till ... | The hours during which the activity takes place. |
Ends after ... occurrences | The activity takes place x times. |
Ends on ... | The end date of the period in which the activity takes place. The value of the End date of the activity is taken over here by default. |
The tab Calendar templates allows to exclude a number of fixed calendar dates when creating activity days. Tick off the calendar templates in question, to be excluded in order to select them.
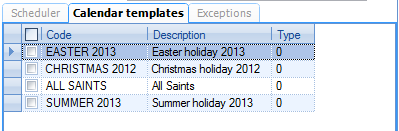 |
How to manage calendar templates is explained in Managementthe manual 'GENERAL - Management'.
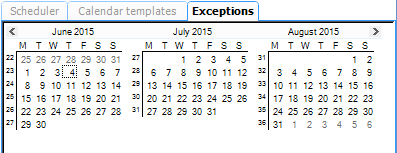
The tab Exceptions allows to exclude a number of separate calendar dates when creating activity days.
 |
Anmerkung
If you continue pressing the <Shift> key while selecting 2 non-consecutive days, the period in between the days will also be selected.
If you continue pressing the <Ctrl> key, you can select several non-consecutive days by clicking on them.
A period of consecutive days can also be selected by clicking on the left mouse button and by dragging the cursor over several days.
Use of the multiple scheduler:
If you use the multiple scheduler, you have to define the days and times in the interface below:
 |
The advantage of the multiple scheduler is that you can combine several simple schedules when creating activity days. This allows you to determine activity periods in an even more flexible way.
The intention is to create the required simple time schedules, each with their own specific period settings under the tab Multiple scheduler.
You can create, modify or delete time schedules at all times. (see manual 'FRAMEWORK'Framework)
A simple time schedule that serves as a part of the multiple time schedule is created/modified in the window below:
 |
For more information on how to define a simple time schedule, we refer to the part Use of the simple scheduler earlier in this chapter.
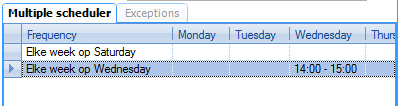
The created time schedules always appear under the tab Multiple scheduler:
 |
Registration information
The right part of the window Modify activity contains the registration information of the current activity.
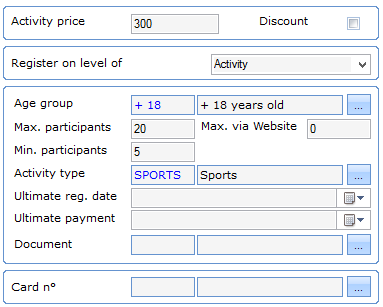 |
Activity price | This is the price of the activity. This price is not linked to the possible price group of the customer and, dependent on the setting Register on level of, this is the price either for the full activity, either for one activity day (part). |
Discount | This option determines if you have to take into account possible discount cards of the customer at registration for this activity (see Customersmanual 'GENERAL - Customers'). If the customer holds such a discount card and makes a registration, the discount linked to the discount card will immediately be deducted from the registration price. |
Register on level of the | This setting influences the way in which the registration price is calculated. If one registers on the level of the Activity, the given price is for the full activity, also if the activity continues over several dates and/or times (on the same day or not). If one registers on the level of the Activity day, the given price is charged for each time the activity takes place within the given period. We can clarify this by means of the current example of the Gym 2015 activity. As mentioned, this activity takes place each Wednesday and Saturday between the 1 January 2015 and 31 December 2015, between 19h and 21h, which corresponds to 44 sessions. A price of 300£ is defined for this activity. If the way of registration is set to on the level of the Activity, the customer will pay 300£ for all 44 sessions together (assuming that the customer registers for the full activity period ). If, however, registration is set to on the level of the Activity day the customer will have to pay 300£ per session. In this way you can for example distinguish between an activity as learning course (in case of which different courses are organised during the activity period) and a simple course that is repeated each week. Another example of a registration on the level of activity day is a sports vacation, for which a child pays for example 7£ per half a day. |
WarnungThe choice for the way in which to register also determines which registration method can be used when effectively registering a customer.
(see Registrations - Usemanual 'REGISTRATIONS - Use') | |
Age category | Here you can determine for which age category the activity is organised. Dependent on the blocking tests (see Parameters) it will be possible to register a customer who does not belong to the required age category. You can create, modify or delete age groups at all times (see Customersmanual 'GENERAL - Customers'). |
Max. # participants | The maximal number of participants allowed for this activity. The number you fill in here counts for registrations in Recreatex + the registrations on the website (if applicable). |
WarnungA value of 0 for Max. # participants means that effectively only 0 participants can be registered! All new registrations for such an activity will thus be put directly on the waiting list. | |
Max. via website | This is the maximal number of web registrations allowed for this activity. In the current example the max. number of participants for the activity is 30, of which 5 registrations can be made on the website. |
Min. # participants | This is an indicative value, which allows you to define a minimal number of participants that is required for the activity to take place. |
Activity type | Here you can select the type of the current activity. See Settings > Activity types. |
Ultimate registration date | This option allows you to define an ultimate registration date for the activity. This date is taken into account on different levels. A message will for example appear if a customer wants to register at the cash register after the final registration date, or in case of accelerated registration the activities of which the final registration date has passed are marked in red. AnmerkungThe ultimate registration date does not have a blocking effect, which means that only messages will appear in case of a registration after the ultimate registration date. In order to effectively prevent people from registering outside a certain period, the setting Sales from ... till ... has to be used (tab Finances) |
Ultimate payment | This is the ultimate date on which customers that have registered for this activity have to pay. Customers that have not yet paid on this date, will for example appear in the overview of Late payers ('Registrations > Visualisations > Late payers' - see manual 'REGISTRATIONS - Use). |
Document | This setting determines which document type will be used for printing the registration certificates. If you do not specify a document type, the default report (Crystal Reports) for registration certificates will be used. You can, however, also use a specific Word document that has been made as registration certificate. For a more detailed explanation on how to manage Word documents in Recreatex, we refer to Managementthe manual 'GENERAL - Management'. |
Card n° | Here you can link an activity card to the activity by filling in or scanning the card number. Usually, barcodes are used to link activities, but other card types can be used as well (if set up correctly in SydAdmin). The advantage of linking the activity to a card is that the employees at the counter can quickly scan the linked card in case of a registration, after which the activity in question will immediately appear on the screen. This way of working is used amongst others for accelerated registrations (see Registrations - Usemanual 'REGISTRATIONS - Use'). |
Other
At the bottom of the window Modify activity you will find the remaining activity settings
You can fill in a detailed description of the activity. The detailed description will appear on the information card of the activity.
 |
It is also possible to fill in an internal message. This message is shown when you make a registration at the POS or under Registrations (comprehensive), after selecting the activity. The internal message can for example contain information on things that have to be communicated to the customer at registration, or things that have to be taken into account by the cashier when registering for this activity.
 |
Finally, the activity settings below still have to be filled in:
|
Show on website | Here you can determine if the activity is shown on the website. Of course, this setting is only applicable if you work with online registrations. |
Blocked | You will not be able to register for this activity if this activity is blocked. This activity will no longer be shown in activity overviews either. Blocking an activity may for example be useful if the activity is passed. |
Print access ticket | If this option is active and if one registers for this activity, an access ticket will be printed according to the chosen Ticket layout. |
Insert in overview calendar | If you select this option, the activity will be shown in the calendar overview. Attention, this is the overview calendar that can be consulted under General > Basic data > Calendar. In the Graphic activities overview ('Registrations > Visualisations > Graphic activities overview' - see manual 'REGISTRATIONS - Use') all activities are always shown. |
General activity | If you tick off this option, you indicate that this activity is a Global activity and will thus be published in the UiTdatabank. If you tick off this option, the tab General activitywill be available (see further 'General activity). |