Recreatex 6.3.0
Introduction
These release notes contain all new features and modifications for the Recreatex release 6.3.0.0.
New versions
The Recreatex 6.3.0.0 release contains the development tickets and internal optimisations of the following applications and their respective versions:
Recreatex 6.3.0.0
Recreatex WSDL 6.3.0.0
Recreatex WEB SHOP 4.3.0.0
Recreatex BKO web app 4.3.0.0
Recreatex LLV web app 4.3.0.0
Recreatex Vending machine 4.3.0.0
Recreatex Driver 6.3.0.0
Recreatex Web tasks 6.3.0.0
Recreatex Plugin Framework 6.3.0.0
What's new
Financial |
|
Interfaces |
|
Security improvements |
|
Guide Planning |
|
Rental |
|
Childcare (BKO) |
|
Course management |
|
Various |
|
 |
Detailed information
This topic contains more detailed information about certain new features in this version:
Revenue recognition
It is now possible to work with revenue recognition. This method of accounting enables the Recreatex user to book sales on a temporary ledger account at first and once the sale has been realized the sales can be booked on the definitive ledger account.
E.g. once the ticket has been devalued. The revenue can now be recognized the moment the visit has taken place and not the moment the ticket is purchased.
Anmerkung
Revenue recognition is only supported for memberships with a limited number of sessions and needs to be configured on every membership article separately.
Configuration
To start using Revenue recognition, a few things need to be configured. Go to General > Settings > Finances > Ledger accounts and determine which accounts will be used as temporary and definitive and - if necessary - create new ledger accounts.
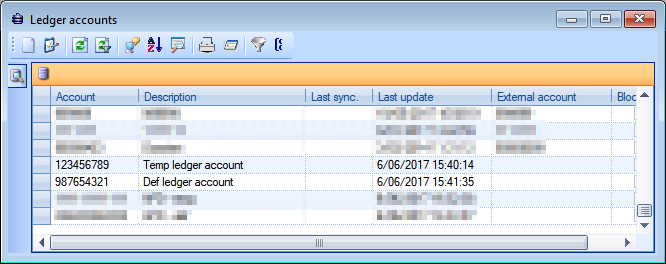 |
Next, go to the article card of each membership article for which you want to implement revenue recognition, go to tab Subscr. validity and tick the check box next to Check number of sessions.
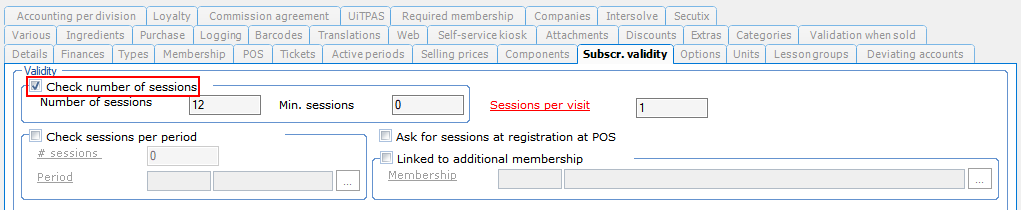 |
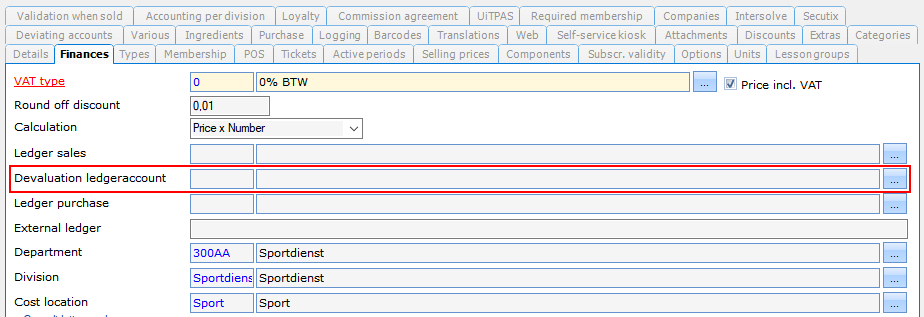
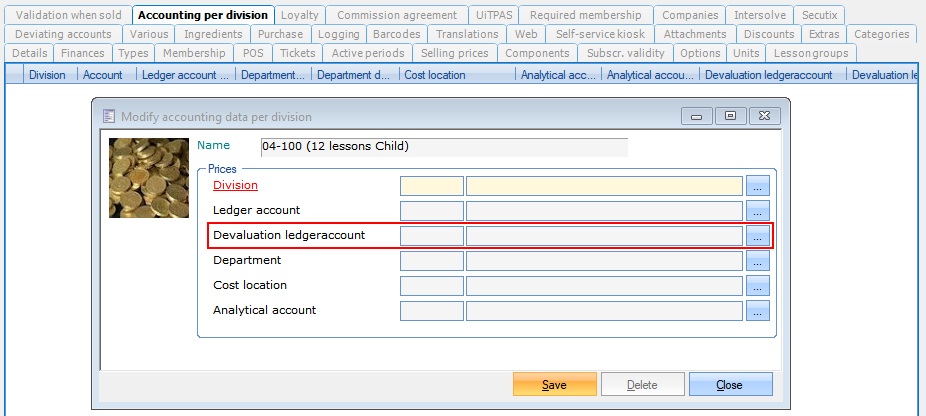
These previous settings will make the fields for the (definitive) devaluation ledger account available on the following tabs on the article card:
Tab Finances
 |
Tab Accounting per division, create a new entry
 |
Anmerkung
The temporary ledger account needs to be entered in the Ledger account field.
The definitive ledger account needs to be entered in the Devaluation ledger account field.
After devaluation, there will be a negative booking on the temporary ledger account and a positive booking on the definitive ledger account.
Automatic batch processing
The revenue recognition data can be automatically exported to an external accountancy program at regular intervals. This batch processing needs to be configured in SydAdmin.
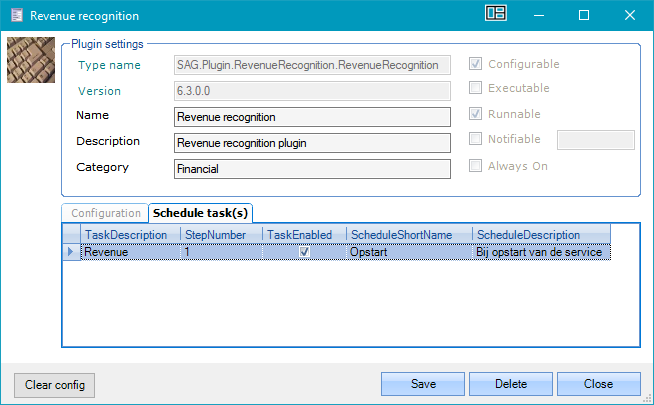
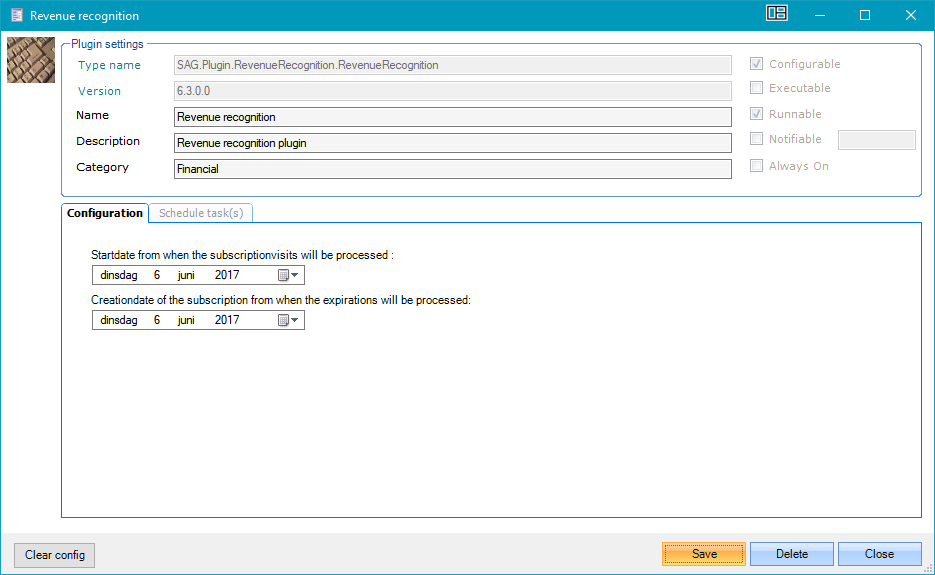
Log into SydAdmin and go to Management > Service > Plugin overview. Click the Load plugins button, search for SAG.Plugin.RevenueRecognition.dll and load the file.
In the Plugin overview window, the file will appear in the list with a red background, which indicates that the plugin still needs to be configured and scheduled.
 |
Right-click on the Revenue recognition plugin and click Setup. On the Configuration tab, enter a Start date from when the subscription visits will be processed and a Creation date of the subscription from when the expirations will be processed. Click Save before exiting.
 |
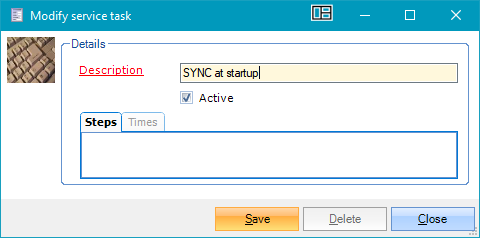
To configure when the batch processing will run, go to the tab Schedule task(s). Right-click to add a new entry.
 |
Enter a description and click Save. You can now configure steps and times.
Manual batch processing
In certain cases, it might be necessary to manually start the batch processing. If technical issues occur it is possible to devalue memberships in batch outside of its validity period.
E.g.: Culture event tickets are scanned at the entrance with a MT2090 scanner. The night of the culture event the WiFi network is down due to technical reasons. The employees switch to manually checking the entrance tickets (date and name of the event on the entrance ticket) After the event they can manually devalue the tickets in RCX.
Go to Membership > Processing > Deduct sessions manually in batch and make a selection using the provided filters. Next, tick the check box(es) in front of the line(s) for which you want to deduct a session and click the Deduct session button.
 |
Plugin framework
We created a dynamic plugin framework so that future interfaces can be created & loaded in Recreatex without having to update the Recreatex-version.
Exports or services can now be configured as plugins independent from Recreatex releases. This decoupled interface framework covers all interfaces without the need for extra development on Recreatex. This Plugin framework allows us to deliver interfaces more quickly and independent from Recreatex releases.
Configuration in SydAdmin
The plugin framework can be configured in SydAdmin. Go to Management > Service > Plugin overview. Click on the button Load plugins to add plugins to this overview.
 |
To configure the plugin, right-click on it and choose Setup. A setup window will open which will be specific for every plugin. Here, you can also change the name and description of the plugin.
In the example below there are two tabs:
Configuration: this tab will look different for every plugin.
Schedule task(s): this tab gives you the possibility to set steps and times when the plugin should run.
 |
Small icons are added next to the name of the plugin to show that it has been configured  or scheduled
Anmerkung
If you need to reset the configuration, click the button Clear config.
In the Plugin overview window you can (de)activate a plugin by right-clicking. If you right-click on the plugin name in the left column, you will be able to (de)activate the plugin for all divisions. If you right-click in the columns of the divisions, you will be able to (de)activate the plugin for every division separately.
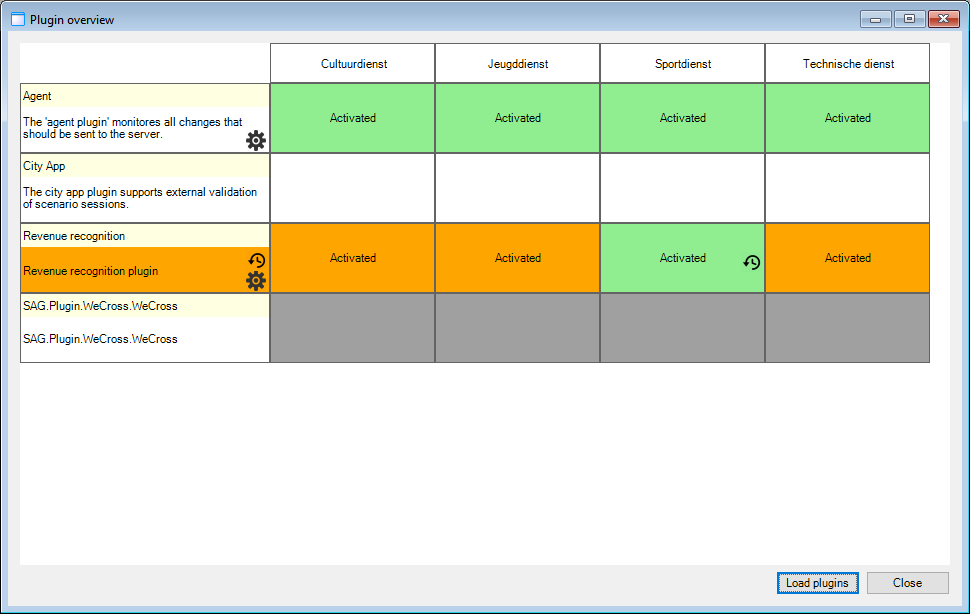
When plugins are loaded into the overview they can have different statuses, which are indicated by a colour.
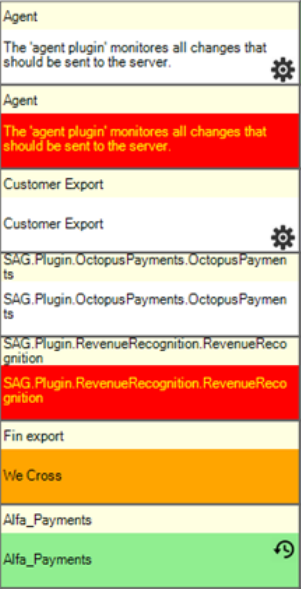 |
Red background color | Plugin is not scheduled & activated |
Orange background color | Plugin is not scheduled OR not activated (1 of both) |
Green background color | Plugin is scheduled & activated for all divisions |
No background color | Plugin is scheduled & activated for ONE of more divisions |
Manually run plugins in Recreatex
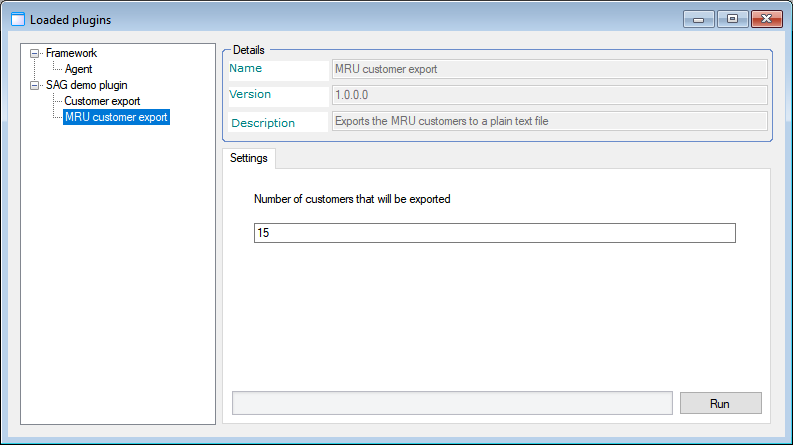
It is possible to manually run executable plugins within Recreatex. Go to System > Plugins for an overview of the loaded plugins. Select an executable plugin and click the Run button on the bottom right corner.
 |
Security improvements
In preparation for the General Data Protection Regulation we have added extra layers of security to our software. We also conducted a comprehensive overhaul of general security measures in Recreatex using best practices (dotting the i's and crossing the t's).
Two new security measures that are directly visible for the users:
We created a token-based authentication system for our API. (See the API section of these release notes for more information)
It is now possible to set a maximum number of attempts to log into the web shop.
Maximum number of login attempts
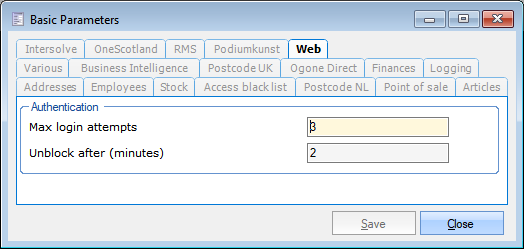
From Recreatex 6.3.0 it is possible to put a limit on the number of login attempts on the web shop. When the maximum number is reached, the user name will be blocked from logging into the web shop for a certain amount of time. This time is also configurable by the Recreatex user.
To set this up, go to General > Parameters tab Web. Here you can determine the maximum number of login attempts and for how long the user name will be blocked.
 |
If a web shop customer has exceeded the permitted number of login attempts the following error message will be displayed:
 |
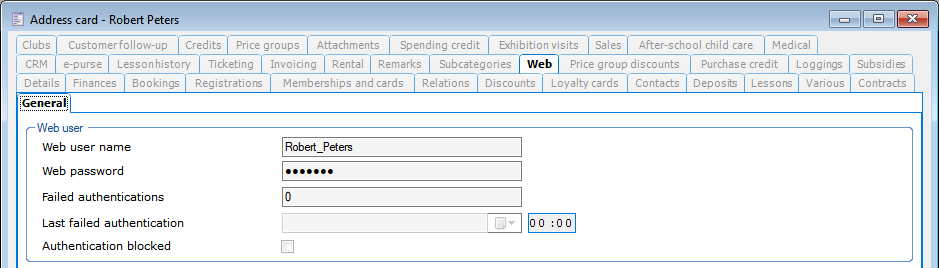
You can see details per user on the address card of the user. Go to General > Basic data > Customers > Addresses (All) tab Web.
Here you can see:
the number of failed authentications,
the time and date of the last failed authentication,
the current status of the customer: authentication blocked or not.
 |
Web tasks (Guide planning)
Below you will find some more information on the improvements made to the Web tasks.
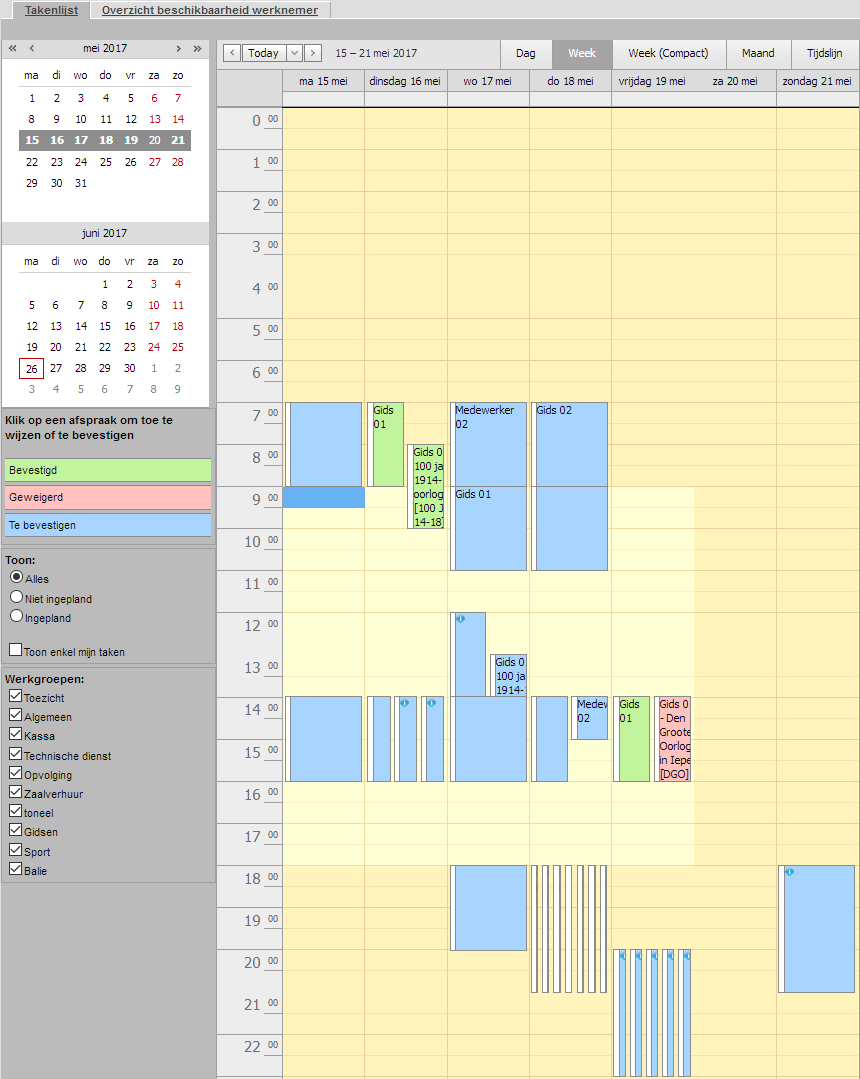
Calendar overview
We have made optimizations to the calendar overview to make it more user friendly.
A full Week view has been added (instead of Work week)
 |
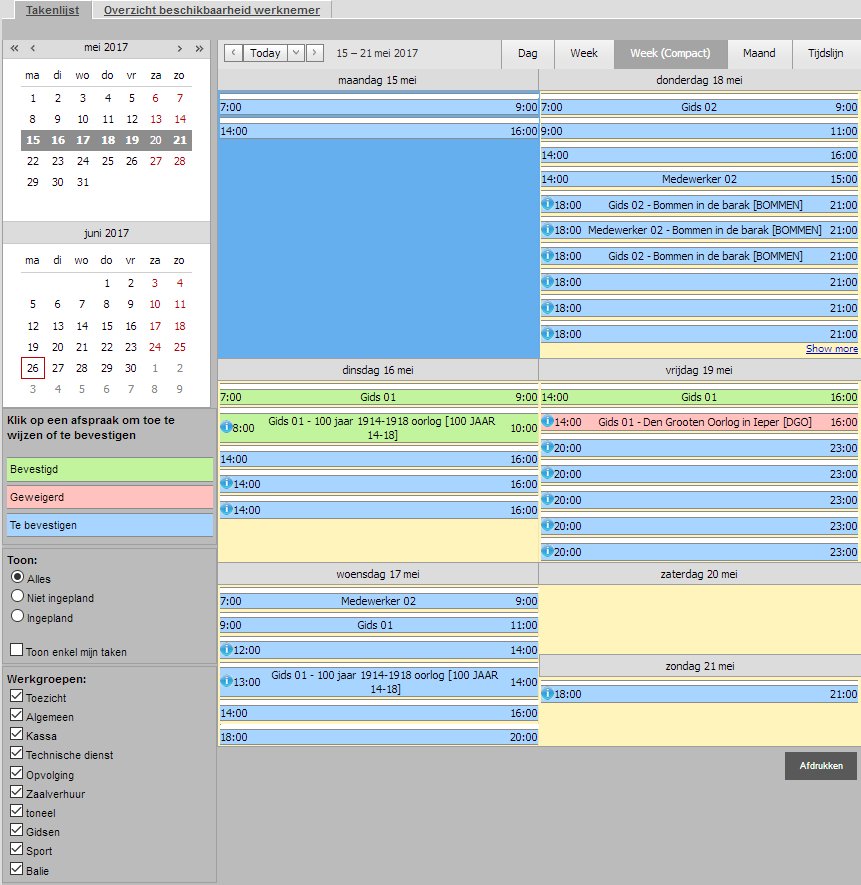
The previous week view has been changed to Week (compact). This view (and the month view) now show more items in the overview than before, making it less likely that you have to use the Show more button.
 |
Task list
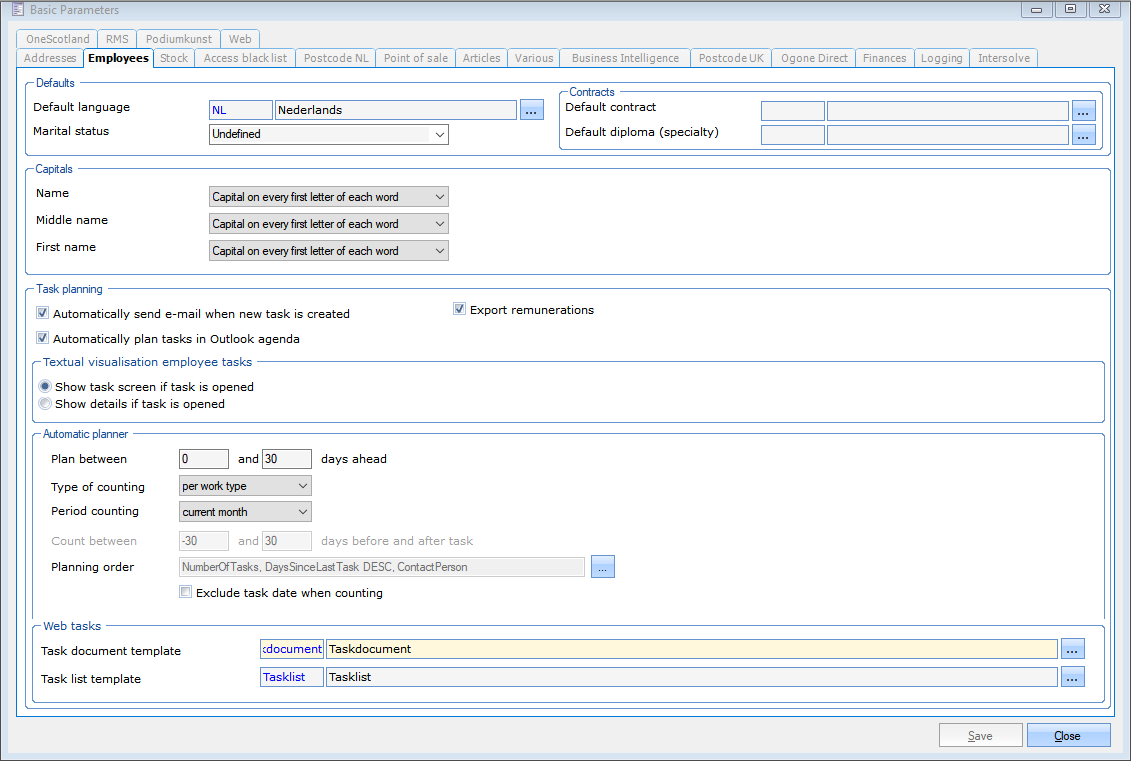
The task list document can now be styled with the use of a Word template. You can also choose which fields you wish to include in the template. To add a template, go to General > Parameters > tab Employees. You will find the Task list template box near the bottom of this tab.
 |
When printing the task list, a PDF will be generated according to the specifications of the template and could look like the screenshot below. This task list will by default be in chronological order.
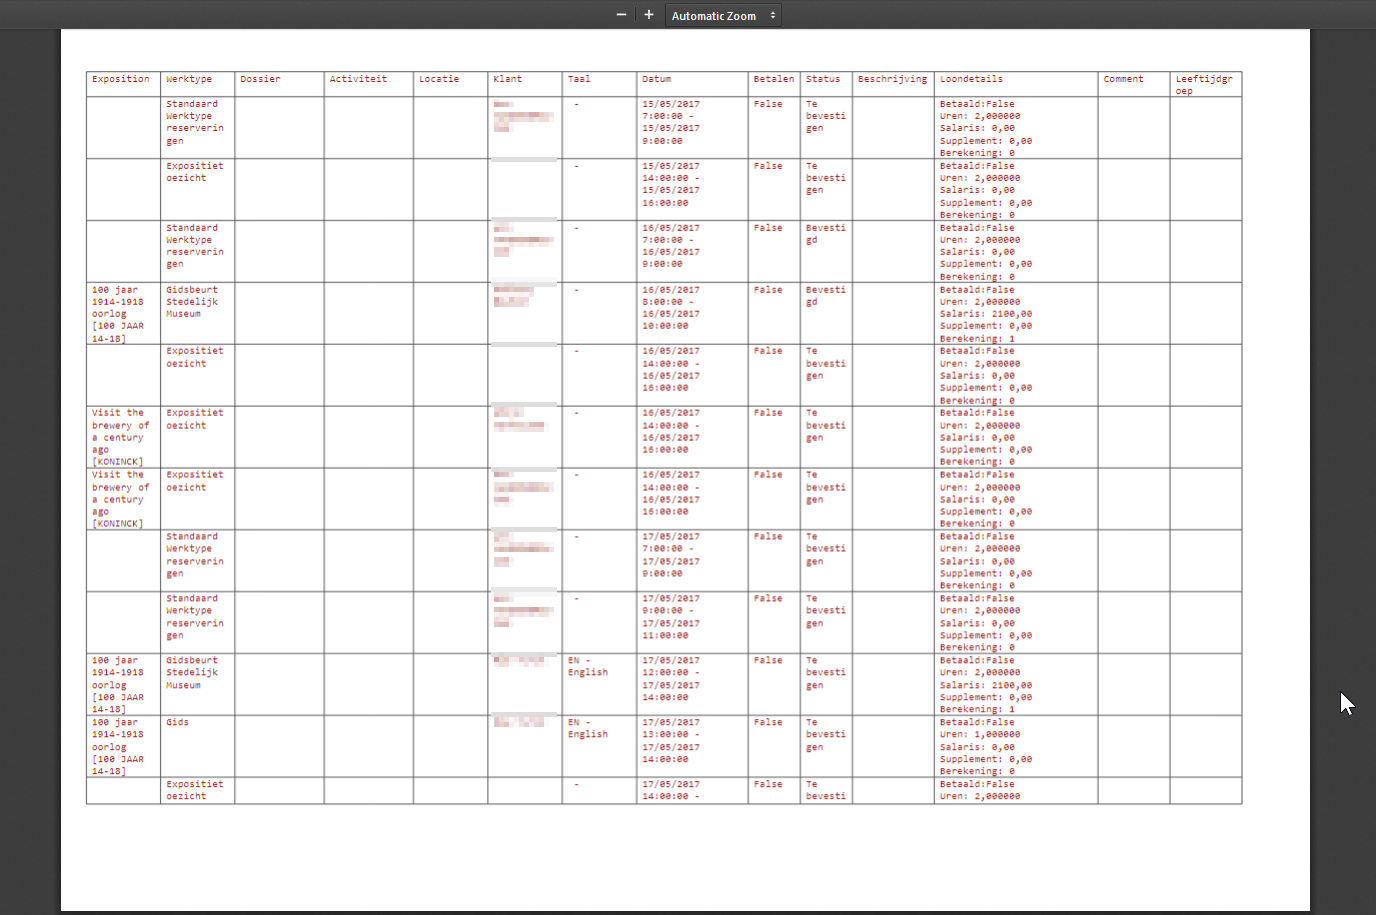 |
Task document
The task document can now be styled with the use of a Word template. You can also choose which fields you wish to include in the template. To add a template, go to General > Parameters > tab Employees. You will find the Task document template box near the bottom of this tab.
|
When printing the task document, a PDF will be generated according to the specifications of the template and could look like the screenshot below.
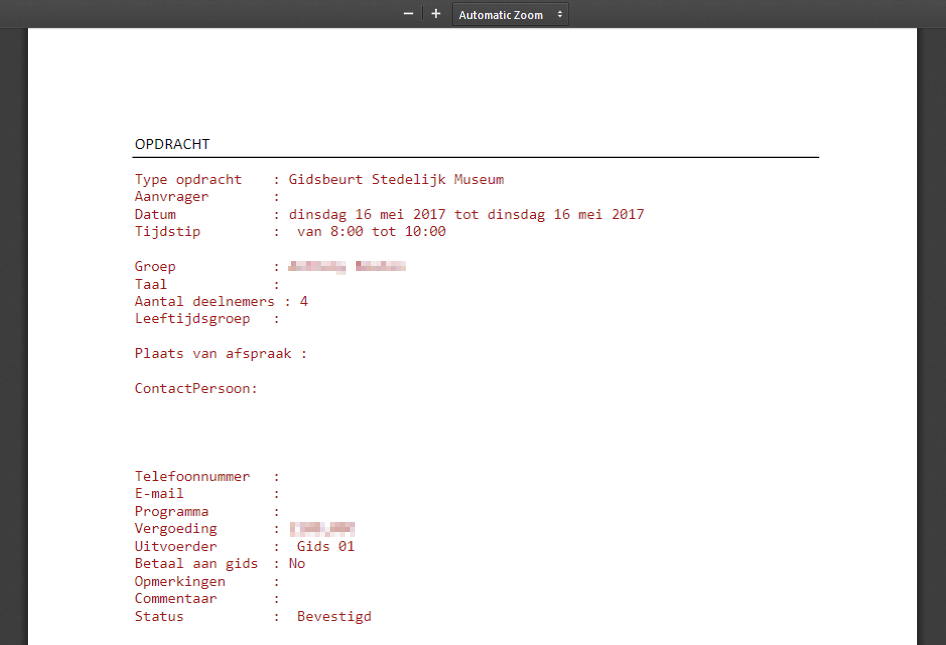 |
Various
It is now impossible for a guide to decline a task in Web tasks that they had previously accepted. If the guide is unable to perform the task, this can from now on only be cancelled through the Recreatex back-office.
When logged into Web tasks, the guide can print an overview of the tasks of the last months. This overview now also contains information about the remuneration.
Rental
A number of improvements have been made to the Rental module:
In Recreatex:
Configure a minimum duration on a rental article.
Filter rental orders on creation date.
Create and delete periods for rental articles in batch.
General usability improvements.
In the web shop:
Add a general remark to a rental order.
Set the desired quantity on the web shop.
Non-valid rental periods are now visualized in the web shop.
Configure a default status for rental orders on the web shop. This allows to create all rental orders on the web shop as optional so they don't have to paid online.
For more information, please see the updated Rental manual.
Childcare
A number of improvements have been made to the Childcare (BKO) module.
For more information, please see the updated Childcare manual.
In Recreatex:
The health service certificate is now available for Childcare (BKO) in Recreatex back-office and on the web shop.
The difference between the available balance and total balance in the E-purse is now visualized.
Increased flexibility in deadline configuration.
Registration periods that are no longer used can be blocked.
Possible to switch between all periods and the future periods of a childcare centre.
In the Recreatex back-office, it is now possible to override the age validation of a child.
Cancelled days in an existing registration are now logged.
On the registration period, it is possible to configure the care centres where the period needs to be enabled.
Setting to generate fiscal certificates only for fully paid registrations.
This should only be used when invoice payments are tracked in Recreatex.
Register on care centre or period can now be configured per registration period instead of per care centre.
Possible to configure when a price is valid with applicable periods.
Show the attendance hours on the cost template.
Possible to configure when two following periods should be counted as one.
Added the name of child and parent in the overview of floating registrations.
In the Childcare web app (BKO)
Visualize ordered options in the childcare web app.
Possible to see periods more then 7 days in the past or future.
Take into account the opening hours of the school for check-in and check-out.
Ask parents if pictures of their children can be taken and visualize this on the childcare web app.
The school of the child is now visualized in the overview.
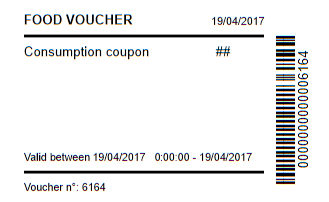
Refund in the form of a redeemable coupon
Instead of refunding the customer in cash, you can now print a coupon, which the customer can then use as a form of payment in your organisation.
Configuration
Create a new payment method for the coupon. Go to General > Setting > Finances > Paymentmethods and add a new payment method.
Tab General: Enter Code, Description and Description ticket.
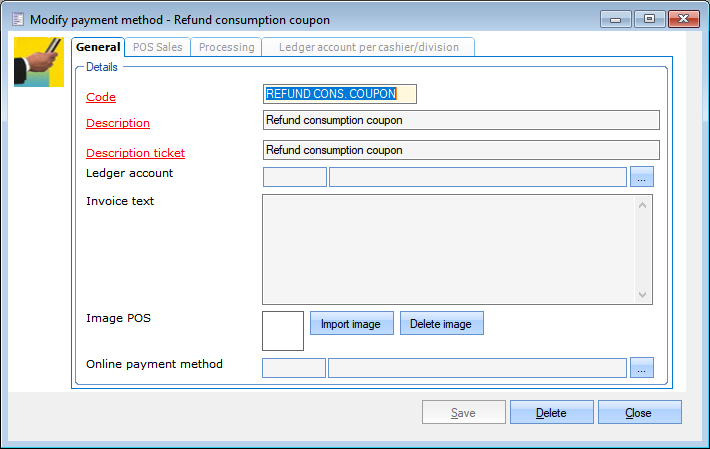 |
Tab POS Sales: Tick the box As refund.
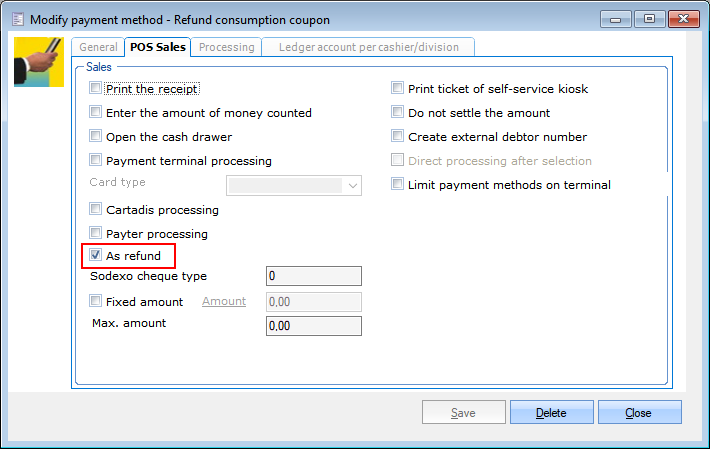 |
Tab Processing: Tick the box Gift & consumption voucher and select the refund item that will be used for processing.
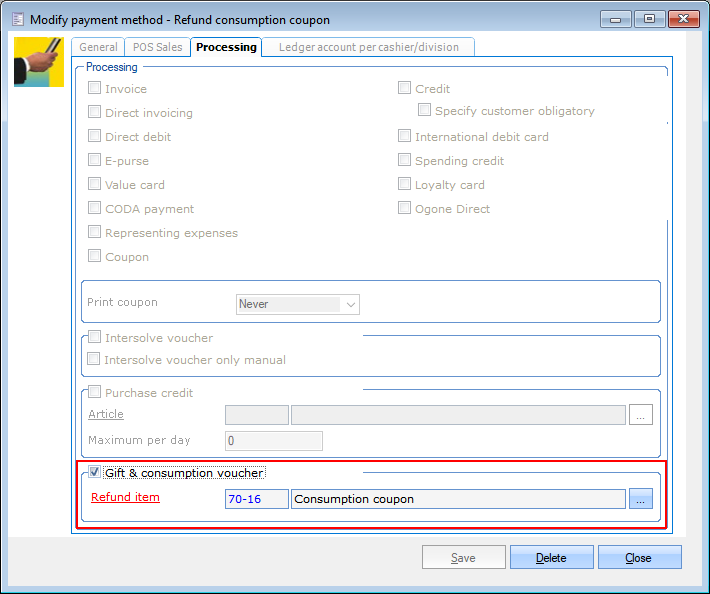 |
This refund item should be configured on the article card on the tab Types as a Gift voucher article or a Food voucher article or a Discount code.
 |
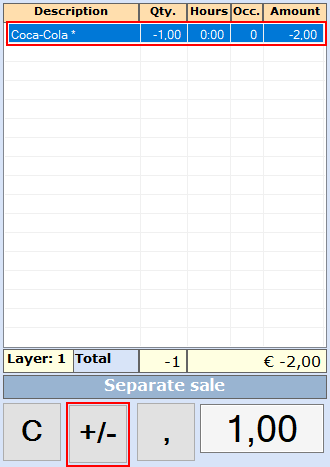
Refund with coupon on desktop POS
The payment method has to be linked to the POS.
Make a negative sale of the item(s) to be refunded.
 |
Proceed to the payment and select the refund payment method you configured before.
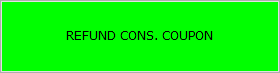
A coupon will be printed and, depending on the configuration of the refund payment method, this will either be a gift voucher, a food voucher, a voucher or a discount code.
 |
API
The following topics contain changes to the API:
Token-based authentication for API
From Recreatex 6.3.0 onwards, we have added token based security to our API as an extra layer of security. This token based security is built on top of the already existing password security. So when a customer decides to use the token based security, a password is still required. The password will be used to generate the token.
Anmerkung
Before activating the token based security, you must make sure that all the clients are properly configured.
Activate the token based security
The configuration of the token based security is done in the 'WebShopConfiguration' that is stored in the WebShopConfiguration database.
Configuration | |
1 2 3 | SELECT [Configuration] FROM [WebShopConfiguration].[dbo].[WebShopConfigurations] where ShopID = '00000000-0000-0000-0000-000000000630' |
To activate the token based configuration, relevant fields should be configured.
Field name | Description |
UseAccessToken | Determines whether the token based security is activated. If that is the case, the access token must be passed with each request. |
PrivateKeyForAccessToken | Access tokens are encrypted with an asymmetric encryption algorithm before they are sent on the wire. A private key is used by the server (WSDL) to decrypt the access token. The client must encrypt the token with the public key. |
Build a token
If token based security is enabled, the client must generate a token and pass that with each request. The token is valid for 30 minutes.
The client can choose whether it:
generates a new token for each request
re-uses a token for a certain time (max. validity is 30 minutes).
The token based security is built on top of the existing password security.
The client/customer should have received:
a public key which is needed to encrypt the token
a secret password which is used to build the token
Steps
The client must create the token-content.
The token-content concatenates the secret password and the number of ticks that represents the current UTC date. A colon should be used as a separator.
The next step is to encrypt the token with the public key.
Finally, the encrypted token is encoded to a base64 string.
Generate token | |
1 2 3 4 5 6 7 8 9 10 11 12 13 14 15 16 17 18 19 | class Client { private readonly string _publicKey; private readonly string _password; public Client(string publicKey, string password) { _password = password; _publicKey = publicKey; } public string GenerateToken() { var completeToken = string.Format("{0}:{1}", _password, DateTime.UtcNow.Ticks); var encryptedToken = EncryptionHelper.Encrypt(_publicKey, completeToken); var token = Convert.ToBase64String(encryptedToken); return token; } } |
Encryption algorithm
The encryption algorithm that is used to encrypt the access token is based on RSA. The code sample below can be used to generate private and public key pairs.
1 2 3 4 5 6 7 8 9 10 11 12 13 14 15 | class EncryptionHelper { public static byte[] Encrypt(string publicKey, string data) { var cspParams = new CspParameters { ProviderType = 1 }; var rsaProvider = new RSACryptoServiceProvider(cspParams); rsaProvider.ImportCspBlob(Convert.FromBase64String(publicKey)); var plainBytes = Encoding.UTF8.GetBytes(data); var encryptedBytes = rsaProvider.Encrypt(plainBytes, false); return encryptedBytes; } } |
API Changelogs
The following list contains the API changelogs for this version:
Version | Date | Type | Method | Summary | Technical Details | Related JIRA Issue |
6.3.0 | 22 Feb 2017 | Edit | LockBasketItems | Properties of RentalReservation | Add property DesiredQuantity | RCXWEBSHOP-2535 - Adding "desired quantity" QA Verified |
6.3.0 | 24 Feb 2017 | New | GetInfoPlayCustomFields | Get the info play custom fields | RCXDGEN-7353 - ICD - InfoPlay 1.3.0.0 - API Development Closed | |
6.3.0 | 24 Feb 2017 | New | GetInfoPlayCustomData | Get the info play custom data | RCXDGEN-7353 - ICD - InfoPlay 1.3.0.0 - API Development Closed | |
6.3.0 | 24 Feb 2017 | Edit | FindSubscriptions | Properties of SubscriptionIncludes and Subscription | SubscriptionIncludes: Add property CustomerPriceGroup Subscription: Add property PriceGroup | RCXDGEN-7352 - ICD - Admission 2.0.1.0 (API development) Closed |
6.3.0 | 27 Feb 2017 | Edit | FindExpositionPeriods | Properties of ExpositionPeriod | Add property Comment | RCXWEBSHOP-2609 - Extra infofield for exhibition period Closed |
6.3.0 | 27 Feb 2017 | Edit | CheckOutBasket | Properties of RentalReservation | Add property GeneralComment | RCXWEBSHOP-2534 - Adding a general remark to the order QA Verified |
6.3.0 | 02 Mar 2017 | Edit | GetPointOfSales | Properties of PointOfSale | Add property FixedPaymentAmount | RCXDGEN-7437 - Add property in PointOfSale Closed |
6.3.0 | 03 Mar 2017 | Edit | FindArticles | Properties of Article, ArticleSearchCriteria and ArticleIncludes | Article: Add property Barcodes ArticleSearchCriteria: Add property Barcode ArticleIncludes: Add property Barcodes | RCXDGEN-7435 - Include barcodes in Article Closed |
6.3.0 | 03 Mar 2017 | Edit | FindSubscriptionArticles | Properties SubscriptionArticle, SubscriptionArticleSearchCriteria and SubscriptionArticleIncludes | SubscriptionArticle: Add property Barcodes SubscriptionArticleSearchCriteria: Add property Barcode SubscriptionArticleIncludes: Add property Barcodes | RCXDGEN-7436 - Include barcodes in SubscriptionArticle Closed |
6.3.0 | 06 Mar 2017 | Edit | ListInfrastructures/ListPlaces | Add new member on ServiceOrigin | ServiceOrigin: Add member TaskFlow | RCXDGEN-7448 - Remove check on ReservationRights in FindPlaces / FindInfrastructures for TaskFlow Closed |
6.3.0 | 06 Mar 2017 | Edit | GetSalesZoneOverview | Add new members on TableOverview | Add member TableNo and Description | RCXDGEN-7458 - Include TableNo & Description in TableOverview Closed |
6.3.0 | 10 Mar 2017 | Edit | RegisterSubscriptionRefusationLog | Add new members on SubscriptionRefusationLogCriteria | Add member SubscriptionId | RCXDGEN-7488 - API - Extend RegisterSubscriptionRefusationLog so that you can register a log for a single subscription Closed |
6.3.0 | 15 Mar 2017 | Edit | RegisterSubscriptionRefusationLog | Add new members on SubscriptionRefusationLogCriteria | Add member EmployeeId | RCXDGEN-7531 - Employee information is not registered for RegisterSubscriptionRefusationLog Closed |
6.3.0 | 11 Apr 2017 | Edit | ArticleSale | Added CalculationType on Article | Article: Add property CalculationType | RCXWEBSHOP-2629 - automatic article with fixed price in exhibition visit not correctly displayed QA Verified |
6.3.0 | 18 Apr 2017 | Edit | SavePersonContact | Add new member on SavePersonContactResult | Add member ValidationResults | RCXDGEN-7657 - Show double username error Closed |
6.3.0 | 20 Apr 2017 | Edit | ListPaymentMethods | Add new member on PaymentMethod | Add member FixedPaymentAmount | RCXDGEN-7777 - API - Include 'SettleAmounts' on payment method Closed |
6.3.0 | 16 May 2017 | Edit | FindReservationsOverviewByDay | Add new member on ReservationsOverviewItem | Add member HasAttachments | RCXDGEN-7396 - Extend FindReservationsOverviewByDay with bool HasAttachments Closed |
6.3.0 | 16 May 2017 | Edit | FindReservationsOverviewByDay | Add new member on ReservationsOverviewItem | Add member CustomerName | RCXDGEN-7397 - Extend FindReservationsOverviewByDay with PersonName CustomerName Closed |
6.3.0 | 16 May 2017 | Edit | FindEmployeeTaskAttachments | Add new member on EmployeeTaskAttachmentIncludes | Add member AttachmentByteArray | RCXDGEN-7809 - Attachments in task comment Closed |
6.3.0 | 18 May 2017 | Edit | FindReservations | Add new member on ReservationIncludes | Add member ReservationSales and RentalSales | RCXDGEN-7811 - Sales items of booking Closed |
6.3.0 | 18 May 2017 | Edit | FindReservations | Add new member on Reservation | Add member ReservationArticleSales and ReservationRentalOrders | RCXDGEN-7811 - Sales items of booking Closed |
6.3.0 | 19 May 2017 | New | FindEmployeeNotifications | New method FindEmployeeNotifications | Loads the notifications for a certain employee. Should only be used within TaskFlow app. | RCXDGEN-7394 - Provide new method FindEmployeeNotifications Closed |
6.3.0 | 07 Jun 2017 | Edit | FindEmployees | Add new member on FindEmployees | Add member PictureUrl | RCXDGEN-7667 - Modify the WSDL / API Closed |
6.3.0 | 31 May 2017 | Edit | FindScenarioSessions | Add new members on ScenarioSessionCheck | Add member Id Add member SortOrder Add member CheckListCategorySortOrder Add member CheckListItemIsBlocking Add member Approvers Add member ApprovedBy Add member CheckListItemSortOrder Add member InternalComment | RCXDGEN-7667 - Modify the WSDL / API Closed |
6.3.0 | 31 May 2017 | Edit | FindScenarioSessions | Add members on ScenarioSessionAttachment | Add member Id Add member Attachment.FileName | RCXDGEN-7667 - Modify the WSDL / API Closed |
6.3.0 | 31 May 2017 | Edit | FindScenarioSessions | Add member on ScenarioSEssionComments | Add member Id Add member ScenarioSessionId Add member EmployeeId Add member CreationDate Add member UserId Add member Description Add member Comment | RCXDGEN-7667 - Modify the WSDL / API Closed |
6.3.0 | 31 May 2017 | New | SaveScenarioSessionComment | Saves a scenario session comment | RCXDGEN-7667 - Modify the WSDL / API Closed | |
6.3.0 | 31 May 2017 | New | DeleteScenarioSessionComment | Deletes a scenario session comment | RCXDGEN-7667 - Modify the WSDL / API Closed | |
6.3.0 | 31 May 2017 | New | SaveSecnarioSessionAttachment | Saves a scenario session attachment | RCXDGEN-7667 - Modify the WSDL / API Closed | |
6.3.0 | 31 May 2017 | New | DeleteScenarioSessionAttachment | Deletes a scenario session attachment | RCXDGEN-7667 - Modify the WSDL / API Closed | |
6.3.0 | 31 May 2017 | New | ValidateScenarioSessionCheck | Validates a scenario session check | RCXDGEN-7667 - Modify the WSDL / API Closed | |
6.3.0 | 08 Jun 2017 | Edit | GetRentalOrder | Add members on RentalOrder | Add member EmployeeTaskIds | RCXDGEN-7810 - Rental details with articles Closed |