Ausstellungen: Kombitickets für mehrere Ausstellungsbesuche
Sie haben nun die Möglichkeit, mehrere Ausstellungen zu kombinieren und Ihren Kunden Kombitickets zu attraktiven Vorzugspreisen anzubieten.
Kombiausstellungen konfigurieren – Backoffice
Bevor Sie mit der Erstellung von Kombiausstellungen beginnen:
Vergewissern Sie sich, dass die einzelnen Ausstellungen erstellt wurden.
auf der Ebene der Ausstellung separate Preise festlegen, die beim Verkauf eines Ausstellungsbesuchs als Teil eines Kombitickets angewendet werden können.
Wenn Sie dieselben Ausstellungen sowohl einzeln als auch als Teil einer Kombiausstellung verkaufen, können Sie für jeden Zweck separate Preise festlegen. Die für die Kombiausstellung reservierten Ausstellungspreise können als Nur in Kombiausstellungen zulässig gekennzeichnet werden.
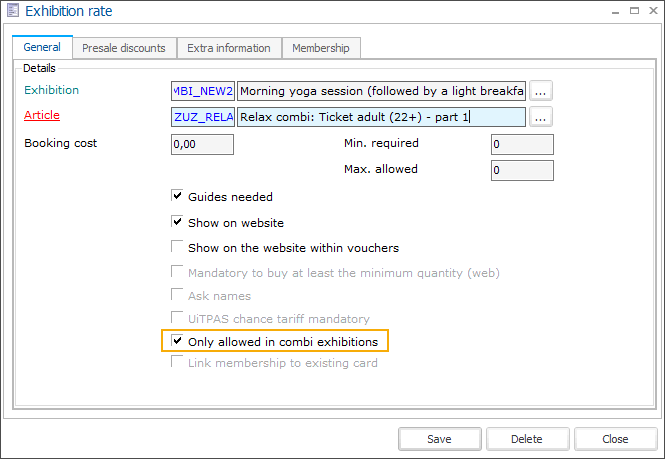
Bei Kombiausstellungen können Sie immer jeden vordefinierten Tarif wählen, unabhängig von der Einstellung, aber beim Einzelverkauf der Ausstellungen werden die Tarife (und die damit verbundenen Preise), die als Nur in Kombiausstellungen erlaubt gekennzeichnet sind, ausgeblendet, um Fehler am POS zu vermeiden.
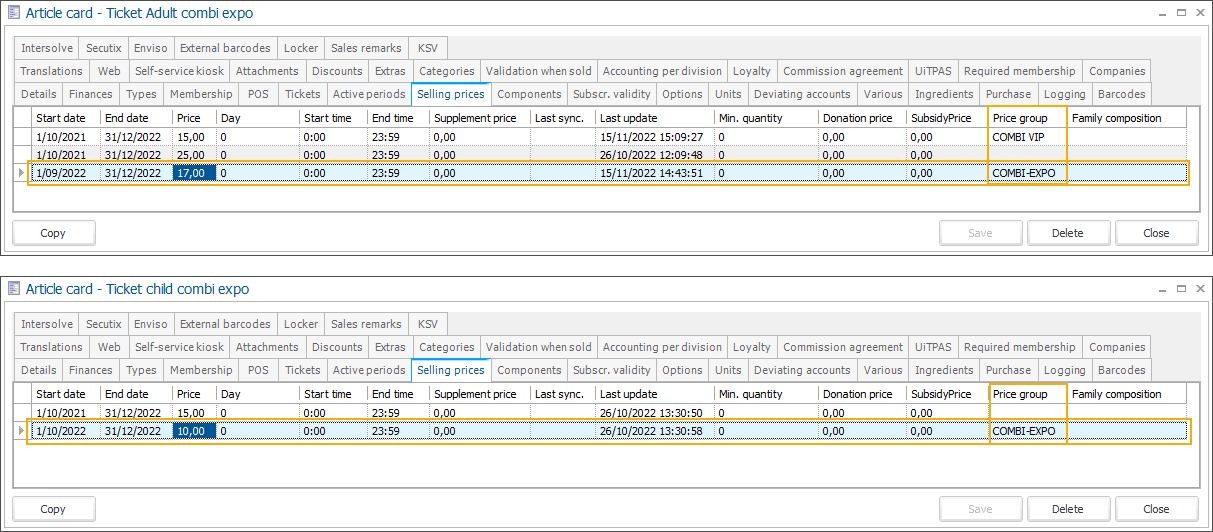
Bei der Definition der tatsächlichen Verkaufspreise auf dem Preisartikel, der mit dem Ausstellungstarif verknüpft ist, können Sie die Verkaufspreise mit einer Preisgruppe verknüpfen, die es Ihnen ermöglicht, Preise zu gruppieren und einfach auf eine bestimmte Kombiausstellung anzuwenden.
Gehen Sie in Recreatex auf Ausstellungen > Kombiausstellungen, um die Übersichtsmaske aller Kombiausstellungen zu öffnen.
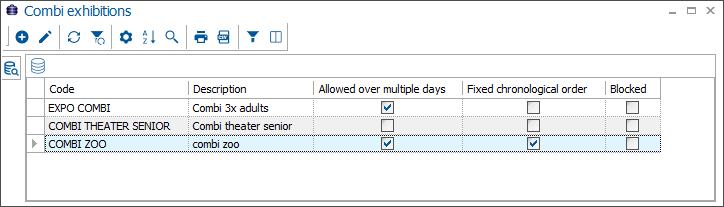
Zum Erstellen, Ändern oder Löschen von Kombinationsausstellungen verwenden Sie die verfügbare Framework-Funktionalität.
In der Registerkarte Allgemeines legen Sie die Grundkonfiguration der Kombiausstellung fest.
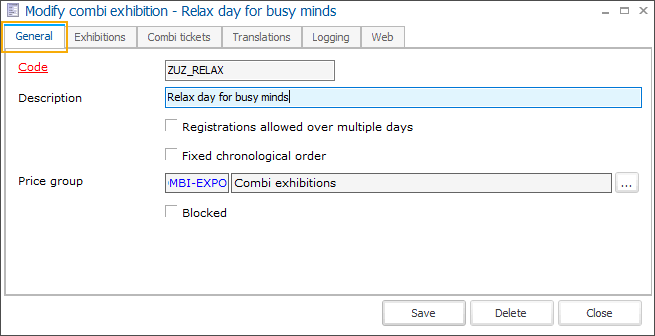
Code
Der Kurzname muss eindeutig sein.
Beschreibung
Beschreibung der Kombiausstellung
Registrierungen über mehrere Tage möglich
Gibt an, ob es erlaubt ist, Ausstellungszeitfenster auszuwählen, die über mehrere Tage verteilt sind
Wichtig
This setting must be activated if you configure the Min./Max. time before (on exhibition level) longer than 24 hours.
Feste chronologische Reihenfolge
Gibt an, ob der Besucher die enthaltenen Ausstellungen in einer bestimmten Reihenfolge besuchen muss.
Preisgruppe
Wenn Sie eine Preisgruppe auswählen, werden die Ticketpreise anhand der mit dieser Preisgruppe verbundenen Preise berechnet.
If you intend to use deviating prices, remove the price group here (or leave it empty if not yet in use) and apply it in the section deviating prices.
Gesperrt
Möglichkeit, eine Kombiausstellung (vorübergehend) zu sperren. Die Kombiausstellung ist dann nicht mehr in der Liste verfügbar, kann aber mit der rechten Maustaste und der Auswahl der Option Inkl. gesperrt visualisiert werden.
Klicken Sie auf Speichern, bevor Sie fortfahren.
Fügen Sie auf der Registerkarte Ausstellungen die Ausstellungen hinzu, die Teil der Kombiausstellung sein sollen.
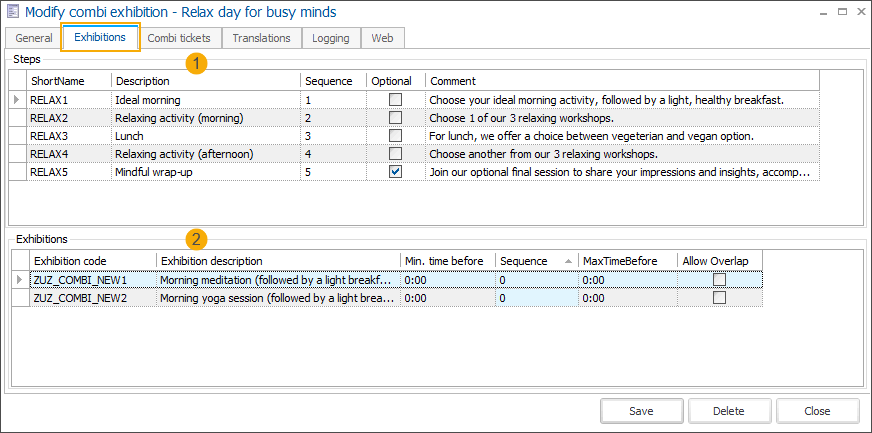
Steps: Create a new combi exhibition step (right-click + New or F2 key). In the tab General you can find the configuration of the exhibition step:
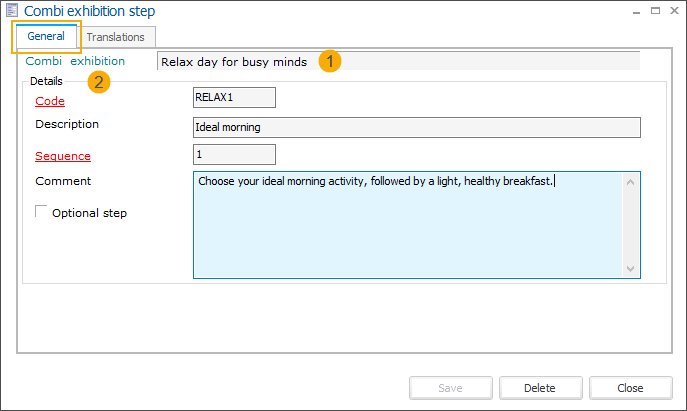
Combi exhibition (1)
Here you can see the combi exhibition for which the step has been created.
In the section Details (2), provide the following information:
Code
The code is mandatory and must be unique.
Description
Description of the combi exhibition step
Sequence
By providing a sequence number, you determine the order in which the steps are displayed at the POS.
Comment
You can add more detailed information for the customer.
Optional step
If a step is marked as optional, customers can choose to skip this step without choosing any exhibition.
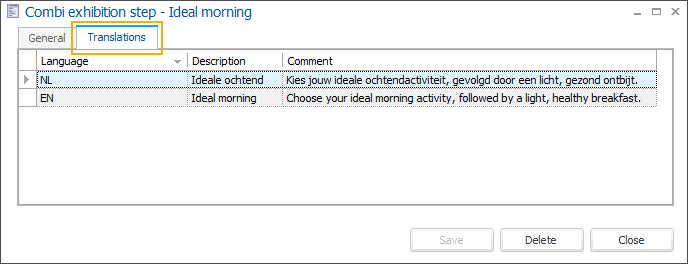
In the tab Translations, provide translations of the description and comment field to all relevant languages. The Webshop uses these translations to show the information in the user's language.
Exhibitions: For each step, you can add 1 or more exhibitions. When purchasing the combi tickets, customers are allowed to choose one exhibition per step.
Add a new exhibition to the combi exhibition step (right-click + New or F2 key).
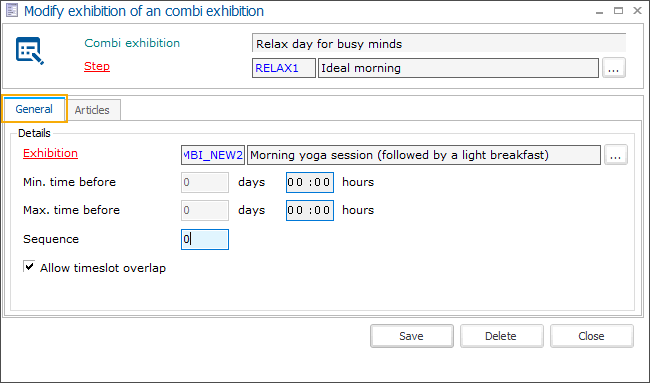
Combi exhibition
Here you can see the related combi exhibition
Step
The step is mandatory and preselected when you open the Modify exhibition screen. You can, however, easily rearrange the exhibitions if needed by assigning them to different steps.
In the tab General, specify the details of the exhibition linked to the step. For each added exhibition you can further specify:
Exhibition
Select the exhibition that should be part of the combi exhibition
Min. time before (days & hours)
The minimum time between the end of the previous time slot and the beginning of the following time slot (of the current exhibition). It will allow the visitor to comfortably move from the location of one exhibition to the location of another exhibition.
The specified minimum time before will be considered when filtering the available timeslots.
Ensure that the setting Registrations allowed over multiple days is activated on the combi-exhibition level if you set the time for more than 24 hours.
Max. time before (days & hours)
The maximum time between the end of the previous time slot and the beginning of the following time slot (of the current exhibition).
The specified maximum time before will be considered when filtering the available timeslots.
Ensure that the setting Registrations allowed over multiple days is activated on the combi-exhibition level if you set the time for more than 24 hours.
Sequence
You can assign a sequence number to control the order in which exhibitions are presented to customers. For example, if you want to highlight or promote a specific exhibition, assign sequence number 1 to ensure it appears at the top of the list.
Allow timeslot overlap
When the setting is disabled, standard logic applies, and timeslots for different exhibitions cannot overlap. If a certain timeslot is already booked for the previous exhibition, the same and overlapping timeslots will not be available for the selection of the subsequent exhibitions.
When this setting is enabled, the timeslots of this exhibition will not affect the availability of timeslots for other exhibitions, allowing them to overlap.
If you select this exhibition first, the overlapping timeslots for subsequent exhibitions will be available for selection.
If you select this exhibition last, the timeslots of this exhibition will be available for selection even if they overlap with timeslots of previously chosen exhibitions.
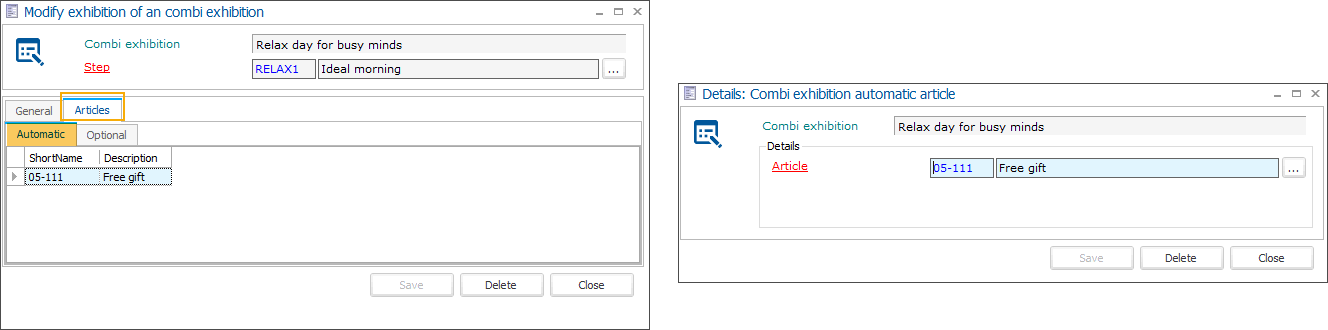
In the tab Articles, you can add automatic and optional articles per exhibition.
Automatic articles
Optional articles
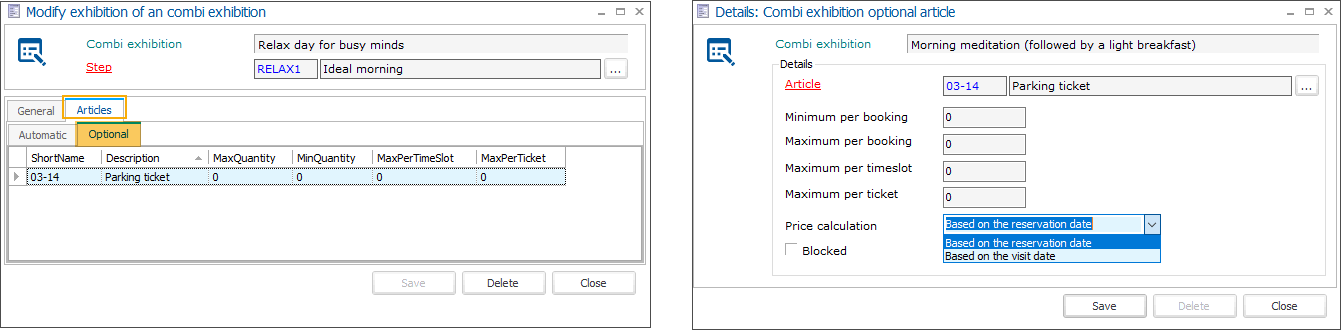
You have the option to set the minimum/maximum number that can be purchased of this optional article and decide if the price should be calculated based on the price available on the booking day or the day of the visit.
Repeat step 3 to add all steps and exhibitions that should be included in your combi-exhibition.
Anmerkung
Steps that have no exhibitions linked are excluded from the ordering flow of the related combi exhibition.
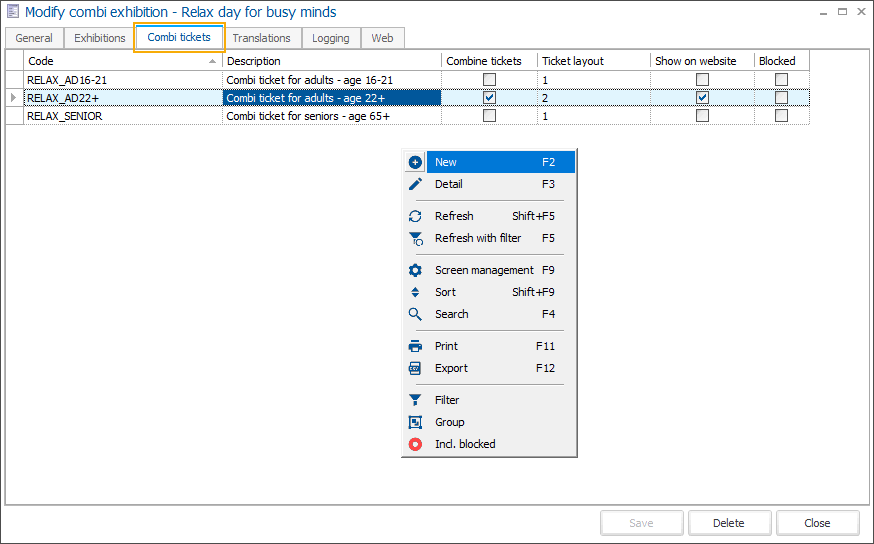
In der Registerkarte Kombitickets definieren Sie alle Arten von Kombitickets, die für Ihre Kombiausstellung verfügbar sein sollen (z. B. Kombitickets für Erwachsene, Kinder, Senioren usw.).
In der Maske Kombiausstellungsticket ändern wechseln Sie auf die Registerkarte Allgemeines, um die Grundkonfiguration des Kombitickets festzulegen.
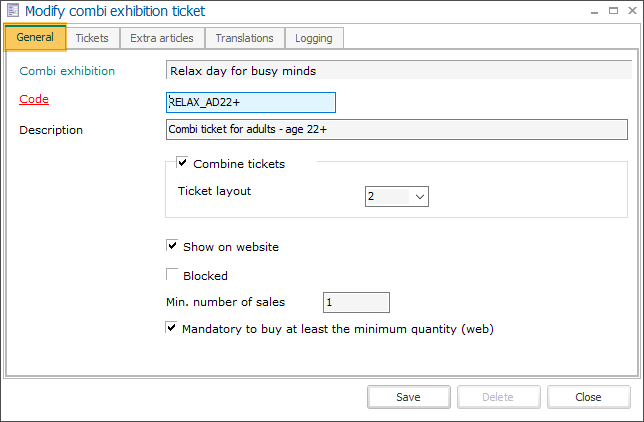
Kombiausstellung
Der Name der aktuellen Kombiausstellung ist schreibgeschützt.
Code
Der Code des Kombiausstellungstickets muss eindeutig sein.
Beschreibung
Beschreibung des Kombiausstellungstickets.
Tickets kombinieren
Sie können die Tickets für die einzelnen Ausstellungen zu einem einzigen Ticket zusammenfassen (1 Strichcode) oder für jeden Teil der Kombiausstellung ein eigenes Ticket erstellen.
Ticket-Layout
Wenn Sie die Tickets kombinieren möchten, müssen Sie ein separates Ticket-Layout angeben.
Anmerkung
Um ein geeignetes Layout für ein kombiniertes Einzelticket pro Besucher zu erstellen, müssen Sie eines der verfügbaren Crystal Reports-Layouts ändern.
Auf der Website anzeigen
(noch nicht umgesetzt)
Gesperrt
Möglichkeit, ein Kombiticket (vorübergehend) zu sperren. Das Kombiticket ist dann nicht mehr in der Liste vorhanden, kann aber über die rechte Maustaste und die Option Inkl. gesperrt angezeigt werden.
Min. number of sales
Option to define the minimum number of tickets that must be purchased for this type of ticket.
Mandatory to buy at least the minimum quantity (web)
If the Min. number of sales is defined, this setting gives you the possibility to choose how strictly you want to enforce the purchase of the minimum required number of tickets on the Webshop.
If checked: The minimum number of tickets to purchase is mandatory, meaning that the minimum number of tickets is preselected and cannot be reduced.
The minimum number of tickets of this type will thus automatically be included in each ticket purchase for this combi exhibition.
If unchecked: The minimum number of tickets to purchase is mandatory on the Webshop if a customer chooses to purchase tickets of this type.
The number of tickets can be selected but if lower than the required number, a blocking message is displayed.
Klicken Sie auf Speichern, bevor Sie fortfahren.
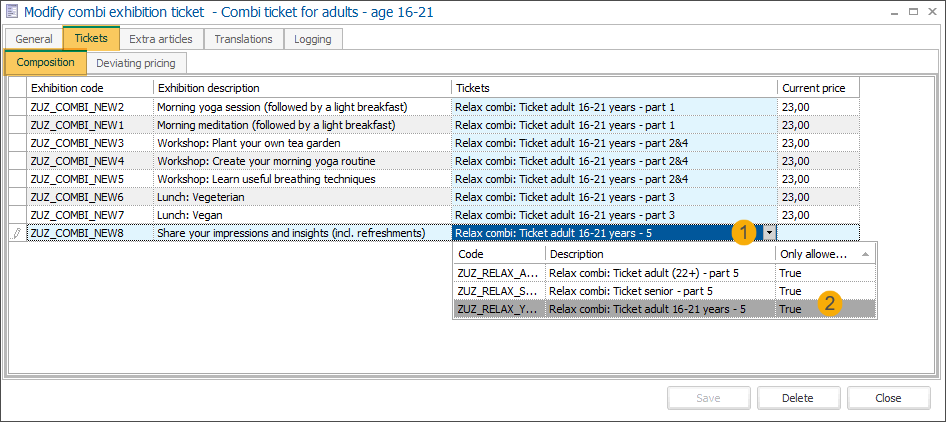
Wählen Sie auf der Registerkarte Tickets die Ticketpreisrate pro Ausstellung. Klicken Sie auf den Pfeil in der Spalte Tickets (1) neben jeder Ausstellung, um eine Dropdown-Liste mit allen verfügbaren Preisraten zu öffnen, die auf Ausstellungsebene konfiguriert sind.
Wenn Sie Preisraten als Nur in Kombiausstellungen zulässig markiert haben, werden diese in der Dropdown-Liste als Wahr markiert (2)
In the tab Tickets > Deviating prices, you can configure a wide range of deviating prices per combi ticket.
Fill in the total combi-ticket price (1) and optionally add a price group (2), e.g. to give an additional discount. Click Set price (3) to generate the prices. The total price is proportionally divided among all exhibitions.
If you change the total price and/or the price group and click Set price again, the prices will be recalculated.
Wichtig
Only price groups of the type not defined (0) or POS (4) can be selected here.
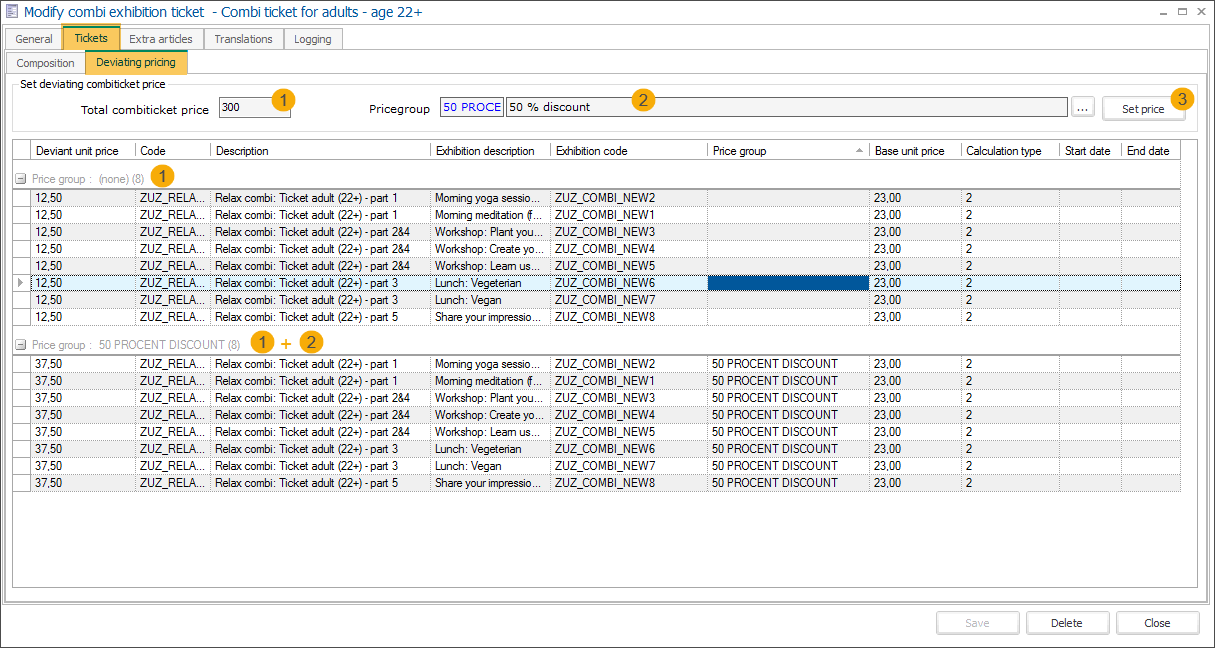
The created prices can be further individually modified or deleted.
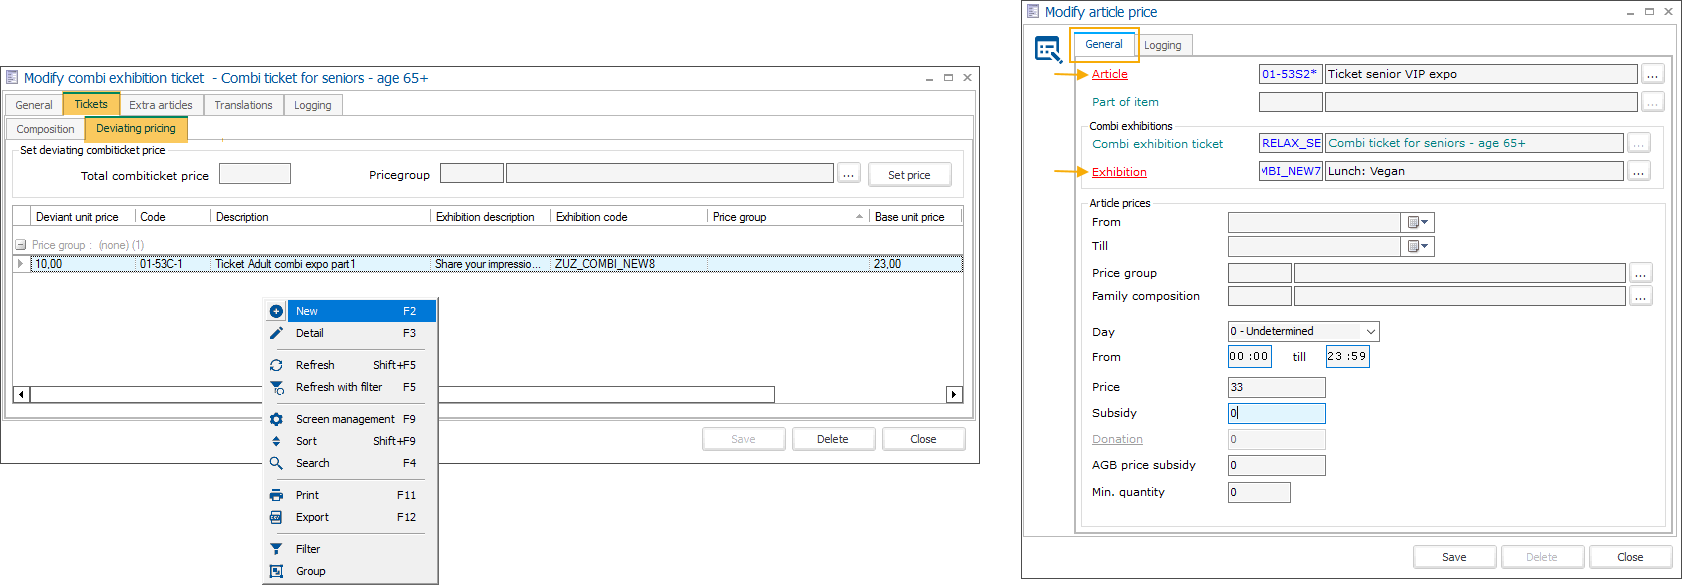
Add deviating price manually (right-click + New or F2 key). Here you can define the price per exhibition using a wide range of criteria, such as minimum purchased quantity or purchase period.
In der Registerkarte Zusatzartikel können Sie zusätzliche Artikel auswählen, die zusammen mit dem Kombiticket verkauft werden sollen.
Automatic articles
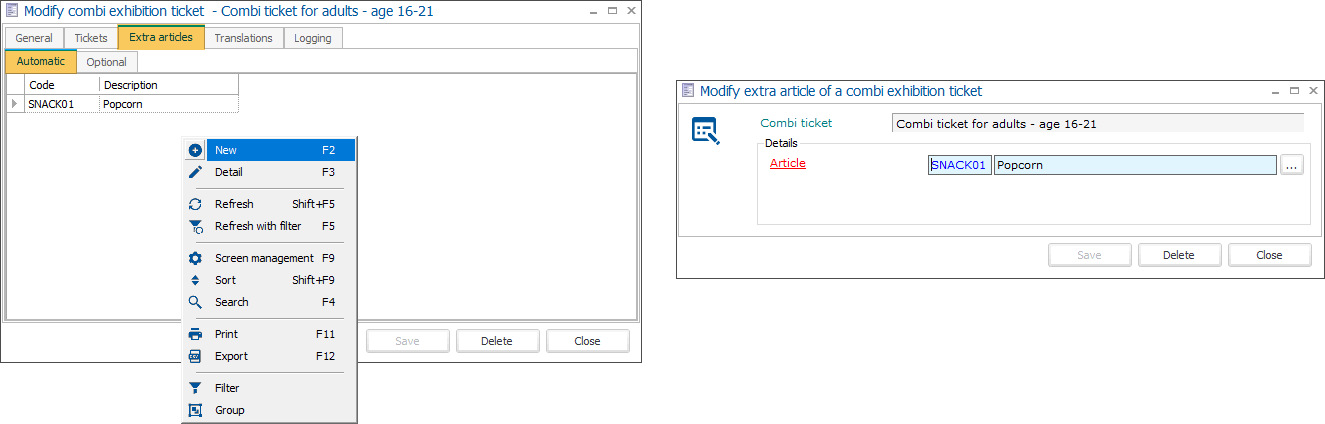
Optional articles
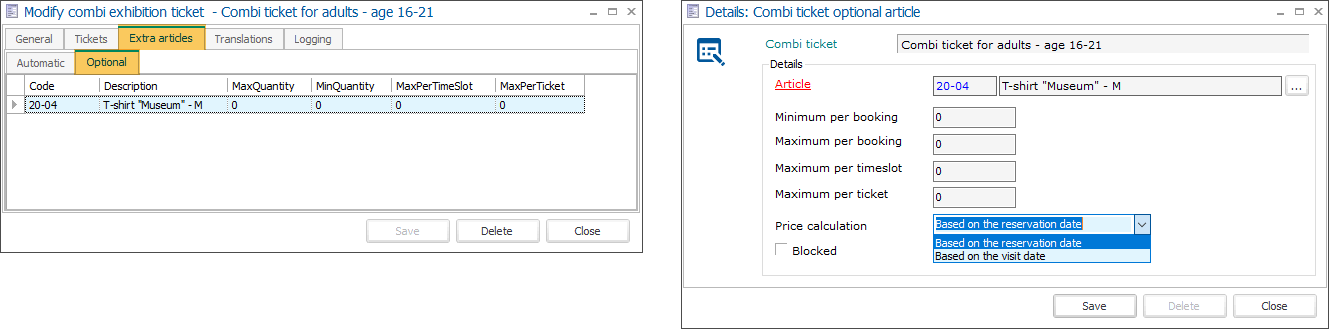
You have the option to set the minimum/maximum number that can be purchased of this optional article and decide if the price should be calculated based on the price available on the booking day or the day of the visit.
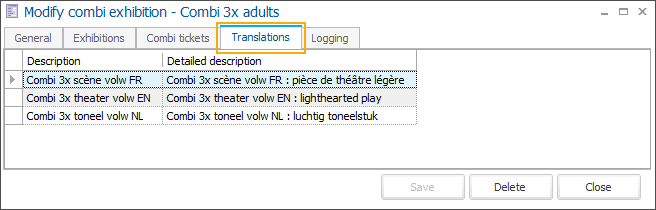
Auf der Registerkarte Übersetzungen können Sie übersetzte Beschreibungen des Kombitickets in mehreren Sprachen hinzufügen.
In der Registerkarte Protokollierung können Sie alle Änderungen des Kombitickets nachvollziehen, einschließlich Datum/Uhrzeit der Anpassung, Art der Änderung, welches Feld geändert wurde, alter und neuer Wert und wer die Änderung vorgenommen hat.
Auf der Registerkarte Übersetzungen können Sie übersetzte Beschreibungen der Kombiaausstellung in mehreren Sprachen hinzufügen.
Auf der Registerkarte Protokollierung können Sie alle Änderungen der Kombiausstellung nachvollziehen, einschließlich Datum/Uhrzeit der Anpassung, Art der Änderung, welches Feld geändert wurde, alter und neuer Wert und wer die Änderung vorgenommen hat.
Verkauf von Kombiausstellungstickets am POS
Wichtig
Der Kombiausstellungsablauf wird nur für Points of Sale mit dem Menü-Layout Modern POS unterstützt.
Sie finden die Einstellung unter Verkauf > Einstellungen > Point of Sale > Point of Sale ändern > Registerkarte Verschiedenes > Einstellung Layout POS-Menü.
Fügen Sie die Kombiausstellung dem POS hinzu.
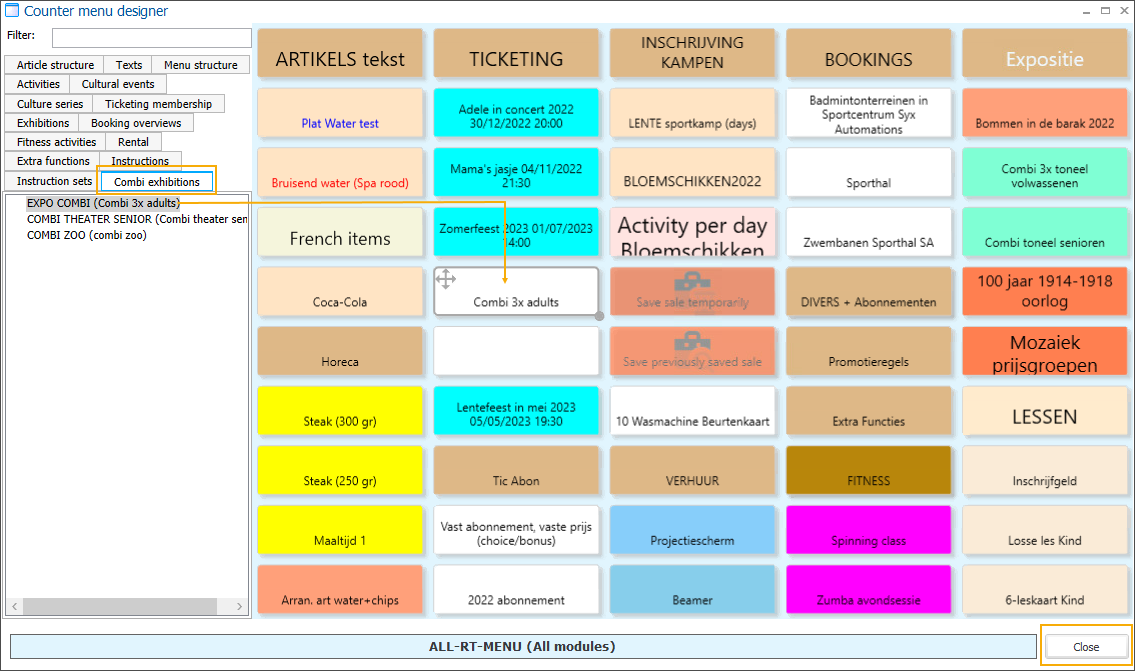
Gehen Sie in Recreatex in das Modul POS > Einstellungen > POS-Menüs und öffnen Sie das entsprechende POS. Klicken Sie dann auf die Schaltfläche Einstellungen, um das Menü Theke zu öffnen.
Wählen Sie unter der Registerkarte Kombiausstellungen die Kombiausstellung aus und ziehen Sie sie per Drag & Drop auf das Schaltermenü.
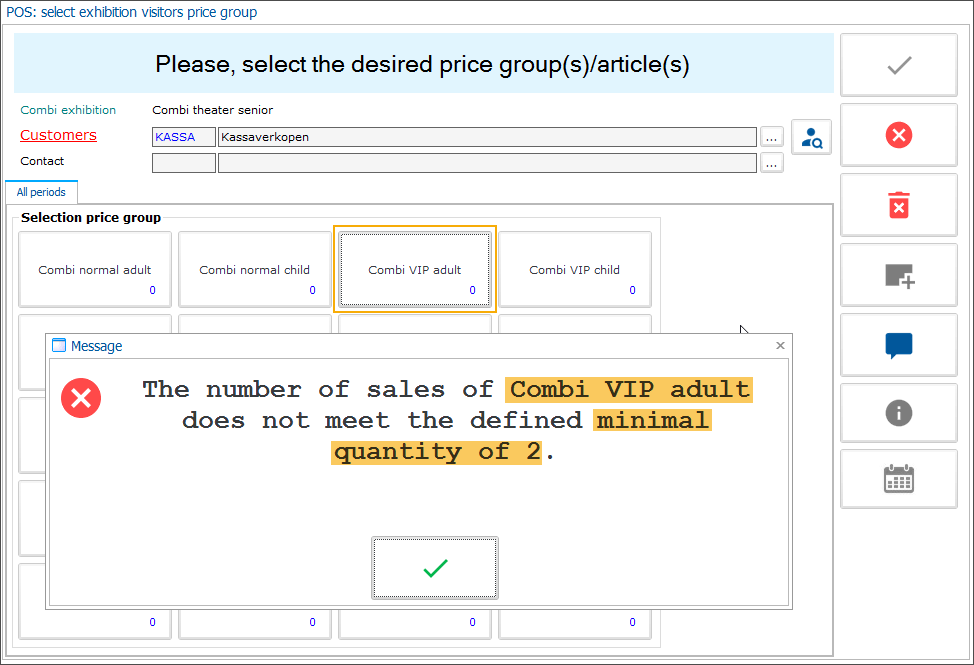
Wählen Sie die Kombiausstellung aus und geben Sie die Art und Anzahl der Kombitickets an.
Geben Sie zunächst die Arten von Kombitickets an, die Sie kaufen möchten (1), und die Anzahl der Besucher für jede Ticketart (2).
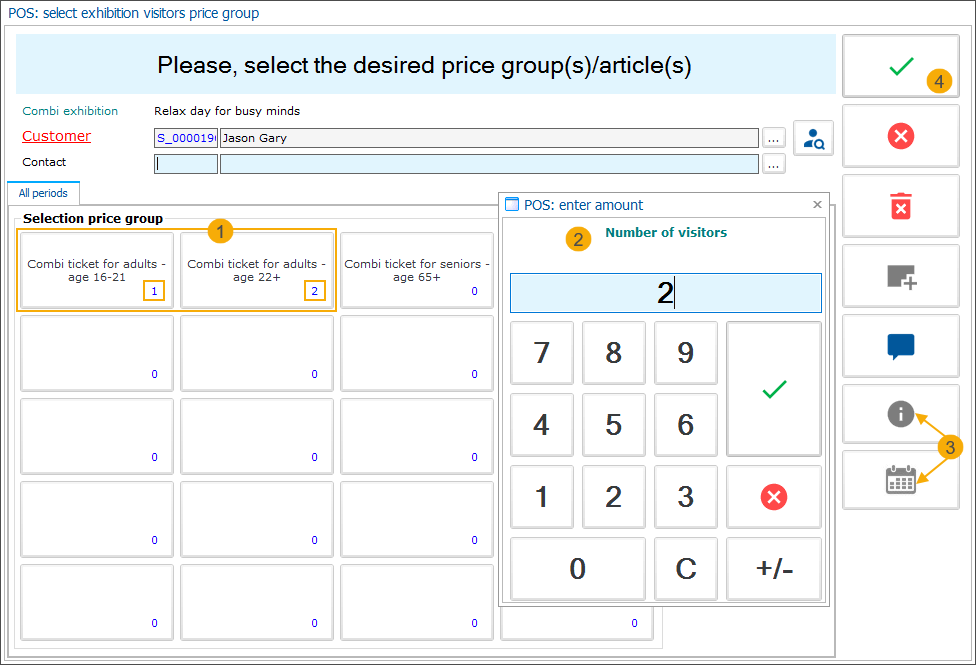
Beachten Sie, dass die Kalenderfunktion (3) und die Informationstaste (3) nicht verfügbar sind, da die Kombiausstellung mehrere Ausstellungen enthält.
Bestätigen Sie Ihre Auswahl, indem Sie auf das grüne Häkchen in der vertikalen Symbolleiste klicken (4).
Anmerkung
If you have configured a mandatory number of tickets that must be purchased for the selected ticket type, a blocking message will be displayed if the number of tickets specified is lower than defined by the setting Min. number of sales (Combi exhibition ticket > tab General).
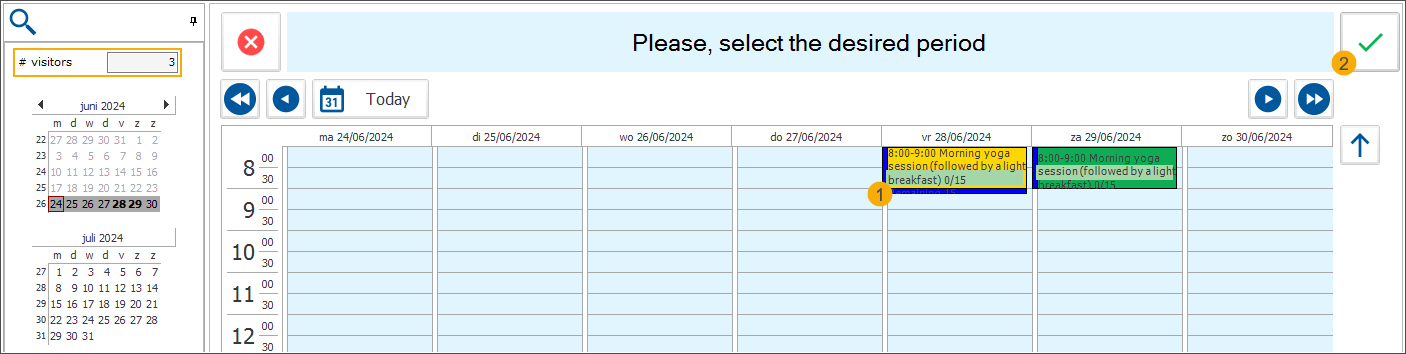
Wählen Sie die Zeitfenster für jede Ausstellung aus.
You will automatically be forwarded to the calendar view of the selected exhibition. The displayed time slots take into account the specified number of visitors.
Select the desired time slot (1) and confirm by clicking the green checkmark (2).
If you have configured optional articles on the level of individual exhibitions, the choice will be presented after the timeslot selection.
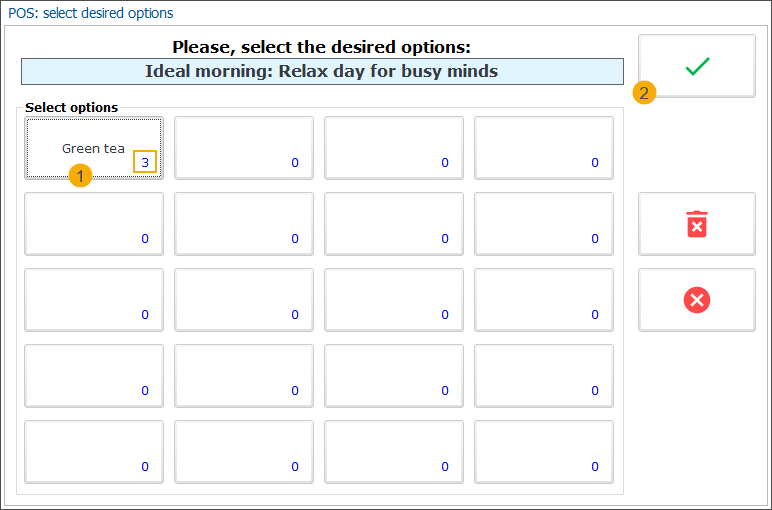
Specify the number of articles the customer wants to include or leave 0 if the customer does not wish to include any optional articles (1). Then click the green checkmark (2) to confirm the choice and move to the next step.
Die Kalenderansicht der 2. Ausstellung wird automatisch geöffnet. Sie können das hervorgehobene Zeitfenster der ersten Ausstellung (1) und alle verfügbaren Zeitfenster für die zweite Ausstellung sehen.
The calendar view of the 2nd exhibition will open automatically. You can see the highlighted timeslot of the first exhibition (1) and all available time slots for the 2nd exhibition.
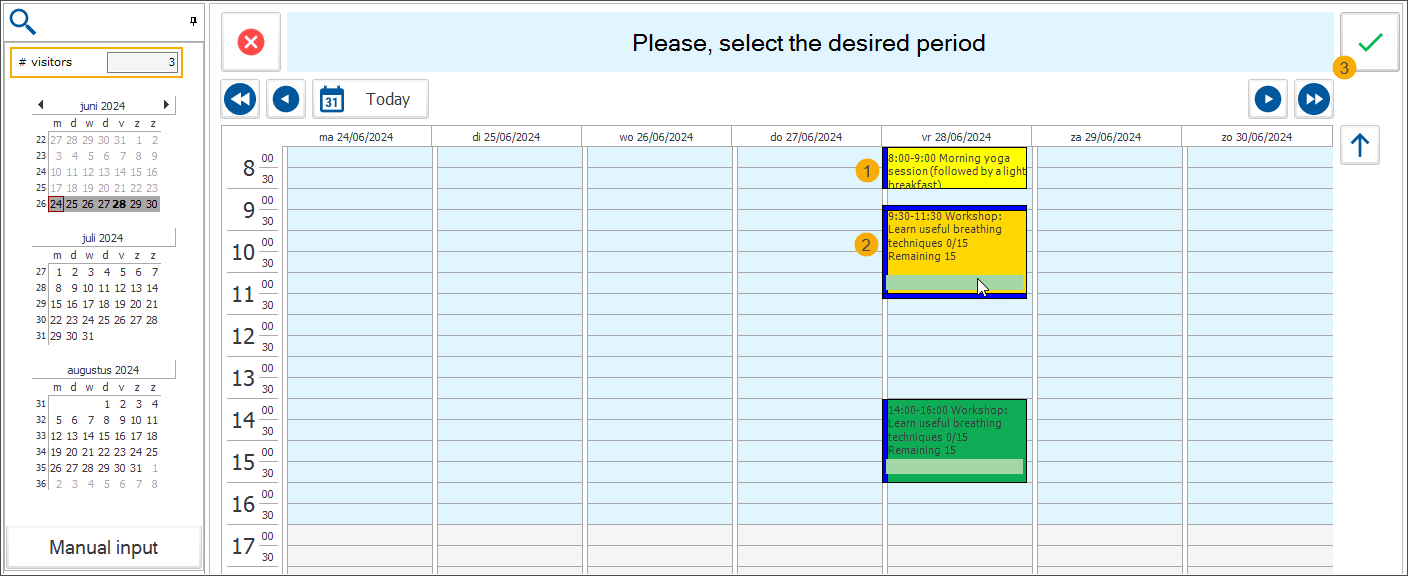
Wählen Sie das gewünschte Zeitfenster aus (1) und bestätigen Sie es mit einem Klick auf das grüne Häkchen (2).
Anmerkung
Ab der 2. Ausstellung werden die verfügbaren Zeitfenster nicht nur nach der angegebenen Besucherzahl gefiltert, sondern auch nach den Einstellungen, die bei der Konfiguration der Kombiausstellung angegeben wurden (oder nicht):
Registrierungen über mehrere Tage erlaubt: Wenn erlaubt, werden die Zeitfenster nicht nur für das Datum der ersten Ausstellung, sondern auch für andere Tage angezeigt. Andernfalls werden nur Zeitfenster desselben Tages angezeigt.
Feste chronologische Reihenfolge (+ Reihenfolge für jede Ausstellung festgelegt): Falls angegeben, werden nur die Zeitfenster angezeigt, die nach dem Zeitfenster der vorherigen Ausstellung verfügbar sind.
Minimale Vorlaufzeit: Falls konfiguriert, werden nur Zeitfenster angezeigt, die sich nicht mit der angegebenen Zusatzzeit überschneiden.
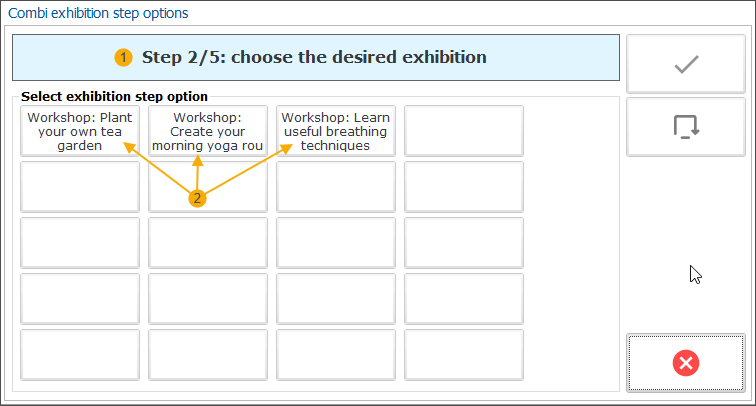
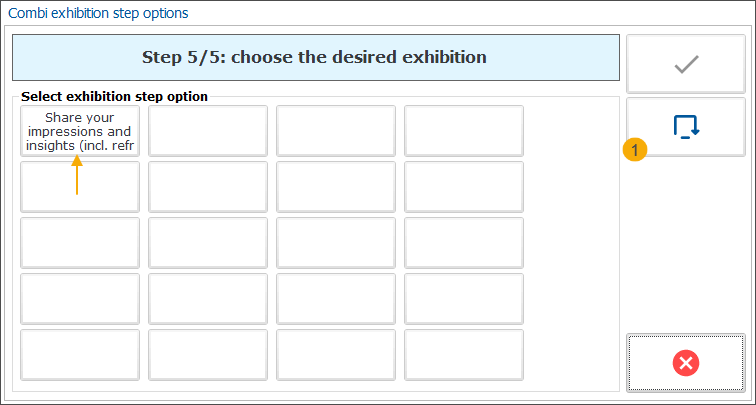
Continue the selection for the remaining steps.
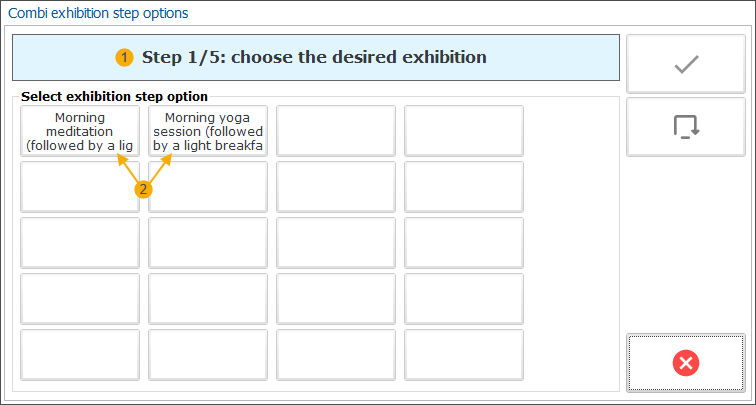
If you have included an optional step in your combi exhibition configuration, the customer will have the option to skip (1) this step without selecting any of the presented options.
If you have configured any optional articles on the level of a combi-exhibition ticket, the articles will be available for selection after completing the selection for the last step.
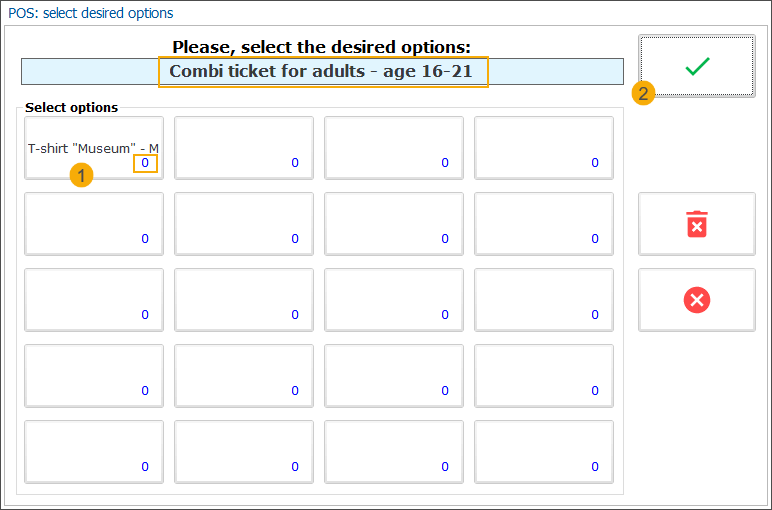
Specify the number of articles the customer wants to include or leave 0 if the customer does not wish to include any optional articles (1). Then click the green checkmark (2) to confirm the choice.
Bearbeiten Sie die Zahlung und drucken Sie die Tickets aus.
In der Bestellübersicht (1) können Sie die Ausstellungen in chronologischer Reihenfolge und die automatisch verkauften Artikel sehen. Sie können nur die gesamte Kombiausstellung löschen, nicht die einzelnen Teile (2).
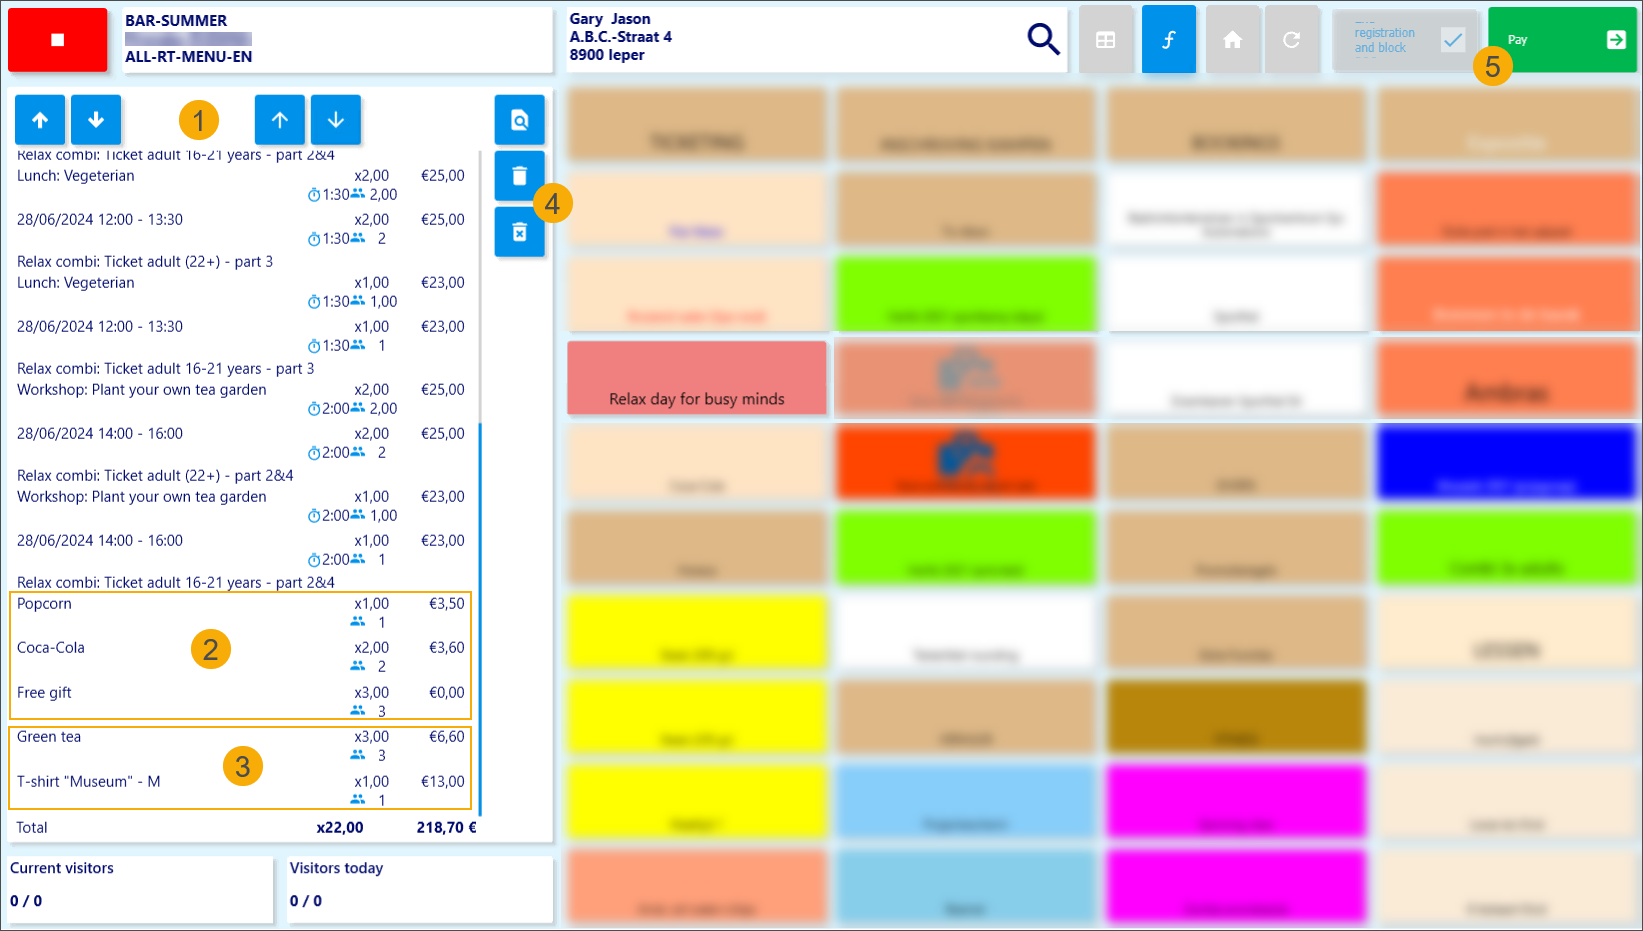
Klicken Sie auf Bezahlen (3) und folgen Sie dem Zahlungsablauf, um die Bestellung abzuschließen.
Die chronologische Reihenfolge der Ausstellungen wird ebenfalls auf dem Beleg festgehalten.
Je nach Konfiguration können Sie für jeden Teil der Kombiausstellung eine eigene Eintrittsticket/Strichcode generieren oder die Tickets zu einem Ticket pro Besucher zusammenfassen, z. B.:
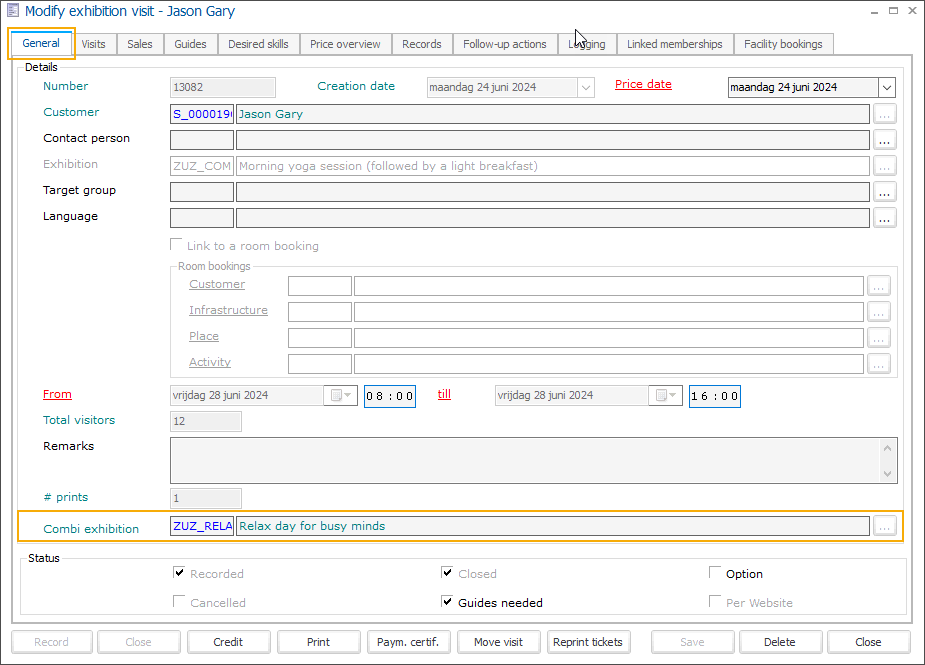
Im Backoffice wurde auf der Ebene des Ausstellungsbesuchs (Registerkarte Allgemeines) ein neues Feld Kombiausstellung hinzugefügt, um anzuzeigen, dass der Besuch Teil einer Kombiausstellung ist.
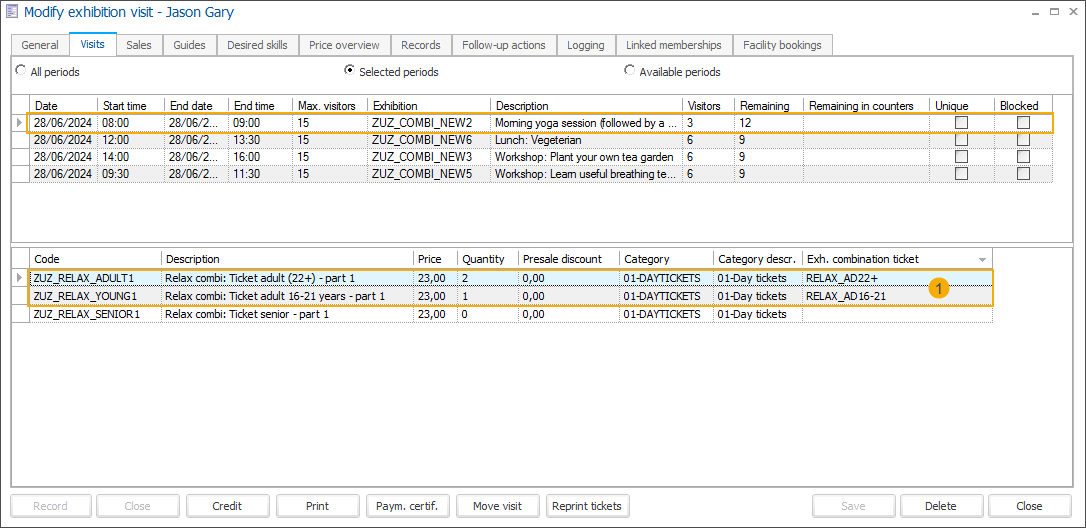
In der Registerkarte Besuche können Sie alle Tickets pro Ausstellungsbesuch sehen. Ein Kombiticket hat zusätzliche Informationen in einer separaten Spalte , z. B. Kombiticket (1).
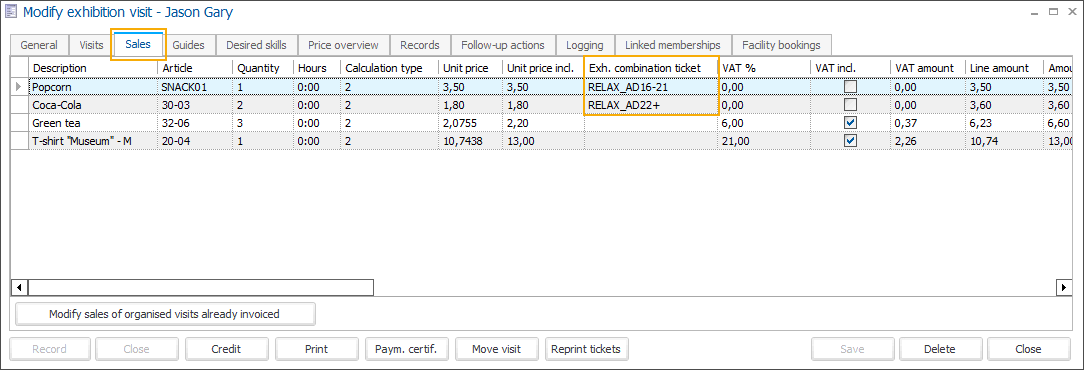
Alle automatisch verkauften Artikel sind in der Registerkarte Verkäufe sichtbar und haben zusätzliche Informationen in einer separaten Spalte Ausstellungskombiticket, wenn sie Teil eines Kombitickets sind.
Sell combi exhibition tickets on the Webshop
Next to Recreatex backoffice and POS, combi exhibition tickets can now also be sold on the Webshop.
To set up this functionality correctly, make sure the following configuration has been completed:
Backoffice configuration
Make sure the exhibitions included in the combi exhibition are available on the Webshop: Modify exhibition screen > tab Web > setting Show on Website.
Create and configure your combi exhibitions and the related tickets in Recreatex backoffice. See Ausstellungen: Kombitickets für mehrere Ausstellungsbesuche for detailed steps.
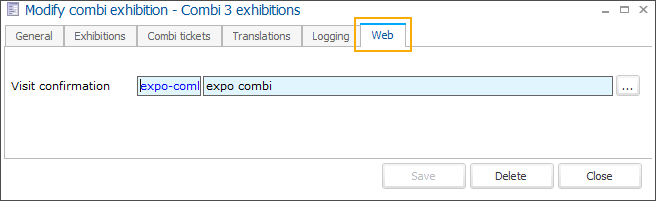
Additionally, select a visit confirmation template under the tab Web in the Modify combi exhibition screen.
Webshop configuration
To make the combi exhibitions available for Webshop customers enable the following settings in the Webshop Manager application, under Exhibitions > Settings:
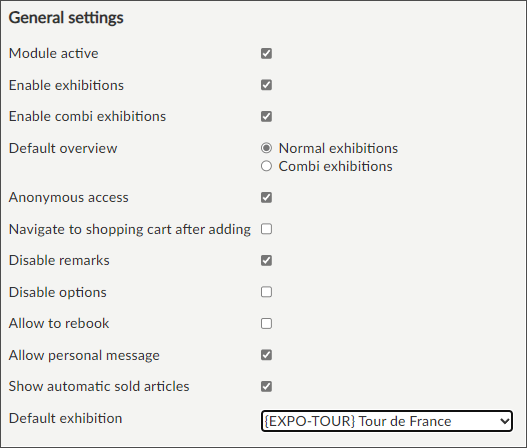
Enable combi exhibitions | Combi exhibitions will become available in a separate section in the module Exhibitions and in My Exhibitions (History and overviews). |
Default overview | If you display the combi exhibitions next to your regular exhibitions, you can choose which overview should be opened by default when a customer enters the Exhibitions module.
|
Combi tickets ordering flow
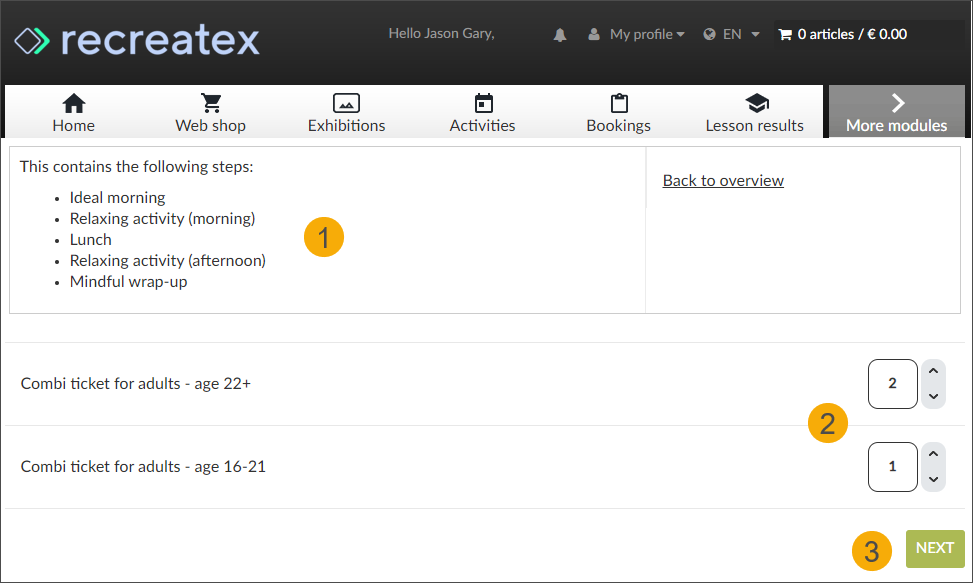
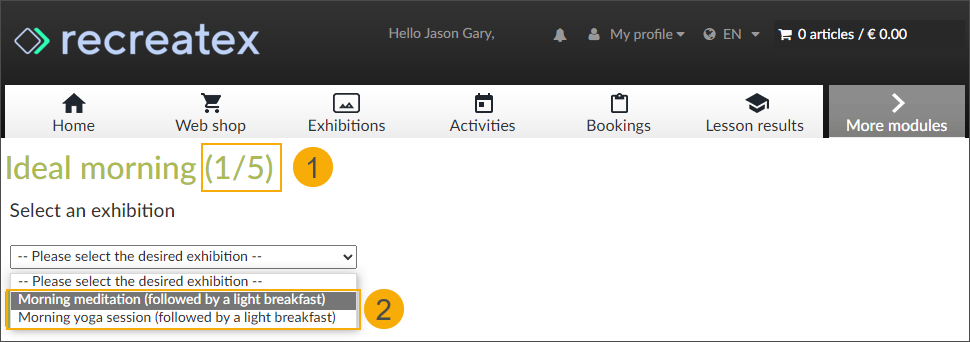
In the module Exhibitions, go to Combi exhibitions and select the desired combi exhibition. Our example is a combi exhibition consisting of 3 parts.

On the ticket selection screen, you can see the overview of all the steps included in this combi exhibition (1). Select the type and number of tickets (2) and click Next (3).
Anmerkung
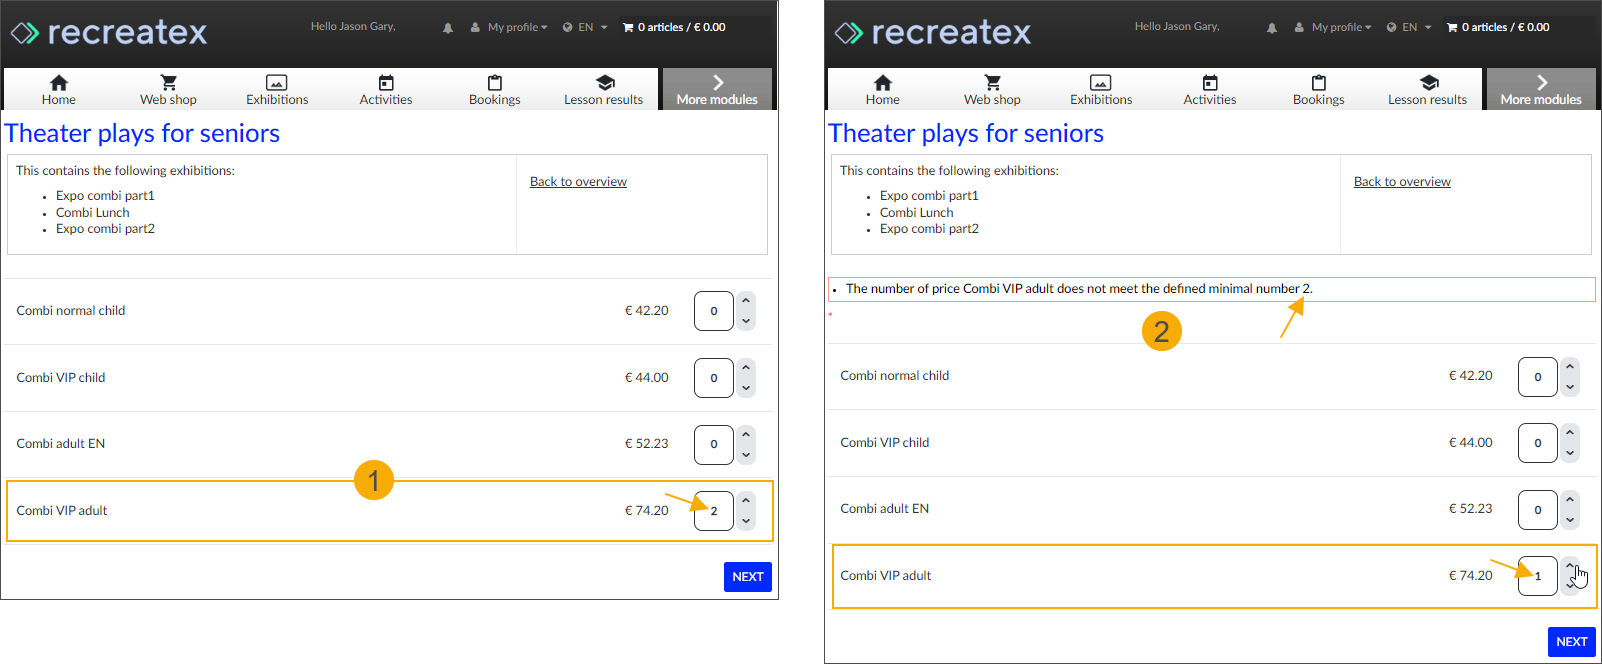
If you have configured a minimum number of tickets that must be purchased, defined by the setting Min. number of sales (Combi exhibition ticket > tab General) for any of the ticket types, the behaviour on the Webshop will further depend on the setting Mandatory to buy at least the minimum quantity (web):
If checked: The minimum amount of tickets to purchase is mandatory, meaning that the minimum number of tickets is preselected and cannot be reduced.
The minimum number of tickets of this type will thus automatically be included in each ticket purchase for this combi exhibition.
If unchecked: The minimum amount of tickets to purchase is mandatory on the Webshop if a customer chooses to purchase tickets of this type.
The number of tickets can be selected but if lower than the required number, a blocking message is displayed.
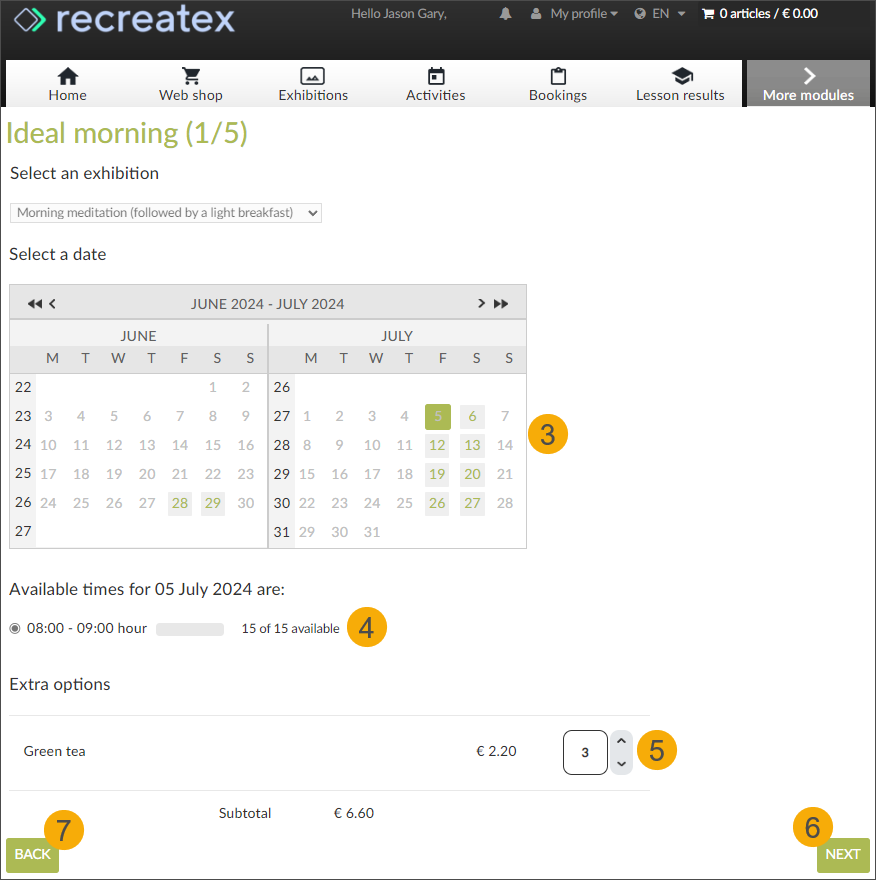
You will be guided through the steps of the combi exhibition one by one (1). Select 1 exhibition from the list of options (per step) (2).
The next selection screen will open automatically. Pick the date (3) and an available timeslot (4). If optional articles (5) are configured for this exhibition, you can select them here as well.
Click Next (6), to continue to the next step.
Click Back (7), to return 1 step back. If you want to adjust the number of tickets, depending on how far you are in the ordering flow, you may need to click the button several times to return to the ticket selection screen.
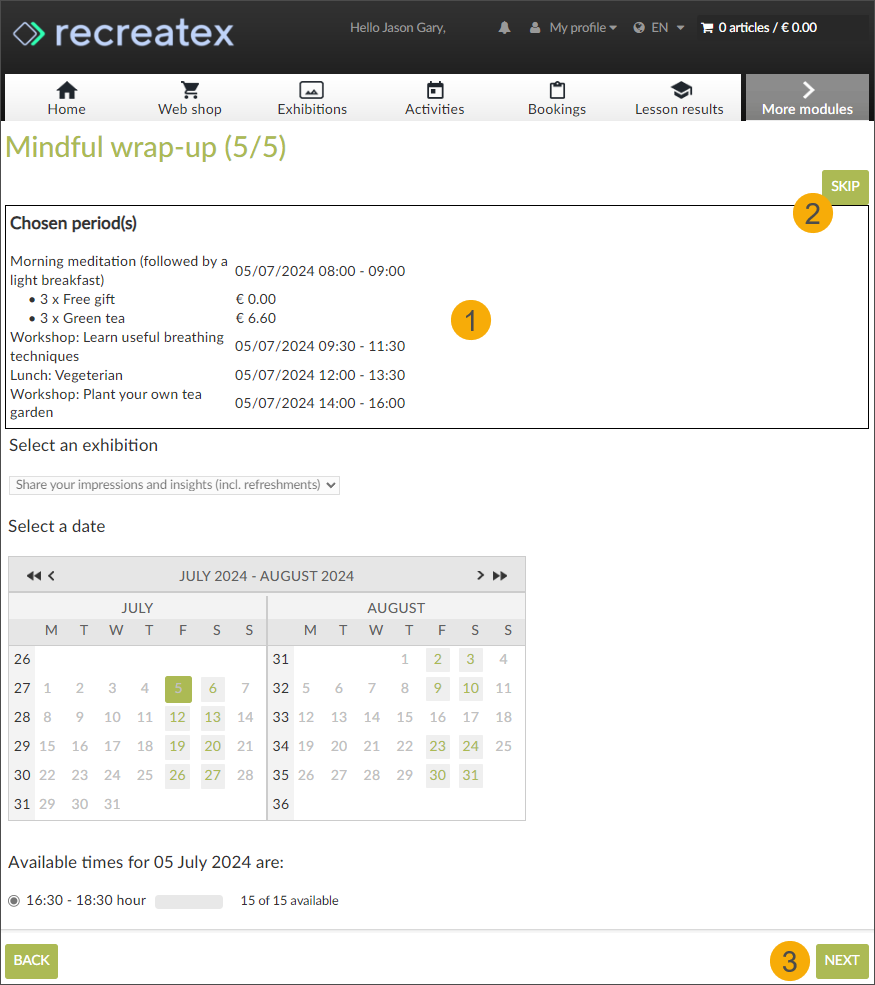
After each step, your selection is added to the overview at the top of the screen (1) and visualized on each subsequent screen. If there is an optional step included, you will see the option to skip the step entirely (2), without making a selection. Click Next (3) to continue.
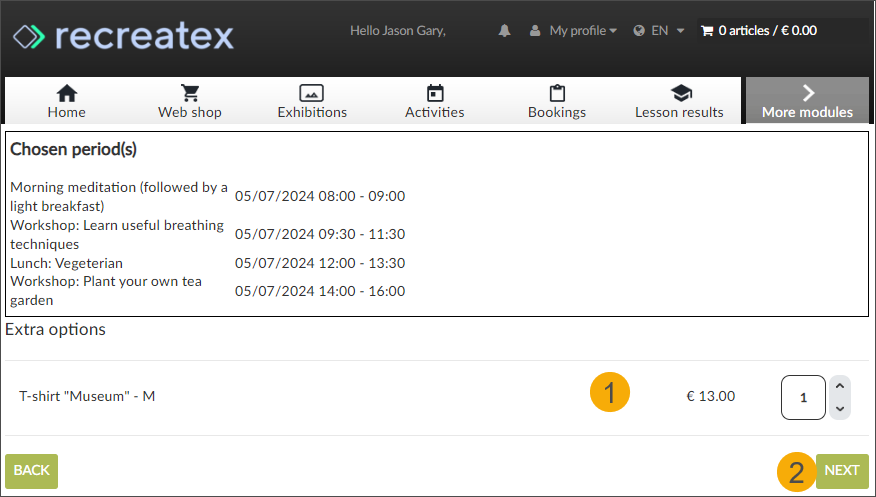
After completing your selection for the last step, you can select optional articles (1) that have been configured on the combi-ticket level. Click Next (2) to finalise your order.
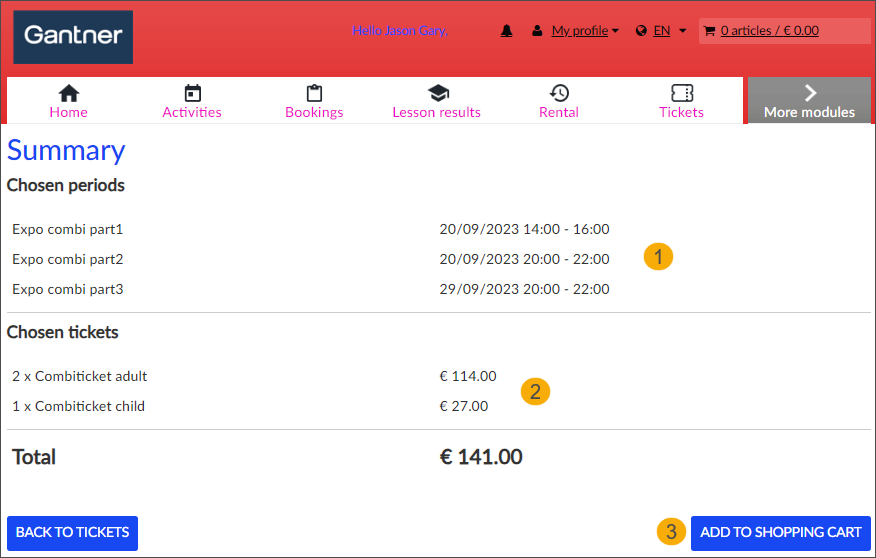
In the Summary, you can see the overview of all selected timeslots (1), including the automatic and optional articles that have been selected per exhibition (2). Further, you can see all selected tickets and their prices (3), including the automatic and optional articles selected on the combi-ticket level and a the bottom, the total price of your order (5).
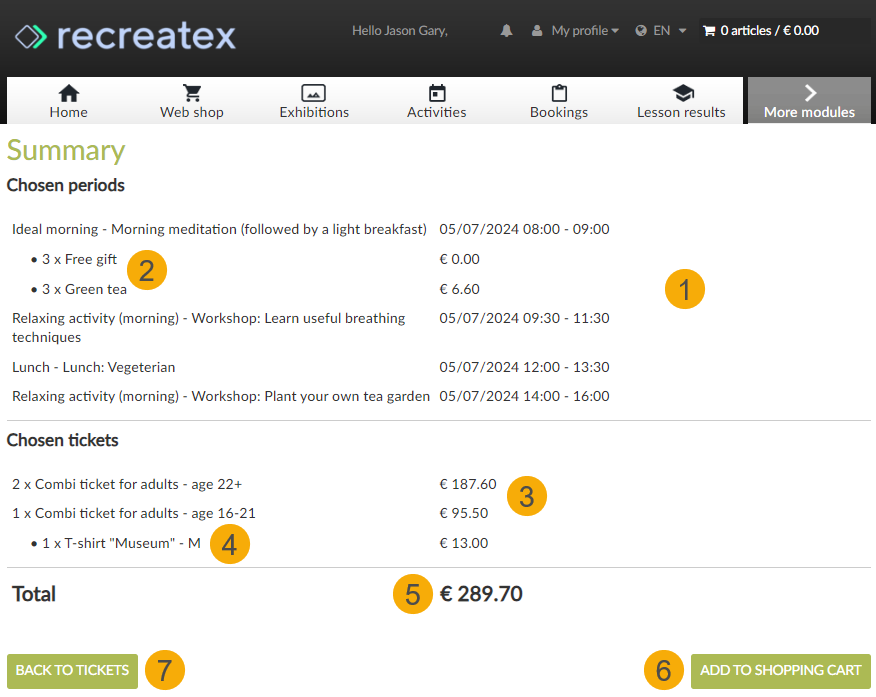
Click Add to shopping cart (5) and follow the checkout flow to pay and receive your tickets.
Click Back to tickets (6) to return to the ticket selection screen and restart the ordering flow.
Combi tickets overview
When buying exhibition tickets on the Webshop your tickets are available immediately after the successful payment on the Confirmation page and in your email.
However, if you need to retrieve your tickets later for any reason or check the details of your order, you can always find this information under My profile > History and overviews > My Exhibitions > Combi exhibitions (1).
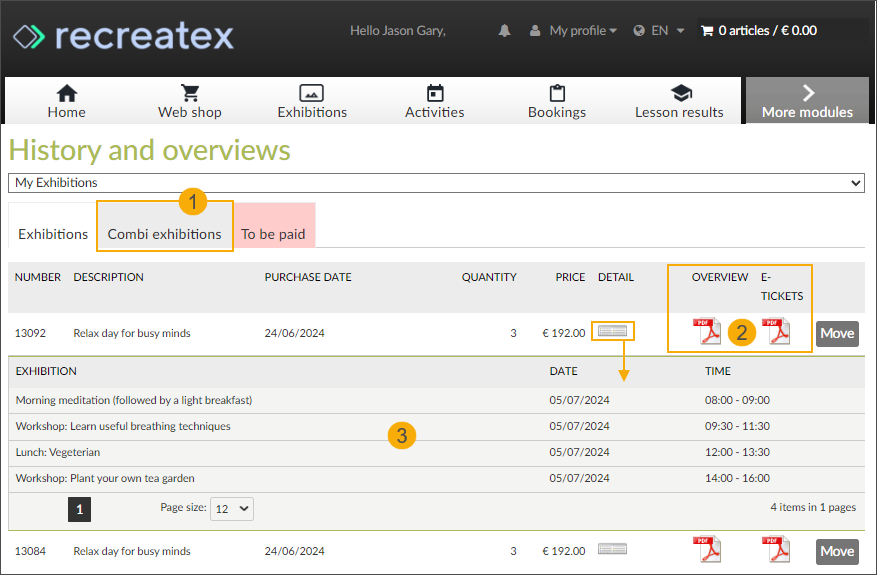
Download your order confirmation and the e-tickets in PDF format (2). Note, that the columns Overview and E-tickets are only visible if activated (History settings: Show e-Tickets in history and Show booking certificate in history).
Click the icon in the column Details to expand a handy overview of the date and timeslot of each exhibition (3).
Kombiausstellungsbesuch verschieben – Backoffice
Sie können den gesamten Ausstellungsbesuch oder Teile davon auf Wunsch in ein anderes Zeitfenster verschieben.
Wichtig
Make sure that the logged-in employee is allowed to modify an exhibition period.
Go to General > Basic data > Employees > Employees > open the detail screen of the employee account and under the tab Exhibitions activate the setting Employee may modify the exhibition period in the exhibition calendar.
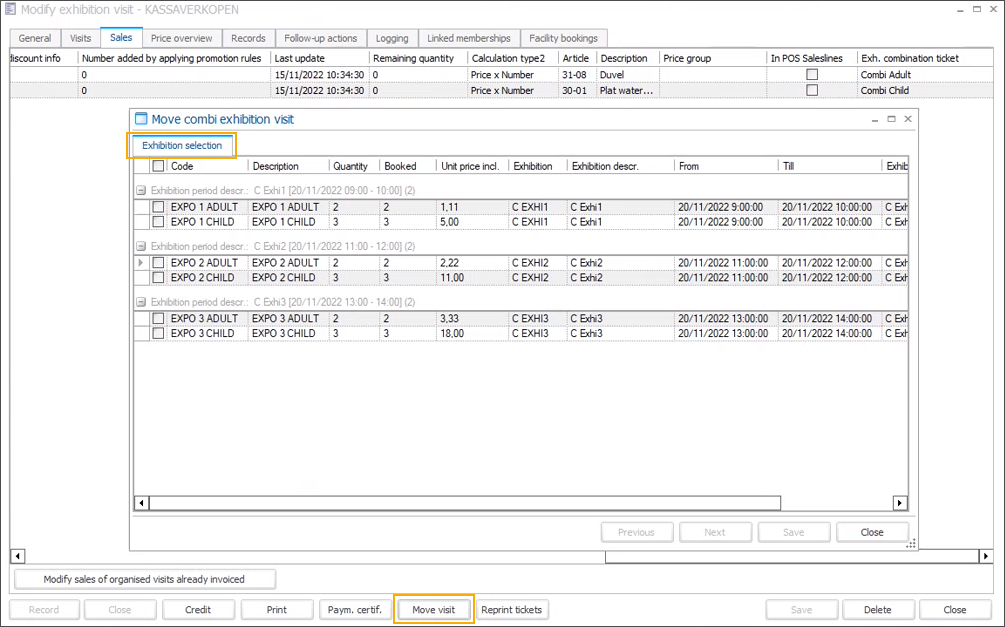
Gehen Sie zu Ausstellungen > Besuche und suchen Sie Ihren Kombiausstellungsbesuch.
Klicken Sie auf dem Bildschirm Ausstellungsbesuch ändern unten auf Besuch verschieben, um das Fenster Kombiausstellungsbesuch verschieben zu öffnen.
In der Registerkarte Ausstellunggauswahl sind die Tickets nach Ausstellungszeitfenster gruppiert.
Wählen Sie die Ausstellungszeitfenster aus, die Sie verschieben möchten:
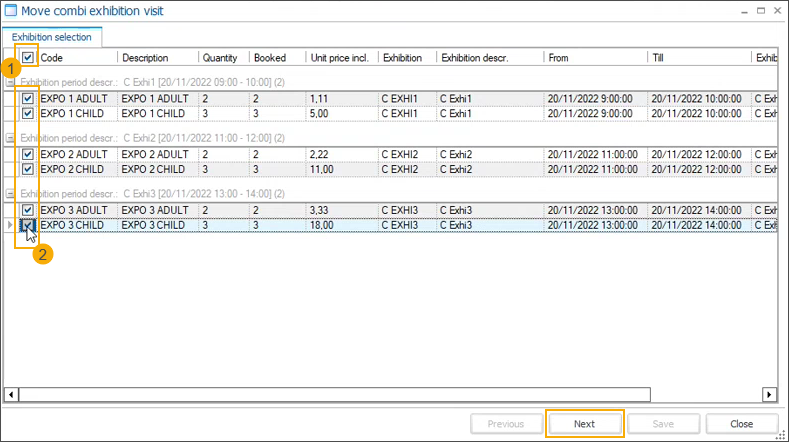
Alle Ausstellungszeitfenster verschieben: Markieren Sie das Kontrollkästchen in der Tabellenüberschrift (1), um alle Zeitfenster und die zugehörigen Tickets auf einmal auszuwählen.
Verschieben Sie einige Zeitfenster der Ausstellung: Wählen Sie ein Ticket pro Zeitfenster, das Sie verschieben möchten. Da es nicht möglich ist, einzelne Eintrittstickets zu verschieben, werden die restlichen Eintrittstickets für dieses bestimmte Zeitfenster automatisch ausgewählt. (2)
Klicken Sie auf Weiter, um fortzufahren.
In der Kalenderansicht werden die Zeitfenster je nach Status mit unterschiedlichen Farben markiert.
bestätigte Zeitfenster, die nicht verschoben werden (1)
zu verschiebende Zeitfenster (2)
verfügbare Zeitfenster (3)
ausgewählte neue Zeitfenster (4)
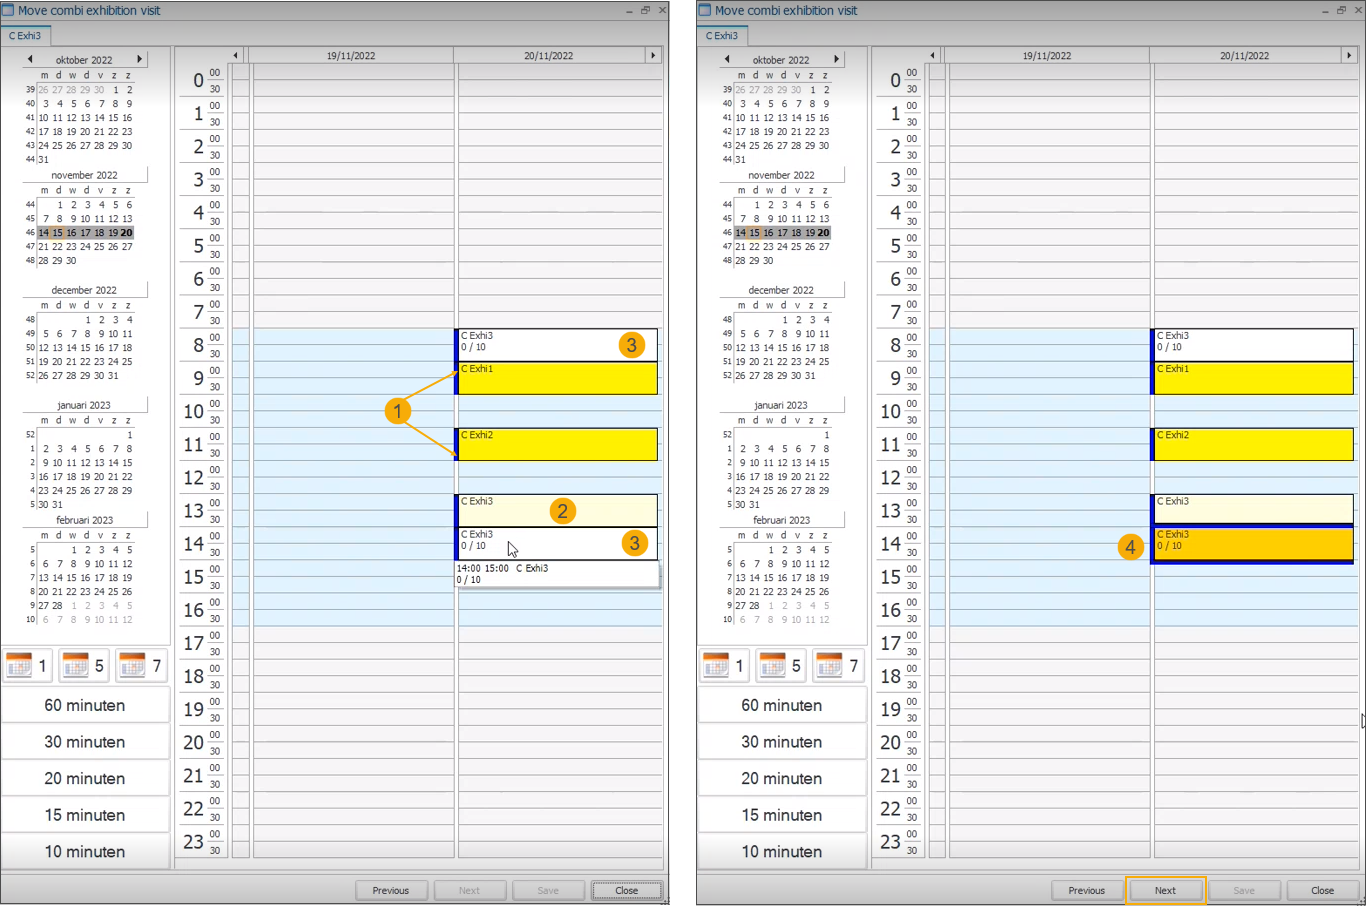
Wählen Sie neue Zeitfenster aus und klicken Sie auf Weiter, um fortzufahren.
In der Zusammenfassung können Sie sich einen Überblick über alle Änderungen verschaffen. Klicken Sie auf Speichern, um die neuen Ausstellungszeitfenster zu bestätigen.
Move combi-exhibition visit - Webshop
The customers can move the complete combi-exhibition visit or its parts to a different time slot online.
Wichtig
Make sure that the option Allow to rebook has been activated in Webshop Manager > Exhibitions > Settings > section General settings.
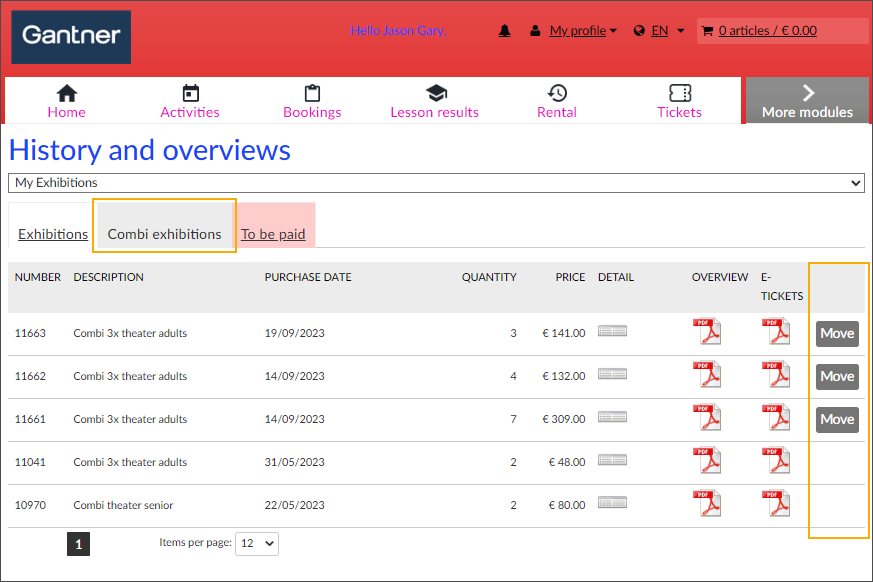
My Profile > History and overviews > select My Exhibitions > overview > tab Combi exhibitions.
If rebooking is still possible, there will be a Move button available next to each combi-exhibition visit that can be moved.
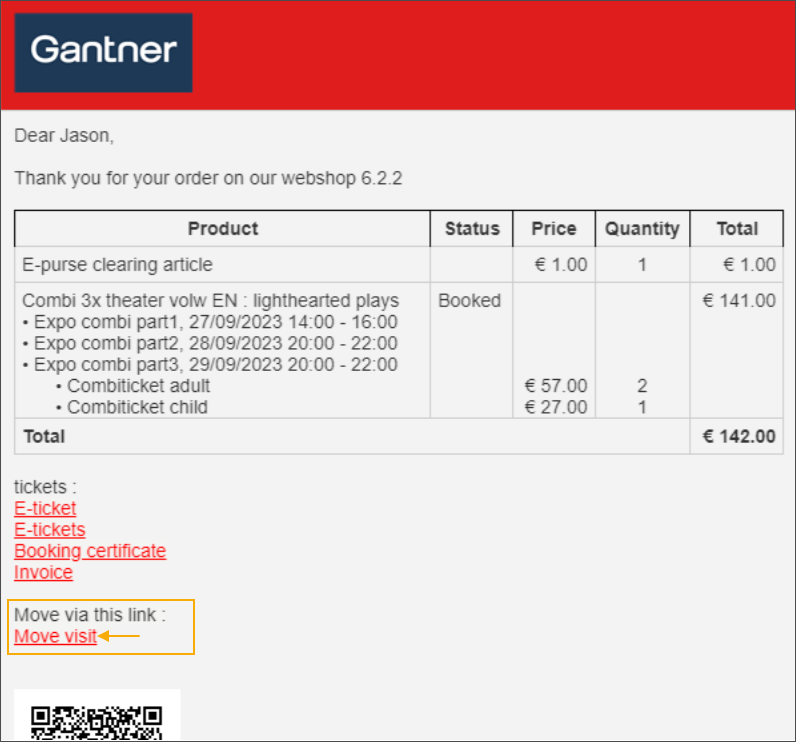
Customers can also use the rebooking link included in their original email confirmation to go directly to the rebooking flow on the Webshop.
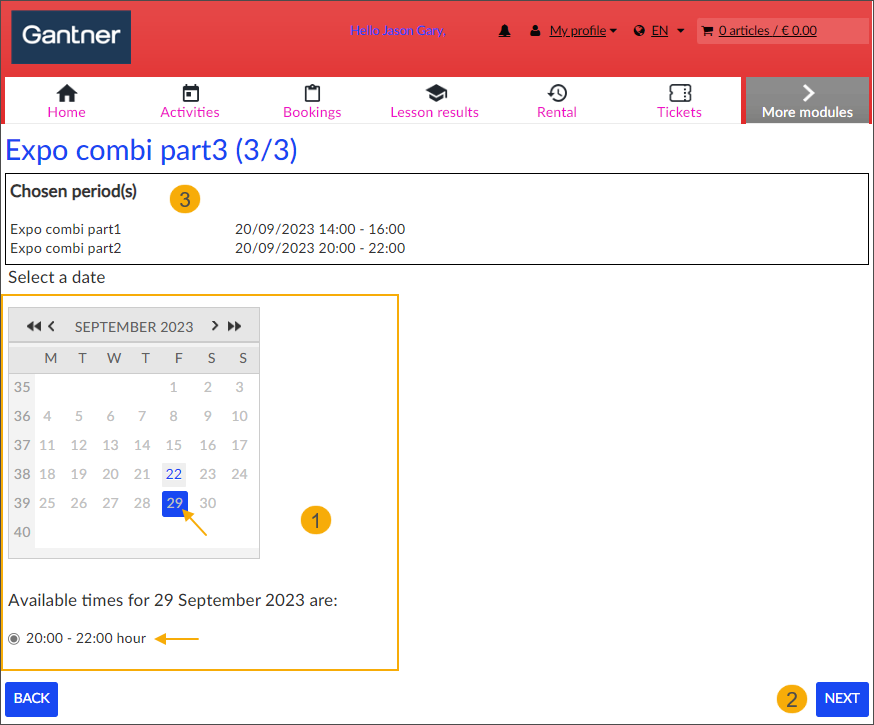
The rebooking flow is similar to the rebooking flow of regular exhibition visits. For each combi-exhibition visit customers can select a new date and timeslot from the available periods (1) and click Next (2).
Each new selection is visualised in the Chosen period(s) overview.
In the Summary customers can see the overview of the new selected timeslots and related ticket prices. Clicking the Add to shopping cart button (3) will trigger the price recalculation.
In the Shopping cart, customers can see the updated price which may include e.g. rebooking costs or additional charges for more expensive tickets.
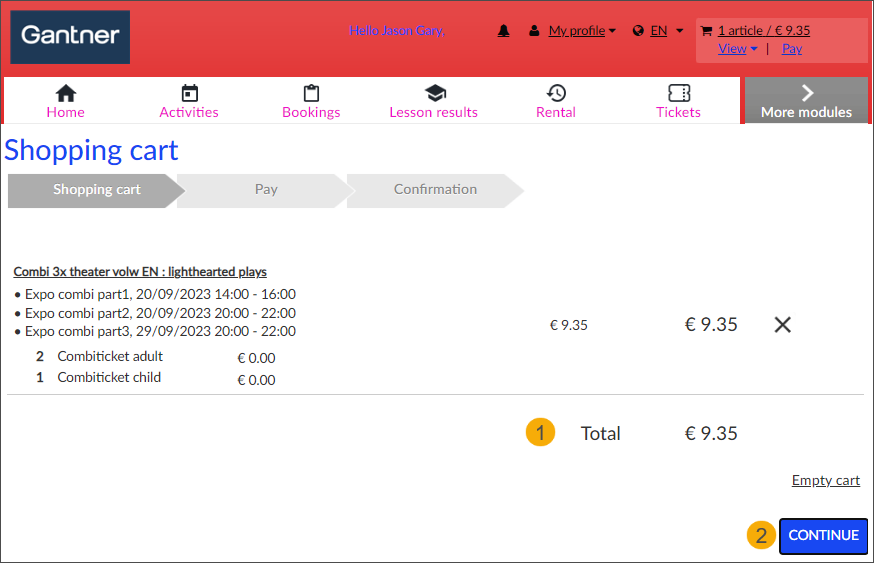
Clicking the Continue button will start the payment flow.
After successful payment, the customers will receive a new email confirmation with updated timeslots and e-tickets.