Registering sales
In principle, the procedure to register a sale on mPOS is as below:
In case of table sales, select an available table.
Select items and add them to the order basket.
Manage ordered items as confirmed or non-confirmed for billing.
Select the payment method and check out.
Note
When registering sales in mPOS for the first time, printing has to be configured. See further, Configuring printing.
Table sales (Horeca)
 |
The steps to registering table sales are:
2. Select items
4. Check out
Select a table
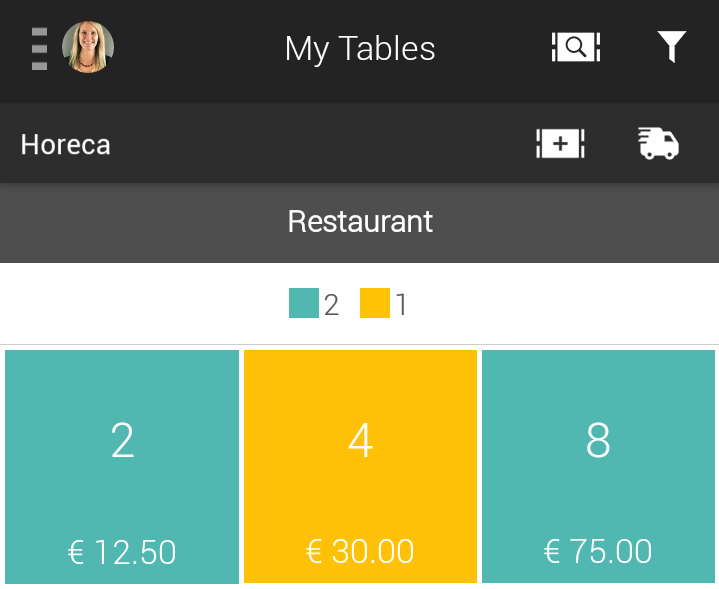
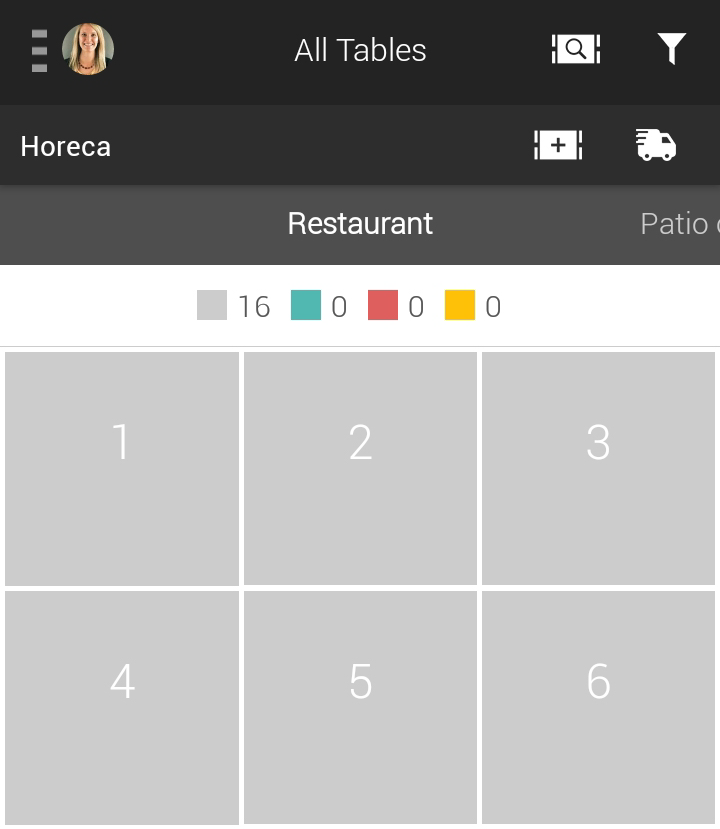
By default, when the user logs in for the first time, the table dashboard view is filtered for All Tables.
In order to change the default visualisation, you can apply the desired filtering options using the Filter button in the upper-right corner of the screen.
 |
For a more detailed description on the available filter options, see filter options.
Scroll through the table dashboard to look for a specific table number.
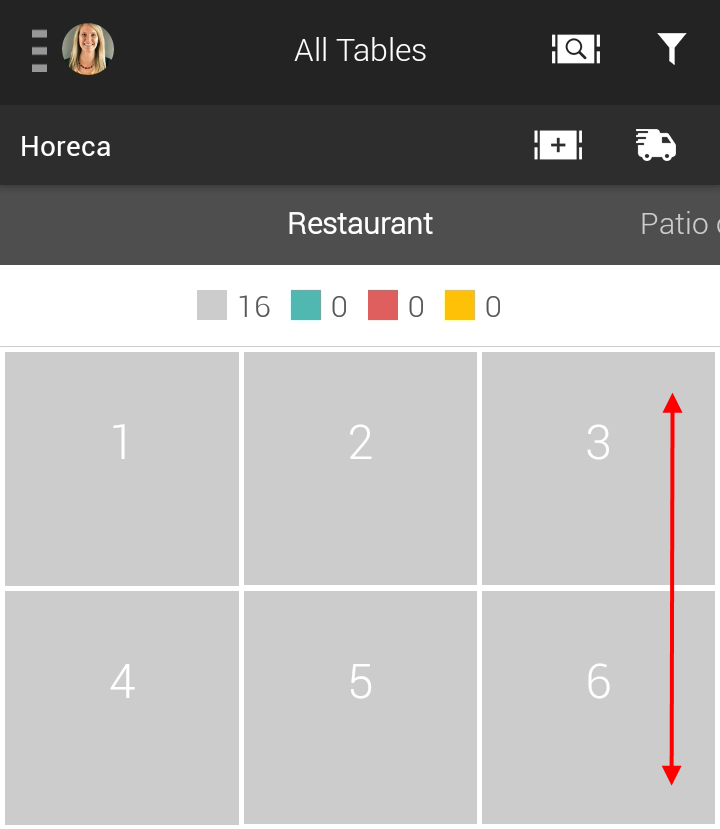 |
Note
It is possible to go directly to the desired table number.
Tap  and enter the desired table number in the resulting text box.
 |
For a more detailed description, see Jump to table.
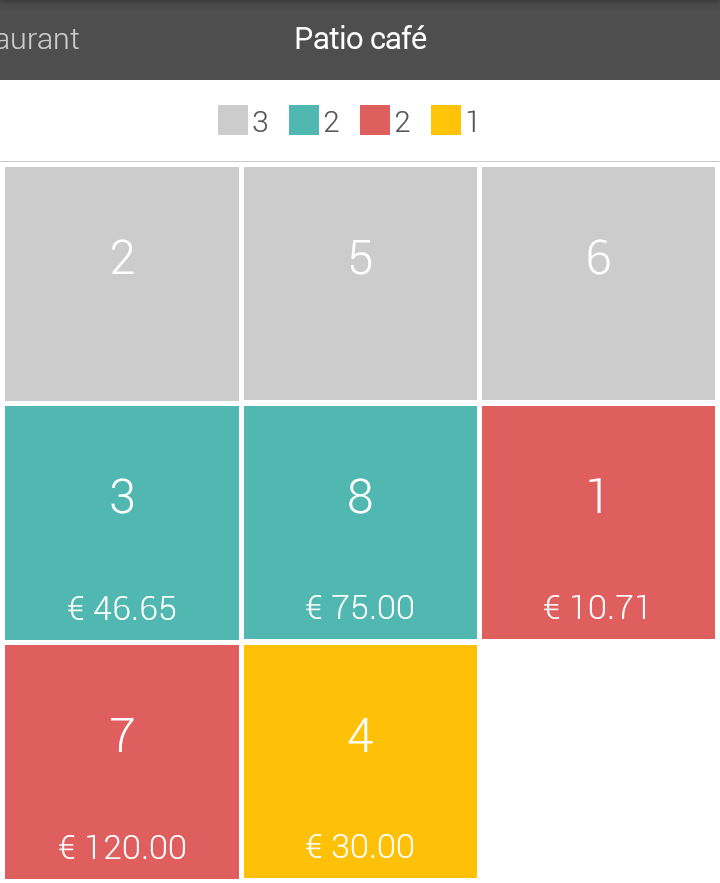
Swipe through the table dashboard to view and switch to the available rooms.
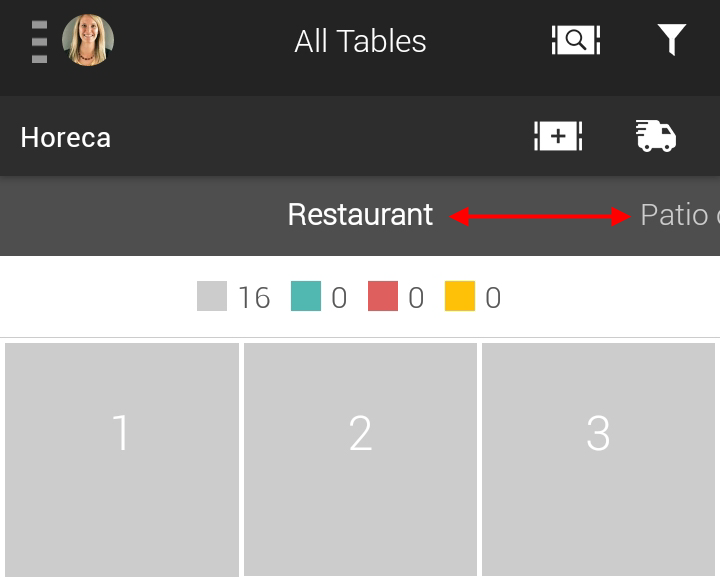 |
Note
If virtual tables are created for take away orders, a new room Virtual will be displayed, containing virtual tables (see create virtual table).
Select a table
Tapping on an available table (visualised in grey), transfers the user to the Categories screen for selecting order items.
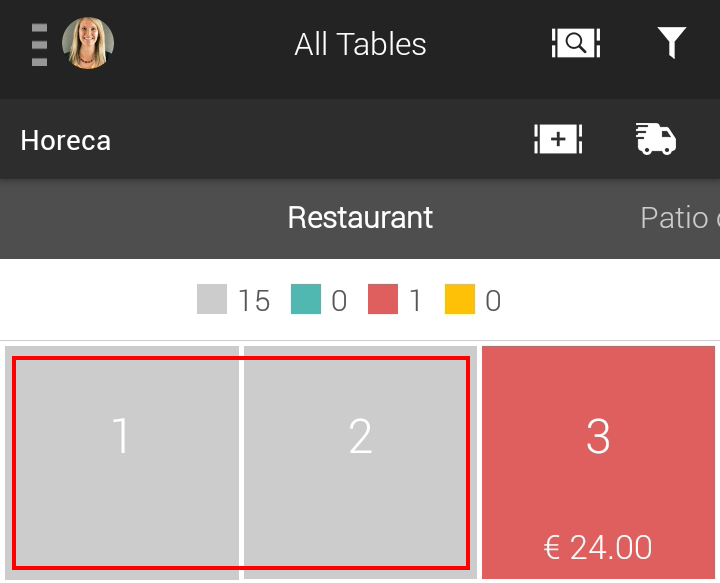 |
Note
Orders can be placed on available tables only. However, dependent on specific authorisation settings on employee level in the Recreatex desktop application, it is possible that an employee can modify orders and settle tables attended by other employees.
Consult table status
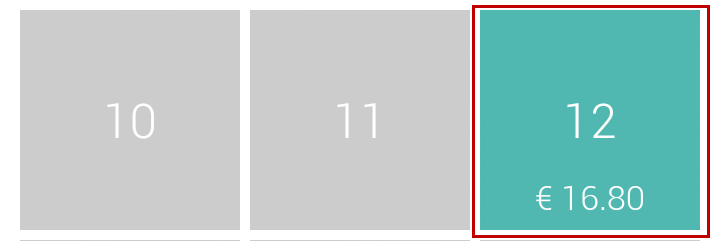
Colours are used to represent table status. Tap on the table legend for an explanation of what they mean.
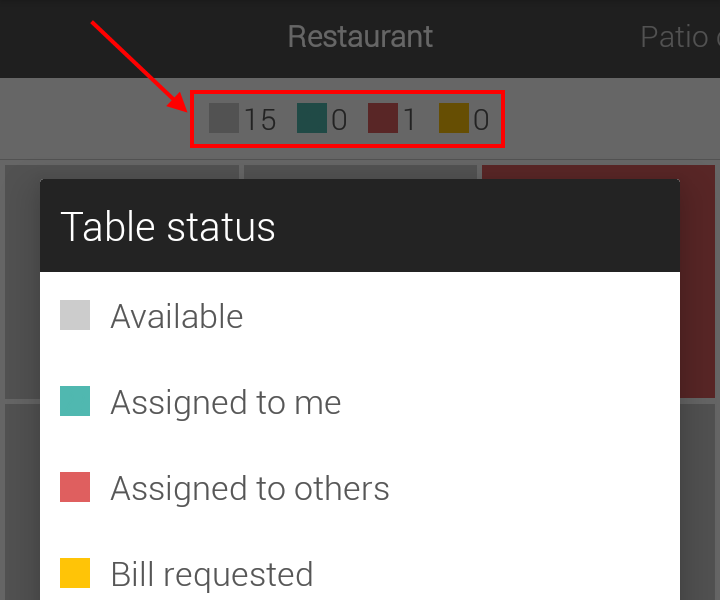 |
It is possible to customise the colours that represent table status. See the description of the setting Custom status colour in the section Table.
Consult customer's credit purchase
When on the table dashboard screen, it is possible to tap the customer's Recreatex membership card to consult his/her credit purchases. For this purpose, the device's NFC must be activated.
Modify table dashboard
It is possible to change the default behaviour and layout of the table dashboard by modifying the appropriate table settings.
Filter options
It is possible to filter the table dashboard view on the basis of tables attended by the user, table status and zones.
 |
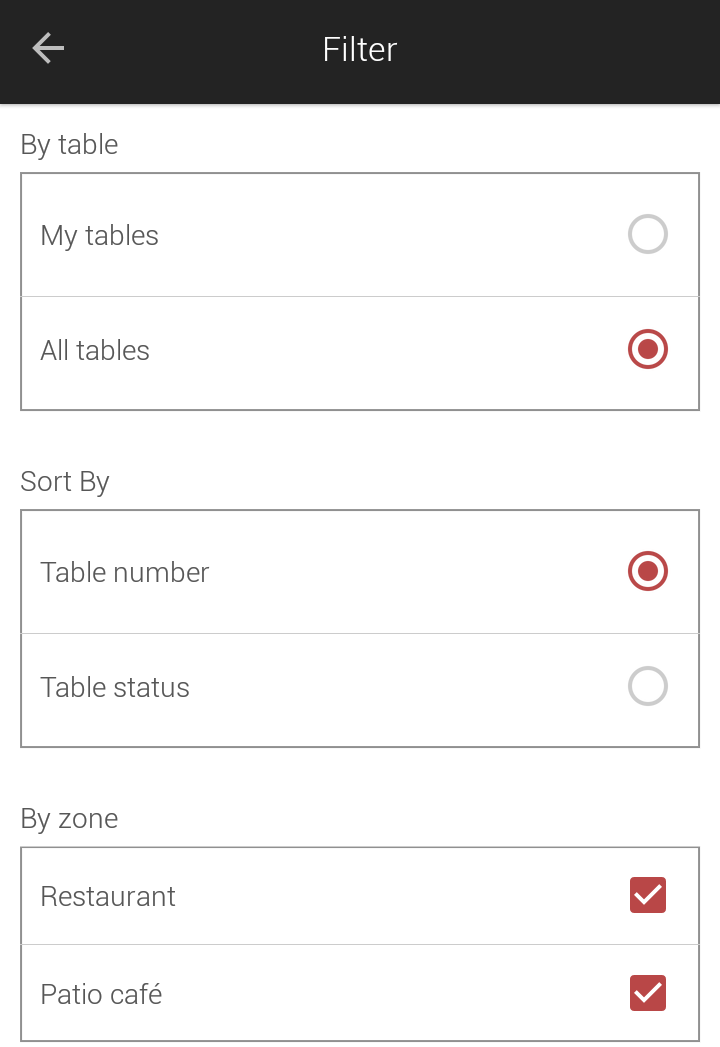 |
By table
My tables | If this option is active, only the tables served by the logged in user will be visualised on the table dashboard.
NoteIt is possible to enable the visualisation of available tables (tables on which no order is placed yet) along with My tables by activating the option Display available tables from Table settings. | |
All tables | If this option is active, all the tables will be visualised on the table dashboard, irrespective of the tables being assigned to the user. |
Sort by
Table number | This parameter displays tables as per their sequence number. | |
Table status | This parameter displays tables as per table status, instead of displaying them per sequence number.
|
By zone
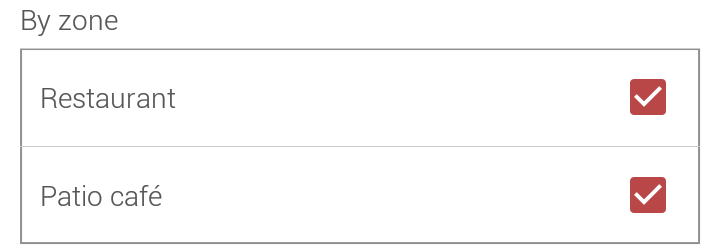
If the sales zone in use is configured with rooms (referred to as zones in the mPOS app) the user will be able to filter the table dashboard view per selected zones.
 |
 |
Note
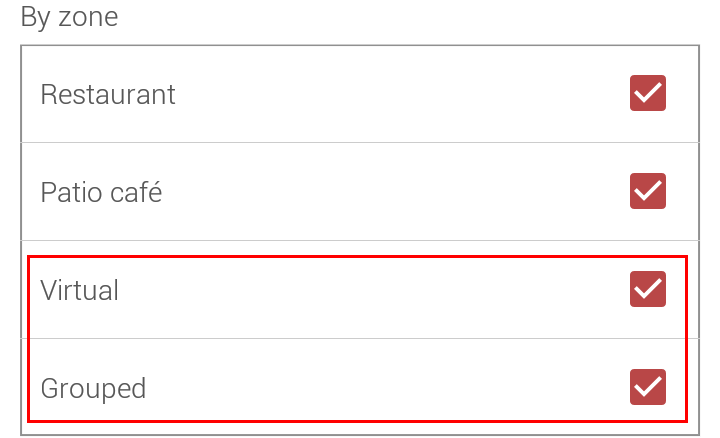
In case tables are grouped or virtual tables are used, the option Virtual and/or Grouped will be shown under By zone.
 |
Tap Continue to save the changes made.
Jump to table
It is possible to skip swiping through the tables on the dashboard and directly place an order on a desired table.
Tap  in the top panel of the table dashboard.
 |
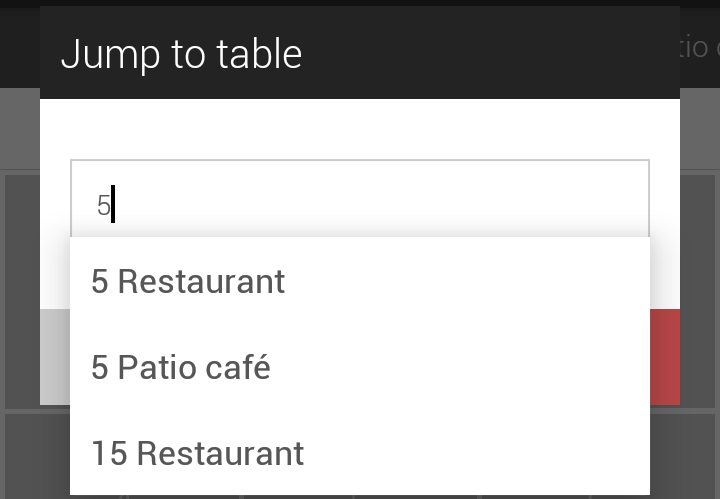
Enter the desired table number or name. A list of possible tables will be shown when typing in the text box.
 |
Tap Jump.
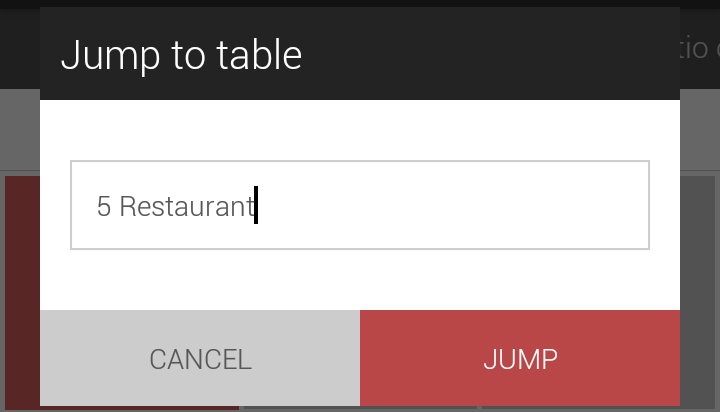 |
The user will be transferred to the Categories screen to place an order for the selected table.
Note
It is possible to define Jump to table as the default way of table selection.
Go to Settings > Table and activate the option Table number entry. On the table dashboard, the user will be prompted to enter the table number or name.
Create virtual table
Virtual tables are temporary tables created for orders that do not have to be served on a table, for example, orders for dine-out.
Tap
 in the top panel of the table dashboard screen.
Enter a description for creating a virtual table and tap Create.
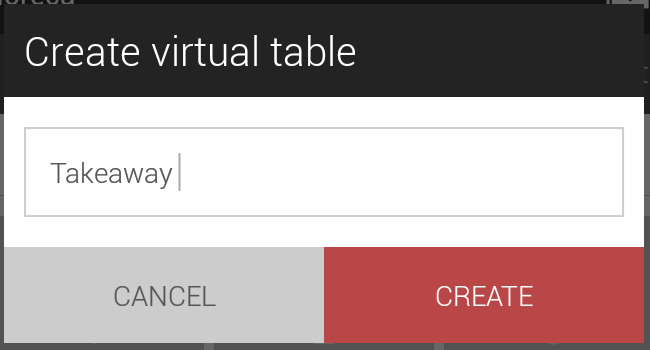
In case the app setting Display table name (Settings > Table) is activated, the description text will be visualised as the table name.
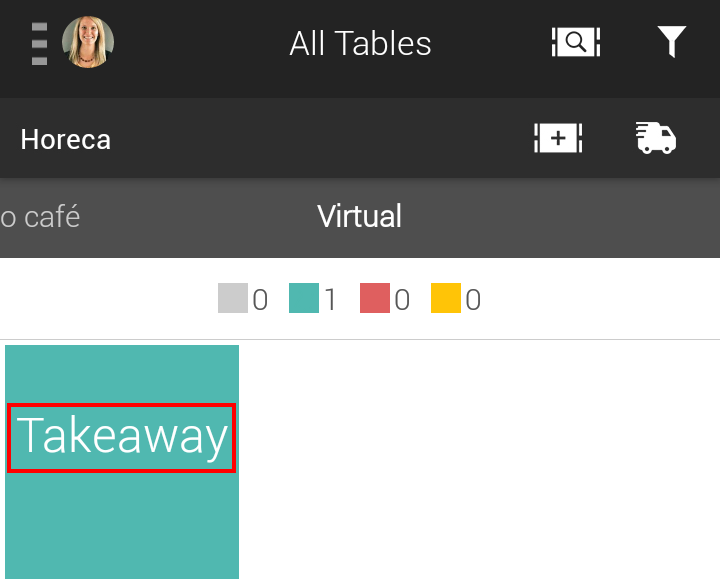 |
Virtual tables can be managed from the tab Virtual.
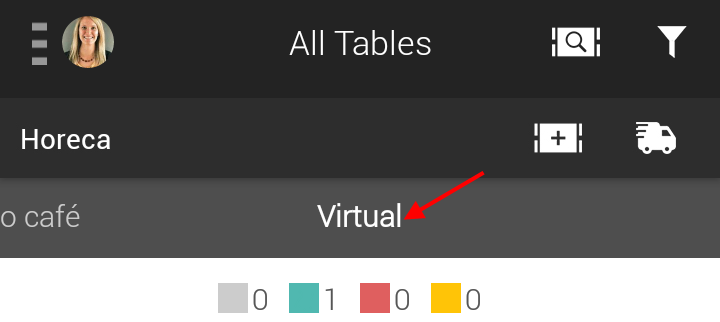 |
It is possible to show/hide the tab displaying virtual tables using the filter  button in the top panel of the table dashboard screen. See further, By zone on Filter options.
A virtual table will automatically be deleted after checkout.
Available quick actions
It is possible to access the quick action options from the table dashboard, the Categories screen and the Basket screen.
Note
The quick action options vary depending on the status of the table and the screen from which it is accessed.
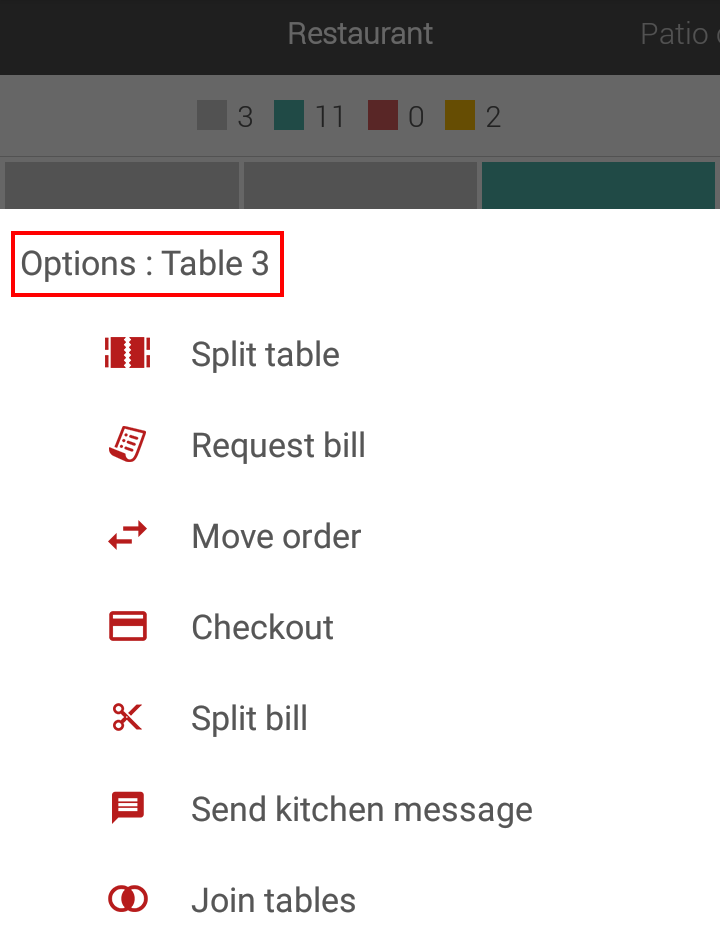
Table dashboard | Press and hold a table to access the quick action options.
| ||
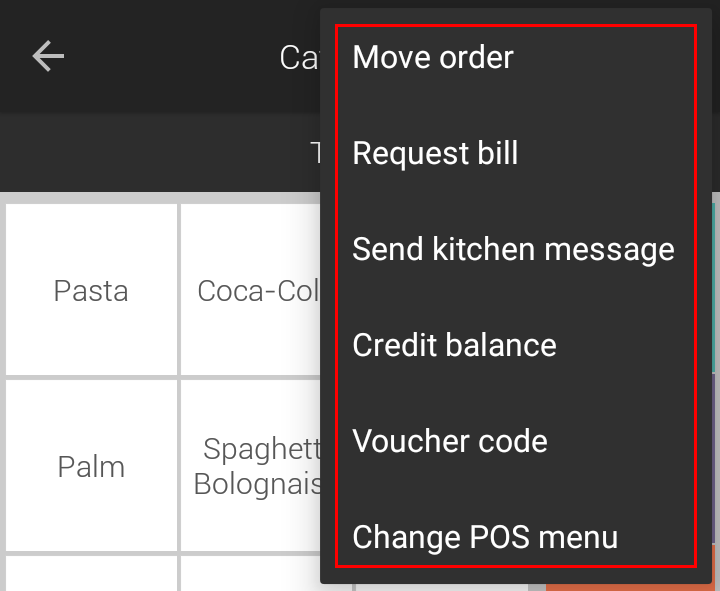
Categories screen | On the Categories screen, tap
| ||
Basket screen | On the Basket screen, tap
|
Quick action options
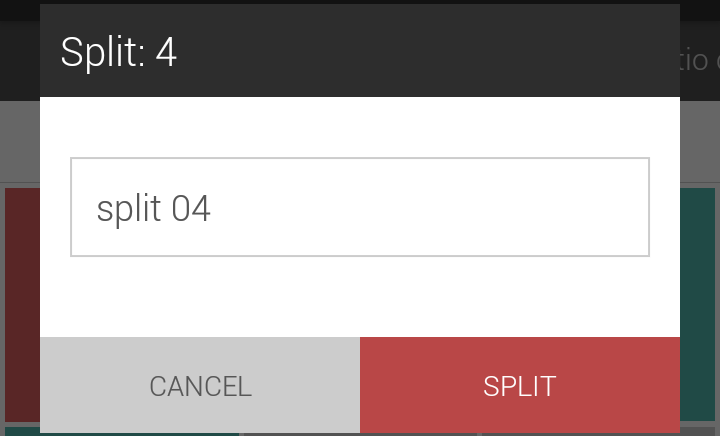
Split table | It is possible to create multiple child tables for a table (except for a virtual table) on the dashboard. The user will be prompted to enter a description for splitting a table.
NoteIn case the app setting Display table name (Settings > Table) is activated, the description text will be visualised as the table name.
Tap Split to create a new child table. The child table will automatically be deleted after checkout. | |||
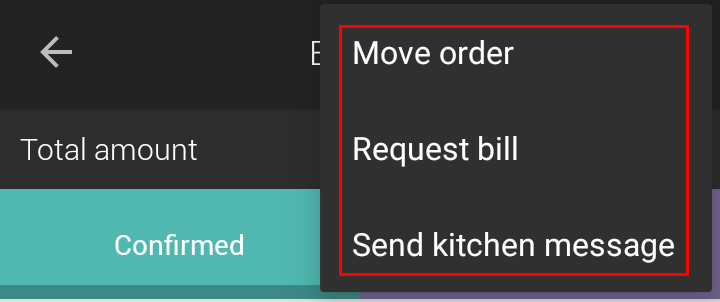
Request bill | This option is used to print an intermediate bill for a table. If a bill is requested for a table, the table colour will automatically be changed to yellow.
NoteA print will be generated from the printer defined for Request bill in Settings > Printer > Printing configuration. See further: Printer settings | |||
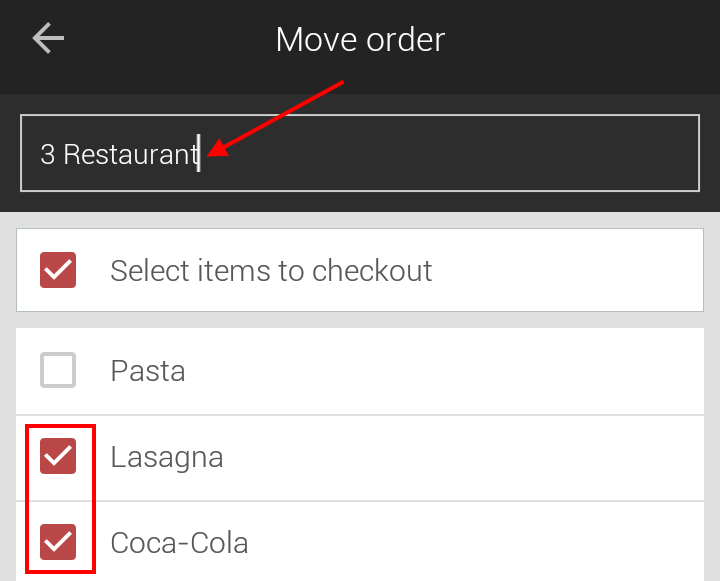
Move order | With this option, it is possible to move an order to another available table. The user will be navigated to the Move order screen. On this screen, the user can select the table as well as ordered items that are to be moved to the new table.
After confirming to move the order to another available table, the order will be shown on the new table. However, dependent on the employee permissions, it is possible to move the order to another occupied table as well.
| |||
Checkout | Tap Checkout to proceed with processing payment for the order on the table in question. | |||
Split bill | It is possible to make a payment for a bill in multiple parts with the split bill option (see split bill). | |||
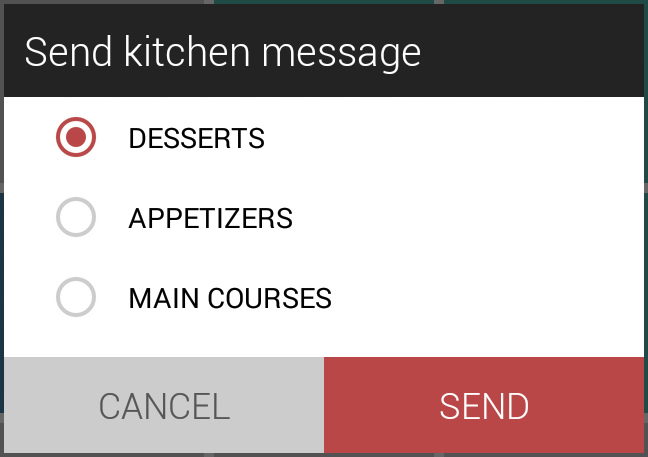
Send kitchen message | This option allows to send pre-defined messages to the kitchen.
NoteA print will be generated from the printer defined for Send kitchen message in Settings > Printer > Printing configuration. See further: Printer settings. | |||
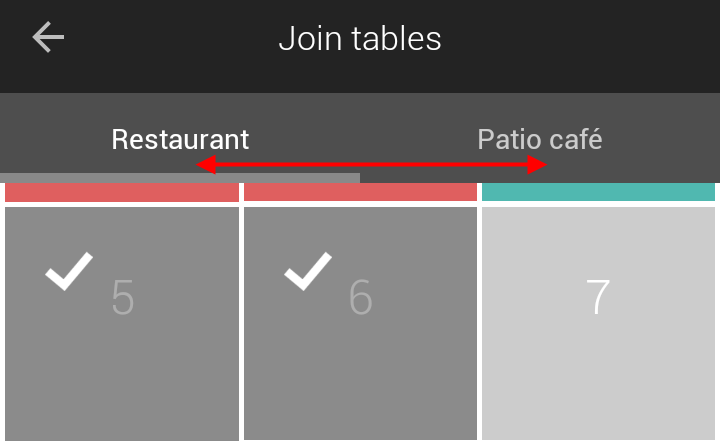
Join tables | It is possible to join two or more tables belonging to the same or different zones (visualised as tabs on the table dashboard). Tapping on Join tables transfers the user to a new screen for selecting the tables for grouping them. The primary table will be selected by default.
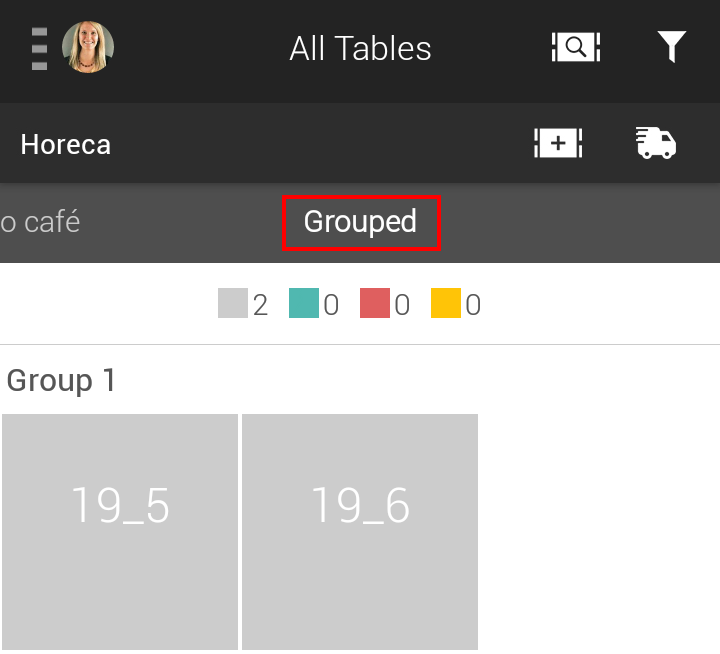
WarningThe user will be able to select tables from the zones that are activated from Filter options. However, virtual tables cannot be used for the purpose of joining tables. Tap Join tables to confirm the selection of the tables. The joined tables will be shown under the tab Grouped.
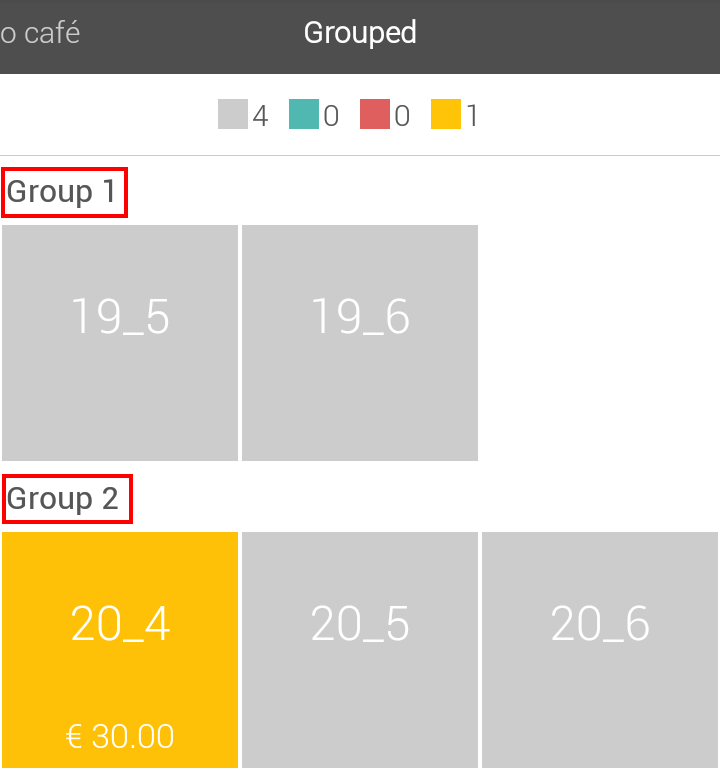
It is possible to create multiple groups by joining tables and register sales independently on each of them.
| |||
Disjoin tables | Press and hold a grouped table to bring up the quick action menu. Tap Disjoin tables to ungroup one or more tables from the group. NoteA joint table will automatically be deleted from the group after it is checked out. | |||
Delete table | The option to delete a table will be visualised for virtual tables or a child table created when splitting a table. | |||
Credit balance | This option allows to consult the credit order history of a customer. Refer Credit balance. | |||
Voucher code | This option allows to apply voucher code(s) to the sales. WarningFor an order, either a voucher code or discount code can be applied. | |||
Change POS menu | This option is available in the quick action options on the Categories screen. After selecting this option, a grid displaying available POS menus will be shown, wherein the POS menu currently in use will be highlighted.
Tap on the desired option to switch the POS menu. |
Select items
Tap on an item to select it for the order.
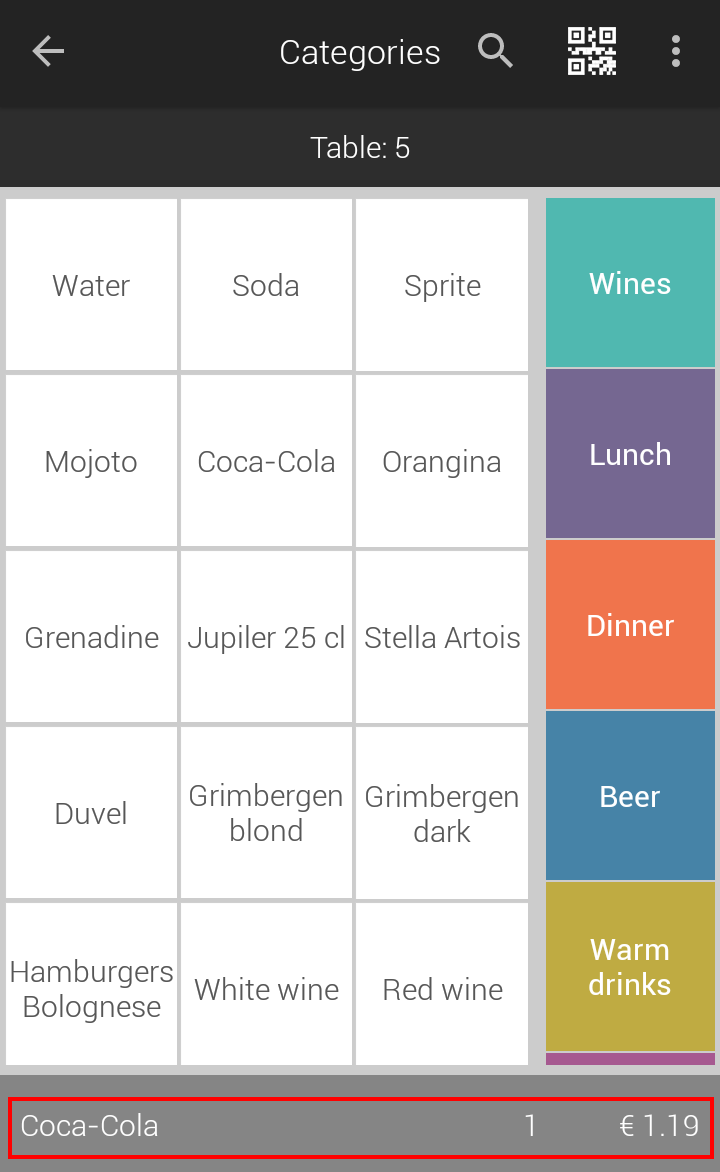 |
Note that every tap on the same item results in an increase in quantity by one.
 |
When you tap on another item, the count starts from one for that item.
Note
It is possible to enter the total quantity for an item at once. Long-press an item. In the resulting pop-up window, enter the total order quantity for that item.
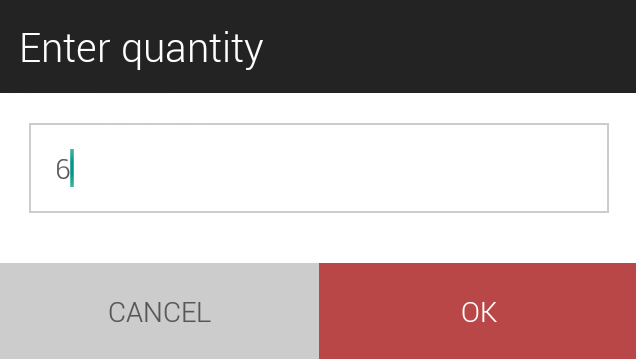 |
It is possible to enter a negative quantity. To do so, you will need to enter '-' before the item quantity.
Reduce quantity
To reduce the order quantity of the current item, tap  .
.
Notice that on every tap on  results in reducing the quantity by one.
Note
If GKS is activated for the point of sale in use, tapping  will create a negative line for that item.
 |
It is also possible to manage the order quantity from the Basket screen (see further Manage ordered items).
View or confirm the order
 |
To view the items added to the basket, tap  . The user will be transferred to the Non-confirmed tab on the Basket screen.
If all the selected items are confirmed for billing, tap  to move them under the Confirmed tab on the Basket screen.
Warning
If any of the ordered items is configured as Customer obligatory in the Recreatex desktop application, the user will be transferred to the Customer selection screen.
Select item with modifiers
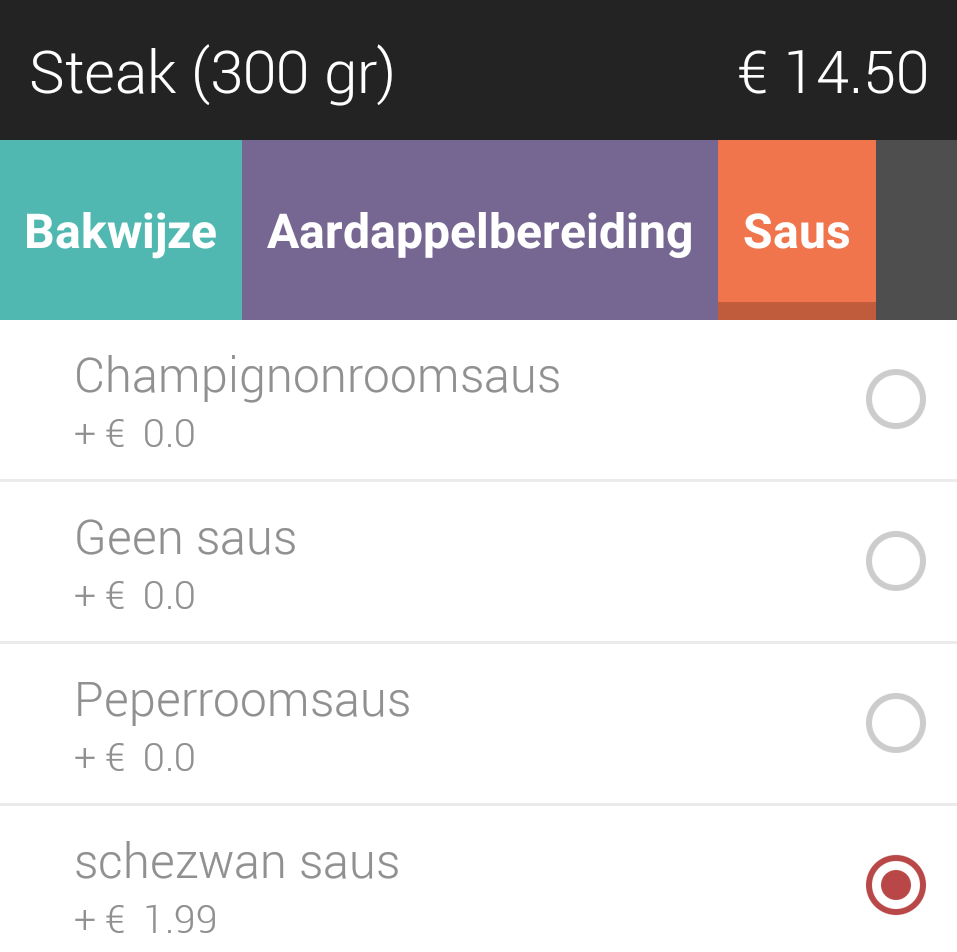
Modifiers are mainly used for catering purposes. Examples for a steak are hot sauces, dressings, etc.
If you select an item with modifiers, you will be able to choose the add-ons from the resulting screen.
 |
Note
When multiple quantities of an item with modifiers is selected (by a long-press on the item), the same modifiers will be selected for each of the ordered units.
Select items from subcategories
The coloured panel on the right indicates subcategories.
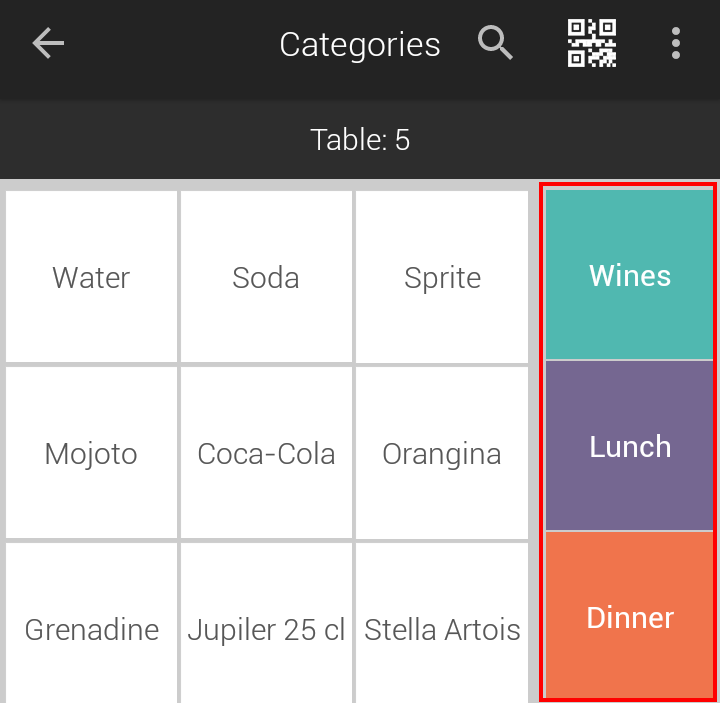 |
Tap on a category to consult the items within it and select items for placing an order.
 |
To return to the previous subcategory, tap  .
.
 |
To return to the main Categories screen, tap  .
.
Scan articles
It is possible to scan articles for registering sales on the mPOS app.
Tap
 in the top panel of the Categories screen.
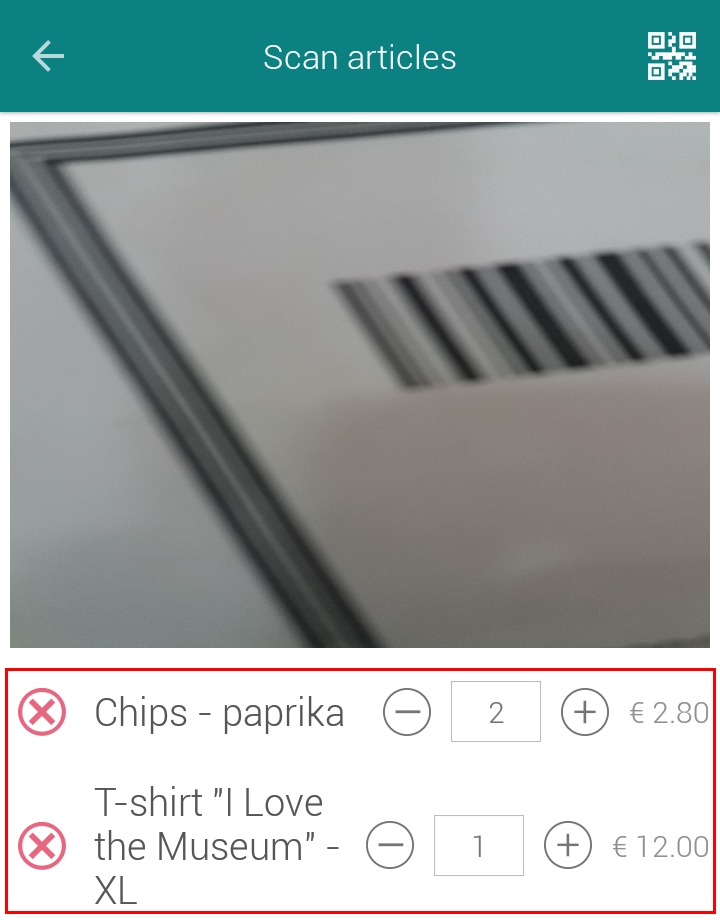
On the resulting screen, scan the article barcode or QR code. The scanned articles will appear on the screen.
Note
To manually enter the barcode number, tap
 to deactivate the device camera and enter the barcode number.
Tap
 to delete an article from the list of scanned articles or use the + and - buttons to manually manage article quantity.
Tap Continue to proceed with adding the scanned articles to the order basket.
See further: Confirm order
Switch POS menu
Selecting an item in another POS menu
It is possible that the item you are looking for is in another POS menu.
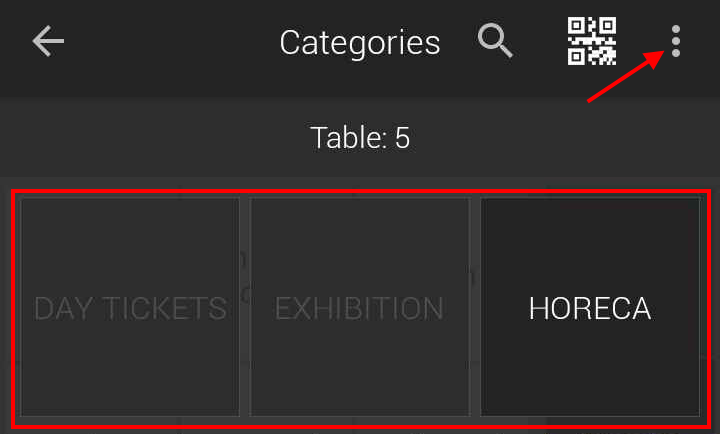
In that case, tap  in the upper-right corner of the Categories screen to open the quick action list.
 |
On the quick action list, tap Change POS menu.
A grid displaying available POS menus will be shown, wherein the POS menu currently in use will be highlighted.
 |
Tap on the desired option to switch the POS menu.
Search for an item
Tap  in the upper-right corner of the Categories screen, and enter the name of the item you want to find in the current POS menu.
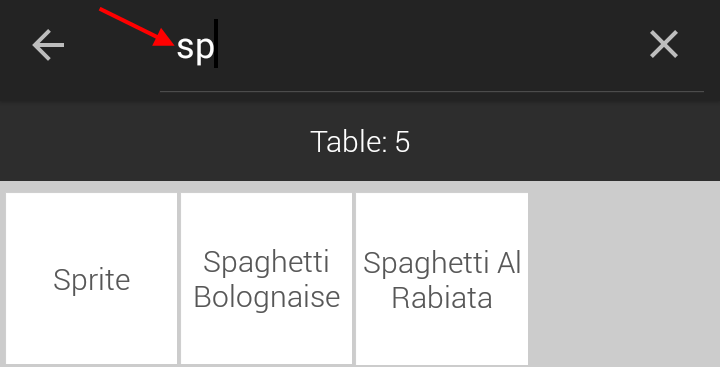 |
The menu items are immediately and automatically filtered while entering the search term(s).
Warning
The entered search term remains active until cleared. If you want to return to the display of all items, you will need to clear the search field.
Confirm order
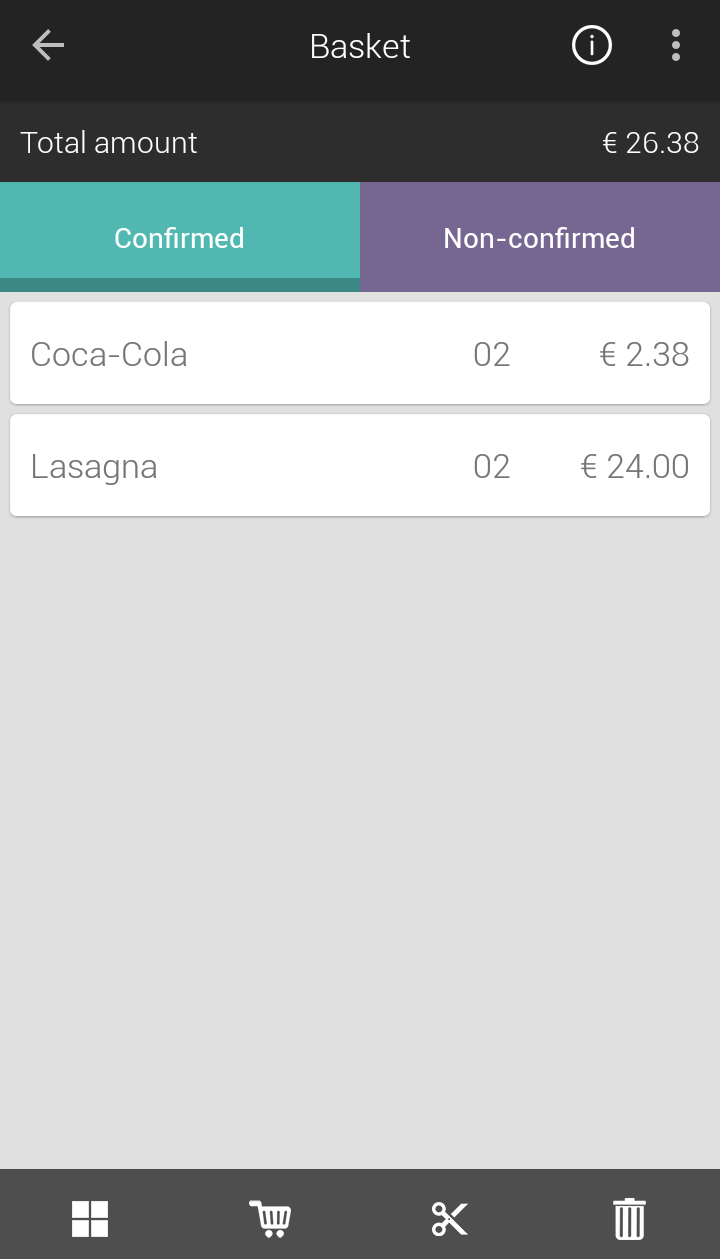 |
Confirmed | Items that are confirmed by the customer for billing will be shown under the tab Confirmed. |
Non-confirmed | Items that are not yet confirmed by the customer for billing will be shown under the tab Non-confirmed. If any of the ordered items is configured asCustomer obligatory in the Recreatex desktop application, the user will be transferred to the customer selection screen. NoteBy default, confirming an item transfers the user to the Table dashboard. It is possible to define the navigation from the parameter Settings > General > Navigate to. See General. Non-confirmed items can be moved to the Confirmed tab by tapping on |
Note
In case promotional rules are configured in the Recreatex desktop application (Sales > Promotion rules > Promotion rules overview), the promotional offer will automatically apply at the time of sale on the mPOS application.
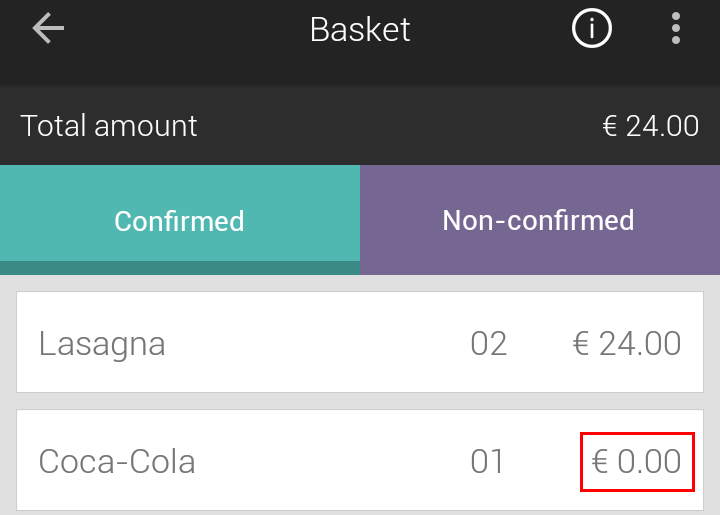 |
Delete order
Tap  to clear all the items in the order.
Note
If GKS is activated for the POS in use, deleting an item will result in an additional line with a negative quantity and value for each item deleted.
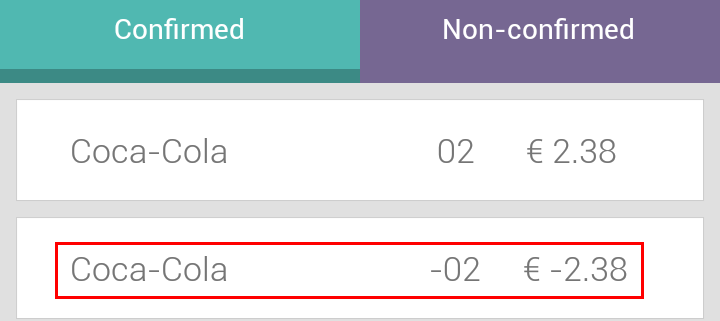 |
Manage ordered items
Tap on an ordered item to manage its quantity and other parameters (see further Manage ordered items).
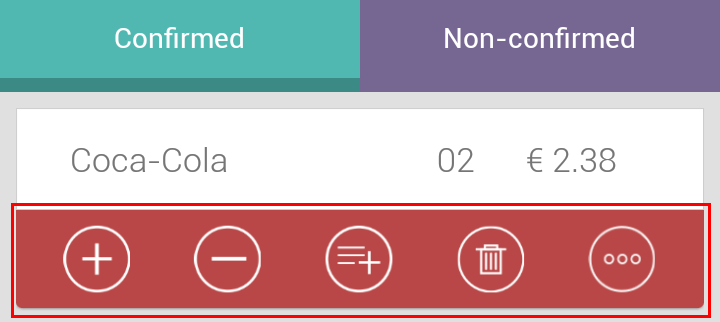 |
Proceed to checkout
Tap  in the bottom panel of the tab Confirmed to proceed to checkout.
 |
It is possible to split the bill before proceeding with checkout, see Split bill.
Manage ordered items
 |
Warning
The options available for managing an ordered item differ depending on the tab they are visualised from (Confirmed/Non-confirmed), employee permissions, activation of FDM (in the case of GKS configured POS) and so on.
Change quantity | Tap + or - to increase or decrease the quantity of the ordered item in question. NoteThe ability of the mPOS user to modify the quantity of a confirmed item depends on the employee authorisation May settle all attributed tablesin the Recreatex desktop application. It is also possible to tap the quantity field to change the item quantity. WarningThe possibility to change the item quantity for confirmed items is not allowed on a GKS configured point of sale. | ||
Add to non-confirmed items | This option will be shown for items under the tab Confirmed. Adds the item under the Confirmedtab to the Non-confirmed tab. | ||
Delete | Deletes the ordered item in question. NoteDependent on the permissions defined at employee level for the parameter May delete articlesin the Recreatex desktop application, the option to delete an ordered item will be available to the mPOS user. | ||
Change modifiers | This option will be shown for items with modifiers. Using this option you can change the selected modifier(s) for the item. | ||
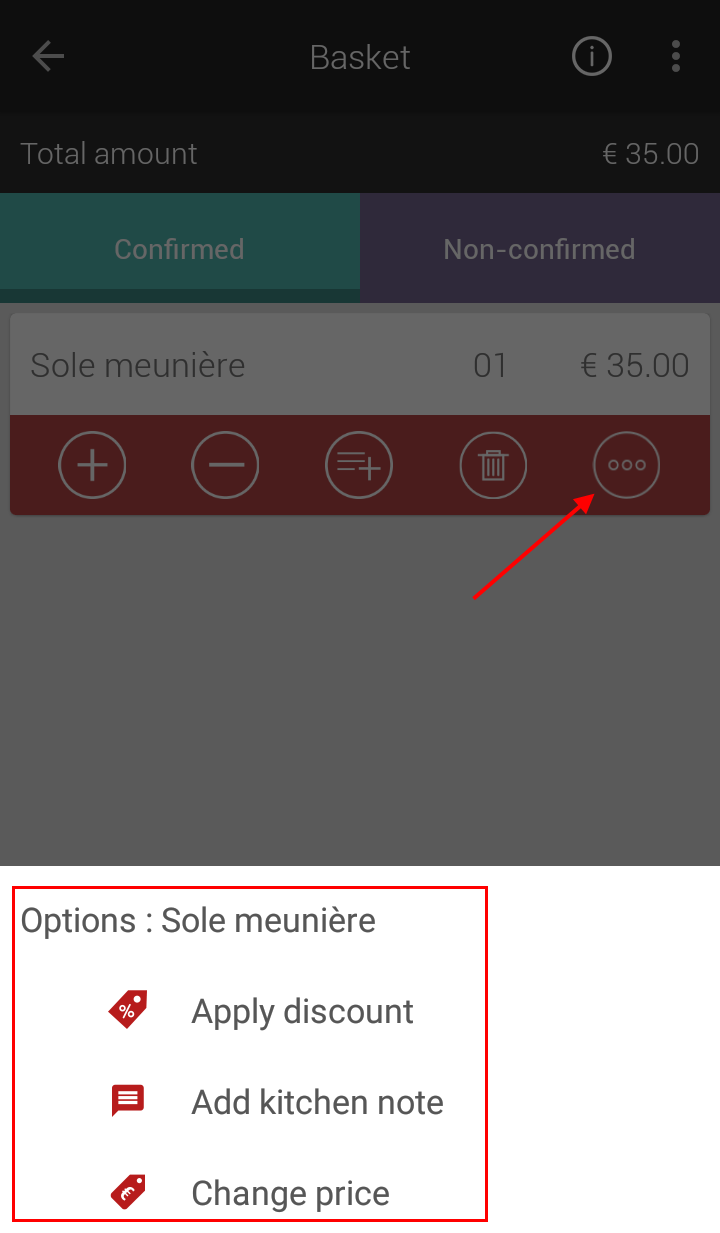
More | This option displays more options available for modifying an ordered item.
| ||
Apply discount | Allows the user to apply a discount to the item in question. See apply discount to an item. | ||
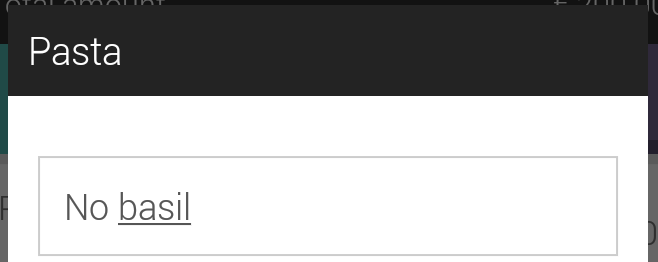
Add kitchen note | When you need to enter an extra description for an item, you can add a kitchen note for it. Tap Add kitchen note and enter a kitchen note in the resulting pop-up. Thereafter, tap OK.
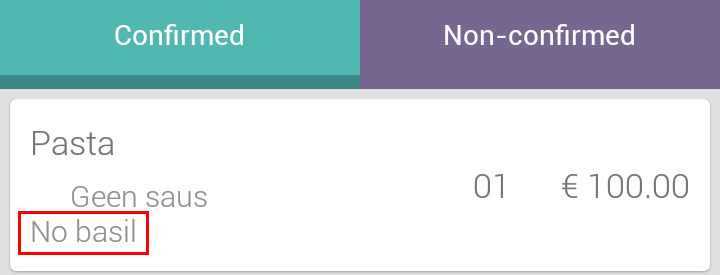
The entered kitchen note will be shown in the item line.
NoteThe entered kitchen note will be printed below the item in question on the receipt of request bill and checkout. | ||
Change price | This option will be shown for items that are configured for price adaptation in the Recreatex desktop application at item level. Using this option will allow you to enter a price, which will overwrite the current price of the item. WarningThe possibility to change the item price is not allowed on a GKS configured point of sale, irrespective of the settings on item level. |
After modifying the items under the Confirmed tab, you will need to confirm the order again by tapping  in the bottom panel of the tab Confirmed.
Apply a discount to an item
Warning
The possibility to apply discounts depends on permissions to allow discounts on employee level and POS level in the Recreatex desktop application.
Tap on the item.
A new line with options will be displayed. Tap the button for more options.
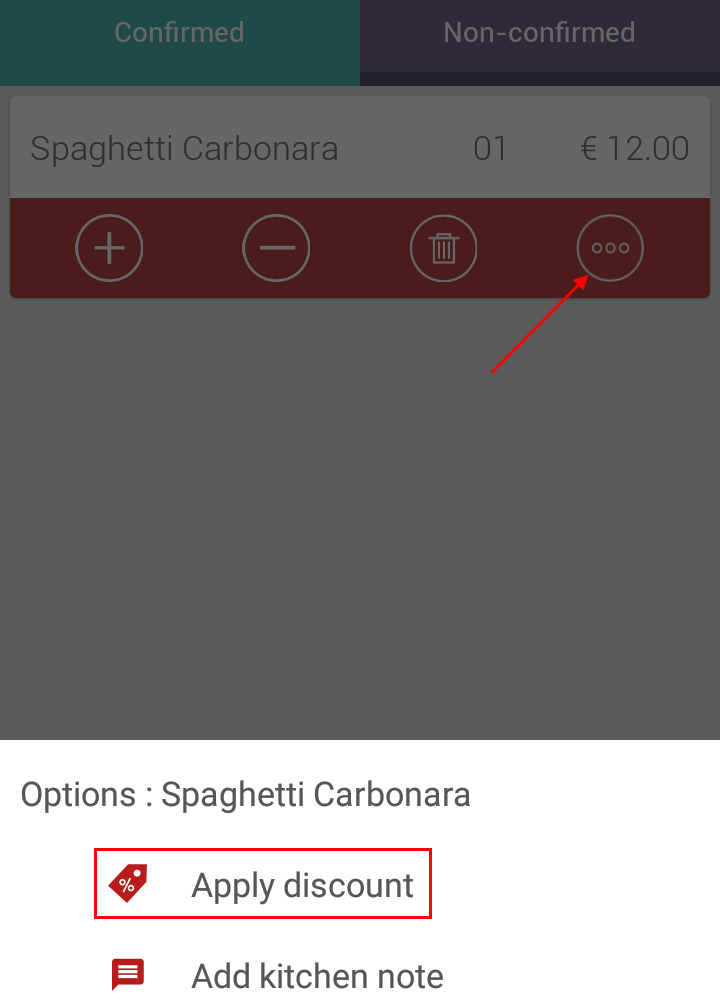
Tap Apply discount.
In the resulting pop-up, enter the discount percentage.
For example, to apply a 20% discount, enter 20.
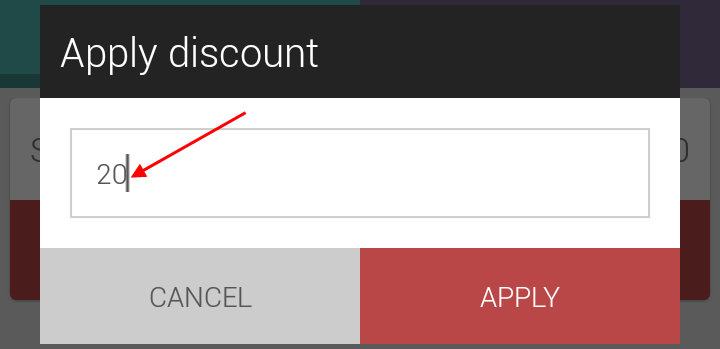
Tap Apply to confirm applying the discount.
The item will be shown with the reduced amount.
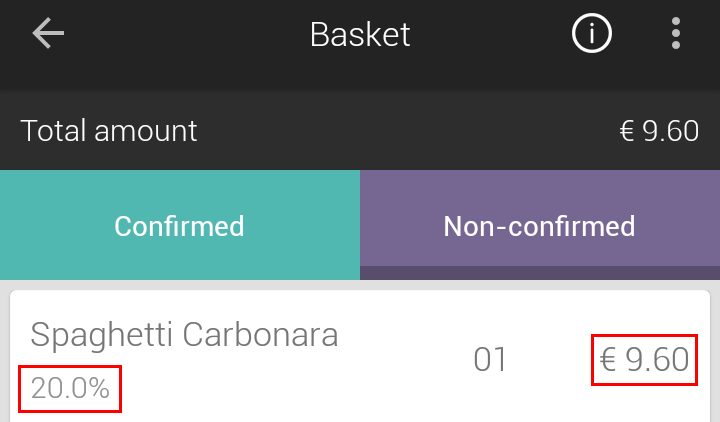
Warning
If a discount is applied to an item under the tab Confirmed, you will have to tap  in the bottom panel to confirm the new amount.
It is possible to apply a discount to the total amount of the order basket. Refer Apply discount on checkout.
Split bill
On the Basket screen, it is possible to split the bill before proceeding to checkout.
Tap
 in the bottom panel under the tab Confirmed.
The user will be transferred to the Split bill screen.
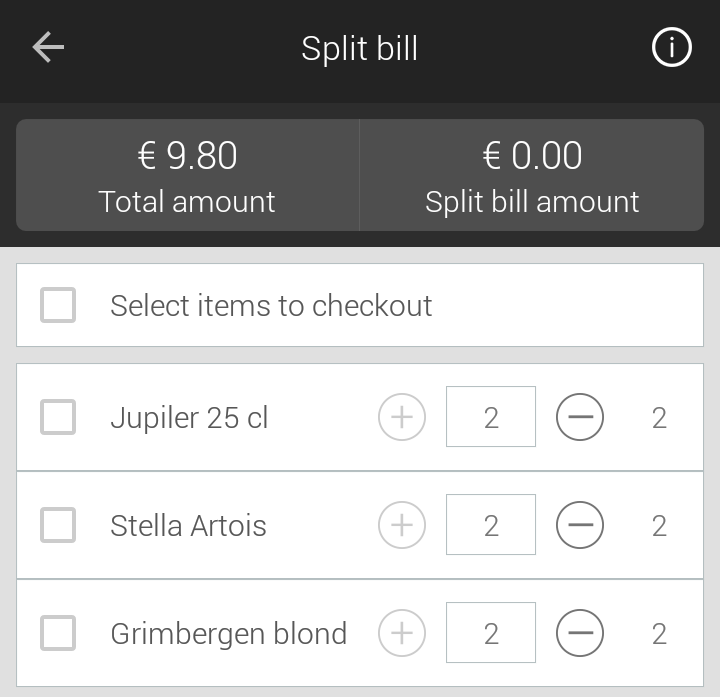
Select the ordered item/s and adjust their quantity using the + or - button, forming one part of the bill payment.
Tap Select items to checkout for selecting or deselecting all the items at once.
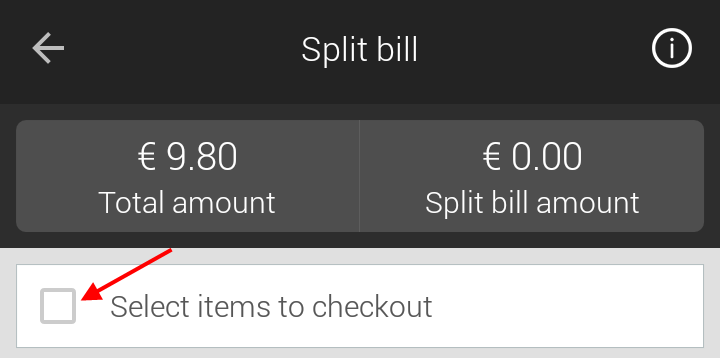
In case of splitting the bill for grouped tables, it will be possible to select items from multiple joined tables to form one part of the bill payment.
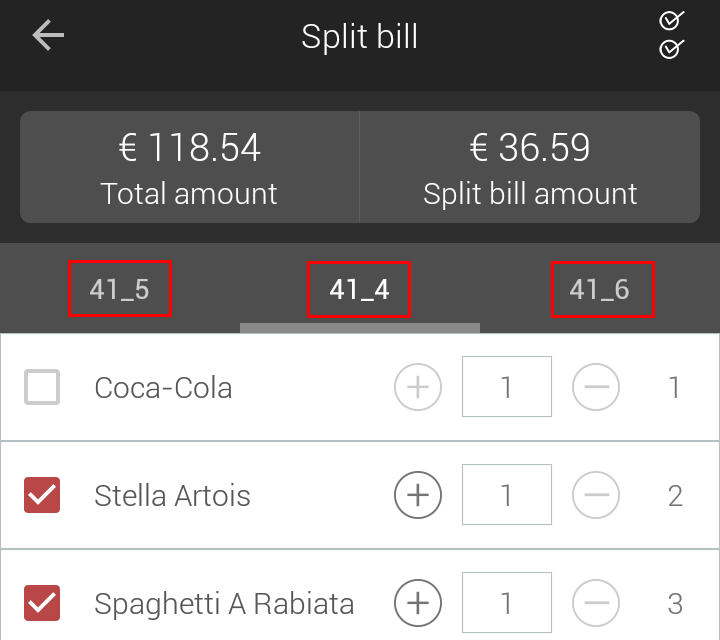
Tap
 in the upper-right corner of the screen for selecting or deselecting all the items at once.
Tap Checkout.
On the Checkout screen, select a customer (if required) and the payment method.
Tap Checkout to proceed with checkout.
Repeat the process until the checkout amount equals the bill amount.
Checkout
On the Checkout screen, you can essentially select the payment method and complete the checkout process.
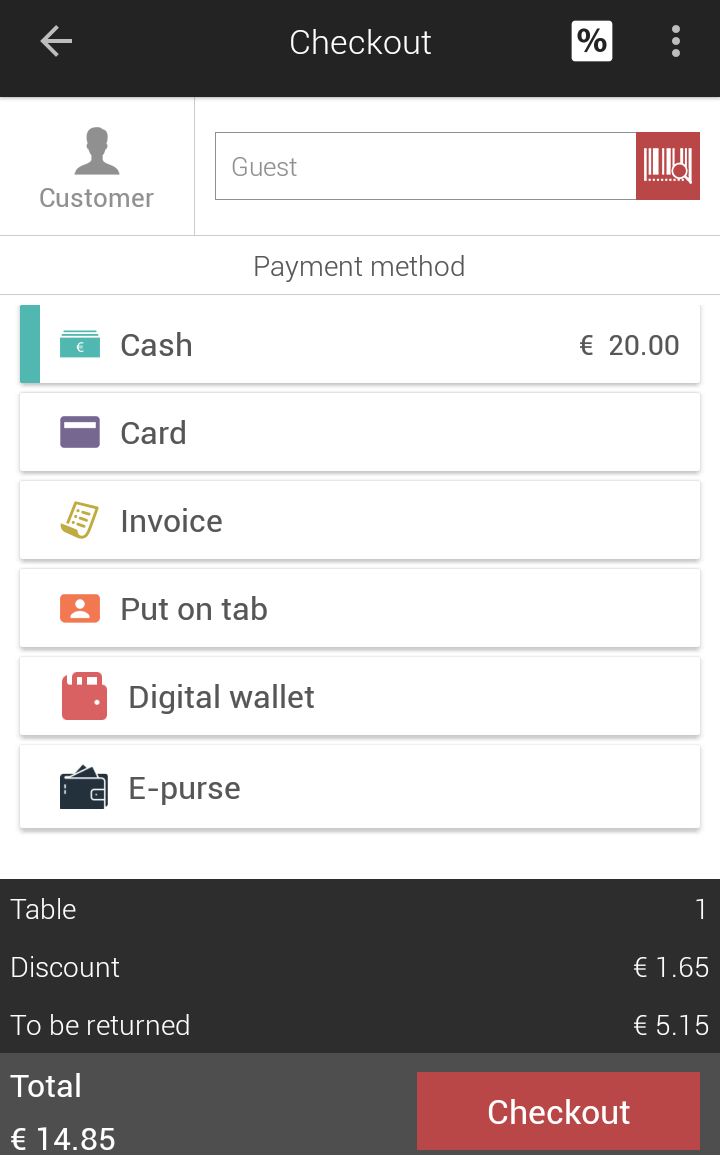 |
It is also possible to apply discount, discount code and gift card on the Checkout screen. Moreover, you can configure which payment options will be shown on the Checkout screen using the General setting Manage payment methods.
In case of table sales, the table number/name will also be visualised as a part of bill breakdown. It is possible to hide or show bill breakdown by tapping on Total.
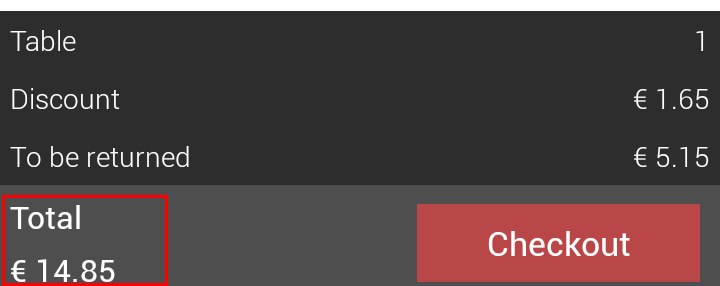 |
Warning
When a discount is applied on exhibition tickets, the discount amount is not shown in the line Discount of the bill breakdown.
Select customer
It is possible to allow complete anonymous sales by selecting the default Guest customer.
 |
To select a customer, tap on the Customer field.
You will be transferred to the Customer selection screen, which will allow you to select a customer in multiple ways.
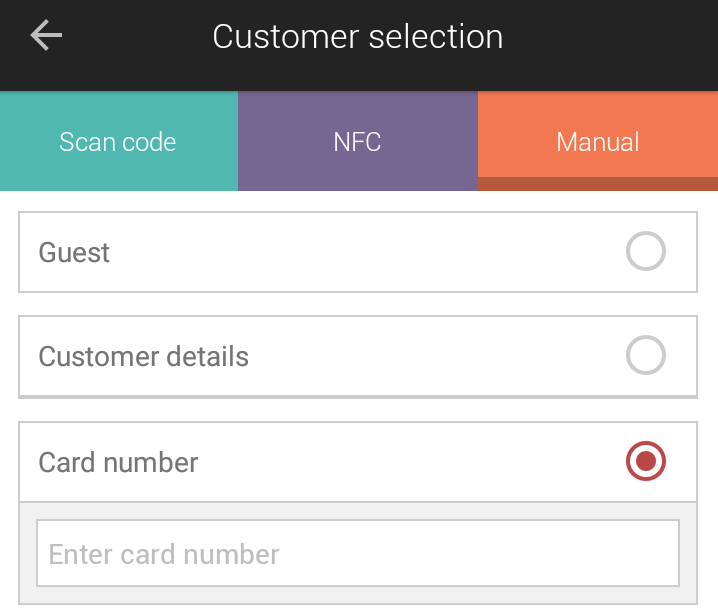 |
Scan code | Tap Scan code and point the device camera at the barcode or QR code on the customer's membership card. The customer's details will be fetched automatically. |
NFC | Select NFC and hold the customer's NFC card near the NFC sensor of your device. The customer's details will be fetched automatically. WarningFor Android devices that do not support NFC, the tab NFC will not be visualised. |
Manual | Guest: This option allows registering sales for a customer whose records are not in the Recreatex database. Customer details:It is possible to search for a customer by entering details in any or all of the available fields. However, because the customer's membership card number is not available, the payment method Put on tab cannot be used. Card number: This option allows you to manually enter the customer's membership card number. |
From the mPOS version 3.3.0, it is possible to create a customer from the customer selection screen.
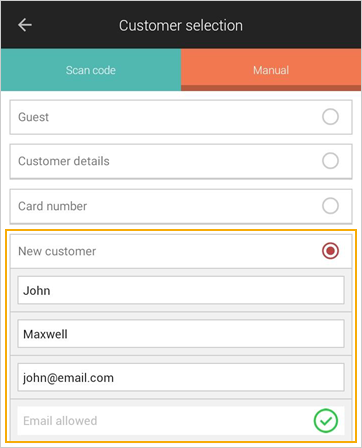
Note
The customers added from mPOS will sync into Recreatex.
Tap OK to confirm the customer selection.
Note
It is possible to define which customer selection method will be opened by default. See Default customer selection mode in General.
When a valid membership card number is found, the option to consult the credit sales history of the customer will appear in the quick action options (visualised as  ) in the upper-right corner of the Checkout screen.
 |
For a more detailed description of credit sales, see Credit balance.
Select payment method
It is possible to make payment using the options which are enabled from General setting Manage payment methods.
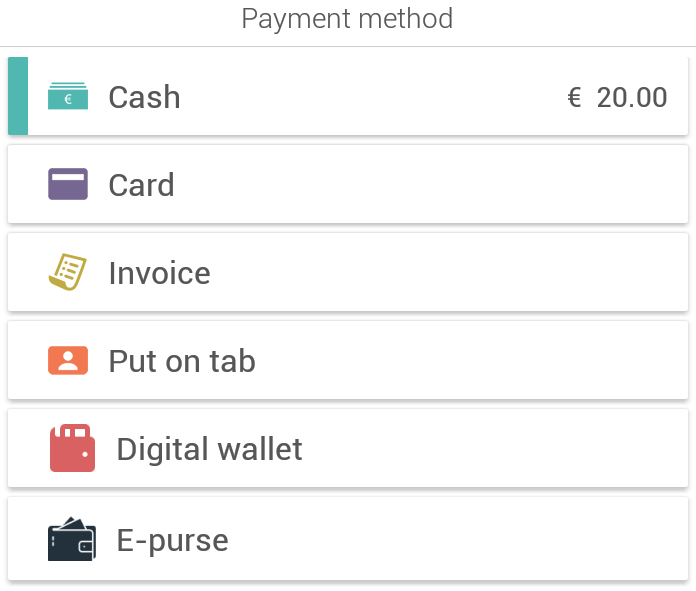 |
Note
The option Put on tab refers to making credit purchase against the customer's membership card.
Important to know:
It is possible to make the payment using a combination of Cash and Card, if the app setting General > Change payment amount is active. However, Put on tab cannot be used in combination with other payment methods.
In case of card payment, you will be able to select card type as per the configuration in Recreatex.
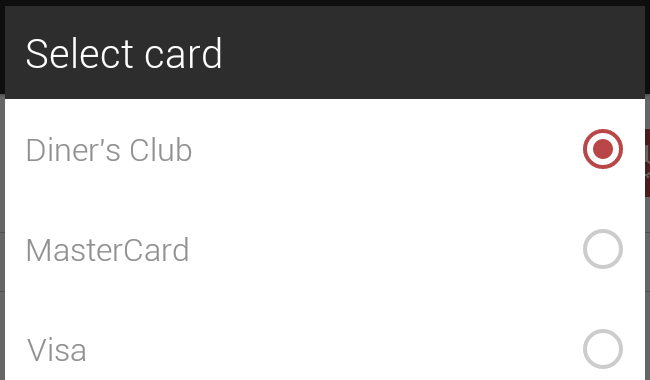
For making payment using Invoice, customer selection is obligatory.
For making a payment using Put on tab, membership card number is required.
Check out using MyPaydesk
When the Payment setting Enable payment terminal is enabled, and the payment method Card is used, the payment will be processed using Ingenico's MyPaydesk app.
On the Checkout screen, select the payment method Card.
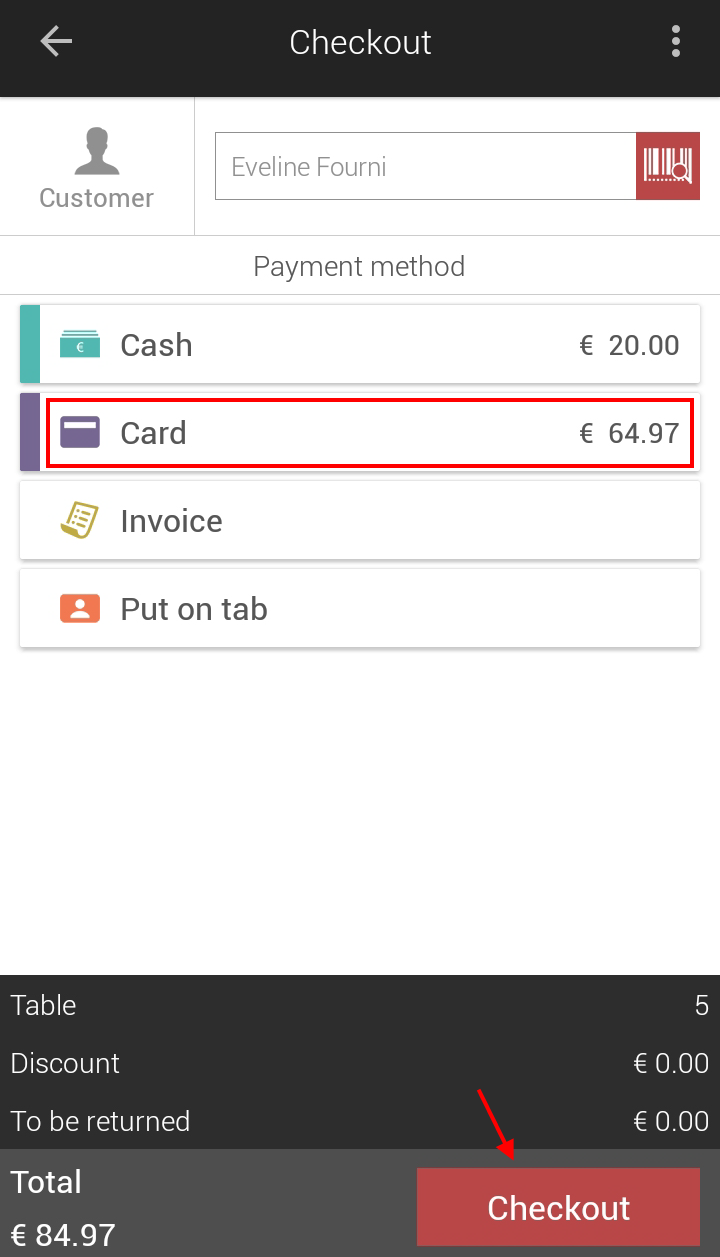
Thereafter, in the resulting popup select MyPaydesk. Note that the option to choose Paydesk is at the top when the setting Enable payment terminal is enabled.
The user will be transferred to the Review Order screen on the MyPaydesk app.
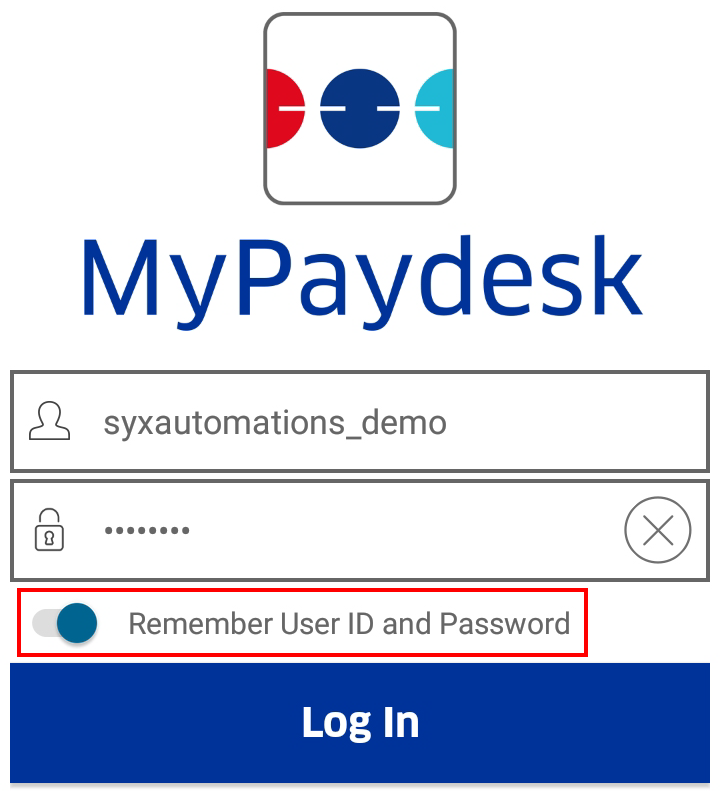
In case the option Remember User ID and Password has been previously enabled on the login screen of the MyPaydesk app, the user will automatically be logged into the app.
Tap Payer.
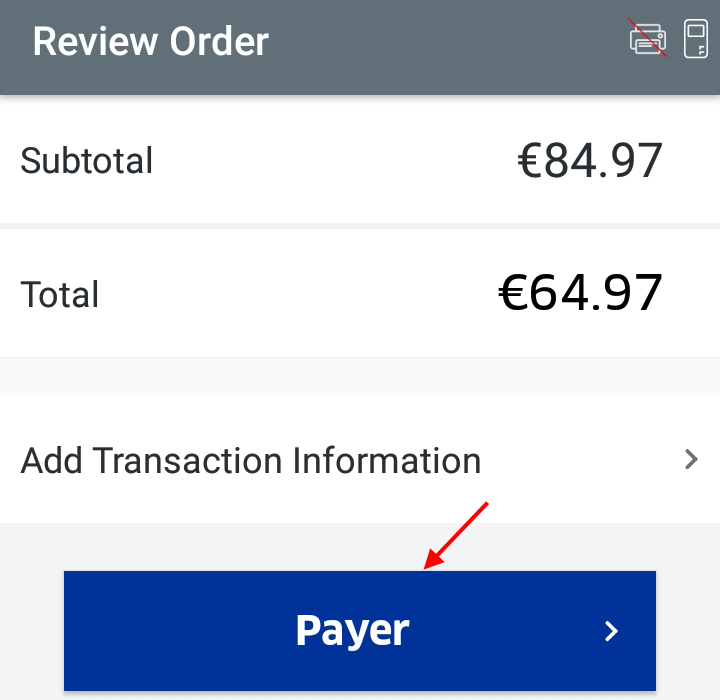
Thereafter, process the card payment using the card reader.
Note
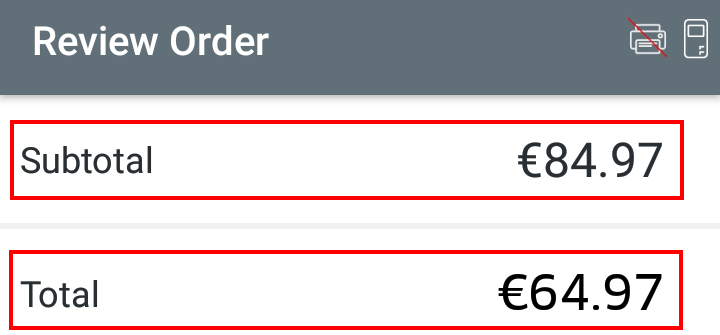
The Total amount refers to the part of the sales amount that will be paid using the card, whereas the Subtotal amount is the total sales amount.
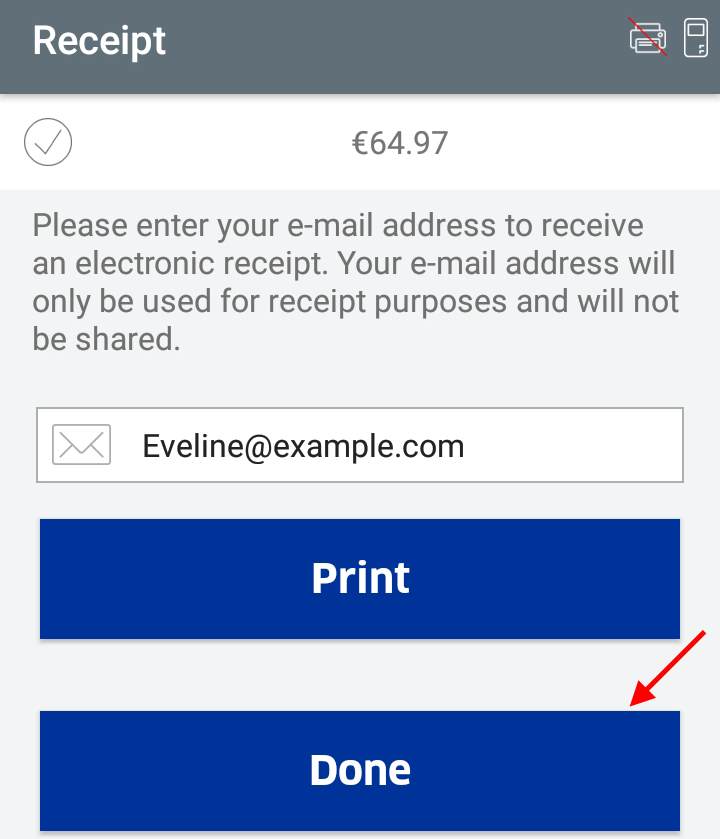
After the transaction is processed, the user will be transferred to the screen Receipt on the MyPaydesk app. Tap Done to complete the payment process.
Important to know:
In case the customer was selected on the Checkout screen of mPOS, the customer's email address will be auto-filled in. Alternatively, it is possible to enter the email address of the customer in the field E-mail Address for sending the transaction receipt to the customer via email.
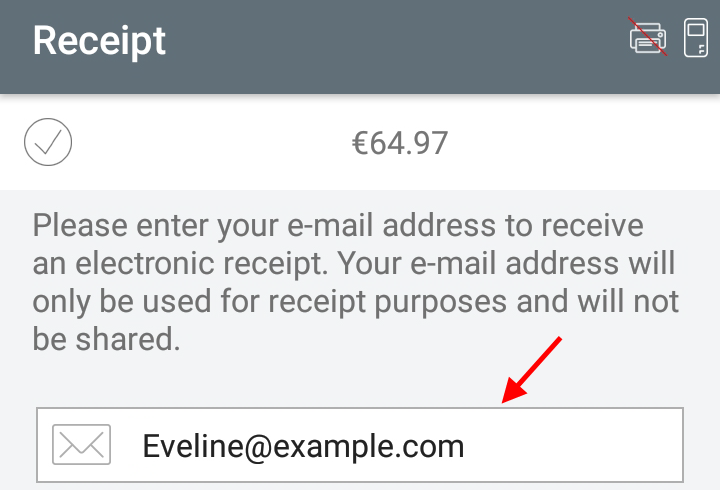
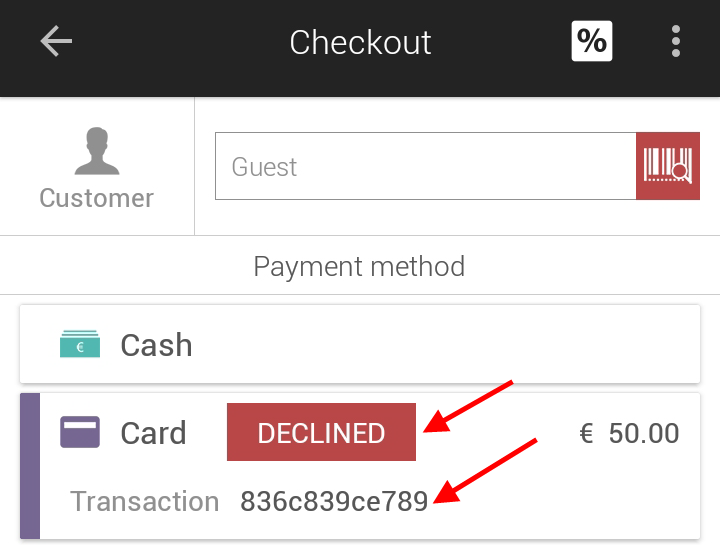
A tick mark against the payment amount indicates the transaction was successful, whereas, a cross would indicate the transaction was declined.

Moreover, in the mPOS app, the transaction status along with a transaction identifying number (Merchant Invoice ID) will be shown on the Checkout screen.
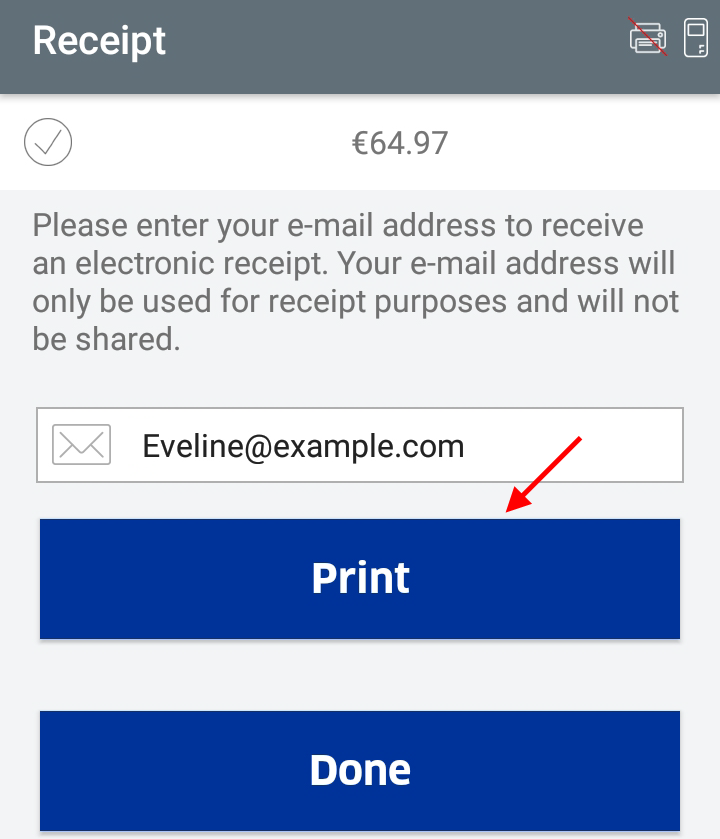
The option to print on the screen Receipt of the MyPaydesk app is not functional until an Ingenico printer is paired with the MyPaydesk app.
The user can consult orders placed using MyPaydesk from Shift history. See further: Shift history
Check out using digital wallet
When the General setting Manage payment methods is enabled, and the payment method Digital wallet is enabled, you will be able to process payments using digital wallet.
On the Checkout screen, select the payment method Digital wallet.
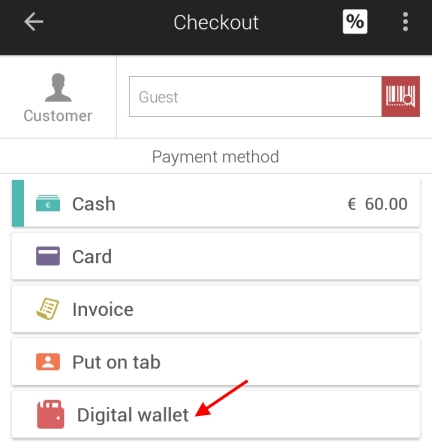
You will be transferred to a new screen to enter the customer's card number.
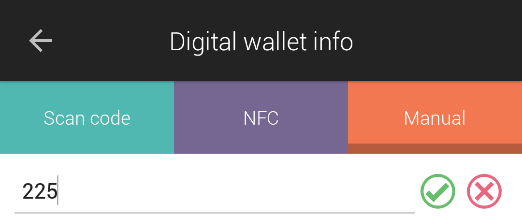
If using Manual entry, it is possible to only enter the last three digits of the customer's card number and then select the concerned customer.
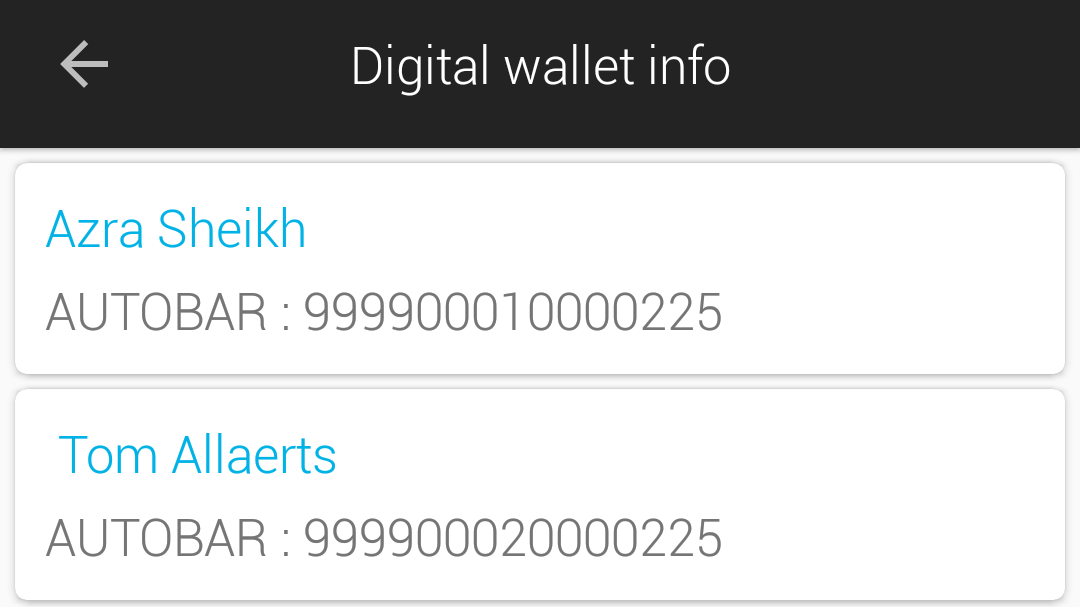
In case there's a digital wallet on the customer's card, you will see the Digital wallet info screen.
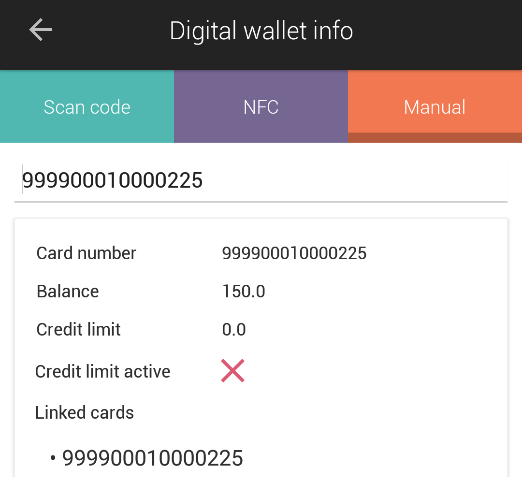
For a detailed description on digital wallet info, refer Digital wallet info
Tap Continue to use digital wallet.
On the Checkout screen, you will see digital wallet been used as a payment method.
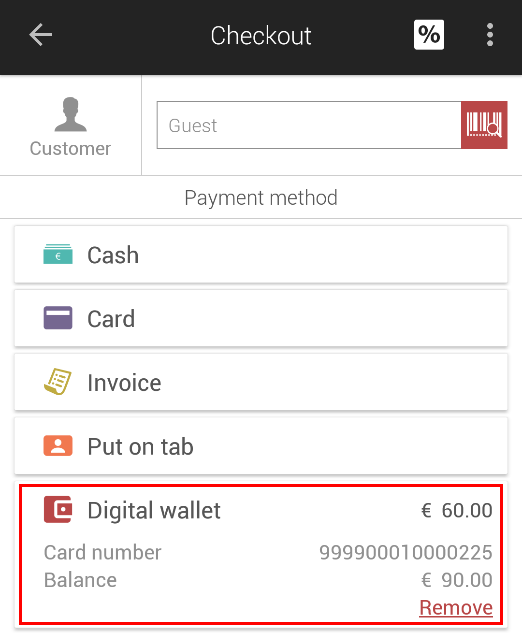
To remove the applied digital wallet, tap Remove in the Digital wallet section.

In case the digital wallet balance is lesser than the total sales amount, it is possible to pay the balance amount using cash or card.
Digital wallet info
Dependent on the digital wallet's configuration in Recreatex, the digital wallet could be either with or without credit limit.
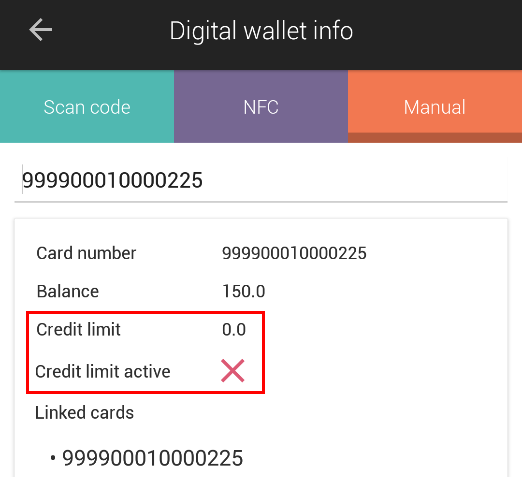 |
In this case, ensure the credit limit is active while making a payment.
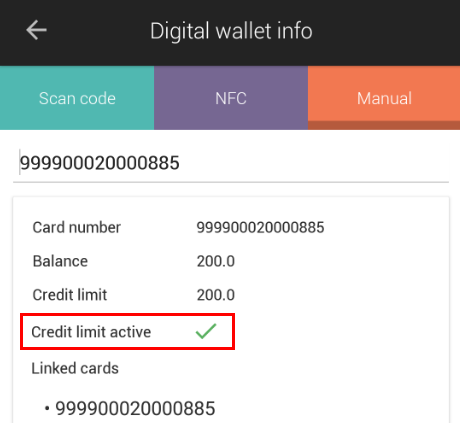 |
Note
Apart from the Checkout screen, you can also consult digital wallet info from the more options button on the Categories screen.
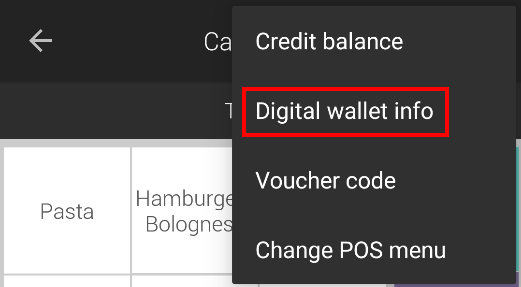 |
Check out using e-purse
It is possible to make payments using e-purse on the mPOS application.
Important to know:
To be able to use the e-purse as a payment method, the following parameters must be activated from the mPOS settings:
Settings > Payment > Enable E-purse
Settings > General > Manage payment methods > Activate E-purse
On the Checkout screen, select the payment method E-purse.
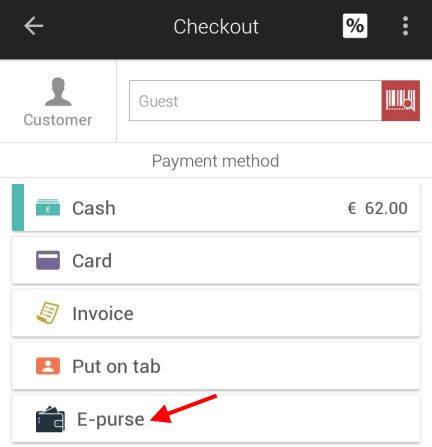
You will be transferred to a new screen to enter the customer's details/card number.
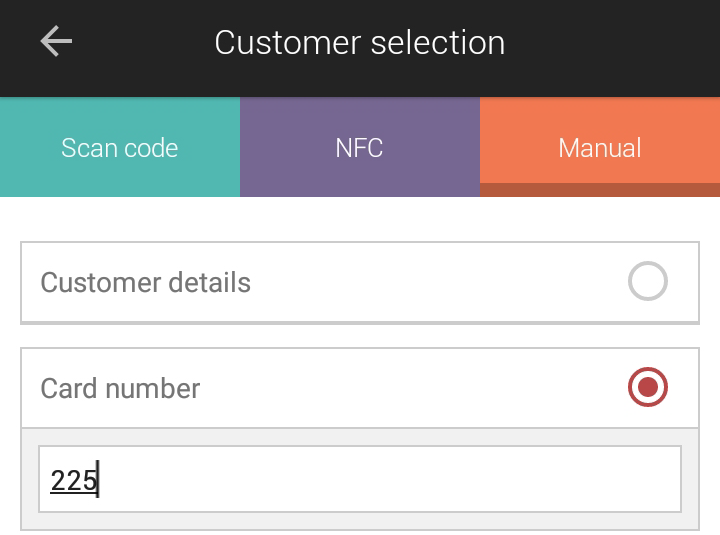
If using Manual entry, it is possible to only enter the last three digits of the customer's card number and then select the concerned customer.

In case there's an e-purse on the customer's card, you will be able to complete checkout using e-purse.
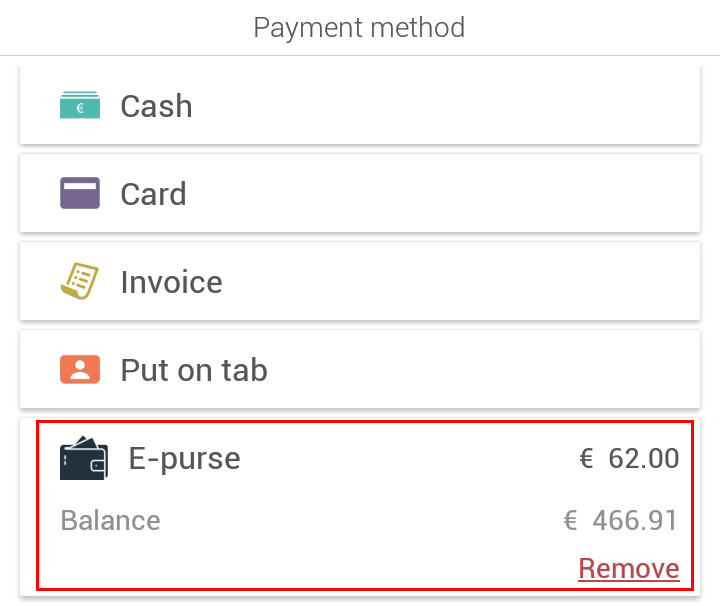
Moreover, to remove the applied e-purse, tap Remove in the E-purse section.

Tap Checkout to complete the payment.
Note
It is possible to check e-purse balance from the menu options (visualised as  ) on the Categories screen,
Apply discount on checkout
Warning
The possibility to apply a discount depends on the permissions to allow discounts on employee level and POS level in the Recreatex desktop application.
Tap
 in the upper-right corner of the Checkout screen.
In the resulting pop-up, enter the discount percentage.
For example, to apply a 20% discount, enter 20.
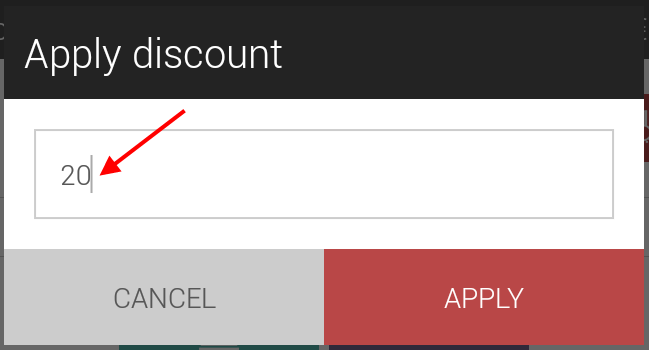
Tap Apply to confirm applying the discount.
The total amount will be discounted and the bill breakdown will be shown at the bottom of the screen.
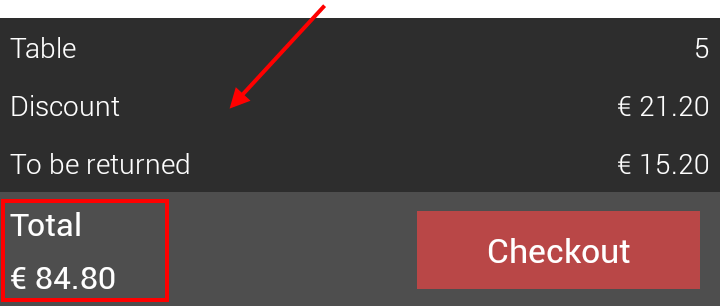
To consult the bill breakdown again, tap Total.
Warning
It is possible to apply a discount at individual item level as well as to the total order amount. However, a discount applied right before checkout (either to individual items or the total amount) will be considered. This means the discount will not be applied twice.
For example, a 5% discount is applied to an item. Now, on the Checkout screen a10% discount is applied. In effect, the total payable amount will be discounted by 10%. The discount at individual item level will be overwritten.
Apply discount code
It is possible to apply one or more discount codes to the total amount of sales.
Tap on the menu options (visualised as  ) in the upper-right corner of the Checkout screen.
 |
Select Discount code.
 |
You will be transferred to a new screen to apply the discount code.
It is possible to scan the discount code or enter it manually.
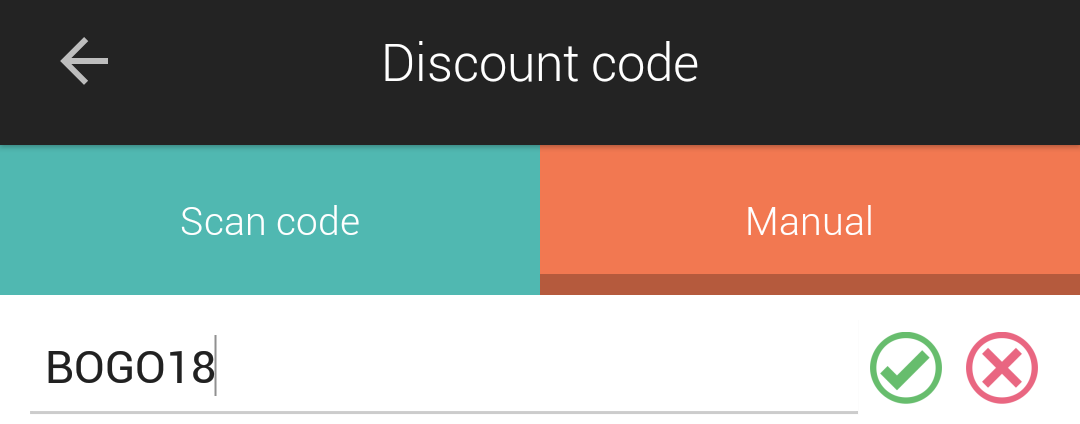 |
Tap OK to apply the discount code to the total amount of sales.
Note
For an order, either a discount code or voucher code can be applied. However, it is possible to use multiple discount codes to order.
Apply gift card
It is possible to apply a gift card to the total amount of sales.
On the Checkout screen, tap on the menu option (visualised as
 ) in the upper-right corner of the screen.
Select Gift card.

You will be transferred to a new screen to apply gift card. It is possible to apply gift card in multiple ways - scan the barcode of the gift card, apply gift card using NFC or manually enter the gift card number.

A valid gift card will be applied to the total sales amount and will be shown on the Checkout screen.
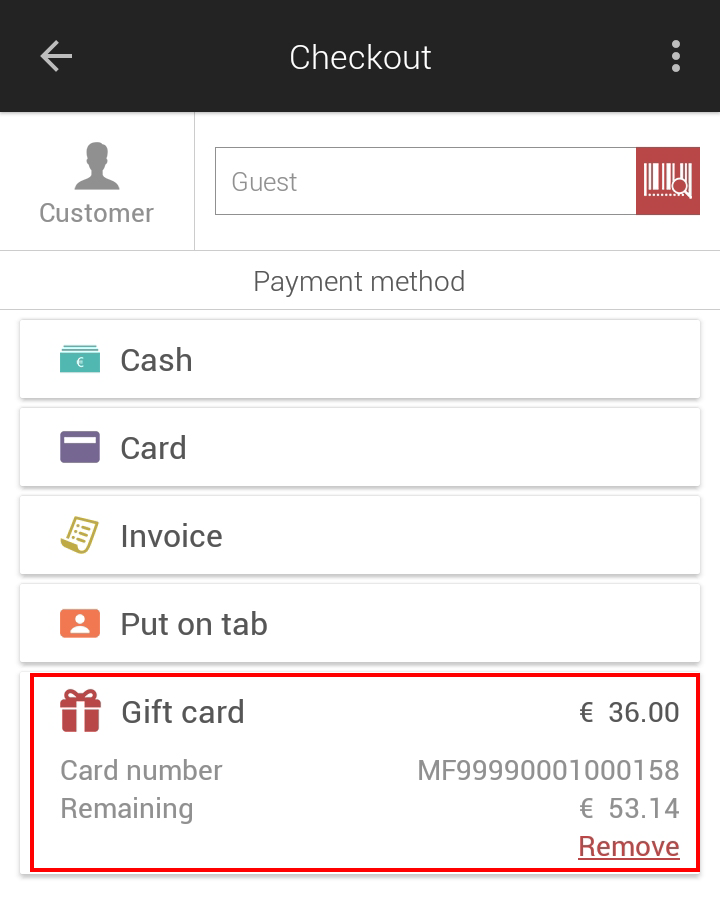
Note
It is possible to apply only one gift card to an order. However, it is possible to apply one gift card and multiple discount codes to an order.
To remove the applied gift card, tap Remove in the Gift card section.
 |
In case the gift card balance is lesser than the total sales amount, it is possible to pay the balance amount using other payment methods.
Express checkout
Express checkout allows for a direct flow to skip table selection and register sales. This can, for example, be useful when beforehand it is not decided whether the order will need to be assigned to a table.
On the table dashboard, tap on the Express checkout icon
 .
.
The user will be navigated to the Categories screen to select items and confirm the order.
After confirming the order, the user will be navigated to the Checkout screen for making the payment.
Note
When using Express checkout, the user will be transferred to the Checkout screen after placing an order, irrespective of the setting defined for the parameter Navigate to in General settings.
Move an express checkout order to a table
In case the order placed using the express checkout method needs to be moved to a table, the user can do so by selecting Move order available in the menu options (visualised as  ) in the upper-right of the Basket or Category screen.
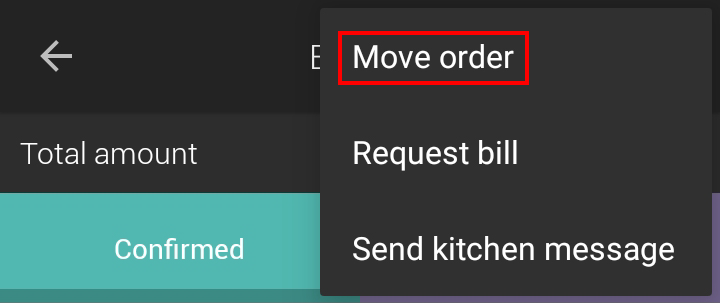 |
It is possible that the express checkout order has been saved under the tab Virtual on the table dashboard.
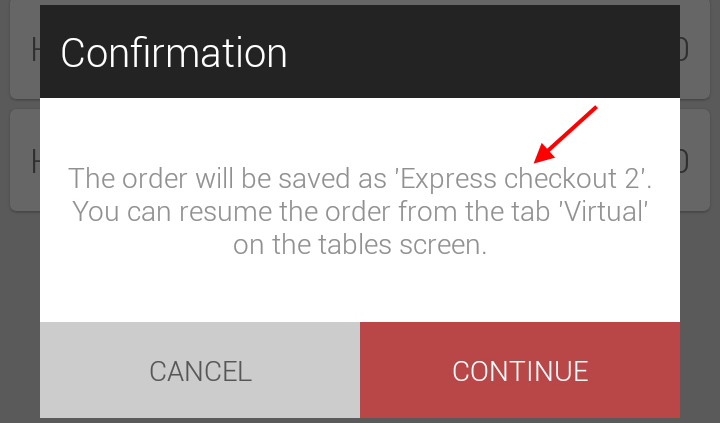 |
In that case, press and hold the table with the express checkout order. A menu containing table options will appear from the bottom of the screen. Select Move order, to move the order to another table.
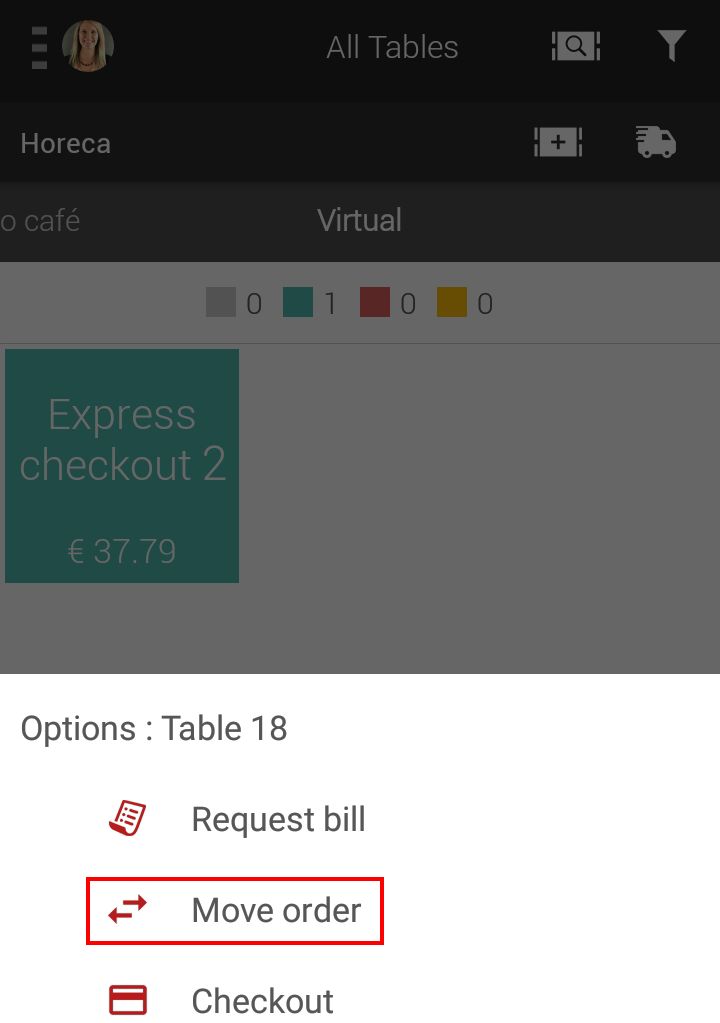 |
For a detailed description on moving an order to another table, see Move order in the section Quick action options.
Direct sales
At the time of logging into the mPOS app, if the selected sales zone is Other, the user will be able to make direct sales.
In case of direct sales, it is possible to register sales without associating it with a table.
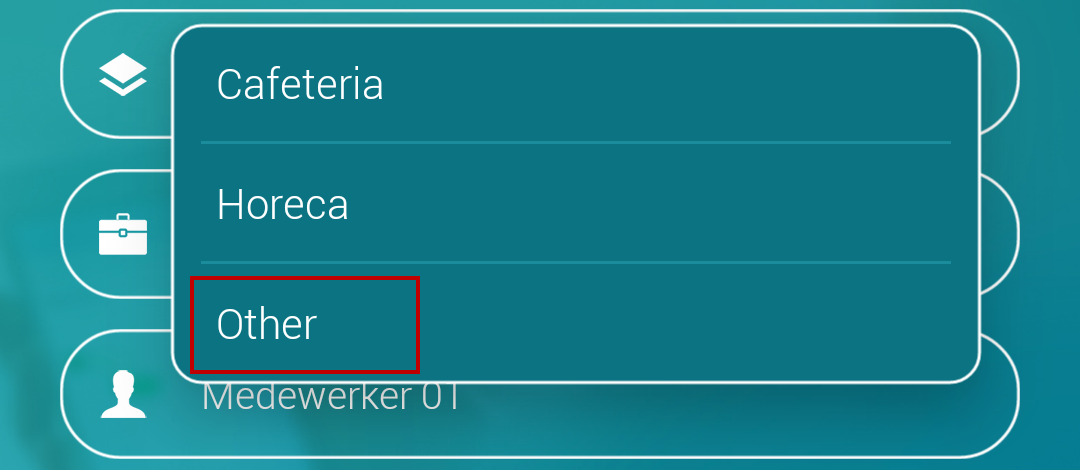 |
Note
Unlike table sales, the current order must be completed before a new order can be taken.
After logging in, the user will directly be transferred to the Categories screen for selecting items for sale.
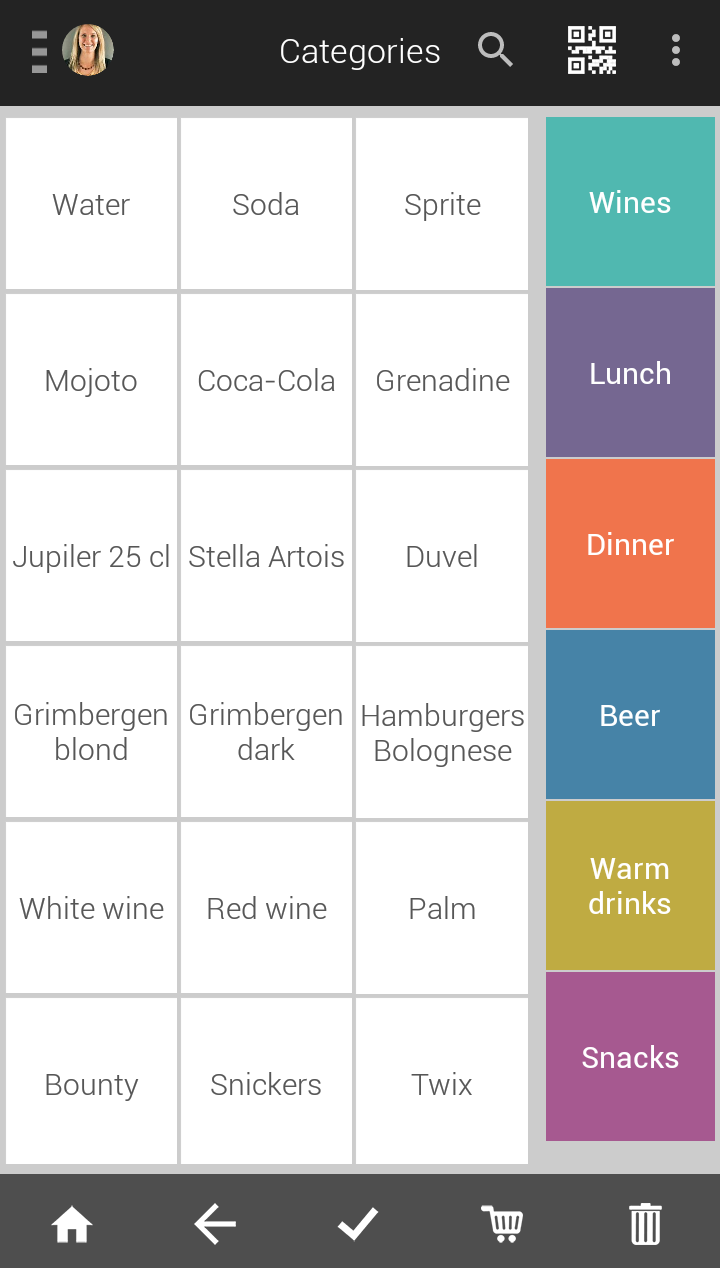 |
Note
It is possible to modify the layout of the Categories screen by using the parameters Category layout and Item view mode in the General settings.
Tap to select an item.
Selecting an item for direct sales functions in the same way as selecting an item for table sales (see further in the section on Select items).
To view the items added to the basket, tap
 . The user will be transferred to the tab Non-confirmed on the Basket screen.
If all the selected items are confirmed for billing, tap
 to move them under the Confirmed tab on the Basket screen.
From the Basket screen, tap
 to proceed with checkout.
Note
On the Basket screen, it is possible to manage the ordered items and apply a discount on individual items. See Manage ordered items.
It is possible to split the bill before proceeding with checkout (see Split bill).
On the Checkout screen, select the customer (if required) and payment method.
Tap Checkout to complete checkout.

For a more detailed description of the possibilities on the Checkout screen, see Checkout.
Park order
In case of direct sales, it is possible to put the current order on hold and take order for the next customer, thereby increasing service efficiency.
On the Categories screen, add the desired items to the basket (as Non-confirmed items
 ).
).Warning
An order having confirmed items in the basket cannot be parked.
To park the current order, tap the menu icon
 in the top right of the Categories screen. Select the option Park the order.
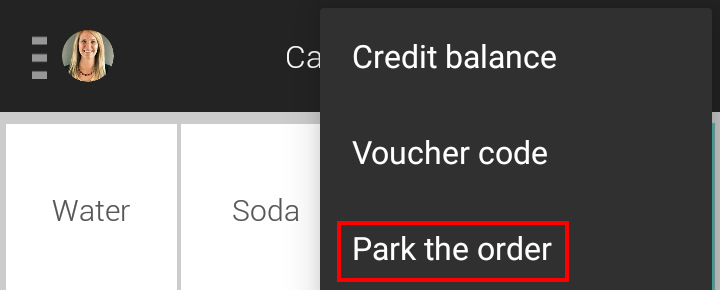
Alternatively, it is possible to park an order using the menu icon
 on the Basket screen.
Now you will be able to place a new order. It is possible to either park the new order or proceed with its checkout.
To restore a parked order and checkout, refer Restore parked order.
Restore parked order
To restore a parked order and proceed with its checkout, tap the menu icon
 in the top right of the Categories screen. Select the option Restore parked order.
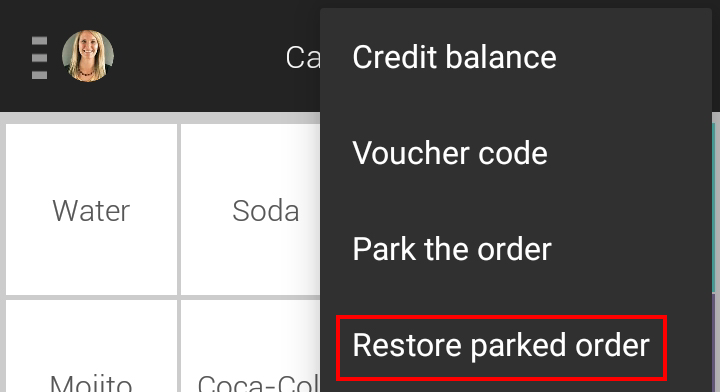
Alternatively, it is possible to park an order using the menu icon
 on the Basket screen.
The user will be navigated to the Parked orders screen, which contains a list of parked orders.
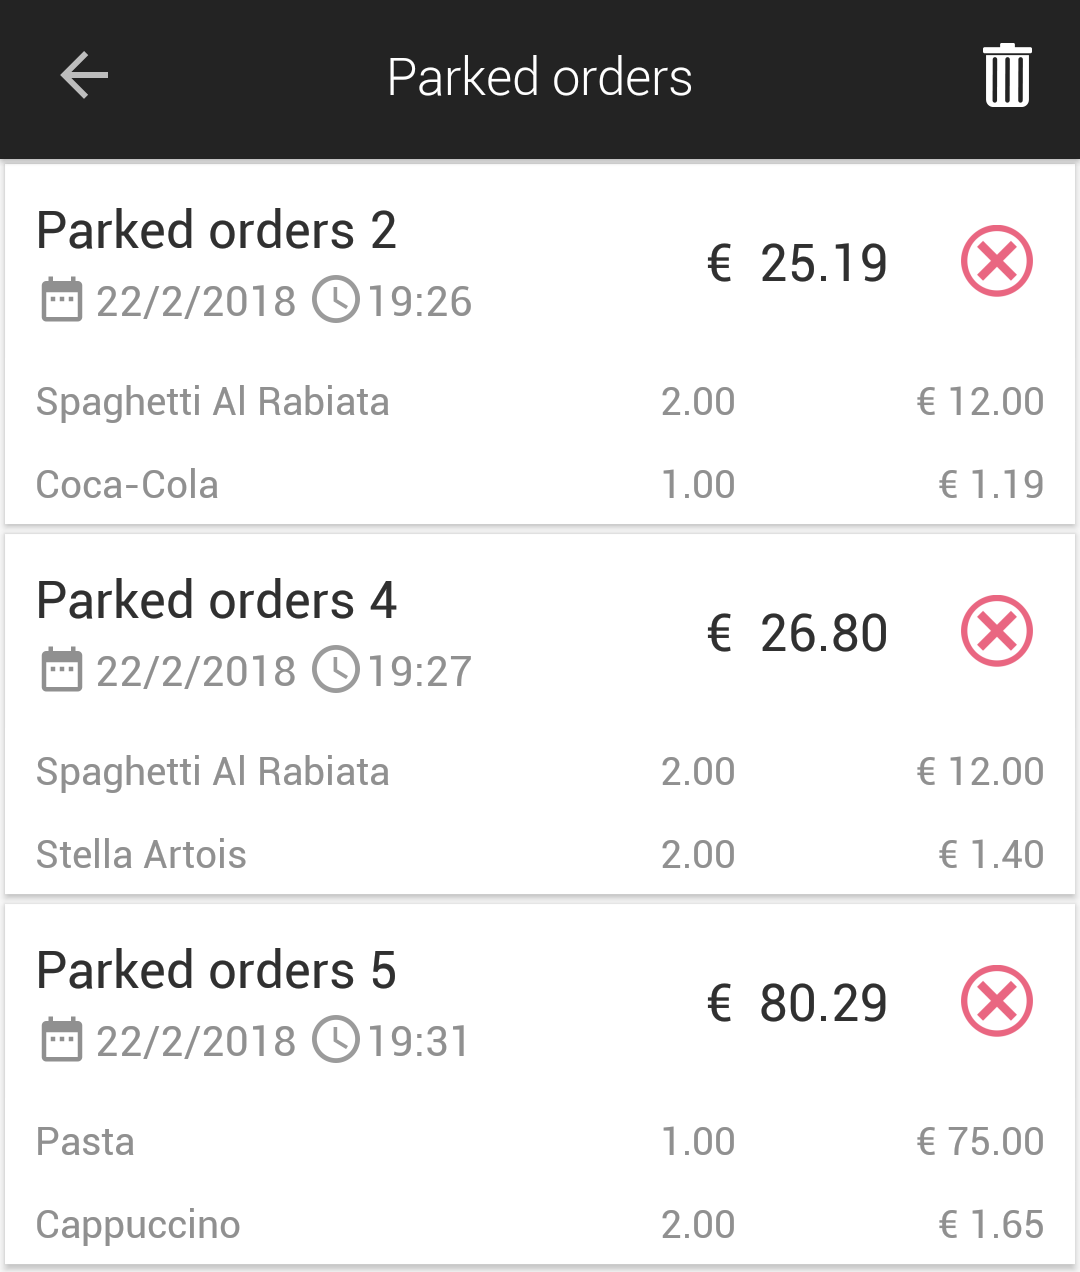
Select an order to restore it.
Note
It is possible to delete a specific parked order by tapping on
 corresponding to the order in question. Tapping on
  will delete all the parked orders.
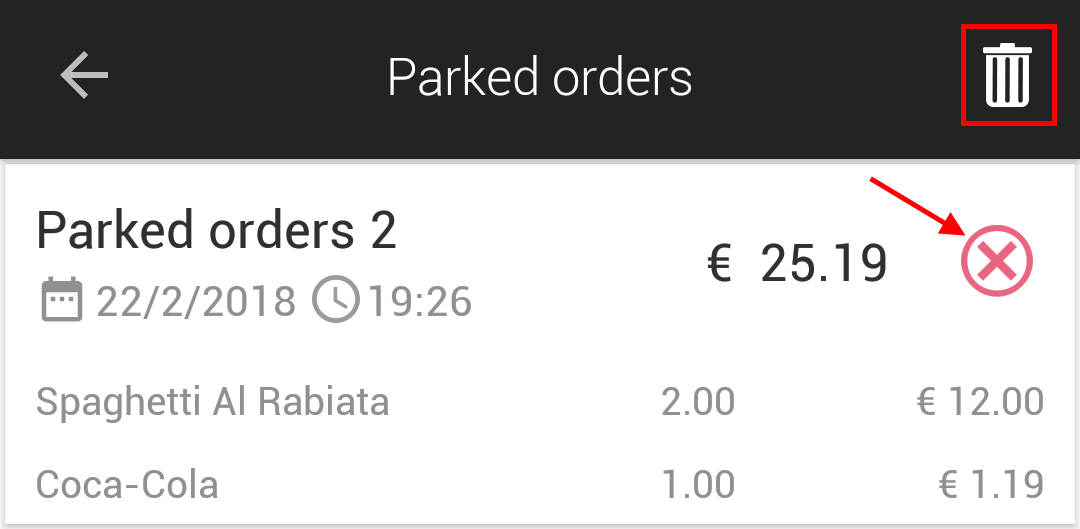
The user will be transferred to the Basket screen, to confirm the order and proceed with checkout.
Ticket sales
When making a ticket sale, an access ticket will be printed in addition to the bill receipt after successful checkout.
Note
The access ticket will be printed from the printer defined in Settings > Printer > Printing instance > Access ticket. See further Printer.
Direct ticket sales
Tap to select an item.
Selecting an item for direct sales functions in the same way as selecting an item for table sales (see further in the section on Select items).
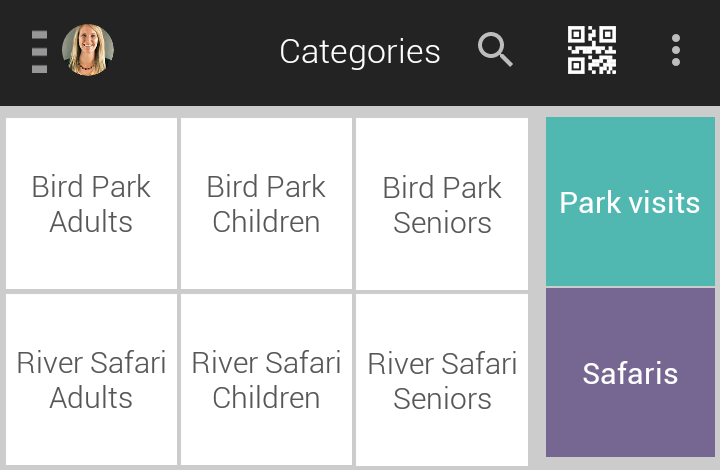
To view the items added to the basket, tap
 . The user will be transferred to the tab Non-confirmed on the Basket screen.
If all the selected items are confirmed for billing, tap
 to move them under the Confirmedtab on the Basket screen.
Next, on the Basket screen tap to proceed with checkout.
Note
On the Basket screen, it is possible to manage the ordered items and apply discounts on individual items. See Manage order items.
Tap
 to proceed with checkout.
It is possible to split the bill before continuing with checkout (see Split bill).
On the Checkout screen, select the customer (if required) and payment method.
Tap Checkout to complete checkout.
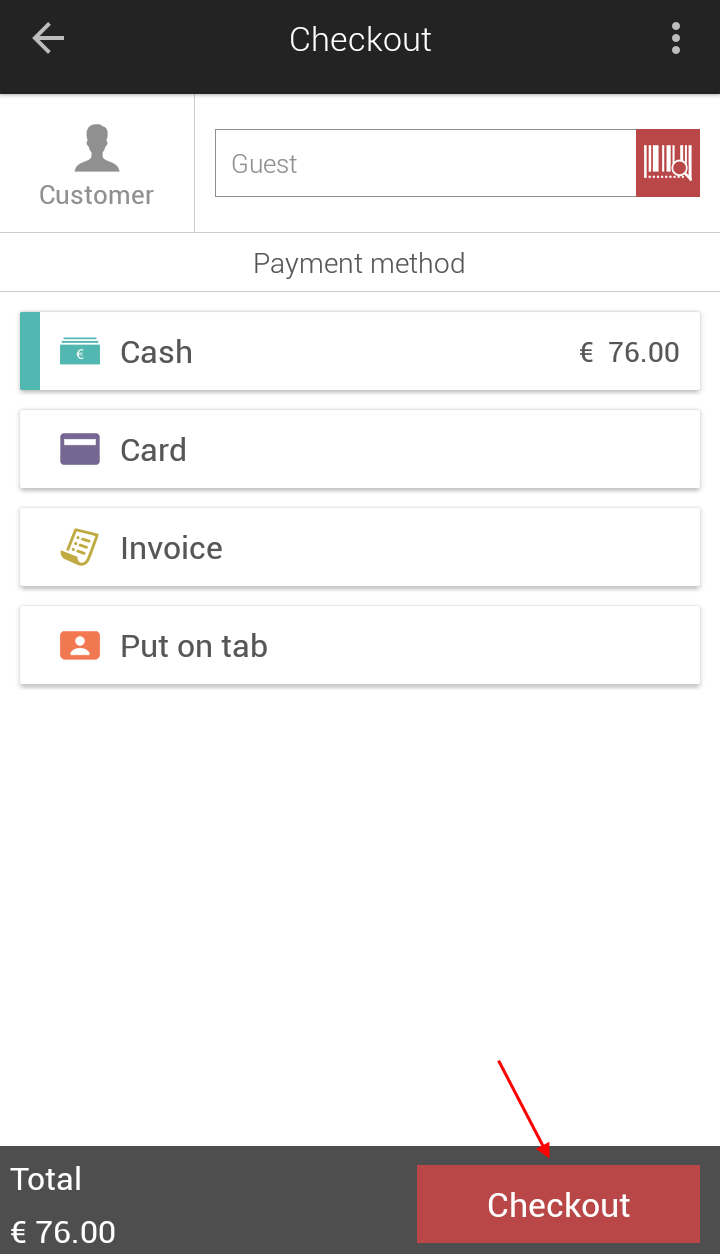
For a more detailed description of the possibilities on the Checkout screen, see Checkout.
Exhibition ticket sales
Select an exhibition.
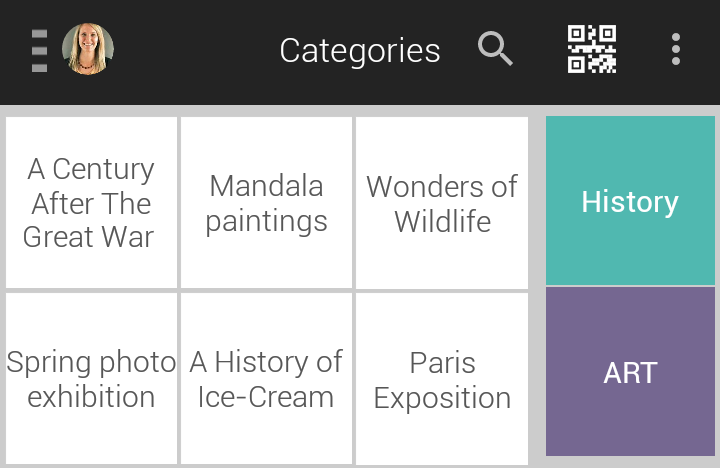
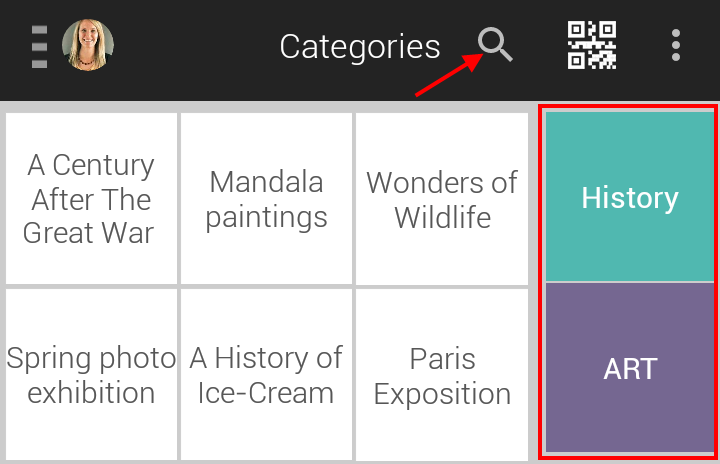
You can look for an item using the search function or by navigating to the appropriate subcategories on the right panel of the screen.
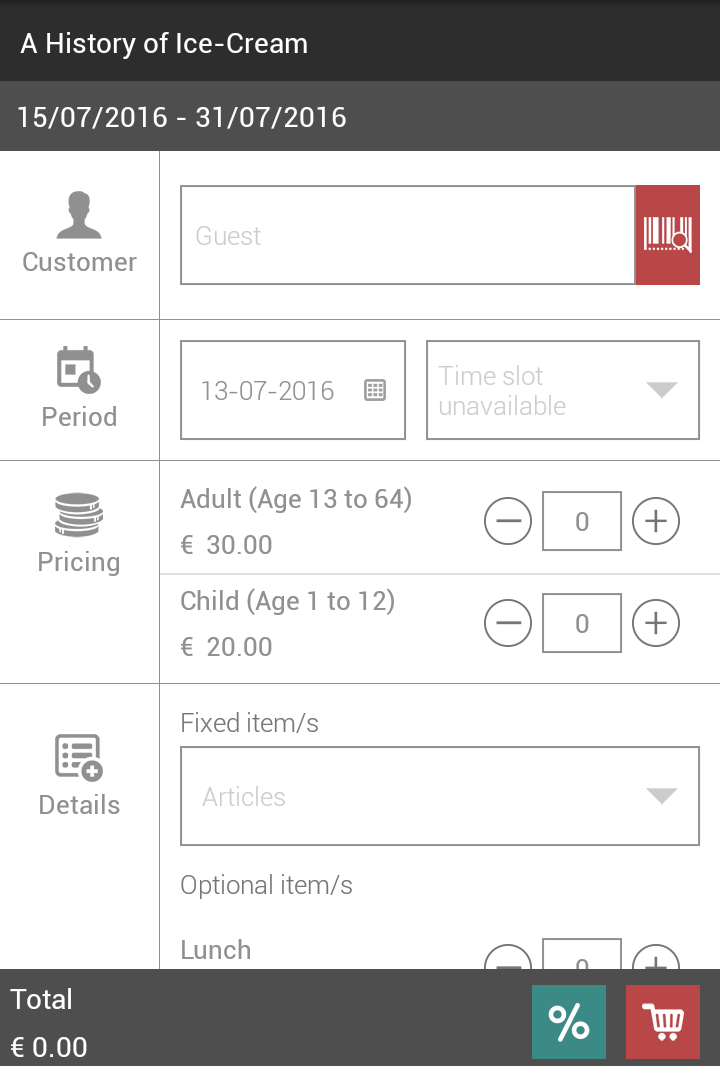
Selecting an exhibition transfers the user to its detail screen. Enter the appropriate details.
From the mPOS version 3.3.0, it is possible to create a customer from the customer selection screen.

Note
If the parameter Customer mandatory is activated at POS level for Exhibitions in the Recreatex desktop application, it will be obligatory to select a customer for exhibition ticket sales.

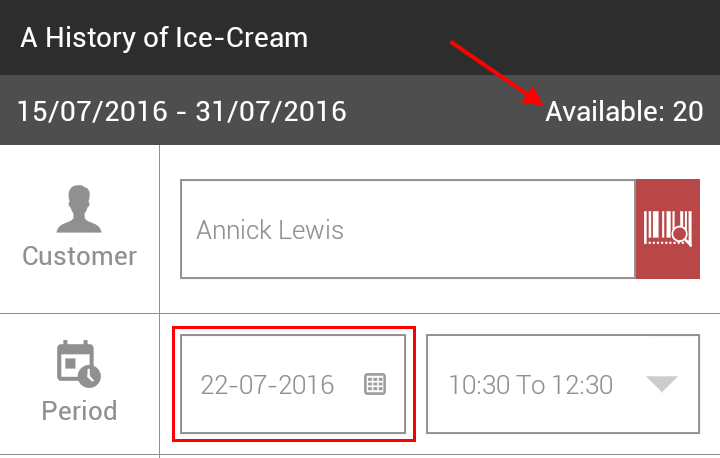
Select the date.
Note that on selecting a valid exhibition date, the availability for that day is displayed.
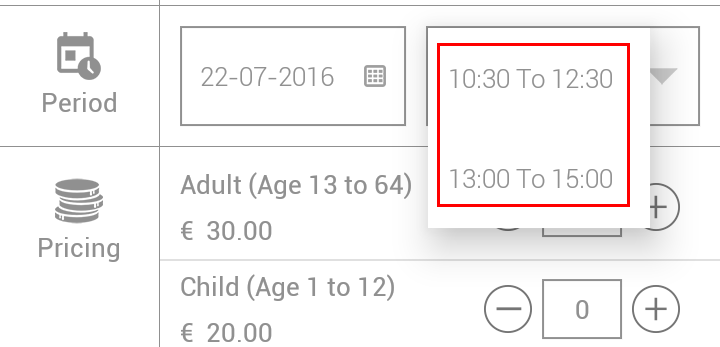
Tap on the time slot to select one of the time slot options.
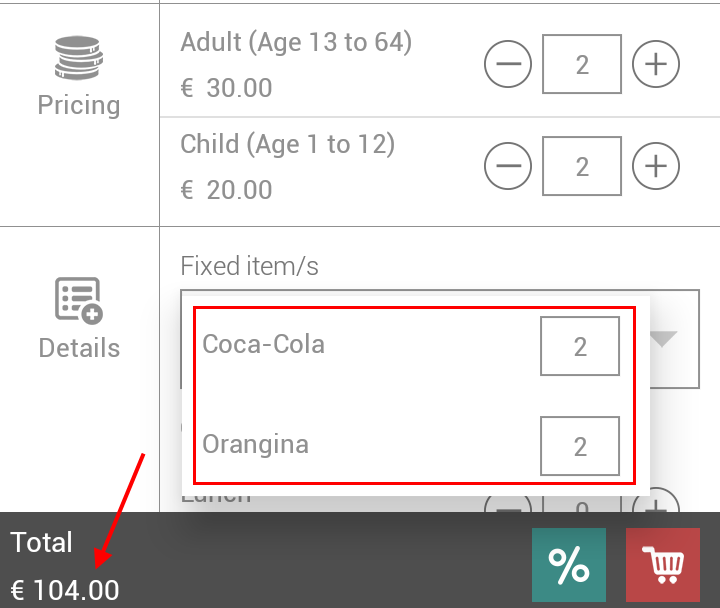
Enter the number of visits per price group.

It is possible to manipulate the number of visitors using the + or - buttons or by a long-press on the quantity field.
Note
Note that the total amount at the bottom of the screen is the sum of the visit price and the price of the fixed items that are sold along with each visit.
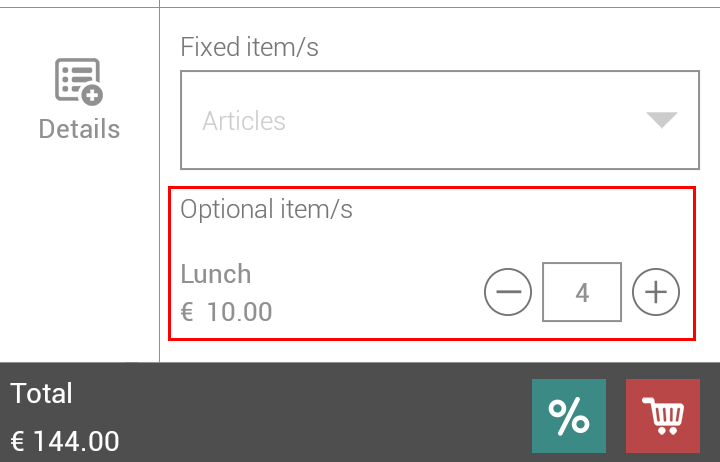
If required, additional items that are available with the sale of the exhibition visit can be added to the order.
Tap
 to apply a discount (if required).
Note
The possibility to apply a discount depends on permissions to allow discounts on employee level and POS level in the Recreatex desktop application.
In the resulting pop-up window, enter the discount percentage.
For example, to apply a 20% discount, enter 20.
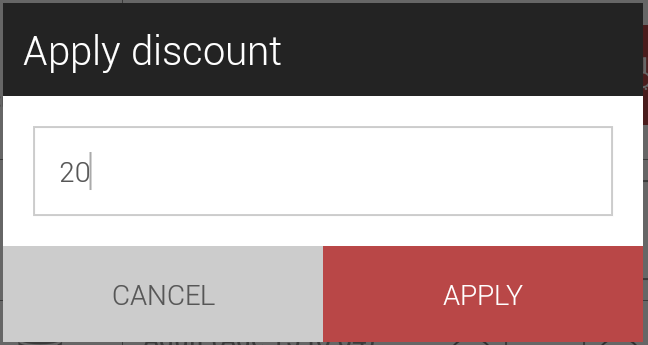
Tap Apply to confirm applying the discount.
Note
The discount is applied on the amount assigned to the selected price group and not to the total amount of the exhibition sale.

Therefore, the price of the automatic items and the additional items are not considered for discount.
A line displaying the discount amount will be visualised for a few seconds before disappearing.
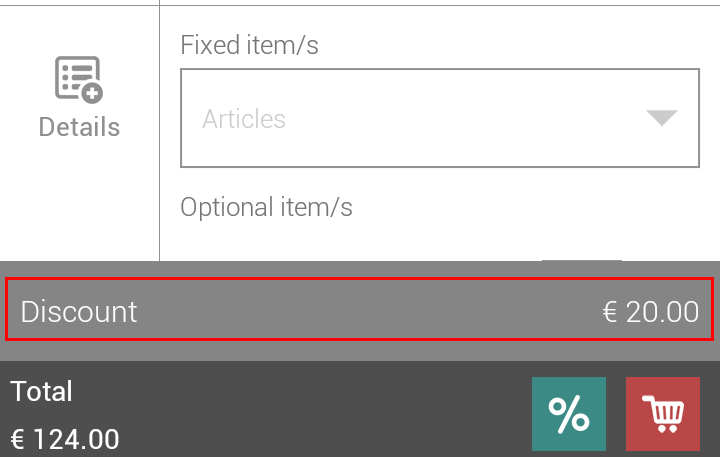
Tap
 to proceed to the basket screen.
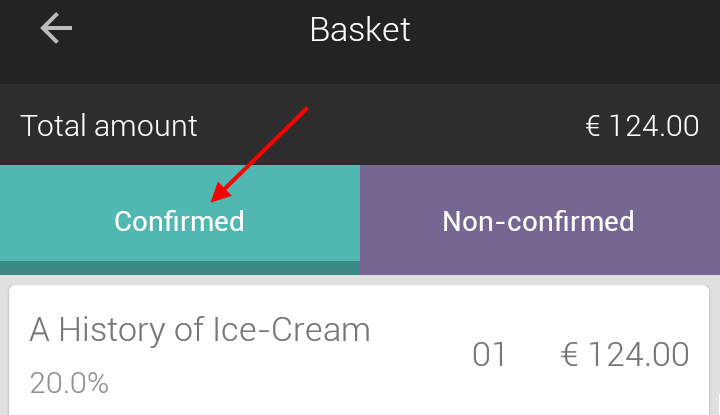
From the Basket screen it is possible to consult the details of the exhibition sale
 or delete it
  .
.An exhibition ticket sale will always be shown under the Confirmed tab of the Basket screen.
Tap
 on the bottom of the Basket screen to proceed to checkout.
On the Checkout screen, tap Checkout.
Note
The customer selected on the exhibition details screen cannot be changed on the Checkout screen.
It is also possible to apply a discount on the Checkout screen. See further, Apply discount to the basket.
Warning
For exhibition items in the basket, the discount is applied to the amount assigned to the selected price group and not the total amount of the exhibition sale.
 |
