Client settings
Part of the client settings, such as the connection settings is obligatory to configure before starting to use the Infoplay desktop application. Another set of the client settings, such as display and general settings allow for possible display changes.
There are two possible ways to configure the client settings:
Using the Settings XML file
Using the InfoPlay configuration tool
Configure client settings using the Settings XML file
This requires entering or modifying the setting parameters' code with an appropriate value.
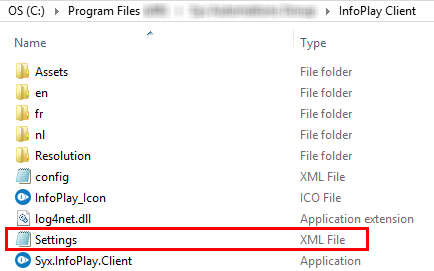
Go to the folder InfoPlay Client.
Click Settings.XML.
Warning
When using Settings.XML file for B&R display running Windows CE, you will be required to first rename the .XML file to .TXT extention, then make the required changes and rename the file back to .XML extension.
Configure the parameters by entering an appropriate value in the respective line of code.
For description on the parameters, see connection settings, display settings and general settings.
Configure client settings using the Infoplay configuration tool
Since entering values directly into each line of code can be cumbersome, Infoplay offers is an option to enter values in form fields using the Infoplay configuration tool.
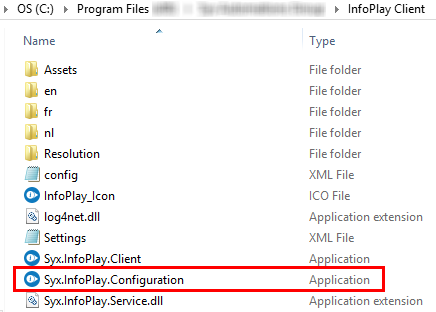
Go to the folder InfoPlay Client.
Open Syx.InfoPlay.Configuration
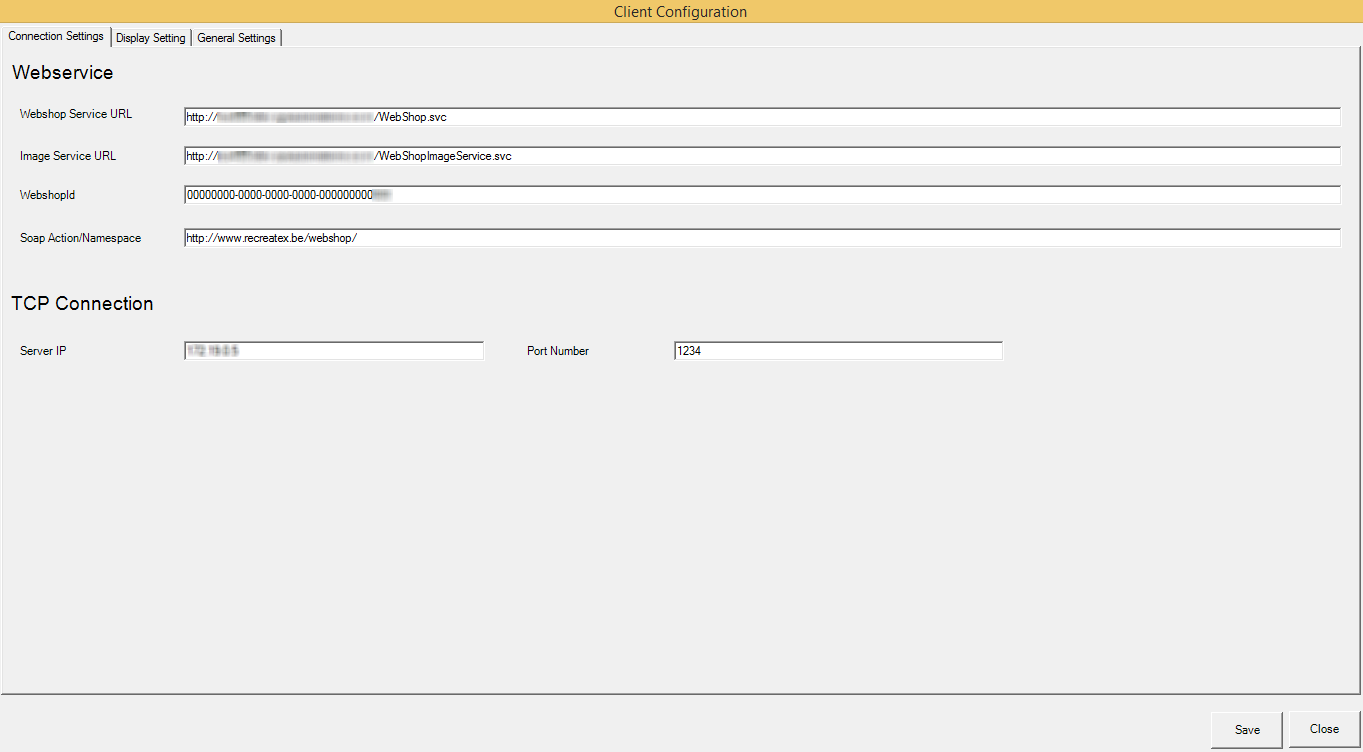
Configure the parameters using appropriate values.
For description on the parameters, see connection settings, display settings and general settings.
Click Save to confirm the made changes.
Connection settings
Webservice settings
It is possible to configure by editing the Webservice parameters in the Settings XML file with appropriate values.

Alternatively, the parameters can be configured by using the Infoplay configuration tool.

Webshop service URL | The Webshop service URL is used for fetching visitors' information from Recreatex. WarningThe Webshop service URL always needs to end with /WebsShop.svc |
Image service URL | The image web service URL is used for fetching visitor’s profile picture from ReCreateX. WarningThe Image service URL always needs to end with /WebShopImageService.svc |
WebshopID | The Webshop ID enables the Infoplay app to correctly identify the customer and his/her database among several customers using the Infoplay app. |
SOAPAction/Namespace | The SOAPAction/Namespace enables the Infoplay app to communicate with the web service. This is a pre-filled field and does not require to be modified. |
TCP connection settings
It is possible to configure by editing the TCP connection parameters in the Settings XML file with appropriate values.

Alternatively, the parameters can be configured by using the Infoplay configuration tool.

Server IP address | The IP address of the server where InfoPlay server is installed. |
Port | The port number of the TCP server that is used for server setup (see server setup). |
Display settings
Information display settings
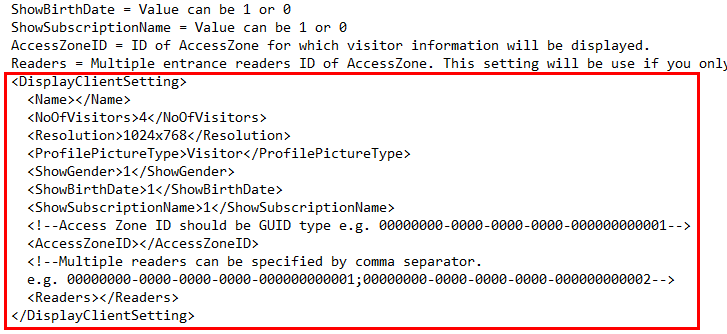
It is possible to configure by editing the display client parameters in the Settings XML file with appropriate values.
Alternatively, the parameters can be configured by using the Infoplay configuration tool.
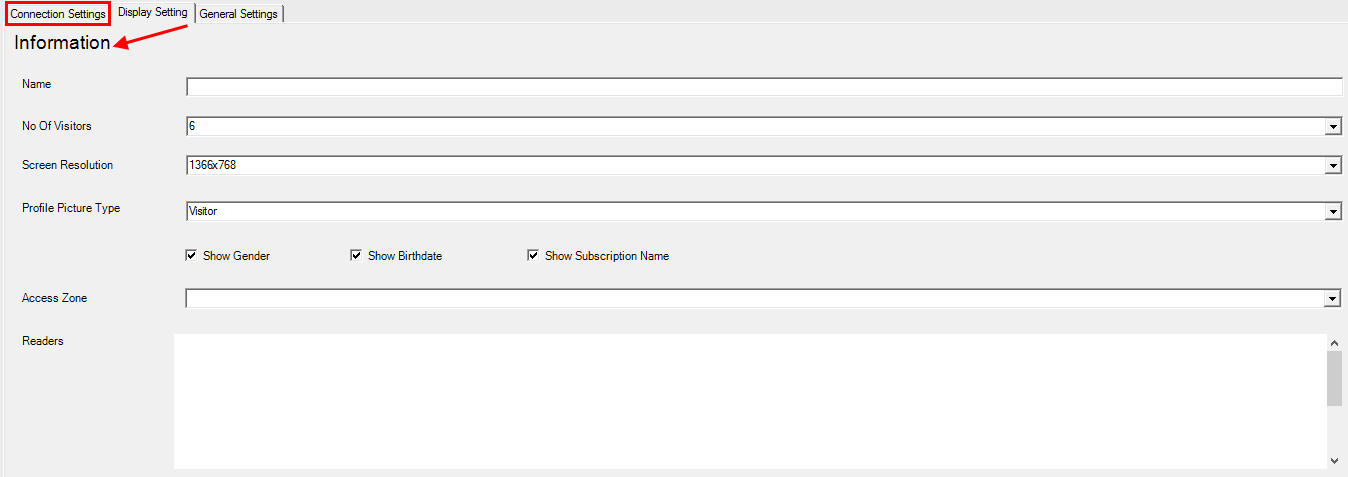
Note
The parameter Name does not affect the setup of Infoplay desktop application 1.1.0.1.
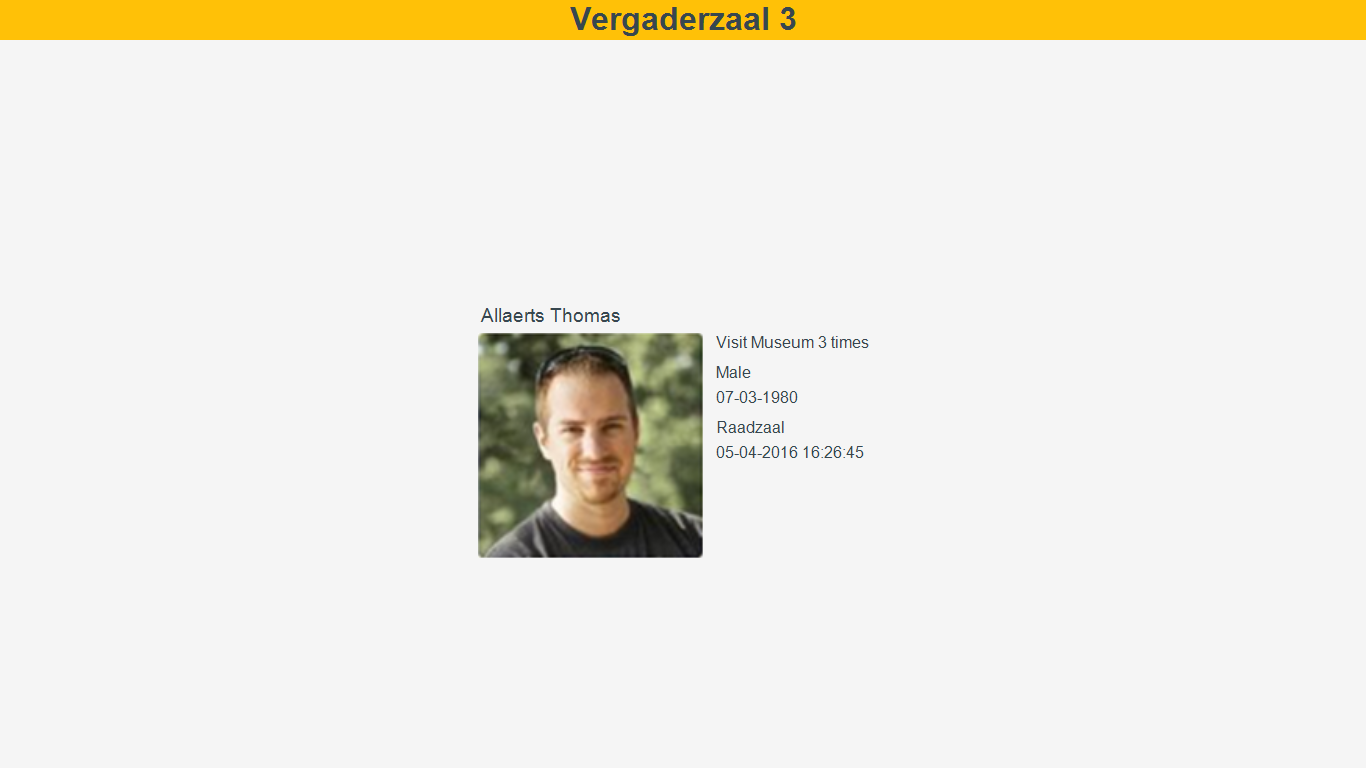
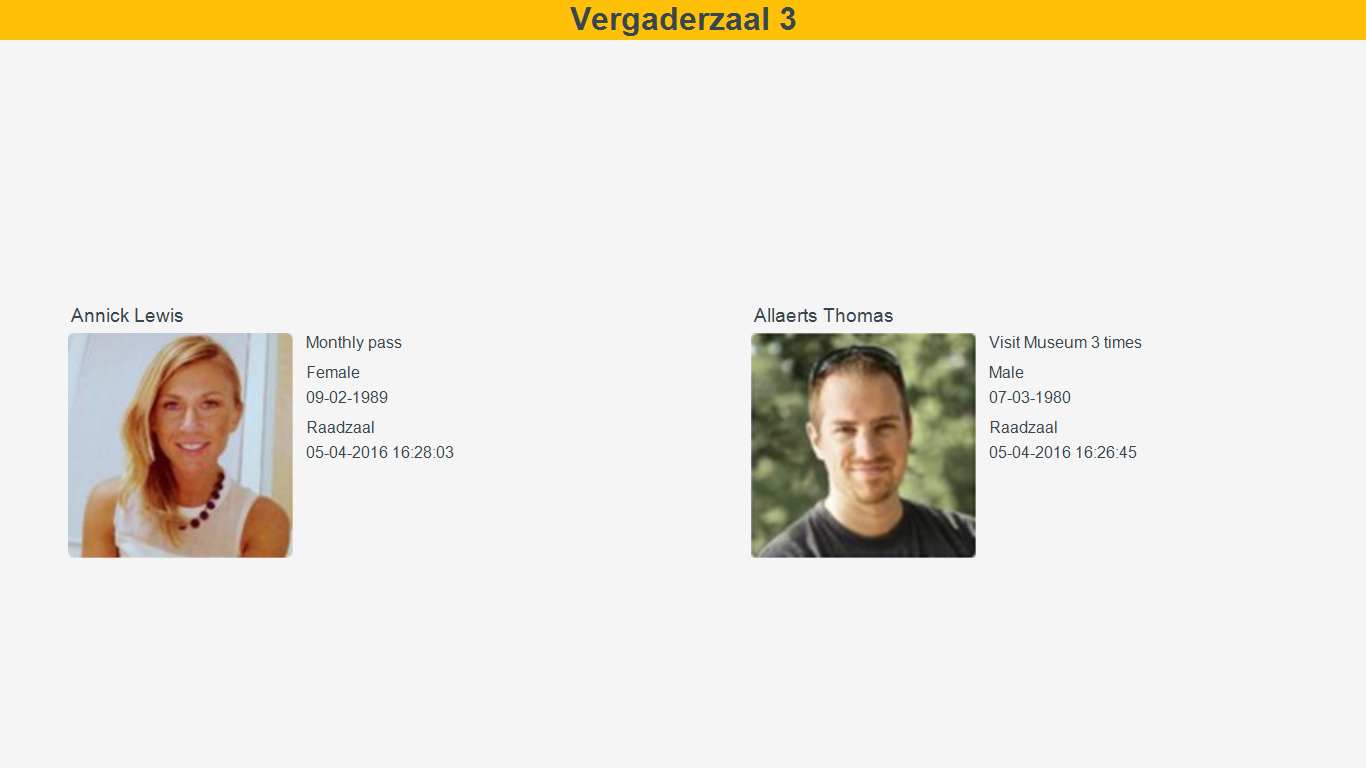
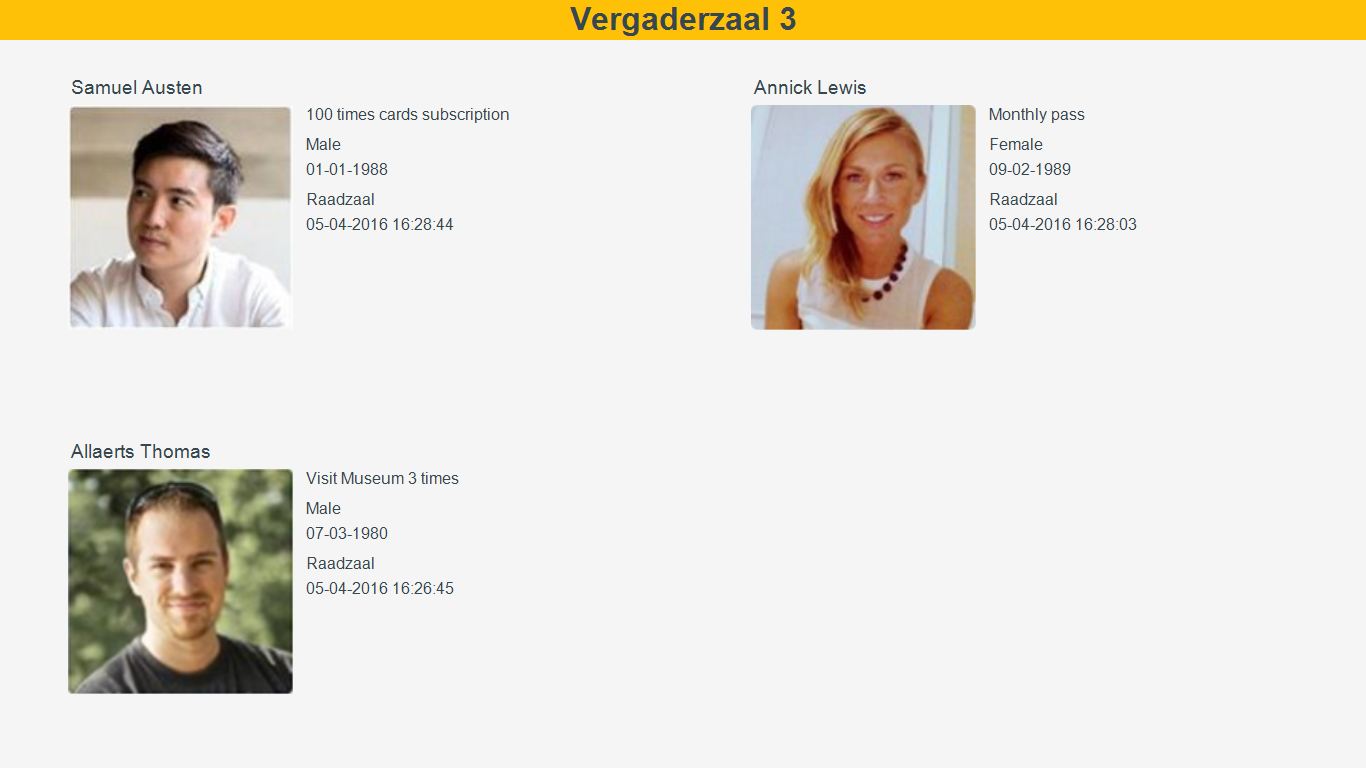
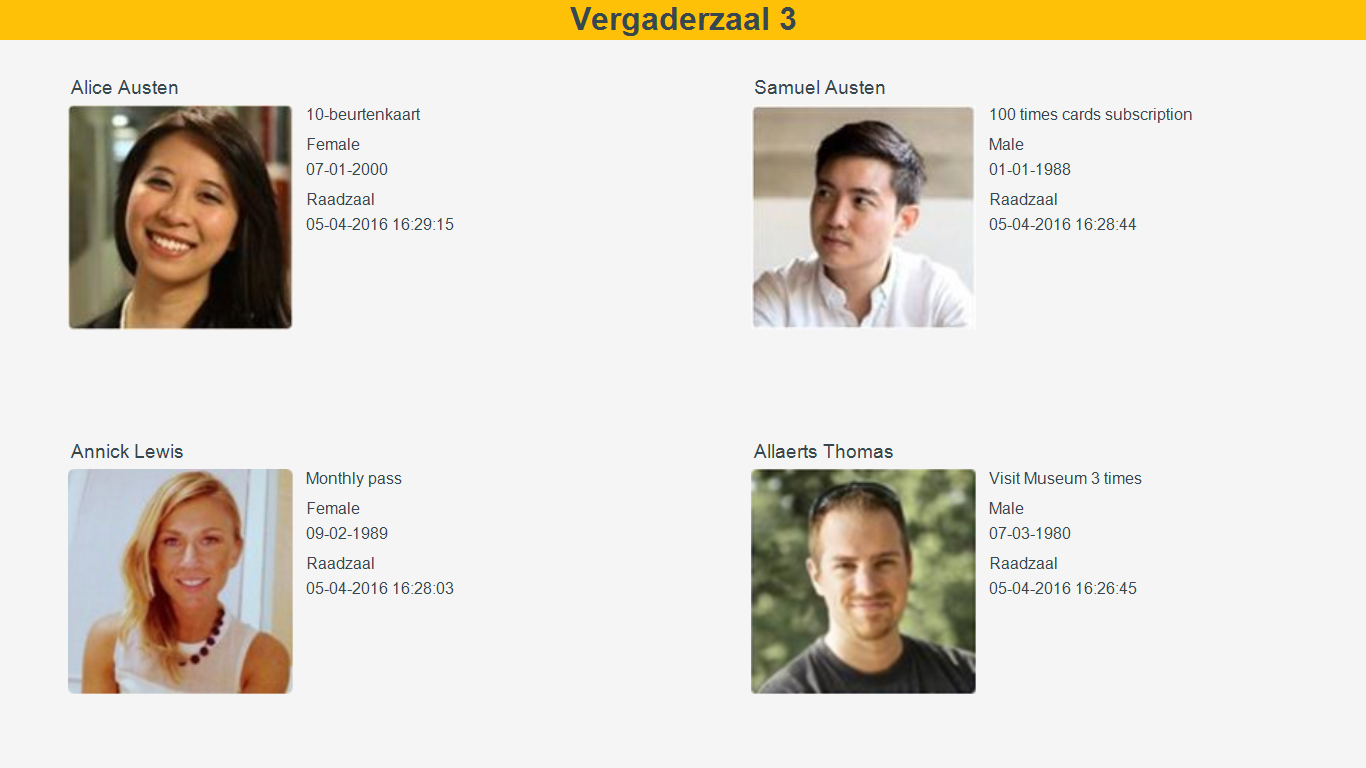
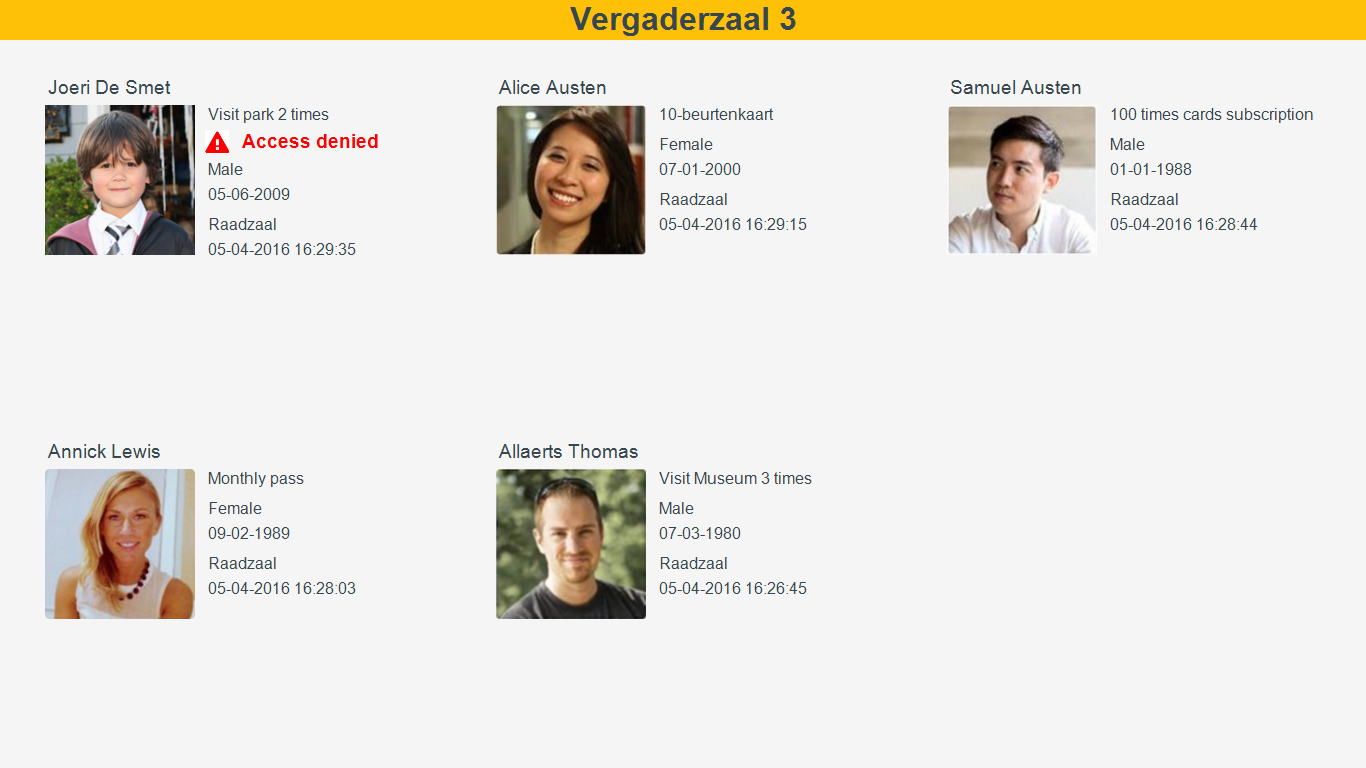
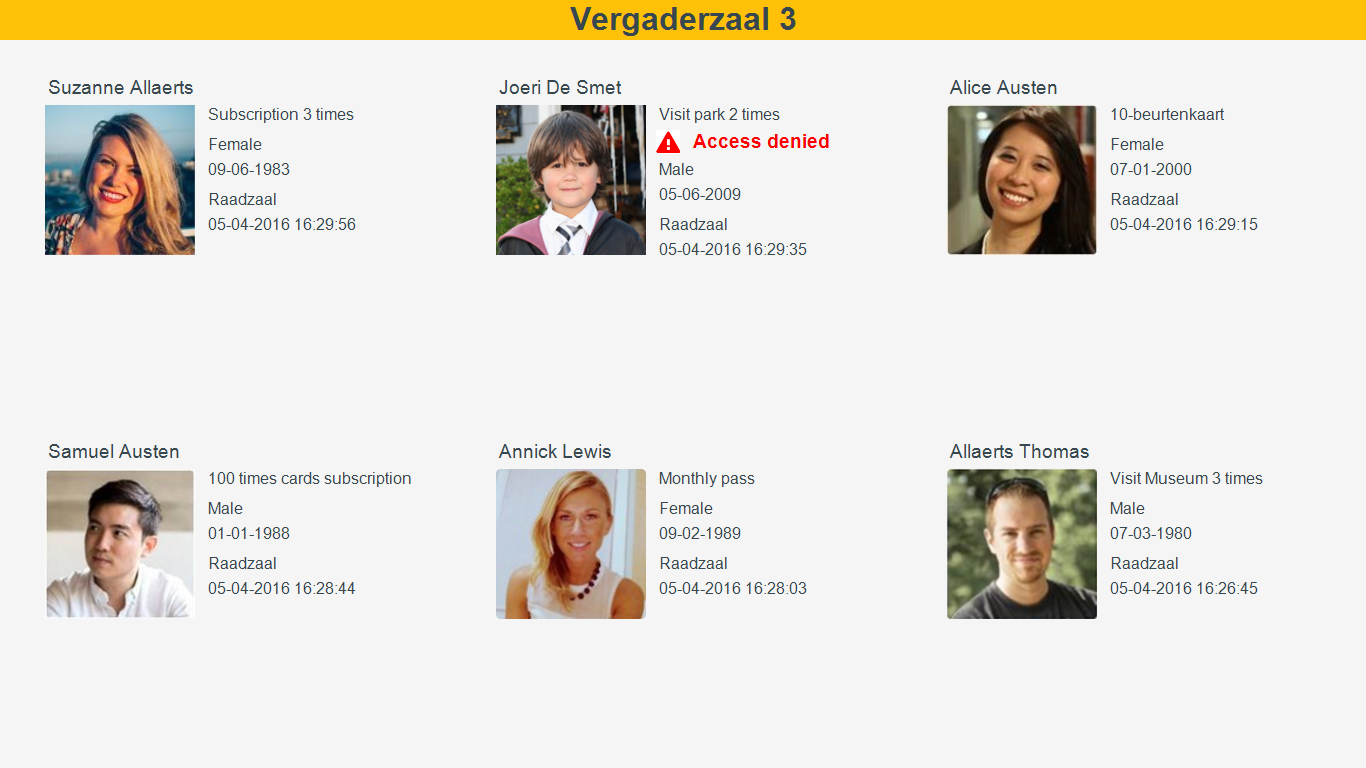
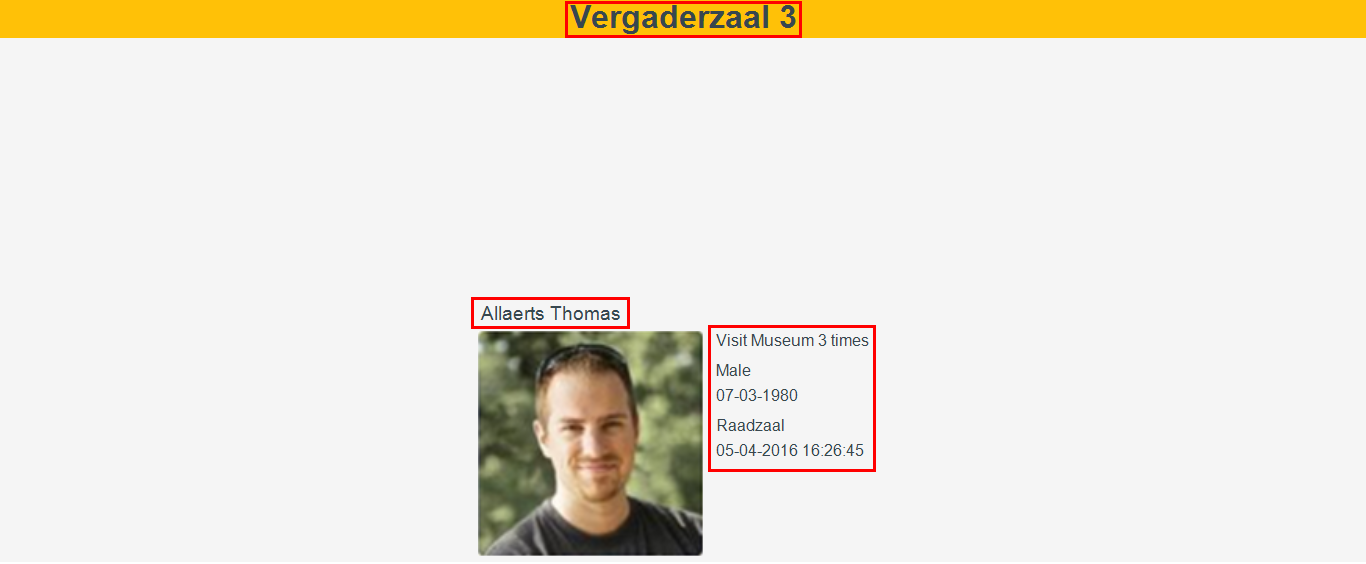
Number of visitors | This parameter allows to define the maximum number of visitors (up to 6) that can be displayed on the visitor info screen. The default value is 4. NoteIt is recommended to use an even value from 1 to 6. By default, the visitor info will populate in the following pattern: First visitor: Visitor info is displayed in the centre of the screen.
Second visitor: The screen is divided into two columns, wherein the most recent visitor's information is shown on the left.
Third visitor: The screen is divided into four equal parts. The most recent visitor's information is shown in the upper left corner.
Fourth visitor: The most recent visitor's information is shown in the upper left corner, while the first visitor's information is moved to the bottom right corner.
Fifth visitor: The screen will be divided into six equal parts.
Sixth visitor: The most recent visitor is displayed at the upper left corner. On the card scan of a new visitor, the visitor info in the bottom right corner will be replaced by its subsequent record.
| ||||||
Resolution | This parameter allows to define the resolution of the screen on which visitors' details will be shown. The default value is 1024x768. Use the exact device resolution from the available options:
In case the display screen has a deviating resolution (different from those mentioned above), it is obligatory to create an XML file for the new dimension before using it. Procedure:
| ||||||
Profile picture type | This parameter allows defining the picture that will be visualised along with the visitor's information. Use a value from the following options:
| ||||||
Show visitor name | This parameter allows to define the visualisation of the visitor's name on the visitor info screen. XML file: Use a value from the following options
Configuration tool: Activating this option results in visualisation of the visitor's name on the visitor info screen.  | ||||||
Show gender | This parameter allows to define the visualisation of the visitor's gender on the visitor info screen. XML file: Use a value from the following options
Configuration tool: Activating this option results in the display of visitor's gender on the visitor info screen.  | ||||||
Show birth date | This parameter allows to define the visualisation of the visitor's date of birth on the visitor info screen. XML file: Use a value from the following options
Configuration tool: Activating this option results in visualisation of the visitor's date of birth on the visitor info screen.  | ||||||
Show subscription name | This parameter allows to define the visualisation of the visitor's membership name on the visitor info screen. XML file: Use a value from the following options
Configuration tool: Activating this option results in visualisation of the visitor's membership name on the visitor info screen.  | ||||||
Access zone | This parameter allows to define the access zone for which visitor info will be visualised. XML file: Enter the access ID in the code <AccessZoneID>....</AccessZoneID> Note
Configuration tool: Select the access zone from the drop-down list.  | ||||||
Readers | This parameter allows to define the readers for which the visitor info will be visualised. XML file: The tag <Readers>...</Readers> defines one or multiple entrance reader IDs, each separated by a semi-colon (;). Configuration tool: Dependent on the selected access zone, a list of readers will populate in the Readers section. Select the readers for which you wish to display visitor info.  WarningIf no reader is selected, by default, the Infoplay desktop app will display visitor info of all the readers configured for the selected access zone. |
Application Theme
The colours of the the Infoplay desktop application's user interface can be modified by using application theme parameters.
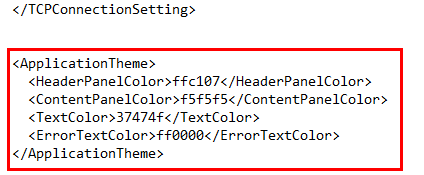
In order to change a colour, enter the hex colour code of the desired colour for the parameter in question.
It is possible to configure by editing the application theme parameters in the Settings XML file with appropriate values.
Alternatively, the parameters can be configured by using the Infoplay configuration tool.

Header panel colour | Colour of the top panel of the visitor info screen. |
Content panel colour | Background colour of the visitor info screen. |
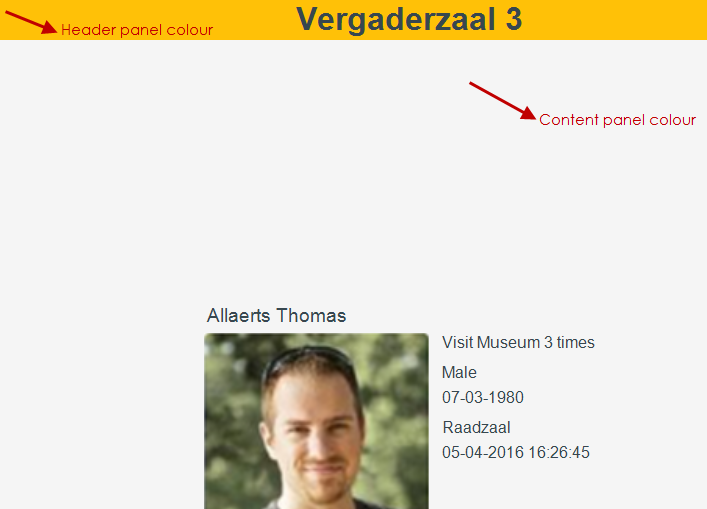 |
Text colour | Colour of the text on the visitor info screen.
NoteBy default, the title text is formatted in bold. | ||
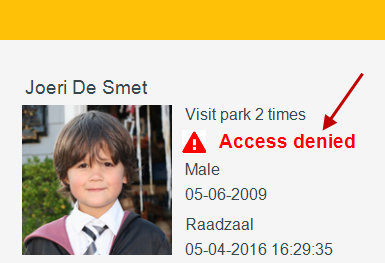
Error text colour | Colour of the error text.
|
General settings
It is possible to configure general settings by editing the language and screen-saver parameters in the Settings XML file with appropriate values.
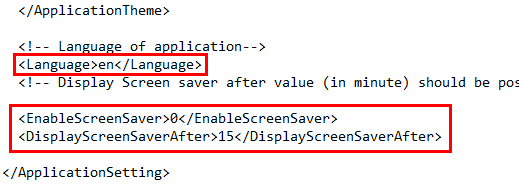
Alternatively, the parameters can be configured by using the Infoplay configuration tool.
 |
Language | This parameter allows to define the language of the Infoplay desktop application. XML file: Use a value from the following options
Configuration tool: Select the desired language from the drop-down list.
WarningWhen using Windows CE, it is important that the option selected for the parameter Language is the same as the installed language package. If this is not the case, the application will stop working properly. Refer Windows CE. | |
Enable screen saver | This parameter allows to enable screen saver when the Infoplay desktop app is idle for a certain amount of time. XML file: Use a value from the following options 1 = Enables screen saver 0 = Disables screen saver Configuration tool: Activate the parameter Display screen saver to enable screen saver for the Infoplay app. | |
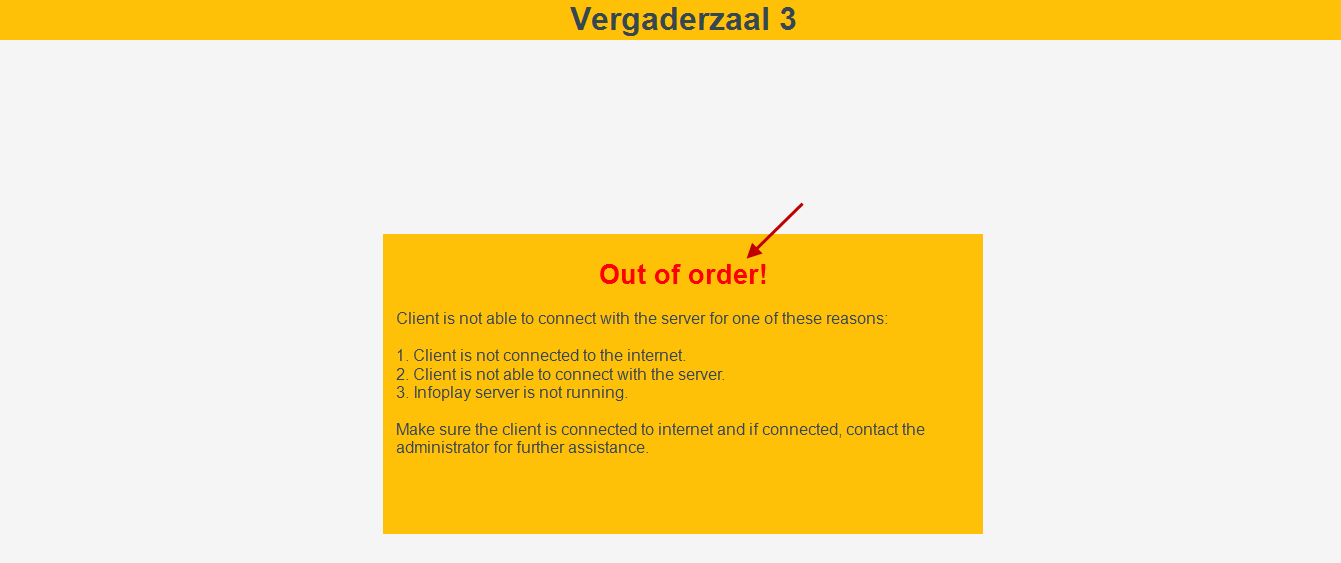
Screen saver timing | This setting is useful when the parameter Enable Screen saver (visualised as Display screen saver on the configuration tool) is activated. In this case, it is possible to define how much idle time (in minutes) must elapse before the the screen-saver is displayed. The default is 15 minutes. In this case, if the Infoplay desktop app is idle for 15 minutes, the screen-saver will be displayed until any activity takes place on the app. The screen-saver time can only be defined in minutes and should be more than 1 minute. WarningIf the Infoplay application goes out of order, an Out of order message will be displayed. In this case, the screen-saver will not be displayed irrespective of the amount of time elapsed. |
